













Introduction
You’ve probably heard of agents, but what does this term actually mean?
Our simple definition is:
An AI system that has instructions (what it should do), guardrails (what it should not do), and access to tools (what it can do) to take action on the user’s behalf
Think of it this way: if you’re building a chatbot-like experience, where the AI system is answering questions, you can’t really call it an agent.
If that system, however, is connected to other systems, and taking action based on the user’s input, that qualifies as an agent.
Simple agents may use a handful of tools, and complex agentic systems may orchestrate multiple agents to work together.
This learning track introduces you to the core concepts and practical steps required to build AI agents, as well as best practices to keep in mind when building these applications.
What we will cover
- Core concepts: how to choose the right models, and how to build the core logic
- Tools: how to augment your agents with tools to enable them to retrieve data, execute tasks, and connect to external systems
- Orchestration: how to build multi-step flows or networks of agents
- Example use cases: practical implementations of different use cases
- Best practices: how to implement guardrails, and next steps to consider
The goal of this track is to provide you with a comprehensive overview, and invite you to dive deeper with the resources linked in each section. Some of these resources are code examples, allowing you to get started building quickly.
Core concepts
The OpenAI platform provides composable primitives to build agents: models, tools, state/memory, and orchestration.
You can build powerful agentic experiences on our stack, with help in choosing the right models, augmenting your agents with tools, using different modalities (voice, vision, etc.), and evaluating and optimizing your application.
Choosing the right model
Depending on your use case, you might need more or less powerful models. OpenAI offers a wide range of models, from cheap and fast to very powerful models that can handle complex tasks.
Reasoning vs non‑reasoning models
In late 2024, with our first reasoning model o1, we introduced a new concept: the ability for models to think things through before giving a final answer.
That thinking is called a “chain of thought,” and it allows models to provide more accurate and reliable answers, especially when answering difficult questions.
With reasoning, models have the ability to form hypotheses, then test and refine them before validating the final answer. This process results in higher quality outputs.
Reasoning models trade latency and cost for reliability and often have adjustable levers (e.g., reasoning effort) that influence how hard the model “thinks.” Use a reasoning model when dealing with complex tasks, like planning, math, code generation, or multi‑tool workflows.
Non‑reasoning models are faster and usually cheaper, which makes them great for chatlike user experiences (with lots of back-and-forth) and simpler tasks where latency matters.
How to choose
Always start experimenting with a flagship, multi-purpose model, such as gpt-5.5.
If your use case is simple and requires fast responses, try gpt-5.4-mini or gpt-5.4-nano for lower latency and cost.
For more complex work, use gpt-5.5 with higher reasoning_effort.
As you try different options, be mindful of prompting strategies: you don’t prompt a reasoning model the same way you prompt a GPT model. So don’t just swap out the model name when you’re experimenting, try different prompts and see what works best—you can learn more in the evaluation section below.
If your application presents a conversational interface, we recommend using gpt-5.4-mini to chat back and forth with the user, then delegating to gpt-5.5 for more demanding tasks.
You can refer to our models page for more information on the different models available on the OpenAI platform, including information on performance, latency, capabilities, and pricing.
Reasoning models and general-purpose models respond best to different kinds of
prompts. Check out our prompting guide below for how to get the best out of
gpt-5.5.
Building the core logic
To get started building an agent, you have several options to choose from: We have multiple core APIs you can use to talk to our models, but our flagship API that was specifically designed for building powerful agents is the Responses API.
When you’re building with the Responses API, you’re responsible for defining the core logic, and orchestrating the different parts of your application. If you want a higher level of abstraction, you can also use the Agents SDK, our framework to build and orchestrate agents.
Which option you choose depends on personal preference: if you want to get started quickly or build networks of agents that work together, we recommend using the Agents SDK. If you want to have more control over the different parts of your application, and really understand what’s going on under the hood, you can use the Responses API. The Agents SDK is based on the Responses API, but you can also use it with other APIs and even external model providers if you choose. Think of it as another layer on top of the core APIs that makes it easier to build agentic applications. It abstracts away the complexity, but the trade-off is that it might be harder to have fine-grained control over the core logic. The Responses API is more flexible, but building with it requires more work to get started.
Building with the Responses API
The Responses API is our flagship core API to interact with our models. It was designed to work well with our latest models’ capabilities, notably reasoning models, and comes with a set of built-in tools to augment your agents. It’s a flexible foundation for building agentic applications.
It’s also stateful by default, meaning you don’t have to manage the conversation history on your side. You can if your application requires it, but you can also rely on us to carry over the conversation history from one request to the next. This makes it easier to build conversations that handle conversation threads without having to store the full conversation state client-side. It’s especially helpful when you’re using tools that return large payloads as managing that context on your side can impact performance.
You can get started building with the Responses API by cloning our starter app and customizing it to your needs.
Building with the Agents SDK
The Agents SDK is a lightweight framework that makes it easy to build single agents or orchestrate networks of agents.
It takes care of the complexity of handling agent loops, has built-in support for guardrails (making sure your agents don’t do anything unsafe or wrong), and introduces the concept of tracing that allows to monitor your workflows. It works really well with our suite of optimization tools such as our evaluation tool, or our distillation and fine-tuning products. If you want to learn more about how to optimize your applications, you can check out our optimization track.
The Agents SDK repositories contain examples in JavaScript and Python to get started quickly, and you can learn more about it in the Orchestration section below.
Augmenting your agents with tools
Agents become useful when they can take action. And for them to be able to do that, you need to equip your agents with tools.
Tools are functions that your agent can call to perform specific tasks. They can be used to retrieve data, execute tasks, or even interact with external systems. You can define any tools you want and tell the models how to use them using function calling, or you can rely on our offering of built-in tools - you can find out more about the tools available to you in the next section.
Rule of thumb: If the capability already exists as a built‑in tool, start there. Move to function calling with your own functions when you need custom logic.
Explore how you can give your agents access to tools to enable actions like retrieving data, executing tasks, and connecting to external systems.
There are two types of tools:
- Custom tools that you define yourself, that the agent can call via function calling
- Built-in tools provided by OpenAI, that you can use out-of-the-box
Function calling vs built‑in tools
Function calling happens in multiple steps:
- First, you define what functions you want the model to use and which parameters are expected
- Once the model is aware of the functions it can call, it can decide based on the conversation to call them with the corresponding parameters
- When that happens, you need to execute the execution of the function on your side
- You can then tell the model what the result of the function execution is by adding it to the conversation context
- The model can then use this result to generate the next response
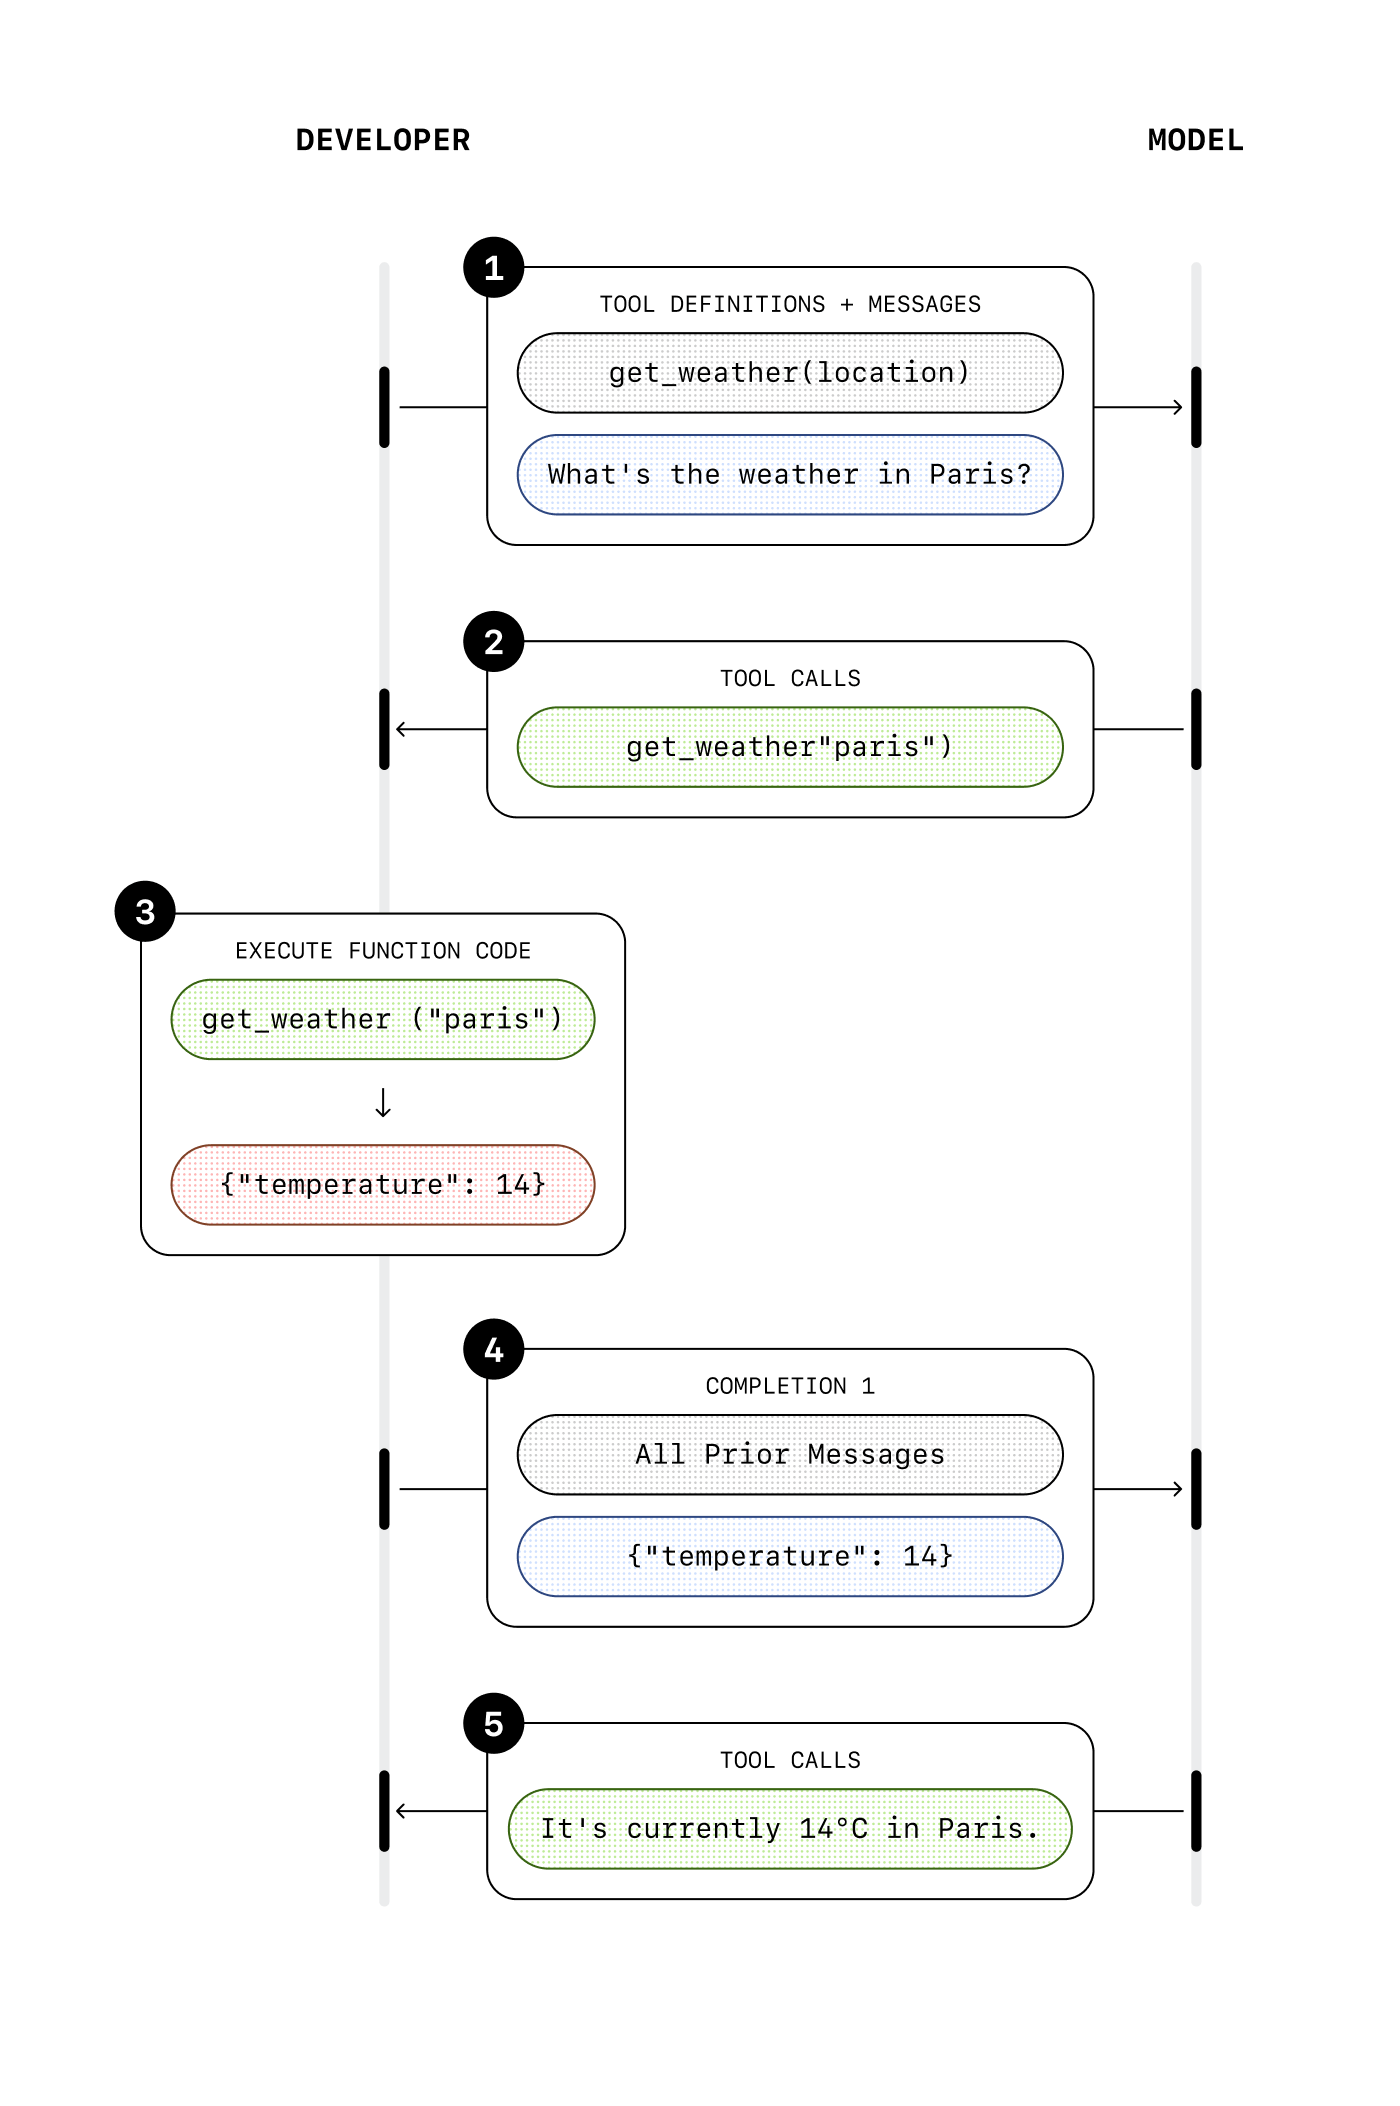
With built-in tools, you don’t need to handle the execution of the function on your side (except for the computer use tool, more on that below).
When the model decides to use a built-in tool, it’s automatically executed, and the result is added to the conversation context without you having to do anything.
In one conversation turn, you get output that already takes into account the tool result, since it’s executed on our infrastructure.
Built‑in tools
Built-in tools are an easy way to add capabilities to your agents, without having to build anything on your side. You can give the model access to external or internal data, the ability to generate code or images, or even the ability to use computer interfaces, with very low effort. There are a range of built-in tools you can choose from, each serving a specific purpose:
- Web search: Search the web for up-to-date information
- File search: Search across your internal knowledge base
- Code interpreter: Let the model run python code
- Computer use: Let the model use computer interfaces
- Image generation: Generate images with GPT Image models
- MCP: Use any hosted MCP server
Read more about each tool and how you can use them below or check out our build hour showing web search, file search, code interpreter and the MCP tool in action.
Web search
LLMs know a lot about the world, but they have a cutoff date in their training data, which means they don’t know about anything that happened after that date.
For example, gpt-5 has a cutoff date of late September 2024. If you want your agents to know about recent events, you need to give them access to the web.
With the web search tool, you can do this in one line of code. Simply add web search as a tool your agent can use, and that’s it.
File search
With file search, you can give your agent access to internal knowledge that it would not find on the web. If you have a lot of proprietary data, feeding everything into the agent’s instructions might result in poor performance. The more text you have in the input request, the slower (and more expensive) the request, and the agent could also get confused by all this information.
Instead, you want to retrieve just the information you need when you need it, and feed it to the agent so that it can generate relevant responses. This process is called RAG (Retrieval-Augmented Generation), and it’s a very common technique used when building AI applications. However, there are many steps involved in building a robust RAG pipeline, and many parameters you need to think about:
-
First, you need to prepare the data to create your knowledge base. This means pre-processing the files that contain your knowledge, and often you’ll need to split them into smaller chunks. If you have very large PDF files for example, you want to chunk them into smaller pieces so that each chunk covers a specific topic.
-
Then, you need to embed the chunks and store them in a vector database. This conversion into a numerical representation is how we can later on use algorithms to find the chunks most similar to a given text. There are many vector databases to choose from, some are managed, some are self-hosted, but either way you would need to store the chunks somewhere.
-
Then, when you get an input request, you need to find the right chunks to give to the model to produce the best answer. This is the retrieval step. Once again, it is not that straightforward: you might need to process the input to make the search more relevant, then you might need to “re-rank” the results you get from the vector database to make sure you pick the best.
-
Finally, once you have the most relevant chunks, you can include them in the context you send to the model to generate the final answer.
As you may have noticed, there is complexity involved with building a custom RAG pipeline, and it requires a lot of work to get right. The file search tool allows you to bypass that complexity and get started quickly. All you have to do is add your files to one of our managed vector stores, and we take care of the rest for you: we pre-process the files, embed them, and store them for later use.
Then, you can add the file search tool to your application, specify which vector store to use, and that’s it: the model will automatically decide when to use it and how to produce a final response.
Code interpreter
The code interpreter tool allows the model to come up with python code to solve a problem or answer a question, and execute it in a dedicated environment.
LLMs are great with words, but sometimes the best way to get to a result is through code, especially when there are numbers involved. That’s when code interpreter comes in: it combines the power of LLMs for answer generation with the deterministic nature of code execution.
It accepts file inputs, so for example you could provide the model with a spreadsheet export that it can manipulate and analyze through code.
It can also generate files, for example charts or csv files that would be the output of the code execution.
This can be a powerful tool for agents that need to manipulate data or perform complex analysis.
Computer use
The computer use tool allows the model to perform actions on computer interfaces like a human would. For example, it can navigate to a website, click on buttons or fill in forms.
This tool works a little differently: unlike with the other built-in tools, the tool result can’t be automatically appended to the conversation history, because we need to wait for the action to be executed to see what the next step should be.
So similarly to function calling, this tool call comes with parameters that define suggested actions: “click on this position”, “scroll by that amount”, etc. It is then up to you to execute the action on your environment, either a virtual computer or a browser, and then send an update in the form of a screenshot. The model can then assess what it should do next based on the visual interface, and may decide to perform another computer use call with the next action.
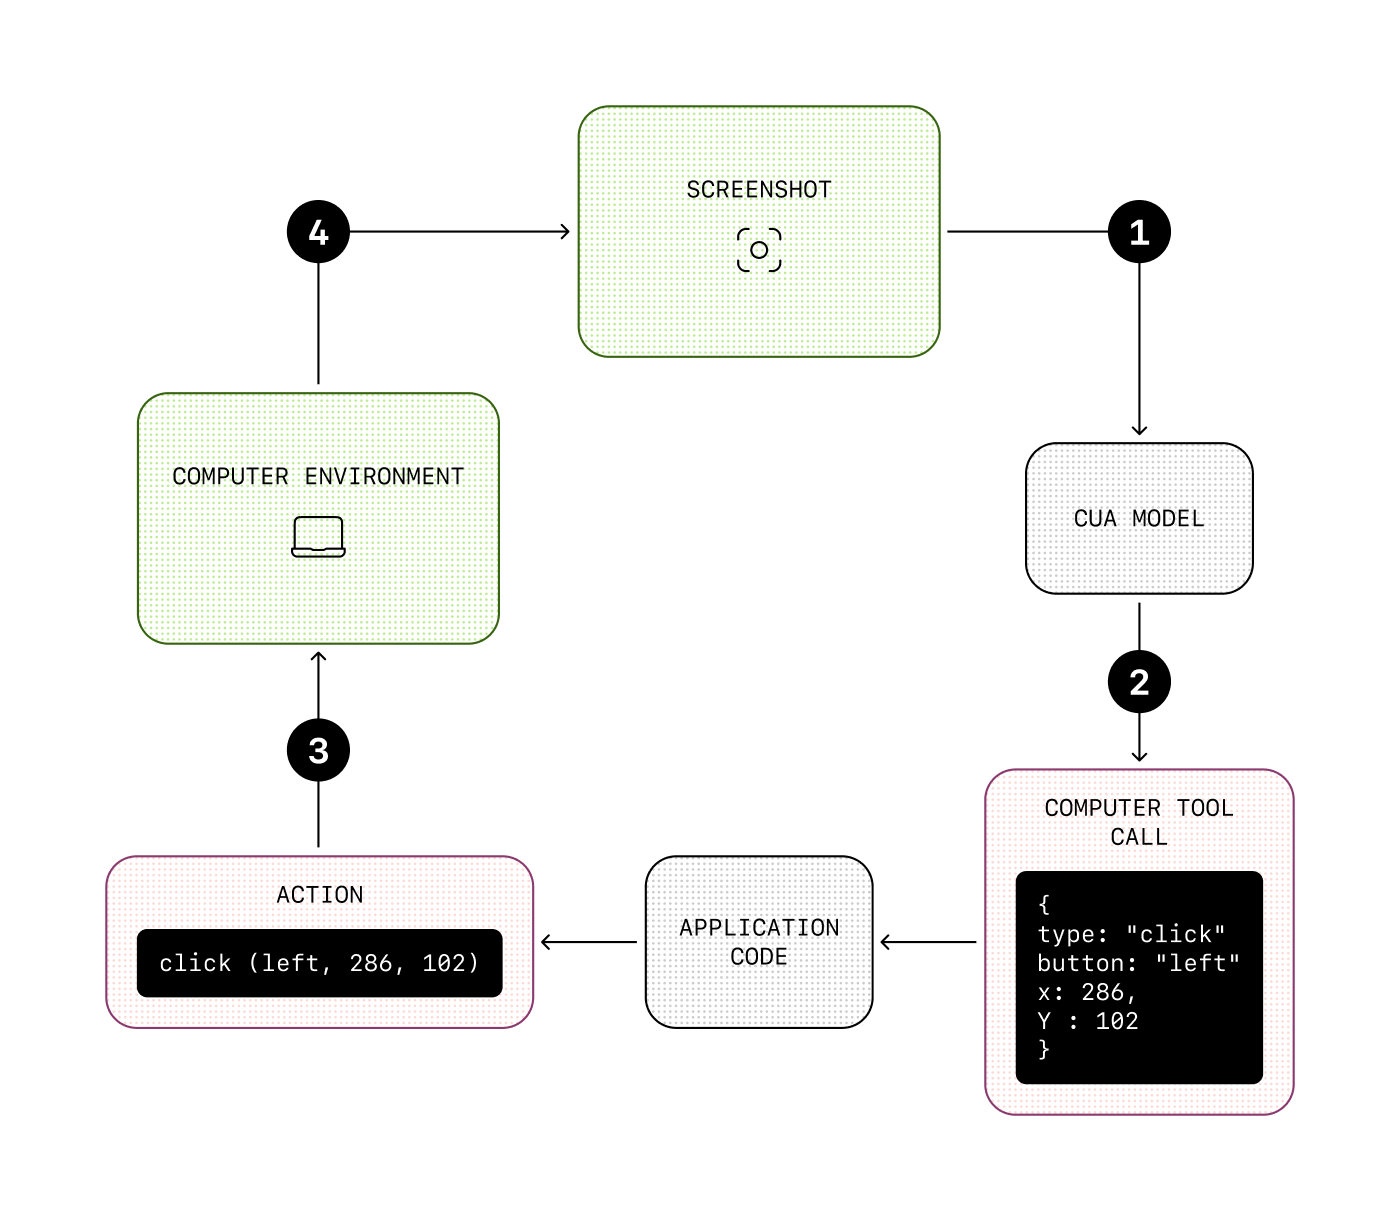
This can be useful if your agent needs to use services that don’t necessarily have an API available, or to automate processes that would normally be done by humans.
Image generation
The image generation tool allows the model to generate images based on a text prompt.
It uses GPT Image models for image generation with world knowledge.
This is a powerful tool for agents that need to generate images within a conversation, for example to create a visual summary of the conversation, edit user-provided images, or generate and iterate on images with a lot of context.
Orchestration
Orchestration is the concept of handling multiple steps, tool use, handoffs between different agents, guardrails, and context. Put simply, it’s how you manage the conversation flow.
For example, in reaction to a user input, you might need to perform multiple steps to generate a final answer, each step feeding into the next. You might also have a lot of complexity in your use case requiring a separation of concerns, and to do that you need to define multiple agents that work in concert.
If you’re building with the Responses API, you can manage this entirely on your side, maintaining state and context across steps, switching between models and instructions appropriately, etc. However, for orchestration we recommend relying on the Agents SDK, which provides a set of primitives to help you easily define networks of agents, inject guardrails, define context, and more.
Foundations of the Agents SDK
The Agents SDK uses a few core primitives:
| Primitive | What it is |
|---|---|
| Agent | model + instructions + tools |
| Handoff | other agent the current agent can hand off to |
| Guardrail | policy to filter out unwanted inputs |
| Session | automatically maintains conversation history across agent runs |
Each of these primitives is an abstraction allowing you to build faster, as the complexity that comes with handling these aspects is handled for you.
For example, the Agents SDK automatically handles:
- Agent loop: calling tools and executing function calls over multiple turns if needed
- Handoffs: switching instructions, models and available tools based on conversation state
- Guardrails: running inputs through filters to stop the generation if required
In addition to these features, the Agents SDK has built-in support for tracing, which allows you to monitor and debug your agents workflows. Without any additional code, you can understand what happened: which tools were called, which agents were used, which guardrails were triggered, etc. This allows you to iterate on your agents quickly and efficiently.
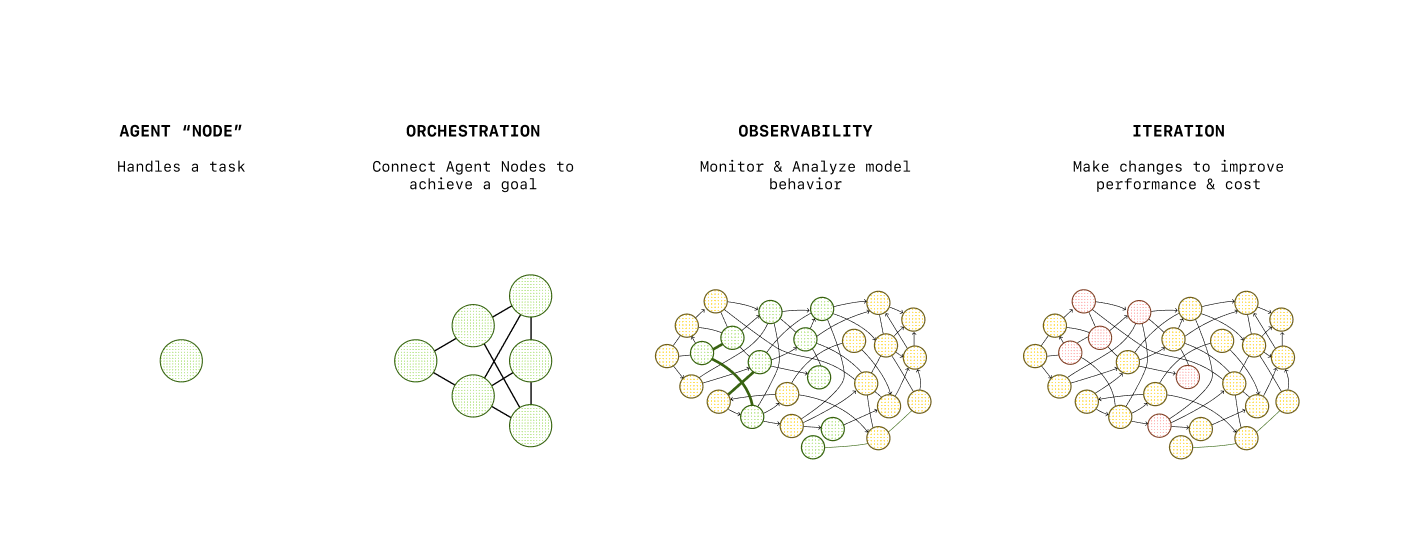
To try practical examples with the Agents SDK, check out our examples in the repositories below.
Multi-agent collaboration
In some cases, your application might benefit from having not just one, but multiple agents working together.
This shouldn’t be your go-to solution, but something you might consider if you have separate tasks that do not overlap and if for one or more of those tasks you have:
- Very complex or long instructions
- A lot of tools (or similar tools across tasks)
For example, if you have for each task several tools to retrieve, update or create data, but these actions work differently depending on the task, you don’t want to group all of these tools and give them to one agent. The agent could get confused and use the tool meant for task A when the user needs the tool for task B.
Instead, you might want to have a separate agent for each task, and a “routing” agent that is the main interface for the user. Once the routing agent has determined which task to perform, it can hand off to the appropriate agent than can use the right tool for the task.
Similarly, if you have a task that has very complex instructions, or that needs to use a model with high reasoning power, you might want to have a separate agent for that task that is only called when needed, and use a faster, cheaper model for the main agent.
Multi‑agent collaboration
Why multiple agents instead of one mega‑prompt?
- Separation of concerns: Research vs. drafting vs. QA
- Parallelism: Faster end‑to‑end execution of tasks
- Focused evals: Score agents differently, depending on their scoped goals
Use agent‑as‑tool (expose one agent as a callable tool for another) and share memory keyed by conversation_id.
Example use cases
There are many different use cases for agents, some that require a conversational interface, some where the agents are meant to be deeply integrated in an application.
For example, some agents use structured data as an input, others a simple query to trigger a series of actions before generating a final output.
Depending on the use case, you might want to optimize for different things—for example:
- Speed: if the user is interacting back and forth with the agent
- Reliability: if the agent is meant to tackle complex tasks and come out with a final, optimized output
- Cost: if the agent is meant to be used frequently and at scale
We have compiled a few example applications below you can use as starting points, each covering different interaction patterns:
- Support agent: a simple support agent built on top of the Responses API, with a “human in the loop” angle—the agent is meant to be used by a human that can accept or reject the agent’s suggestions
- Customer service agent: a network of multiple agents working together to handle a customer request, built with the Agents SDK
- Frontend testing agent: a computer-using agent that requires a single user input to test a frontend application
Best practices
When you build agents, keep in mind that they might be unpredictable—that’s the nature of LLMs.
There are a few things you can do to make your agents more reliable, but it depends on what you are building and for whom.
User inputs
If your agent accepts user inputs, you might want to include guardrails to make sure it can’t be jailbreaked or you don’t incur costs processing irrelevant inputs Depending on the tools you use, the level of risk you are willing to take, and the scale of your application, you can implement more or less robust guardrails. It can be as simple as something to include in your prompt (for example “don’t answer any question unrelated to X, Y or Z”) or as complex as a full-fledged multi-step guardrail system.
Model outputs
A good practice is to use structured outputs whenever you want to use the model’s output as part of your application instead of simply displaying it to the user. Structured outputs are a way to constrain the model to a strict json schema, so you always know what the output shape will be.
If your agent is user-facing, once again depending on the level of risk you’re comfortable with, you might want to implement output guardrails to make sure the output doesn’t break any rules (for example, if you’re a car company, you don’t want the model to tell customers they can buy your car for $1 and it’s contractually binding).
Optimizing for production
If you plan to ship your agent to production, there are additional things to consider—you might want to optimize costs and latency, or monitor your agent to make sure it performs well. To learn about these topics, you can check out our AI application development track.
Conclusion and next steps
In this track you:
- Learned about the core concepts behind agents and how to build them
- Gained practical experience with the Responses API and the Agents SDK
- Discovered our built-in tools offering
- Learned about agent orchestration and multi-agent networks
- Explored example use cases
- Learned about best practices to manage user inputs and model outputs
These are the foundations to build your own agentic applications.
As a next step, you can learn how to deploy them in production with our AI application development track.