
Published: June 14, 2020
Last updated: July 2, 2020
I wrote briefly about Block Lab in my post on going headless with Gridsome, but I find it to be such a handy plugin that I thought I’d write just a bit more in depth on what it does and how to use it, as well as how I’ve adapted it specifically to my workflow in writing content for a headless WordPress site.
What is Block Lab and what does it do?
First things first: Block Lab is a WordPress plugin that simplifies the process of creating custom blocks to use in the block editor, AKA Gutenberg, the new content editor in WordPress 5.0.
Ordinarily, you’re restricted to the types of blocks WordPress includes by default—the standard text, headings, dividers, images, quotes, etc.—and if you need something more specialized, you’d either have to install a third-party plugin with the type of block you want, or you’d have to get your hands dirty writing a pretty good deal of custom code. Block Lab is something of a best-of-both hybrid of those two choices.
Block Lab is a plugin that helps you create your own custom blocks with minimal code required.
There are three main steps to this process:
- Set up the name and type of your block using the WordPress admin interface;
- Create a template file in your theme that will render the block’s contents whenever it’s used;
- Optionally, add some CSS to style the block.
While there is technically a tiny bit of PHP involved, it’s so little (and in the form of such reusable boilerplate) that I’d say anybody comfortable writing HTML (and maybe a bit of CSS) should be just fine getting started with Block Lab.
Why custom blocks?
I always find it’s helpful to start with the why before diving into the how, so let’s take a second to talk about what custom blocks might be used for.
If you're familiar with WordPress shortcodes, think of custom blocks as the next evolution of that idea. Custom blocks are the same concept, but much easier to use (since the author just picks a block type, rather than typing a specific key combination).
Personally, I have a few custom blocks. One I really like—that I’ll use for this example—is my “side note” block. It renders content like this on the front end of the site:
This is just an example of the Side Note block! Nifty, eh.
I find that block handy for expressing tangential thoughts and info in the middle of some content; it helps tell the reader that they can skip that part if they’re not interested in extra details, while also adding some visual interest.
It would certainly be possible to achieve this result without a custom block, but it would be tedious extra work. At minimum, you (or the author) would need to add a class to whatever block you were using each time you wanted to invoke the component. Or, you could use a shortcode, or even use the block editor’s styling controls to change the block’s appearance.
But in any of those cases, it’s a hassle and too much to expect of content authors.
Ideally, authors would just be able to click a button to create a side note block and fill it in instead—and that’s exactly what a custom block allows you to do! No memorization or extra configuration required. Here’s how it works, with the example side note you just saw above:
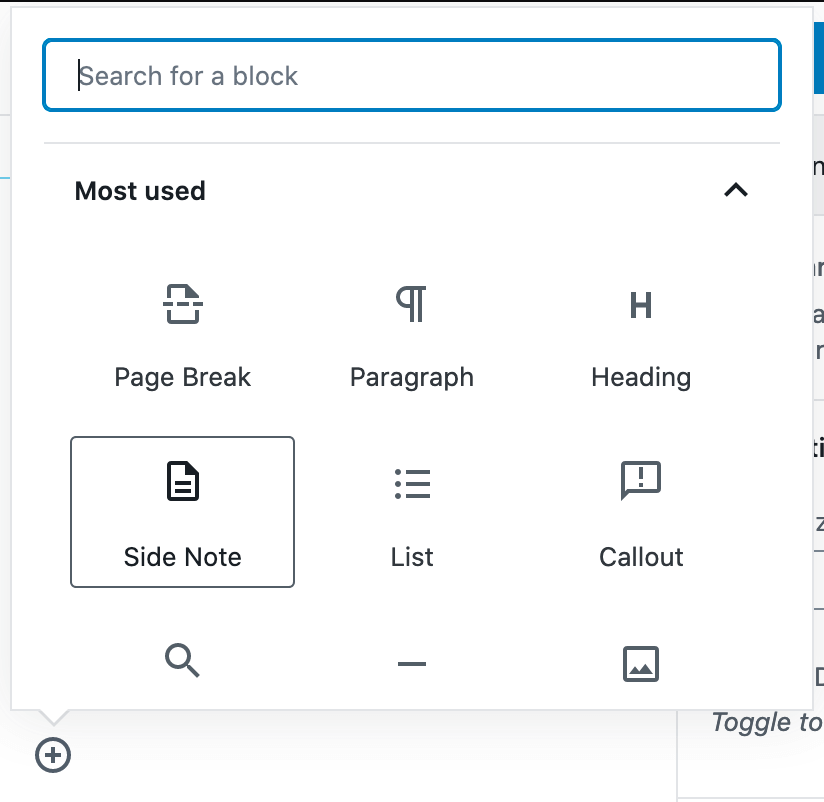
Custom blocks can be easily selected from the normal block menu…
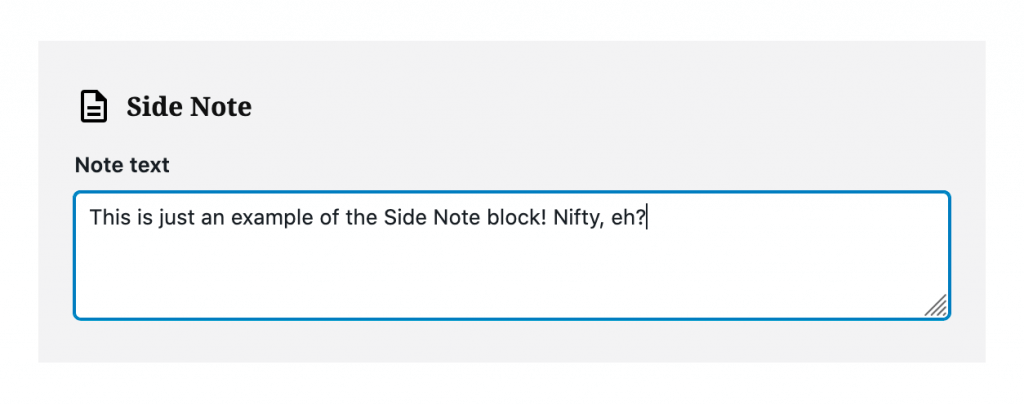
…then simply filled in with content, with no need to worry about manual styling.
That’s a lot better than styling the block manually or adding classes each time you want to use it, so let’s dive into how to get that custom block set up.
Creating your first custom block
Like I said before: this will require a little bit of editing files and writing code, but as long as you’re comfortable with basic HTML and navigating your WordPress file system, this should be perfectly well within your grasp. Don’t sweat it if you don’t know PHP—there’s so little required for basic blocks, it wouldn’t even help anyway.
The natural first step is to install the Block Lab plugin, which of course you can do right from the WordPress admin like any other plugin, or by downloading the plugin from WordPress.org and uploading the .zip file.
Either way, once it’s installed and activated, you’ll find a new ”Block Lab” item in the WordPress admin sidebar. Head there, and choose ”New block.”

Block options
Let’s cover the block options in the screenshot above briefly:
- Block name: naturally enough, this is the name your block will go by; it’s what you’ll search for and choose when using your custom block in the editor, so name it intuitively (and nicely).
- Slug: the code-friendly name for the block, which you’ll use later when creating the template file. You’ll notice that as you type in the block name field, this will auto-populate for you, which is convenient.
- Icon: the icon used for the block’s button. There are a few dozen to choose from. Ideally, pick one relevant to what the block does.
- Category: the group that this block will be associated with. You can choose one of WordPress’s existing block categories, or create your own.
- Keywords: words related to the functionality or type of your block, which will be used to match when searching for blocks. It’s probably a good idea to add some, in case you can’t remember your block’s exact name, or other content authors are just trying to find a block that does what yours does by typing similar words.
At minimum, you’ll need to give your block a name (which will also assign it a slug, which you’ll also need). Icon, category and keyword are all optional, but also all good ideas.
Once you’ve named your block, click the ”add field” button to start adding some actual customized functionality to your block.
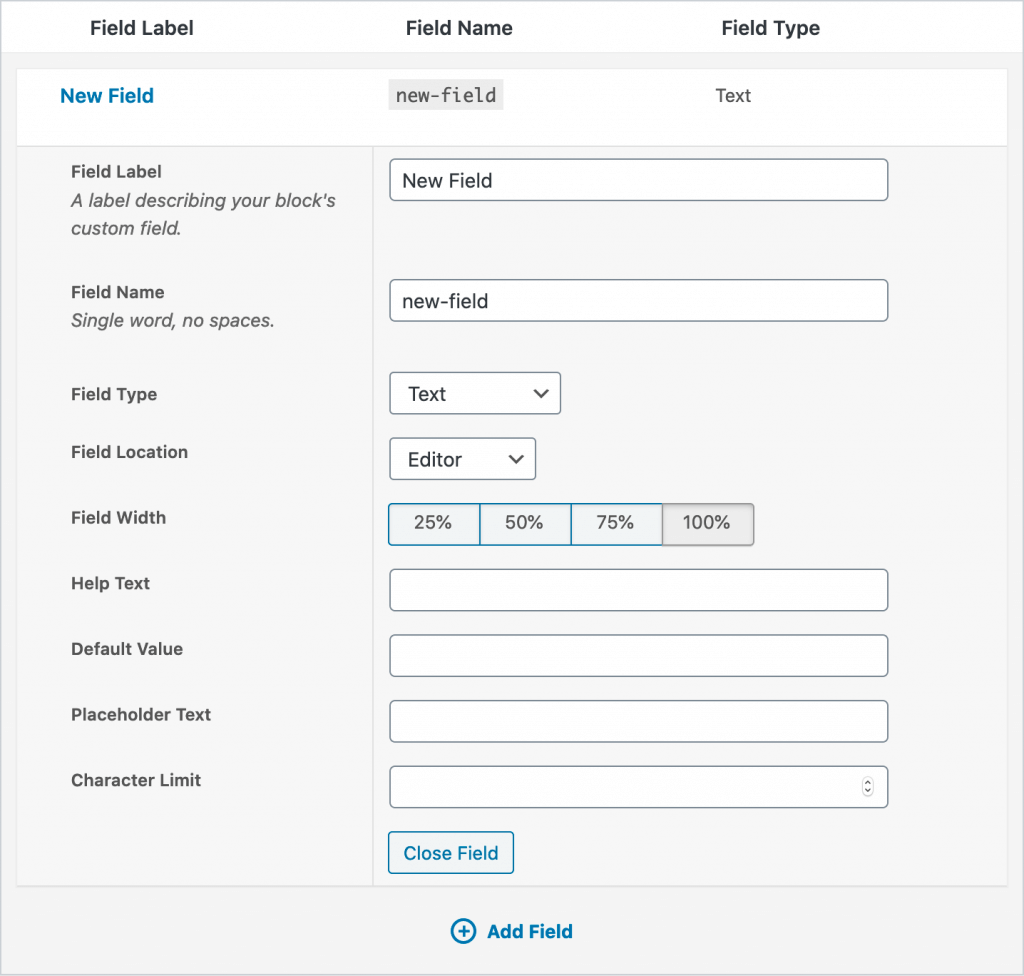
Field options
Fields are the things you actually fill in with your content when using the block. You could think of the field(s) as the variable part of the block; the part that the user adds each time the block is used.
Theoretically, you could have a block without fields if it just looked and worked the same each time it was used—a divider or spacer block, for example—but generally, you’ll want at least one field to fill in with some content.
Most of the time, I find just one field per block is what I want, but you can get creative do more than one. Either way, you have several options for field type. Let’s get a quick overview of the main options:
If you’re familiar with Advanced Custom Fields (ACF), then this part will be very familiar to you. In fact, as I understand it, Block Lab is actually built on top of Advanced Custom Fields under the hood, so all the power of that excellent plugin comes standard.
In any case, though, working with fields in Block Lab is pretty much identical to working with fields in ACF.
- Field label: intuitively enough, how the field will be labeled when this block is used.
- Field name: the sluggified version of the label; you’ll use this later in your code to actually pull the contents out of the field and display it in the template file. Also auto-fills when you create the label.
- Field type: this is the most important part; there are several options like text (short), textarea (long), image, toggle, multi-select, and many others. Again, if you’re familiar with ACF, you won’t find anything surprising here. For most straightforward content block use cases, a text or textarea type will do just fine.
- Field location: whether this field appears directly in the content area (editor), or in the sidebar (inspector). I’d stick with “Editor” unless you have a good reason to move the field out of the main content flow.
I’m not going to go into the other options here since they’re, well, optional, but they’re fairly straightforward, and you can read about them in the Block Lab documentation if you’re so inclined.
If it helps, this is how my example “Side Note” block from above is set up:
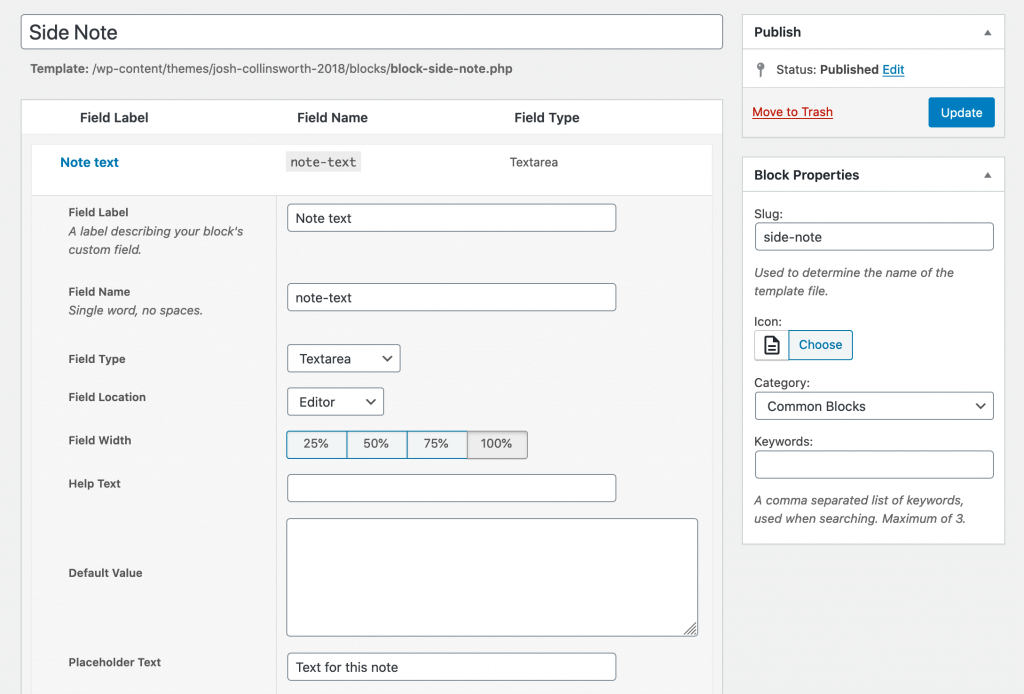
I don’t fill in the help text since I’m the only editor on this site, but it’s a good idea if your block(s) will be used by others.
In any case, once you’re happy with the setup of your block, hit the Publish button, and you’ll be done here!
Helpfully, Block Lab gives you a popup detailing your next step, which is: creating a template file for your block, which you’ll place inside your theme.
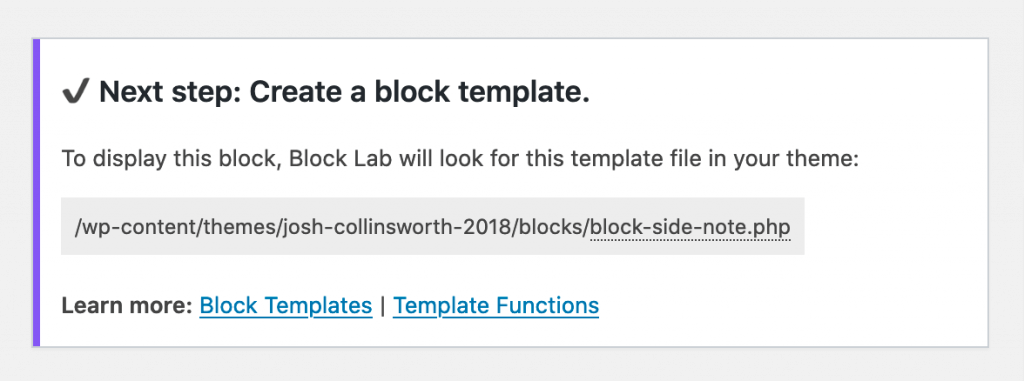
As you can see, Block Lab helpfully lets you know what to do next once you’ve published your block.
Technically, your block is available to choose in the block editor at this point, but it won’t work right until you take the next step and add a template file.
Create a template file for your custom block
In order to display your custom block (either in the block editor or on the front end of the site), you’ll need to create a PHP template file for it. Don’t panic, though. As I’ve already mentioned: the beautiful thing about Block Lab is that you don’t need to know anything about PHP to create custom blocks. Just a little HTML and CSS is enough. All you’ll need to know is where to find your theme’s folder, and how to add files to it. (And it may go without saying, but be sure you’re using a child theme or your own custom theme before you attempt this, or your work will probably be overwritten next time your theme updates.)
Again, Block Lab lets you know exactly what you should name your template file and where to place it. There are a few ways to go about this part, depending on your needs (you can read more in the documentation if interested), but we’ll stick with the simplest:
- Create a folder named
blocksinside your theme’s folder; - Create a file for your custom block, with the name that Block Lab gives you, inside that folder.
Obviously, you’ll need to be able to access your site’s files in order to complete this step. That means either using FTP, or a plugin that gives you access to the file system from the WordPress admin.
The naming convention is: block-slug.php, where slug becomes the actual “slug” field you used above when the block was created. In the case of the example “side note” block, the file that Block Lab will look for to render the block is block-side-note.php.
What you actually want inside your template depends on how you’d like it to look and what content it will hold, but let’s assume we just want a basic div wrapping the content with a special class. In that case, here’s what our block-side-note.php might look like:
<div class="side-note">
    <?php block_field( 'note-text' ); ?>
</div>
Remember how I said you wouldn’t need to know any PHP? That’s because for basic blocks, the above is all you need, and you can easily just copy, paste, and adapt that code for whatever fields you have.
The important thing is just to make sure that the string inside the parentheses ('note-text' in the example code block above) matches the field’s name.
What this all means is: every time you use this block, it’ll be dynamically rendered wrapped in a div with the side-note class. And the cool thing is: that applies both in the editor, and on the front end!
Adding CSS
Obviously, a div doesn’t do us much good on its own; we need to use some CSS to style our content, too. That code could go in your theme’s stylesheet if you only care about styling the block on the front end and not in the editor. However, if you want to use the same styles both places (which I personally feel is nice, since it’ll help the editing experience mirror the finished look), you’ll want to add a new stylesheet just for blocks.
To do this, create a blocks.css file, also in the blocks folder in your active theme. Block Lab will automatically read this stylesheet and apply its styles on both the front and back end of the site.
You could also have a separate CSS file for each block, but unless a block gets pretty complex, I personally prefer just having all block styling together in one place.
Here’s the actual CSS code I use on this site to create that Side Note component, if you’re interested or want to try this block out on your site:
.side-note {
	padding: 0.5rem 1.5rem;
	position: relative;
	margin: 3rem 0;
	font-size: 0.9rem;
	font-style: italic;
	border: 1px solid var(--blue-light);
}

.side-note:before {
	content: 'Side Note';
	position: absolute;
	top: -0.5em;
	left: 0.5rem;
	background: var(--paper);
	padding: 0 1rem;
	line-height: 1;
	font-weight: bold;
	text-transform: uppercase;
	font-size: 0.7rem;
	color: var(--blue-light);
}
Recap
That’s all it takes! Creating a custom block to use in the block editor is as simple as:
- Using Block Lab to create a block and pick its options;
- Adding a block template file to your theme;
- Optionally, adding CSS for the block.
Notes on Block Lab’s future, and unlocking Block Lab Pro
Of note: Block Lab was recently acquired by WP Engine. You can read about the acquisition on their blog, but the summary is: Block Lab itself is not going to live on in its current form. However, the team is building something similar and new with WP Engine, and they’ve committed to offering a seamless migration path when that product comes out, whatever it looks like.
In the meantime, the plugin will continue working for the foreseeable future. And as a bonus, the Block Lab team has publicly revealed that the Pro tier of the plugin—a paid offering, which is now obviously an unappealing investment—is easily unlocked by modifying a single line of code within the plugin.
That needs to be done manually, of course, and will need to be re-done any time the plugin updates (if it does). But to do this: you can simply go into the plugin’s folder, open php/class-util.php, and change the is_pro() function (on line 31, as of this writing) to return true, like so:
public function is_pro() {
  return true; //This line is edited
}
That will open up a handful of additional extremely handy fields for you to use in your blocks, including the all-powerful repeater field, and the ever-useful rich text field.
Again, though, just remember to modify the line again if the plugin ever updates; you’re playing with fire a little bit by going this route, and bad things will probably happen to your pro feature blocks if the plugin updates and your modification is lost. This is definitely not WordPress best practice by any means, but it is a viable path to unlocking some powerful features in an already exceptionally useful plugin.