









Published: December 31, 2015
Last updated: June 16, 2020
One lesson a lot of WordPress novices learn the hard way, just like I did, is that if you want to customize anything about your theme itself—whether that’s editing the CSS styles, adding functionality like a custom post type, changing the header code or creating a custom page template—you need to be using a WordPress child theme.
(There are of course plugins to handle all of the above tasks, and if you want to go that route instead, that’s fine. I personally prefer minimizing plugins since each one active is a slight drain on page load speed and one more thing to worry abut updating, but it’s a matter of personal preference.)
When you’re just starting out with WordPress, it’s easy to think that you can just make edits by opening up the main theme’s included files (like style.css or header.php) and making whatever alterations you see fit. And that will work—at least for a while—but it won’t be a good idea.
Why? Because themes update. As improvements are made, bugs are fixed and issues are patched, your theme will most likely be altered by its author, who will push an update. At that point, you’ll log in to WordPress and receive a notification that your theme has an update available, and should you click it, any custom changes you may have made to your theme’s code will be overwritten, replaced with the fresh new version.
This leaves you in the unfortunate predicament of choosing between redoing all of your file changes every time an update is issued (which, depending on the theme, could be many times a year) or making sure you (and your clients) never update the theme at all.
Neither of those are good choices, obviously. You need efficiency, and you need to be updating your theme(s) for optimal security and performance. But fortunately, you have a third option: create a WordPress child theme. Then all your problems are solved and the above issues can be safely and easily sidestepped!
So what is a WordPress child theme?
A WordPress child theme is kind of like an add-on extension of the main theme. A child theme borrows everything it can from its parent theme, but exists independently apart from any files you want it to share. A WordPress child theme allows you to add files to supplement those of the parent theme, taking precedent over the parent’s files without the risk of being overwritten.
To put it in simpler terms: any time WordPress needs a theme file (say, for example, header.php), it will look inside the child theme folder for the named file. If there is a file by that name in the child theme’s folder, it will use that file. But if not, it will look for a file by that name in the parent theme’s folder instead, and will borrow that file from its parent theme.
This works perfectly for any file in the WordPress template hierarchy, but you might be wondering: what about my CSS?
In the case of our stylesheets, we can set up a child theme to use all of the parent theme’s styles (because we likely chose our main parent theme in part due to its appearance and don’t want to be forced to start from scratch), but then to load a custom child theme stylesheet afterward, which we can use to override and replace certain existing styles as we choose.
The process of setting up a child theme can seem a little intimidating, particularly if you don’t spend much time in FTP or WordPress’s file structure, but it’s actually pretty simple. Let’s walk through the steps.
There are plugins to create child themes for you, and that’s generally simpler and easier than this process. But if you’d like to do it manually for full control, or if you’d just like to understand what goes into a child theme better, read on.
Step 1: Create a New Theme Folder
If your site is already up on a live server, you’ll need to connect to your site via FTP in order to do this. (If you’re not sure how to do that, check with your host, and if you need an FTP client, I consider Transmit to be well-worth the price, though there are free options available.) In any case, you’ll head to the wp-content/themes/ folder.
Inside that folder, you’ll see a list of themes on your site, probably similar to this:
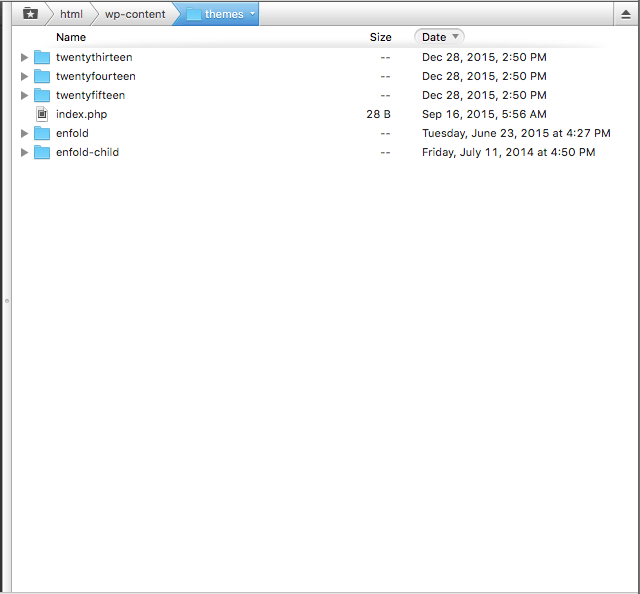
Here, you’ll simply create a new folder and name it whatever you want your child theme to be named. Usually, this is a hyphenated version of the parent theme name, such as with “enfold” and “enfold-child” in the screenshot above. This naming convention exists so that anybody looking at the list of themes can immediately tell which themes rely on others, but if you’d rather, the name can be whatever you want.
Step 2: Create a style.css File
Open the child theme folder you just created. Inside it, make a new file and name it “style.css”.
It’s important that you give the file this exact name. If you’re not familiar with the inner workings of WordPress: it looks for files based on their name. WordPress expects to find a style.css file in the active theme’s root folder; it’s programmed to know that’s where to find info about a theme. So it won’t automatically find and load it if it’s not specifically named “style.css” and placed inside the theme folder. (You could load it other ways, but that’s just making extra work for yourself.)
As far as the file itself, you can either create it in your FTP client and then open it in a text editor to make changes; or you can use a text editor to create and save a style.css file locally, and then upload it afterward. It’s up to you; just as long as the style.css file gets in the child theme folder, you’re good.
Step 3: Add the Following to style.css
If you look at the Codex entry for child themes, you’ll find the following snippet of code to copy and paste into your child theme’s style.css file. Don’t copy and paste this just yet, though; I’m only giving you the full list of things you might see at the top of a theme’s style.css file:
/*
 Theme Name: Twenty Fifteen Child
 Theme URI: http://example.com/twenty-fifteen-child/
 Description: Twenty Fifteen Child Theme
 Author: John Doe
 Author URI: http://example.com
 Template: twentyfifteen
 Version: 1.0.0
 License: GNU General Public License v2 or later
 License URI: http://www.gnu.org/licenses/gpl-2.0.html
 Tags: light, dark, two-columns, right-sidebar, responsive-layout, accessibility-ready
 Text Domain: twenty-fifteen-child
*/
It looks scary, but I’ll let you in on a little secret: almost none of the above is actually required for your child theme to work properly. In fact, most of it is there for people who intend build a new theme and distribute it.
If you’re creating a theme to distribute publicly, you’ll want to fill out every line of the above snippet as accurately as possible. But if not—if this is a child theme that’s only going to be used by you or your client on your site alone—you can safely skip most of the above (though you should still include some of it).
At this point you might be wondering: isn’t this just a comment? Why do I need to include it? Aren’t comments supposed to be read by humans and ignored by computers?
You’d be mostly right, but actually, browsers and servers do read comments. (Otherwise, how would they know when the comment was over?)
In the case of WordPress files, comments are frequently used to pass WordPress information about themes and plugins. Just like the file’s name is important, having the above comment snippet at the top of your style.css file is also important; it’s how we can pass certain important pieces of information on to WordPress about our theme! But from a purely functional standpoint, most of that info up there is actually not crucial at all for a WordPress child theme to function.
In fact, if you want to save yourself the hassle, here’s all you’ll really need to worry about:
/*
 Theme Name: Your Theme Name
 Template: parent-theme-name
 Text Domain: your-theme-name
*/
Even of the above three lines, the Template line is the only one that’s strictly necessary for the child theme to function, but you’ll want to fill out the others too. Here’s what each one does:
- Theme Name: The human-readable version of your child theme’s name. This is what will appear in your themes list within WordPress itself. Can be anything you want, and can include capital letters and spaces. Doesn’t have to be named something relative to the parent theme, but probably should be just for clarity.
- Template: As mentioned, the only mandatory line. This should be the name of the parent theme, written exactly as its folder name is written within the themes directory. This tells WordPress where to find the parent theme files when it needs to.
- Text Domain: The “sluggified” version of your theme name (in other words, your theme name without capital letters or spaces). This is how WordPress refers to your theme in code. It has to do with localization.
Though the above three are the main functional pieces of the puzzle, it’s still good practice to include at least the Author and Author URI lines as well, so that anybody who might be working on the site after you’ve done your work can figure out where this child theme came from and whom to contact if they have any questions. Description is always nice too—it’s the paragraph that shows up on the Theme Details page in WordPress, so it allows you to share some added info with any admin who might be using the site. But those are optional and not related to the actual functionality of the WordPress child theme. The rest of the lines we haven’t talked about hold info that’s shared by theme developers when they release their themes publicly.
All of that is a long way to say: it’s just a simple process of copying and pasting the above snippet of code to the top of your WordPress child theme’s style.css file, and replacing the pertinent details with your own (and optionally deleting anything you don’t need). It looks a bit complex, particularly if you aren’t familiar with WordPress file comments, but it’s actually very simple: just replace the part after the colon on each line with your own info!
Now that you have a properly commented style.css file in your WordPress child theme, you can add all your CSS to it, below the opening comment!
You should know that the CSS won’t actually take effect yet, however. Later, in step 3, we’re going to tell WordPress to load the parent theme’s stylesheet first and our child theme’s stylesheet second. This way, because of the way that CSS works, any styles that you add to your child theme’s style.css file will load last, and will therefore override the parent theme’s CSS so that you won’t need to delete or alter anything in the parent theme’s stylesheet. Huzzah! (This is assuming, of course, that the child theme’s styles are of equal or greater specificity. If you’re not sure what that means or if you could use a refresher on CSS specificity, check this article out.)
But until we do that, our CSS in this file won’t actually work. WordPress assumes we’ve put our theme info at the top of our style.css file, but it won’t assume we want to actually use it as a file for our actual CSS styling. That will come shortly, when we use functions.php to enqueue our parent theme’s stylesheet, and then our child theme’s.
This way, the parent theme is free to update all it wants, but your styles remain intact and unaffected. Your site stays up-to-date and secure, while your styles stay safe from unintended alterations.
(Side note: if you want to create and use other stylesheets, too, you can do that; you don’t necessarily need to put all your styles in this style.css file. But since every stylesheet has to load separately, it’s generally best to use just the one CSS file unless you have a good reason not to.)
Optional Step: Add a Screenshot
While this step is completely optional, it’s fun, and it helps your child theme feel a little more professional.
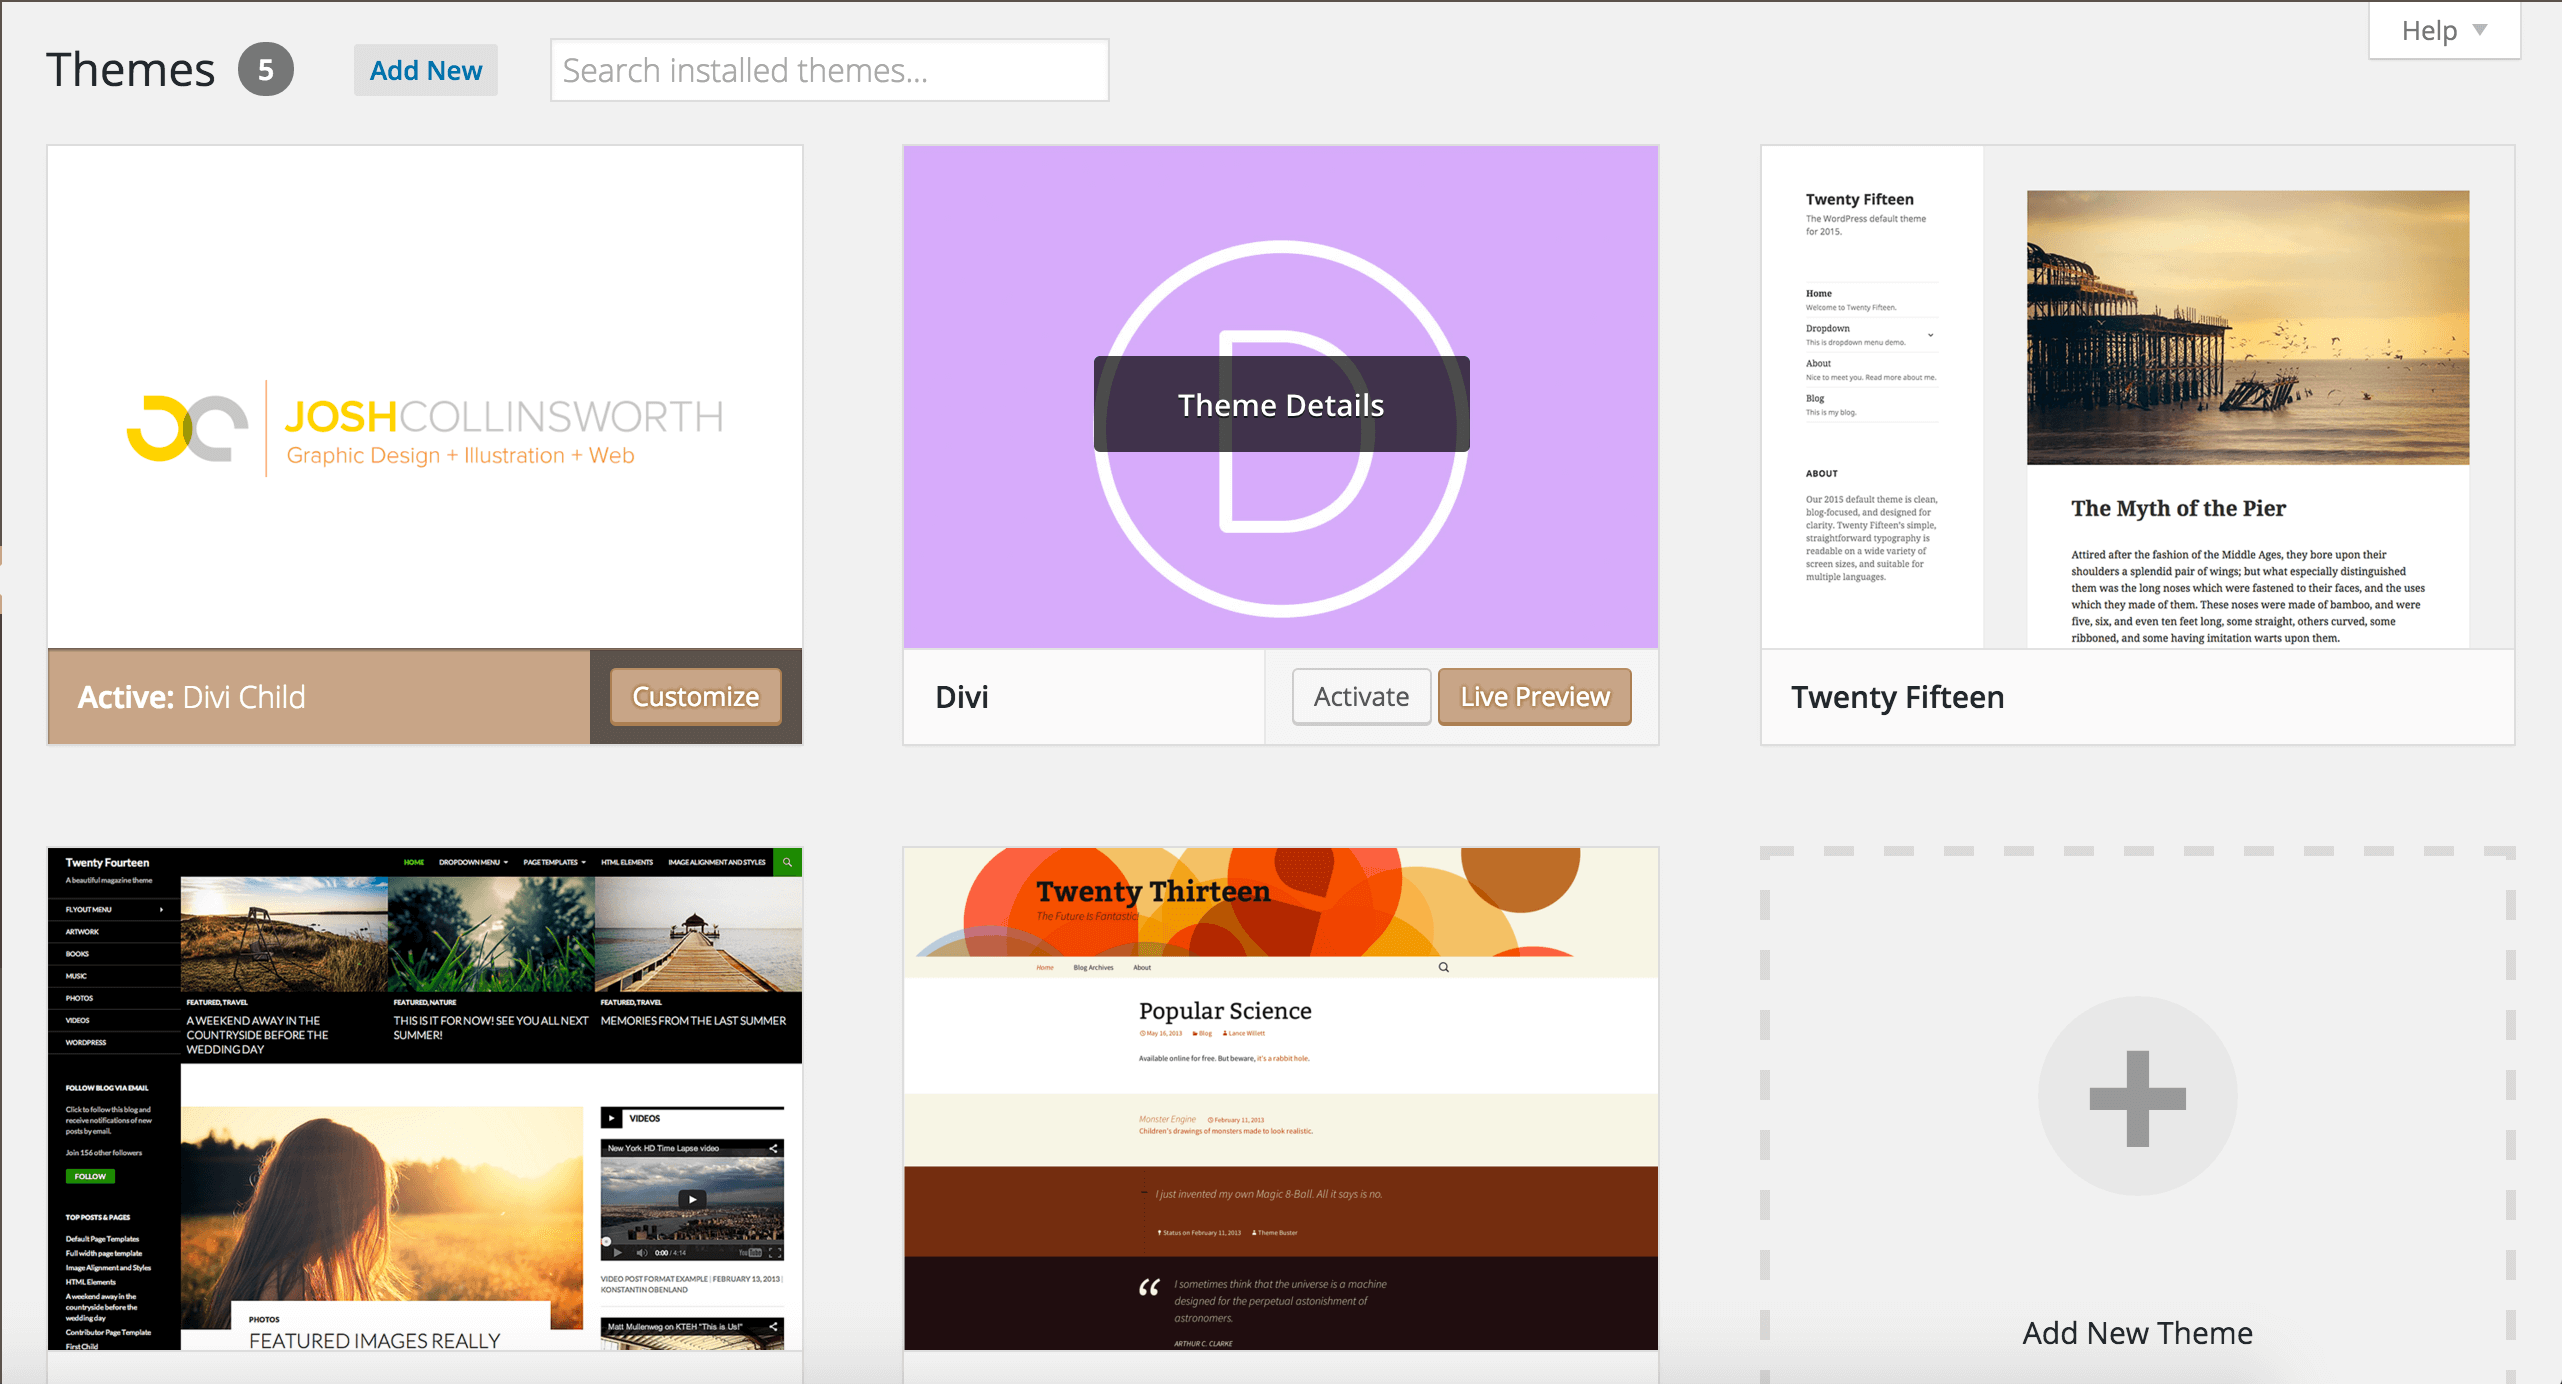
To give your theme an image that will appear on the theme selection screen, just save a .png inside your child theme’s folder (the same place you saved the style.css file above) and name it “screenshot.png”. WordPress will try to work with pretty much any size, but an image with a 4:3 ratio works best, with the recommended resolution being 880px by 660px.
While this feature exists so that you can show potential theme users what their site will look like if they activate this theme, if you’re working on a child theme, you can add that extra little something special by making screenshot.png your logo or your client’s logo.
Step 3: Create a functions.php File
In the last couple of steps we created the style.css file for our child theme, but we still need to tell WordPress to include (or “enqueue”) the parent theme’s stylesheet as well as our new child theme’s stylesheet, in that order.
In just the same way that you created a new style.css file inside your child theme’s folder, you’ll now create a new file named “functions.php” in the same place, i.e., your child theme’s folder. (You can create it with your FTP client and then edit it, or make it on your local machine and then upload it. Up to you.)
Again, however, it’s critical that this file is named “functions.php” exactly (mind the plural); otherwise, WordPress won’t know that it’s the file containing our child theme’s unique functionality and won’t find and run it automatically.
What is functions.php?
When any given WordPress theme is active, any code in that theme’s functions.php file will run every time a page on that site is loaded (as will its parent theme’s). So our child theme’s functions.php file (and its parent theme’s functions.php file) will load and run every time a new page loads, as long as our child theme is the active theme.
This is true in both the WordPress admin area and the front-facing portion of the site. That’s why things like styles, custom post types, navigation menus, theme features, and other “always-on” bits of functionality are generally added to functions.php. You can think of functions.php a little like a custom plugin specially made for your theme.
Step 4: Copy the Enqueuing Function to functions.php
<?php
  function theme_enqueue_styles() {

    $parent_style = 'parent-style';

    wp_enqueue_style( $parent_style, get_template_directory_uri() . '/style.css' );
    wp_enqueue_style( 'child-style',
      get_stylesheet_directory_uri() . '/style.css',
      array( $parent_style )
    );
  }

  add_action( 'wp_enqueue_scripts', 'theme_enqueue_styles' );
?>
If you’re not familiar with (or intimidated by) PHP, don’t worry—you don’t have to make any changes to the above code, or even understand it, really. You just need to copy and paste it into your WordPress child theme’s new, blank functions.php file. (Technically, it would be best practice to change the two instances of “theme_enqueue_styles” to reflect your custom theme name in order to avoid any potential conflicts, but it’s not strictly mandatory.)
There are other ways to code the enqueueing of parent and child stylesheets, but this way is straight from the Codex, and ensures that the child theme’s stylesheet loads after the parent theme’s (which is what we want).
By the way: you’ll want to be sure you have the opening php tag (the first line in the snippet above) at the beginning of your functions.php file, but the closing tag at the end isn’t strictly necessary, especially if you plan on adding more code later on.
Just make sure your style.css and functions.php files are both saved inside your child theme’s main folder, then there’s only one more simple step!
Step 5: Activate the Child Theme
You’re done with file editing now. All you need to do is sign into WordPress on your site and head to Appearance > Themes from the admin sidebar. You should now see the child theme you created in the list of available themes for your WordPress site (with the screenshot image showing if you took on the optional step above). Just click the “Activate” button and you’re good to go!
If you previously had the parent theme active, you probably won’t see any visible changes on your site. You’ll notice a difference, though, when you start populating your child theme’s style.css file, adding to functions.php, and/or adding custom page templates to your child theme (though that’s a topic for another time).
That’s it!
You’re done! You’ve created a WordPress child theme, and can make all the changes you want to your site’s appearance and functionality—through style.css and functions.php, respectively—without any worry of your code being overwritten when the parent theme updates. Go, you!
Have anything to add? Did I miss anything? Feel free to let me know.