惯性聚合 高效追踪和阅读你感兴趣的博客、新闻、科技资讯
阅读原文 在惯性聚合中打开

推荐订阅源

Microsoft Azure Blog
博客园_首页
Forbes - Security
Forbes - Security
WordPress大学
WordPress大学
P
Proofpoint News Feed
T
Threat Research - Cisco Blogs
L
LINUX DO - 热门话题
L
Lohrmann on Cybersecurity
Spread Privacy
Spread Privacy
D
Darknet – Hacking Tools, Hacker News & Cyber Security
大猫的无限游戏
大猫的无限游戏
博客园 - 三生石上(FineUI控件)
P
Privacy International News Feed
A
About on SuperTechFans
T
Tailwind CSS Blog
I
InfoQ
S
Securelist
云风的 BLOG
云风的 BLOG
罗磊的独立博客
Recent Announcements
T
The Exploit Database - CXSecurity.com
B
Blog RSS Feed
V
Visual Studio Blog
Know Your Adversary
Know Your Adversary
The GitHub Blog
The GitHub Blog
Jina AI
Jina AI
腾讯CDC
Cyberwarzone
Cyberwarzone
有赞技术团队
有赞技术团队
AWS News Blog
AWS News Blog
博客园 - 【当耐特】
cs.AI updates on arXiv.org
F
Full Disclosure
S
Secure Thoughts
博客园 - 司徒正美
J
Java Code Geeks
Y
Y Combinator Blog
Google Online Security Blog
GbyAI
GbyAI
N
News and Events Feed by Topic
Help Net Security
Help Net Security
freeCodeCamp Programming Tutorials: Python, JavaScript, Git & More
Project Zero
Project Zero
T
Tenable Blog
cs.CV updates on arXiv.org
T
Tor Project blog
MyScale Blog
MyScale Blog
Scott Helme
Scott Helme
小众软件
小众软件
K
Kaspersky official blog

Sun Boy's Blog

五一浪荡 春色怡人 冬日印象 蜜月之旅 2025 回忆上学三两事(二) 秋尾闲游 我们所需要的婚礼 关于校园恋爱的思考 回忆上学三两事(一) 问答分享:有个妹妹是种什么体验 月全食人生首拍 尼康新手人像初拍 基于腾讯云COS自动生成相册 回忆找工作三两事 更换busuanzi统计服务记录 文章页面默认头图透明调整记录 第一次拍月亮记录 源站域名和回源HOST头理解及个人实践
Github Actions与EdgeOne自动化刷新
Sun Boy · 2025-08-22 · via Sun Boy's Blog

写前哔哔

老早就看到别人用Github Actions来实现Hexo自动化部署,但是看见一长串教程就退缩了,正好趁着休假抄一下店长的作业。

Hexo自动化部署 By Github Actions

想当初挡住我的第一步就是上传仓库,各种git搞得我眼花缭乱,后来才知道Github官方还有个图形化应用程序Github Desktop可以极大简化操作:

  • 首先在本地电脑上新创建一个用于存放博客源码的文件夹(我的文件夹名是blog_source),然后将博客根目录(我的是blog)下的所有文件复制粘贴到blog_source中。
  • 打开 [Blogroot]/.gitignore,输入以下内容:
1
2
3
4
5
6
7
8
9
10
.DS_Store
Thumbs.db
db.json
*.log
node_modules/
public/
.deploy*/
.deploy_git*/
.idea
themes/butterfly/.git

最好把butterfly目录下的.git文件夹删除,这是因为[Blogroot]/themes/butterfly 本身是一个独立的 Git 仓库(里面包含 .git 文件夹),所以 Git 会把它识别为 “嵌入式仓库”,而不是普通文件目录,直接 git add 无法正常跟踪其内容。

  • [Blogroot] 新建 .github 文件夹,注意开头是有个 . 的。然后在 .github 内新建 workflows 文件夹,再在 workflows 文件夹内新建 autodeploy.yml,在 [Blogroot]/.github/workflows/autodeploy.yml 里面输入:
1
2
3
4
5
6
7
8
9
10
11
12
13
14
15
16
17
18
19
20
21
22
23
24
25
26
27
28
29
30
31
32
33
34
35
36
37
38
39
40
41
42
43
44
45
46
47
48
49
50
51
52
53
54
55
56
57
58

name: 自动部署

on:
push:
branches:
- main

release:
types:
- published

jobs:
deploy:
runs-on: ubuntu-latest
steps:
- name: 检查分支
uses: actions/checkout@v2
with:
ref: main

- name: 安装 Node
uses: actions/setup-node@v1
with:
node-version: "24.x"

- name: 安装 Hexo
run: |
export TZ='Asia/Shanghai'
npm install hexo-cli -g

- name: 缓存 Hexo
uses: actions/cache@v4
id: cache
with:
path: node_modules
key: ${{runner.OS}}-${{hashFiles('**/package-lock.json')}}

- name: 安装依赖
if: steps.cache.outputs.cache-hit != 'true'
run: |
npm install --save

- name: 生成静态文件
run: |
hexo clean
hexo generate

- name: 部署
run: |
cd ./public
git init
git config --global user.name '${{ secrets.GITHUBUSERNAME }}'
git config --global user.email '${{ secrets.GITHUBEMAIL }}'
git add .
git commit -m "${{ github.event.head_commit.message }} $(date +"%Z %Y-%m-%d %A %H:%M:%S") Updated By Github Actions"
git push --force --quiet "https://${{ secrets.GITHUBUSERNAME }}:${{ secrets.GITHUBTOKEN }}@github.com/${{ secrets.GITHUBUSERNAME }}/${{ secrets.GITHUBUSERNAME }}.github.io.git" master:master
#git push --force --quiet "https://${{ secrets.GITHUBUSERNAME }}:${{ secrets.GITHUBTOKEN }}@github.com/${{ secrets.GITHUBUSERNAME }}/仓库名.git" master:main

需要注意的主要有三点:

一是要保证uses: actions/cache@v4,因为GitHub Actions 工作流中使用了已被废弃的 actions/cache@v1 版本,GitHub 已不再支持该版本,需要更新到 v3 或 v4 版本。

二是如果新仓库,那么分支应该都是main,但是最后一行的分支为master:main,而不是main:main

三是如果博客部署的仓库不是Github Pages所在的仓库的话,如仓库名.github.io,那么最后一行应该修改为git push --force --quiet "https://${{ secrets.GITHUBUSERNAME }}:secrets.GITHUBUSERNAME:${{ secrets.GITHUBTOKEN }}@github.com/${{ secrets.GITHUBUSERNAME }}/仓库名.git" master:main

  • 参照以下视频利用Github Desktop上传博客源码至Github仓库:
  • 参照店长教程添加相关环境变量并查看部署情况:

在之前一篇教程中实现了在本地端用Hexo 的deployAfter钩子触发EdgeOne自动化刷新,但这种方法貌似在Actions中不起作用,于是大法启动。

  • scripts文件夹中新建edgeone-cache-actions.js,然后复制粘贴以下代码:
1
2
3
4
5
6
7
8
9
10
11
12
13
14
15
16
17
18
19
20
21
22
23
24
25
26
27
28
29
30
31
32
33
34
35
36
37
38
39
40
41
42
43
44
45
46
47
48
49
50
51
52
53
54
55
56
57
58
59
60
61
62
63
64
65
66
67
68
69
70
71
72
73
74
75
76
77
78
79
80
81
82
83
84
85
86
87
88
89
90
91
92
93
94
95
96
97
98
99
100
const tencentcloud = require("tencentcloud-sdk-nodejs-teo");
const TeoClient = tencentcloud.teo.v20220901.Client;


if (require.main === module) {
main().catch(err => {
console.error("执行失败:", err);
process.exit(1);
});
} else {

console.log("[EdgeOne] 脚本被Hexo加载,跳过执行(仅手动执行生效)");
}

async function main() {

const edgeoneCfg = {
enable: process.env.EDGEONE_ENABLE === 'true',
secretId: process.env.EDGEONE_SECRET_ID,
secretKey: process.env.EDGEONE_SECRET_KEY,
zoneId: process.env.EDGEONE_ZONE_ID,
region: process.env.EDGEONE_REGION || 'ap-guangzhou',
type: process.env.EDGEONE_TYPE || 'purge_host',
targets: process.env.EDGEONE_TARGETS ? process.env.EDGEONE_TARGETS.split(',') : [],
method: process.env.EDGEONE_METHOD || 'invalidate',
retry: process.env.EDGEONE_RETRY ? parseInt(process.env.EDGEONE_RETRY) : 2,
};


console.log("[EdgeOne] 环境变量检测:", {
enable: edgeoneCfg.enable,
hasSecretId: !!edgeoneCfg.secretId,
hasZoneId: !!edgeoneCfg.zoneId
});


if (!edgeoneCfg.enable) {
console.log("[EdgeOne] 缓存刷新已禁用(EDGEONE_ENABLE != 'true')");
process.exit(0);
}


const requiredFields = ['secretId', 'secretKey', 'zoneId'];
const missingFields = requiredFields.filter(field => !edgeoneCfg[field]);
if (missingFields.length > 0) {
console.error(`[EdgeOne] 配置错误:缺少必填参数 ${missingFields.join(', ')}`);
process.exit(1);
}


const client = new TeoClient({
credential: {
secretId: edgeoneCfg.secretId,
secretKey: edgeoneCfg.secretKey,
},
region: edgeoneCfg.region,
profile: { httpProfile: { endpoint: "teo.tencentcloudapi.com" } },
});


await refreshCacheWithRetry(client, edgeoneCfg, edgeoneCfg.retry);
}

async function refreshCacheWithRetry(client, config, retryLeft) {
try {
const params = {
ZoneId: config.zoneId,
Type: config.type,
Targets: config.targets,
Method: config.method,
};

const res = await client.CreatePurgeTask(params);


if (!res || !res.JobId) {
throw new Error(`无效响应: 缺少JobId | ${JSON.stringify(res)}`);
}

if (res.FailedList && res.FailedList.length > 0) {
throw new Error(`部分目标刷新失败: ${JSON.stringify(res.FailedList)}`);
}

console.log(`✅ EdgeOne 刷新成功 | 任务 JobId:${res.JobId}`);
console.log(`→ 类型:${params.Type} | 方式:${params.Method}`);
console.log(`→ 目标:${JSON.stringify(params.Targets)}`);
return true;

} catch (err) {
if (retryLeft > 0) {
console.log(`⚠️ 刷新失败(剩余重试 ${retryLeft} 次):${err.message}`);
return refreshCacheWithRetry(client, config, retryLeft - 1);
} else {
console.error(`❌ 最终刷新失败:${err.message}`);
process.exit(1);
}
}
}
  • autodeploy.yml中添加以下代码:
1
2
3
4
5
6
7
8
9
10
11
12
13
- name: 刷新EdgeOne缓存
if: success()
env:
EDGEONE_ENABLE: 'true'
EDGEONE_SECRET_ID: ${{ secrets.EDGEONE_SECRET_ID }}
EDGEONE_SECRET_KEY: ${{ secrets.EDGEONE_SECRET_KEY }}
EDGEONE_ZONE_ID: ${{ secrets.EDGEONE_ZONE_ID }}
EDGEONE_REGION: 'ap-guangzhou'
EDGEONE_TYPE: 'purge_host'
EDGEONE_TARGETS: 'www.sunboy.ltd,image.sunboy.ltd'
EDGEONE_METHOD: 'invalidate'
run: |
node ./scripts/edgeone-cache-actions.js
  • 然后再在仓库的Settings > Secrets and variables > Actions中添加以下密钥:

    • EDGEONE_SECRET_ID:腾讯云 API 密钥 ID

    • EDGEONE_SECRET_KEY:腾讯云 API 密钥 Key

    • EDGEONE_ZONE_ID:EdgeOne 的站点 ZoneID

具体获取方法见:

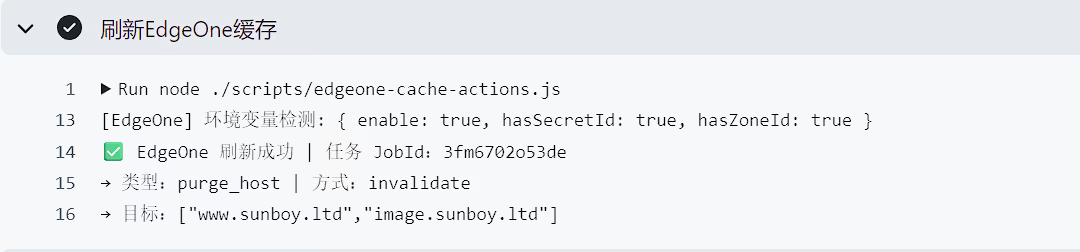
  • 最后在Actions处查看deploy流程,如果显示以下内容说明EdegeOne缓存刷新成功:

image-20250822221826800

最后叨叨

个人纯小白,全程豆包编码,仅做个人成功案例分享,大佬勿喷。

版权声明: 本博客所有文章除特别声明外,均采用 CC BY-NC-SA 4.0 许可协议。转载请注明来源 Sun Boy's Blog