


Karpenter is a fast, flexible Kubernetes autoscaler designed to improve cluster performance and cost efficiency. When the cluster doesn’t have capacity to schedule a pod, Karpenter requests additional compute from the cloud provider, specifying a right-sized instance that matches the preferences you’ve set (for example, instance family). Karpenter can also reduce node count to mitigate cluster idle and minimize costs by consolidating workloads onto fewer instances and requesting termination of the abandoned instances.
Karpenter was originally developed by AWS and is supported in Amazon EKS, and its adoption is rapidly expanding as support emerges for other public clouds. As of 2025, it has become the preferred autoscaling solution over the traditional Cluster Autoscaler (CAS).
In this post, we’ll cover the core concepts of Karpenter’s architecture. We’ll explore how Karpenter optimizes cost efficiency and how it compares to traditional Kubernetes autoscaling. But first, we’ll look at the capabilities that enable Karpenter to optimize the performance and cost of your Kubernetes clusters.
Karpenter’s configuration is built around a clear separation of concerns. Policies that determine Karpenter’s provisioning and optimization behavior are configured in one Kubernetes custom resource—a provider-agnostic NodePool. Specific infrastructure details that determine how Karpenter launches nodes in your cloud environment are configured in a separate custom resource—a provider-specific NodeClass. Dividing this logic across two separate custom resources enables Karpenter to flexibly and efficiently provision compute capacity that ensures application performance within your infrastructure’s operational constraints.
The NodePool determines the shape of the nodes Karpenter can provision. It defines constraints like instance families and architectures, resource limits, and disruption behavior—for example, how aggressively Karpenter should consolidate nodes to reduce waste. Because the NodePool is provider-agnostic, the logic remains consistent regardless of where your cluster is running.
When multiple capacity types are allowed in a NodePool, Karpenter uses a specific internal hierarchy to select the most efficient compute. Note that the sequence in which these types are listed in your YAML does not convey their priority.
| Capacity type | Selection strategy | Cost consideration |
|---|---|---|
| 1. Capacity Reservations | Uses selectors in the NodeClass to utilize specific prepaid capacity. | Commitment is already paid. Karpenter prioritizes this to maximize ROI. |
| 2. Spot | Balances the lowest price with the lowest risk of interruption. | Usually significantly cheaper than On-Demand. |
| 3. On-Demand | Chooses the cheapest instance that satisfies the pod’s requirements. | Used only when Reservations are unavailable and Spot is out of capacity or more expensive. |
Karpenter’s provisioning logic follows a strict priority hierarchy: It first utilizes any available Capacity Reservations, followed by Spot Instances, and finally On-Demand Instances. If your NodePool includes multiple capacity types, Karpenter’s consolidation logic continuously evaluates the cluster to identify more cost-effective paths—such as replacing an active node with a newly available Reservation—to maintain efficiency. For workloads that cannot tolerate the potential interruptions associated with Spot capacity, cluster administrators should explicitly limit their NodePool requirements to on-demand or reserved types to ensure stability. The following code sample shows a NodePool that defines the compute architecture ("amd64") and instance families ("c", "m", "r"), in addition to explicitly enabling all three capacity types.
apiVersion: karpenter.sh/v1
kind: NodePool
metadata:
name: default
spec:
template:
spec:
nodeClassRef:
group: karpenter.k8s.aws
kind: EC2NodeClass
name: default
requirements:
- key: karpenter.sh/capacity-type
operator: In
values: ["reserved", "spot", "on-demand"]
- key: kubernetes.io/arch
operator: In
values: ["amd64"]
- key: karpenter.k8s.aws/instance-category
operator: In
values: ["c", "m", "r"]
# Limits the total resources this NodePool can provision
limits:
cpu: 1000
memory: 1000Gi
# Defines how aggressive Karpenter is in removing nodes
disruption:
consolidationPolicy: WhenEmptyOrUnderutilized
consolidateAfter: 1m
The NodePool definition also specifies a consolidationPolicy, which shapes how aggressive Karpenter is in consolidating workloads to optimize costs. The consolidationPolicy: WhenEmptyOrUnderutilized configuration setting allows Karpenter to replace nodes whenever it identifies a less expensive instance or set of instances that can run the same pods at a lower total cost. Karpenter ensures application availability during these moves by respecting PodDisruptionBudgets (PDBs), which are Kubernetes resources that enable workload developers to specify a limit of how many replicas can be voluntarily evicted at once.
The NodeClass object expresses specifically how Karpenter will launch the capacity that’s generally defined in the NodePool. The EC2NodeClass is an AWS-specific NodeClass, and a similar instance of the NodeClass object is available for each of the various cloud providers.
The following code sample shows an example EC2NodeClass definition. It defines the family of Amazon Machine Images (AMIs) to use, as well as selectors that define the subnets and security groups to use. It also specifies tags that will be applied to the EC2 instances to identify the team that owns the instances, the environment where they run, and the cost center they belong to.
apiVersion: karpenter.k8s.aws/v1
kind: EC2NodeClass
metadata:
name: default
spec:
# Discovers AMIs based on the version and architecture
amiSelectorTerms:
- alias: al2023@latest
# Discovers subnets and security groups using tags
subnetSelectorTerms:
- tags:
karpenter.sh/discovery: my-cluster
securityGroupSelectorTerms:
- tags:
karpenter.sh/discovery: my-cluster
# IAM Role for the nodes
role: "KarpenterNodeRole-my-cluster"
# Tags applied to every EC2 instance created by this class
tags:
Team: "DevOps"
Environment: "Production"
CostCenter: "1234" # Useful for CCM cost allocation
In Part 4 of this series, we’ll look at how Datadog Cloud Cost Management (CCM) helps you understand how Karpenter shapes your cloud costs, including using tags for cost allocation.
Karpenter includes a controller for the EC2NodeClass resource that resolves the high-level settings defined in the EC2NodeClass into the concrete IDs and options it uses to provision compute capacity. Its primary responsibility is to maintain an up-to-date view of the infrastructure defined in the EC2NodeClass. It validates that the specified AMIs, subnets, and security groups actually exist and are reachable. For example, the controller resolves the EC2NodeClass selectors (such as subnet and security group selectors) into concrete IDs by querying AWS APIs. The response gives Karpenter the specific launch parameters it needs when it provisions instances. Karpenter then caches these values so it can quickly compose requests to the AWS APIs when it needs to revise the cluster’s capacity.
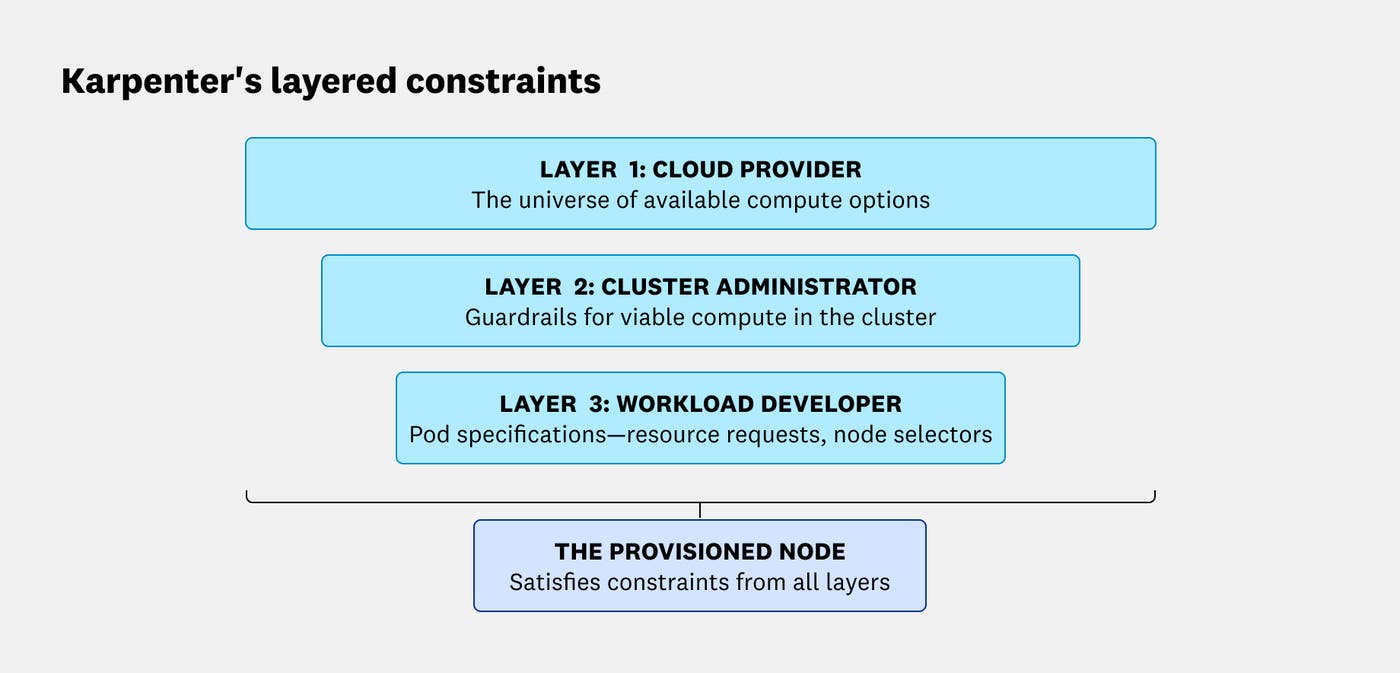
Karpenter’s scheduling decisions are shaped by constraints dictated by the cloud provider, the cluster administrator, and the workload developer. The intersection of these three layers of constraints define what instances Karpenter is allowed to provision:
The cloud provider layer: These constraints define the universe of available compute options, including instance sizes, families, capacity type (i.e., Spot, On-Demand), available inventory, and pricing.
The cluster administrator layer: The NodePool and EC2NodeClass define the guardrails and environment for the cluster.
The workload developer layer: Pod specifications are created and maintained by application developers. These specs define the compute to be used by each workload—for example, by describing the workload’s resource requests and node selectors.
Like other autoscaling mechanisms, Karpenter helps you ensure that your workloads have the resources they need to perform well. It also helps you avoid excess costs through bin-packing—combining workloads to maximize node utilization. Karpenter further optimizes efficiency by automatically consolidating running workloads onto fewer nodes to remove underutilized capacity, and by moving workloads onto less expensive Spot Instances where appropriate.
In this section, we’ll look at how Karpenter requests just-in-time compute resources from your cloud provider to ensure performance and how it safely consolidates workloads to improve cost efficiency.
When the Kubernetes scheduler can’t place a pod on any existing node, it marks the pod as unschedulable and emits a FailedScheduling event. Karpenter watches the Kubernetes API for these unschedulable pods and processes them in batches, rather than immediately launching one node per workload. This batching window is a deliberate cost-optimization feature: By waiting briefly, Karpenter can consider multiple pending pods together and provision fewer, better-utilized nodes instead of overprovisioning.
You can tune Karpenter’s batching behavior through global settings, which you can configure via the command line or environment variables:
--batch-idle-duration (as a CLI parameter) or BATCH_IDLE_DURATION (as an environment variable) controls how long Karpenter waits without a new FailedScheduling event arriving before it finalizes the batch. This is 1 second by default.
--batch-max-duration (CLI) or BATCH_MAX_DURATION (environment variable) caps how long the batch window can be extended. This is 10 seconds by default.
Once Karpenter has a batch of pending pods, it evaluates their scheduling requirements against the NodePools you’ve configured. It runs scheduling simulations to find capacity that can satisfy those requirements. It then creates a NodeClaim to represent the node it intends to add. The NodeClaim includes the exact requirements Karpenter chose for the new node, including instance type, zone, and capacity type.
The following sample code illustrates a NodeClaim that represents a c5.large Spot Instance:
apiVersion: karpenter.sh/v1
kind: NodeClaim
metadata:
# Unique name generated by Karpenter for this specific node
name: specialized-node-claim-x9z
labels:
karpenter.sh/nodepool: default
karpenter.sh/capacity-type: spot
spec:
# 1. Reference to the provider-specific config (AMI, Security Groups)
nodeClassRef:
group: karpenter.k8s.aws
kind: EC2NodeClass
name: default
# 2. The EXACT constraints this specific node satisfies
# (Karpenter has resolved the "range" from the NodePool into a single decision)
requirements:
- key: node.kubernetes.io/instance-type
operator: In
values: ["c5.large"] # Locked to the specific type Karpenter chose
- key: topology.kubernetes.io/zone
operator: In
values: ["us-east-1a"]
- key: karpenter.sh/capacity-type
operator: In
values: ["spot"]
# 3. Resources this node provides to the cluster
resources:
requests:
cpu: "2"
memory: "4Gi"
After creating the NodeClaim, Karpenter calls the cloud provider API to request an instance that matches those requirements. Importantly, Karpenter also maintains “in-flight awareness”: It tracks nodes that have been requested (via NodeClaims) even before they’re registered in the Kubernetes cluster. This helps avoid duplicate provisioning—if new pods arrive that will fit on capacity that’s already on the way, Karpenter can account for that pending node instead of launching another one.
Karpenter’s cost controls go beyond bin-packing at launch time. It manages node lifecycles through two primary automated mechanisms: expiration and disruption. Expiration enforces a maximum node age that you configure—for example, to rotate AMIs. Expiration is forceful: When Karpenter detects an expired node, it immediately begins draining it without waiting for a replacement to be provisioned first. Disruption is a more graceful, budget-aware process managed by the Disruption Controller. It identifies candidates for removal based on three reasons: emptiness, underutilization (consolidation), or drift.
Disruption behavior is configured in the NodePool, where you can choose between two consolidationPolicy settings:
WhenEmpty: Karpenter only deletes nodes that are completely unused.
WhenEmptyOrUnderutilized: Karpenter actively replaces nodes if it identifies a cheaper instance (or set of instances) that can run the same pods more efficiently. In both cases, Karpenter ensures the availability of the application by respecting PDBs to avoid forcing a consolidation action that would violate availability guarantees.
A key detail behind drift is that updating a NodePool or EC2NodeClass updates Karpenter’s desired launch configuration, but it does not “patch” existing nodes in place. Consequently, existing nodes maintain their original settings (such as their AMI or security groups) and may diverge from the updated specification. This divergence—whether caused by changes to the NodePool template, EC2NodeClass selectors, or mismatched requirements—is what Karpenter identifies as drift. It replaces drifted nodes gradually so the fleet converges back to your intended configuration.
In many Kubernetes environments, you can choose between Karpenter and the Kubernetes Cluster Autoscaler (CAS). But there are also cases where Karpenter isn’t an option. For example, some multi-cloud setups or clusters that depend on newer Kubernetes features like Dynamic Resource Allocation (DRA) may need an autoscaling approach that doesn’t rely on Karpenter. When both Karpenter and CAS are viable, it helps to understand how each autoscaler adds and removes capacity, and what those differences mean for performance, flexibility, and cost.
| Feature | Karpenter | Cluster Autoscaler (CAS) |
|---|---|---|
| Scaling mechanism | Interacts directly with cloud provider APIs (e.g., EC2 CreateFleet). | Requests capacity through autoscaling groups or managed node groups. |
| Provisioning speed | Generally faster due to a direct path to the cloud provider API. | Can be slower due to extra communication layers within the cloud provider. |
| Flexibility | High; selects right-sized instances based on real-time pod needs. | Lower; limited to scaling within predefined, static node groups. |
| Cost optimization | Proactively consolidates workloads onto fewer or cheaper nodes. | Primarily optimizes by deleting empty nodes after rescheduling pods. |
| Cloud support | Unbundled core logic; feature parity may vary across cloud providers. | Bundled project with mature support for a broad set of environments. |
Karpenter provisions nodes by interacting directly with your cloud provider’s provisioning APIs (e.g., the AWS EC2 CreateFleet API). That direct path gives Karpenter flexibility to select an instance type that fits the workloads it’s trying to place (while still respecting your configured requirements). Working directly with the cloud provider API can improve responsiveness in some environments, minimizing scheduling latency and moving pending pods to a running state more quickly.
CAS, on the other hand, generally scales by requesting capacity through the cloud provider’s autoscaling abstractions, such as managed node groups or autoscaling groups. CAS scaling may be less responsive in some situations. CAS works by adjusting the desired size of predefined groups on a periodic scan loop, while Karpenter’s group-less autoscaling can react immediately to unschedulable pods. In many clusters, the biggest part of scale-out time is still the underlying instance launch and node bootstrap, regardless of which autoscaler triggers it.
Karpenter optimizes cost through consolidation, a process that goes beyond simply removing empty nodes. It can replace a set of underutilized nodes with fewer instances that run the same pods more efficiently, keeping clusters lean without sacrificing performance. Karpenter also makes scale-to-zero patterns more practical because it can provision new capacity quickly when needed.
CAS, however, relies on a more traditional approach for scaling in. While CAS can be configured to remove underutilized nodes, it primarily optimizes by attempting to reschedule pods onto existing capacity and then deleting nodes once they are empty or fall below a specific utilization threshold. Teams often use CAS successfully when workloads are relatively steady, when node groups are a good fit for the organization’s operational model, or when they prefer the predictability of scaling within defined groups rather than letting an autoscaler choose from a broad range of instance options. Because it’s slower to provision new nodes, CAS users often keep unused nodes running so new workloads can be scheduled quickly. Those unused nodes also drive up cloud costs.
Karpenter separates its core provisioning logic from cloud-specific integrations. This is reflected in the two custom resources Karpenter uses for its configuration—the provider-agnostic NodePool and the provider-specific NodeClass. This unbundling enables the Karpenter project to sometimes speed innovation on a given provider, but it also means feature parity can vary across clouds and versions.
CAS, on the other hand, includes implementations for many cloud providers in a single, bundled project. This can be appealing if you want one autoscaler that works across a broad set of environments with a familiar operational model.
Optimizing a Kubernetes cluster requires balancing the immediate resource needs of your applications with the long-term goal of cost efficiency. As we’ve seen, Karpenter’s NodePools and NodeClasses allow for a highly flexible, just-in-time approach to provisioning infrastructure. By moving away from static node groups and toward a model of intelligent consolidation, you can ensure your cluster remains both performant and lean.
However, the increased flexibility of Karpenter also introduces new layers of complexity. To truly master your cluster’s efficiency, you need deep visibility into how these automated decisions affect your bottom line and your application health. In the next part of this series, we’ll dive into the key metrics you should monitor to track Karpenter’s activity and ensure your scaling logic is performing as expected.
此内容由惯性聚合(RSS阅读器)自动聚合整理,仅供阅读参考。 原文来自 — 版权归原作者所有。