惯性聚合 高效追踪和阅读你感兴趣的博客、新闻、科技资讯
阅读原文 在惯性聚合中打开

推荐订阅源

P
Privacy International News Feed
CTFtime.org: upcoming CTF events
Jina AI
Jina AI
T
Tailwind CSS Blog
WordPress大学
WordPress大学
Scott Helme
Scott Helme
C
Cybersecurity and Infrastructure Security Agency CISA
博客园 - Franky
C
CERT Recently Published Vulnerability Notes
cs.AI updates on arXiv.org
雷峰网
雷峰网
Schneier on Security
博客园 - 聂微东
T
Tor Project blog
Hugging Face - Blog
Hugging Face - Blog
博客园 - 司徒正美
AI
AI
T
Troy Hunt's Blog
Security Latest
Security Latest
T
The Blog of Author Tim Ferriss
cs.CV updates on arXiv.org
C
Check Point Blog
T
Threat Research - Cisco Blogs
W
WeLiveSecurity
V
Vulnerabilities – Threatpost
Recorded Future
Recorded Future
Recent Commits to openclaw:main
Cisco Talos Blog
Cisco Talos Blog
C
CXSECURITY Database RSS Feed - CXSecurity.com
Cloudbric
Cloudbric
J
Java Code Geeks
罗磊的独立博客
C
Cyber Attacks, Cyber Crime and Cyber Security
aimingoo的专栏
aimingoo的专栏
L
LangChain Blog
freeCodeCamp Programming Tutorials: Python, JavaScript, Git & More
P
Privacy & Cybersecurity Law Blog
Google DeepMind News
Threat Intelligence Blog | Flashpoint
让小产品的独立变现更简单 - ezindie.com
L
Lohrmann on Cybersecurity
I
InfoQ
MongoDB | Blog
MongoDB | Blog
OSCHINA 社区最新新闻
OSCHINA 社区最新新闻
The GitHub Blog
The GitHub Blog
The Hacker News
The Hacker News
H
Help Net Security
钛媒体:引领未来商业与生活新知
钛媒体:引领未来商业与生活新知
P
Proofpoint News Feed
N
News and Events Feed by Topic

Datadog | The Monitor blog

Introducing our open source AI-native SAST Instrument and monitor Boomi integration flows with OpenTelemetry and Datadog Not all index scans are equal: How we cut query latency by over 99% Platform engineering metrics: What to measure and what to ignore Integrate Recorded Future threat intelligence with Datadog Cloud SIEM CI/CD security: threat modeling using a MITRE-style threat matrix CI/CD security: How to secure your GitHub ecosystem Ingress NGINX is EOL: A practical guide for migrating to Kubernetes Gateway API Operating agentic AI with Amazon Bedrock AgentCore and Datadog LLM Observability: Lessons from NTT DATA Introducing the Datadog Code Security MCP Capture and analyze custom heatmaps in Session Replay Understand session replays faster with AI summaries and smart chapters Monitor ClickHouse query performance with Datadog Database Monitoring How we designed empathetic alert sounds for on-call engineers Search and act across Datadog to resolve issues faster with Bits Assistant Measure the business impact of every product change with Datadog Experiments Analyzing round trip query latency Configuring JavaScript caches for better performance Introducing Bits AI Dev Agent for Code Security Datadog achieves ISO 42001 certification for responsible AI Monitor Nutanix clusters, hosts, and VMs with Datadog Monitor Juniper Mist in Datadog A new Host Map for modern infrastructure Annotate traces to improve LLM quality with Datadog LLM Observability What’s new in Cloud SIEM: AI-powered investigations, enhanced threat intelligence, and scalable security operations Explore Kubernetes with native OpenTelemetry data Monitor Oracle Fusion Cloud Applications with Datadog Announcing the Datadog Terraform provider v4.0.0 Scaling Kubernetes workloads on custom metrics How to design cloud environments for AI-powered threat analysis Monitor Aruba Central in Datadog How we centralize and remediate risks with Datadog Case Management Accelerate incident response with Datadog and ServiceNow Monitor your application and network load balancer logs Understanding Karpenter architecture for Kubernetes autoscaling Tools for collecting metrics and logs from Karpenter Monitor Karpenter with Datadog What your product data is actually saying Key metrics for monitoring Karpenter Securing Datadog’s platform in the AI age: The role of observability data Four ways engineering teams use the Datadog MCP Server to power AI agents Approaching your observability migration with the right mindset Meet the new Bits AI SRE: Deeper reasoning, twice as fast Key learnings from the 2026 State of DevSecOps study Use plain English to query your multi-cloud infrastructure in Resource Catalog Simplifying troubleshooting across the user journey with Datadog Synthetic Monitoring Protect your OCI resources with Datadog Cloud Security This Month in Datadog - February 2026 Amazon EC2 security: How misconfigured and public AMIs expand your cloud attack surface Enable end-to-end visibility into your Java apps with a single command Measure and improve mobile app startup performance with Datadog RUM Evaluating our AI Guard application to improve quality and control cost Identify untested code across every level of your codebase Make use of guardrail metrics and stop babysitting your releases Monitor Versa Networks SD-WAN performance in Datadog Improve performance and reliability with APM Recommendations Remediate transitive vulnerabilities faster with Datadog Software Composition Analysis Generate audit-ready vulnerability and compliance reports with Datadog Sheets Monitor Fortinet FortiManager performance in Datadog Improve test coverage across codebases with Datadog Code Coverage Move fast, don’t break things: Consistent testing standards at scale Enrich logs with ServiceNow CMDB context before routing to any SIEM or logging tool Monitor Lustre with Datadog Make faster, better product decisions with Datadog Product Analytics Surface and remediate runtime posture issues with Workload Protection Findings Protect agentic AI applications with Datadog AI Guard How to optimize JavaScript code with CSS Trace Google Pub/Sub workloads in Cloud Run with Datadog Detect human names in logs with ML in Sensitive Data Scanner How we cut our NLQ agent debugging time from hours to minutes with LLM Observability Debug PostgreSQL query latency faster with EXPLAIN ANALYZE in Datadog Database Monitoring Datadog acquires Propolis Unify and correlate frontend and backend data with retention filters Scale compliance across global frameworks with Datadog Cloud Security Monitor Arista VeloCloud SD-WAN performance with Datadog Building reliable dashboard agents with Datadog LLM Observability Simplify log collection and aggregation for MSSPs with Datadog Observability Pipelines Mitigation for Node.js denial-of-service vulnerability affecting Datadog APM Automate flaky test fixes with the Bits AI Dev Agent and Test Optimization How we built an AI SRE agent that investigates like a team of engineers Datadog integrations 2025 recap: Observability for AI, security, and hybrid cloud Design effective executive dashboards with Datadog Implement dbt data quality checks with dbt-expectations Bring faster visibility into AWS Lambda functions with remote instrumentation Troubleshoot faster with the GitLab Source Code integration in Datadog How Cambia Health Solutions saved $30,000 monthly with Cloud Cost Management and the Datadog Resource Catalog Normalize any logs for Cloud SIEM with Datadog's OCSF processor Optimizing Datadog at scale: Cost-efficient observability at Zendesk Detect, diagnose, and resolve network issues easily with CNM Network Health Connect engineering errors to user impact in early-stage products Cilium configuration for Kubernetes operations at scale Designing feedback loops for progressive delivery Ship features faster and safer with Datadog Feature Flags Choosing the right OpenTelemetry Collector distribution Route your monitor alerts with Datadog monitor notification rules Automate Cloud SIEM investigations with Bits AI Security Analyst Cloud threat detection: How to identify risky activity across control and data planes Collecting Kafka performance metrics Monitoring Kafka with Datadog Monitoring Kafka performance metrics
How to use locators to design more resilient synthetic tests
Addie Beach, Hakan Bakkalbasi, Rachel White · 2025-02-21 · via Datadog | The Monitor blog

Most modern web applications are frequently updated to implement new features, execute marketing campaigns, or enhance their UX with new libraries or APIs. While this helps you better engage your users, constant UI updates make designing flexible, long-lasting tests challenging.

To help keep track of shifting UI elements through different design iterations, many synthetic tests include locators. Locators are unique identifiers that you can use to label each element in your app, enabling you to track them even as your overall layout changes. While there are many ways you can create locators, two of the most common methods are to use CSS or xPath selectors, which enable you to query the Document Object Model (DOM) to retrieve specific elements.

Figuring out which type of selector to use can present its own set of difficulties, and many teams may even implement features of each to create their own locators. For example, Datadog Synthetic Monitoring uses a custom locator system that draws on several different reference points—including xPath, text, and classes—to reliably identify elements. Understanding the advantages and disadvantages of each approach can help you design more effective synthetic tests tailored to the unique needs of your text stack.

In this post, we’ll show you:

  • How locators work in synthetic testing, including the differences between CSS and xPath selectors

  • How to customize your locators using Datadog Synthetic Monitoring

How locators work in synthetic testing

Locators can take a number of different formats, enabling you to target elements based on their attributes or location. Some of the strategies for using locators are more straightforward, such as directly querying element IDs via methods like getElementById(). However, factors such as missing IDs can complicate these approaches, making it difficult to get complete, resilient coverage for your tests. To accomodate more advanced use cases, many testers turn to using CSS and xPath selectors instead. These selectors provide you with more options for targeting elements, helping you integrate locators into your tests with minimal additional work.

CSS vs. xPath selectors

When deciding which selector type to use in your tests, one of the biggest advantages to CSS selectors is that they are typically easier to learn and read than xPath. CSS selectors use much of the same syntax as HTML, defining elements based on features such as their class and attributes—this makes it relatively easy to determine which elements each locator applies to just by looking at your code. For example, you can easily select a link element in your text like so:

`const gum_link = document.querySelector(“[href=’https://candy.example/product/bubblegum’]”)`

Additionally, CSS selectors are able to access elements within the shadow DOM via functions like :host(). By navigating into the shadow DOM, you can granularly test elements that normally would be hidden within a larger web component, such as the individual video control buttons within a web player.

By contrast, xPath selectors tend to have a higher learning curve but can provide more advanced querying options. You can use xPath selectors to target an element based on content, including text, which can come in handy for elements like individual <div> containers that may not have any unique attributes. You can also define an element based on its location by traversing both up and down the DOM tree—for example, to select a list based on its parent, you could use something like the query below:

`const gum_list = //h1/parent::ul`

In addition to being useful for elements without distinctive attributes, this feature can come in handy when you have multiple nested elements, such as in a menu.

You can easily copy the xPath of an element using your browser’s developer tools functionality:

The right-click menu for an element in Chrome DevTools, with options to copy the element’s xPath or selector displayed.

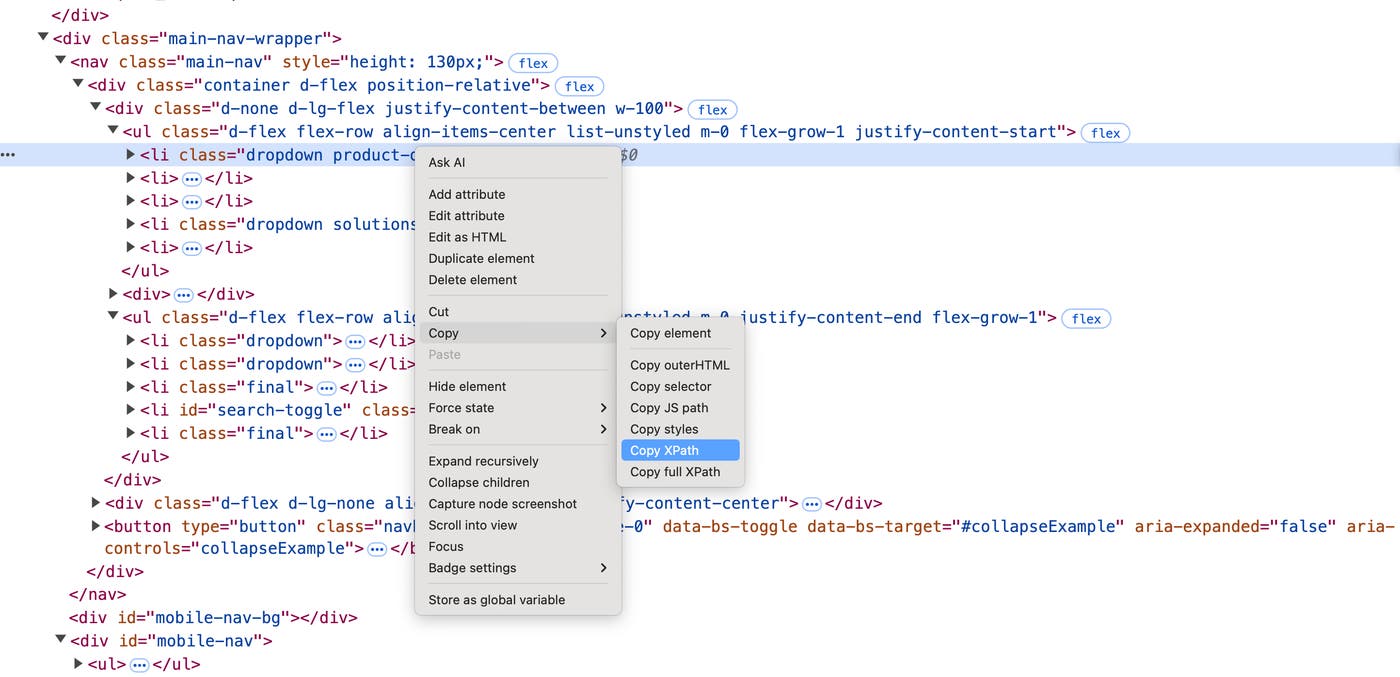
Note that you can often use these tools to get the CSS selector for an element as well—in the example above, you would use the Copy selector option.

If you choose to define an element based on its location using xPath, you will have to be careful that any UI updates don’t change the position of the element in the DOM. This could result in a locator that either points to a different element than intended or is broken completely. If you anticipate frequent changes to your app’s DOM structure, you may want to choose CSS selectors instead.

Customizing locators in Datadog Synthetic Monitoring

Datadog Synthetic Monitoring’s self-healing locators automatically cover most use cases, with no scripting knowledge necessary. However, there are a few select situations where you might need to customize your own locators. To account for this, Synthetic Monitoring also provides out-of-the-box testing templates that help you easily create your own xPath or CSS locators. You can use basic naming conventions with these locators to select elements based on their page section, for example. Note that the xPath selectors are enhanced with JavaScript functions that help determine their location dynamically.

The template selection window in Datadog Synthetic Monitoring, showing the two locator-related templates.

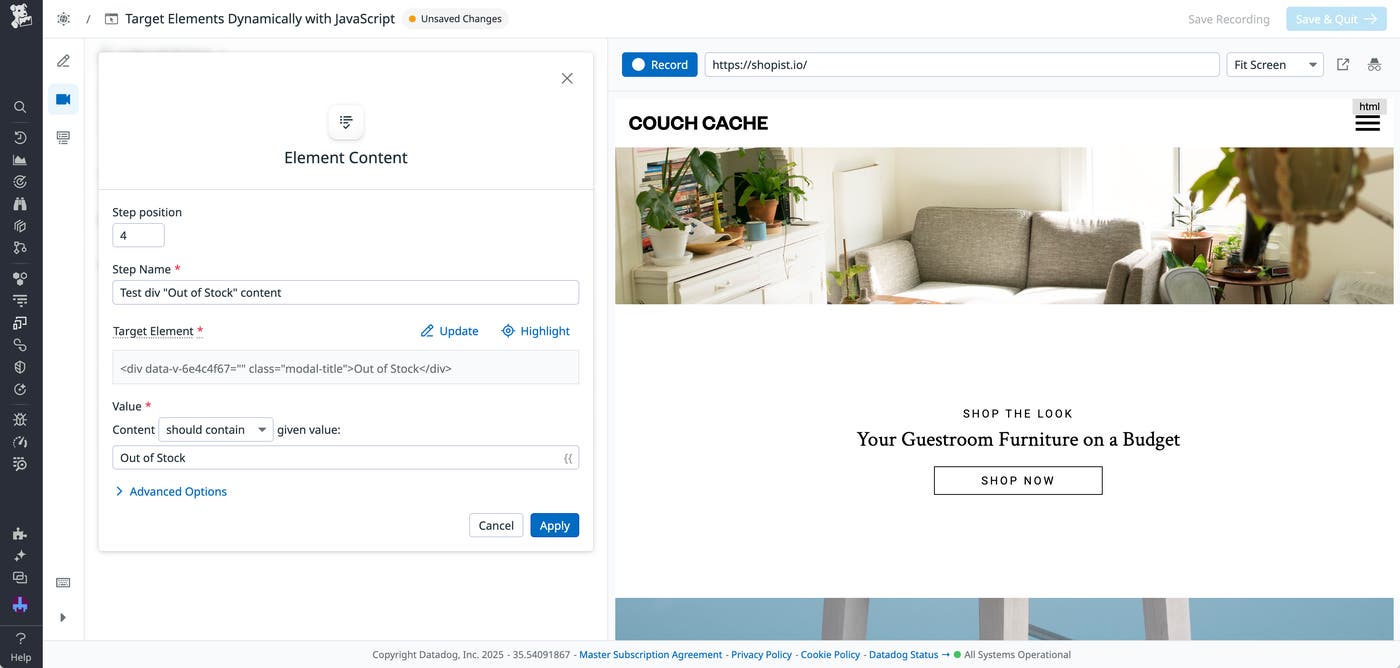
Let’s say that you want to select an element based on a certain dynamic condition—perhaps you want to select the first Out of Stock element in your inventory. The exact element that this applies to might change from session to session, with only this text acting as a reliable identifier. In this situation, you can use the Datadog testing templates to create a synthetic browser test that automatically creates an xPath locator for this element.

The Element Content panel for a locator that selects an element with ‘Out of Stock’ text.

Alternatively, let’s say you’re testing an element that could go missing or otherwise break under certain conditions. Because Datadog’s default locators are self-healing, they will automatically try to find elements that have moved, changed, or disappeared. Therefore, to create tests that you intentionally want to fail, you may want to define your own locators instead. For example, maybe you want to determine whether your styling remains consistent even in the face of certain edge cases, such as a widget that breaks due to issues with a third-party API. You can explicitly target this widget with a user-created locator to ensure that any errors within it result in a failing test. You can then review these failed tests to make sure that your app was able to handle the issue correctly.

Start implementing locators in your synthetic tests with Datadog

Datadog Synthetic Monitoring helps you quickly create tests that can withstand any UI changes, from planned updates to unexpected layout shifts or rendering issues. Using our synthetic testing templates, you can easily design tests for your specific use cases, with the ability to customize granular features like locators.

You can check out our documentation to get started with Datadog Synthetic Monitoring. Or, if you’re not yet a Datadog user, you can sign up for a 14-day free trial.