


AWS Identity and Access Management (IAM) enables organizations to set up permissions policies for users and workloads that need access to cloud services and resources. But as your cloud environment scales, it can be challenging to create and audit IAM policies that work effectively without compromising security. To properly secure your cloud environment, you need to avoid policies that are overly permissive—which can lead to gaps in your security—and overly restrictive, which can hinder engineers with AccessDenied errors. Ideally, IAM policies should grant least-privilege permissions (i.e., the minimum level of access required to complete necessary tasks) without blocking workflows.
In this post, we’ll look at the key elements of AWS IAM policies, explore several examples, and share strategies for granting permissions effectively and securely across your organization.
IAM policies define the permissions that govern how IAM entities—users or roles—may access AWS resources. For example, when an IAM role accesses an S3 bucket, AWS evaluates the IAM policies that have been applied to the role and to the S3 bucket, and allows or denies the request based on the permissions defined in those policies. There are several types of IAM policies, and in this post, we’ll show you how you can use the following types to manage access to your AWS resources in a secure and scalable way:
Identity-based policies are attached to IAM identities (i.e., specific users, groups, or roles) and specify what actions those identities are allowed to execute on AWS resources (e.g., SNS topics).
Resource-based policies are attached to AWS resources and specify the actions that particular identities—known as principals—are allowed to perform on those resources. Not all AWS services support resource-based policies; see the documentation for details.
Service Control Policies (SCPs) are a feature of AWS Organizations, and allow an organization administrator to establish organization-wide limits on the permissions that can be granted to any identity. SCPs don’t grant permissions, but they define the maximum permissions that can be provisioned on any identity within the AWS account(s) they’re applied to.
Permissions boundaries are an advanced feature that allows an administrator to set constraints on the permissions that can be granted to an identity. Like SCPs, permissions boundaries don’t grant permissions, but they do identify what actions a principal is allowed to perform.
The code snippet below shows an example identity-based IAM policy that can be used to grant permissions to view information about EC2 instances in the us-east-2 region.
{
"Version": "2012-10-17",
"Statement": [
{
"Sid": "DescribeEC2Instances",
"Effect": "Allow",
"Action": [
"ec2:DescribeInstances",
"ec2:DescribeInstanceAttribute",
"ec2:DescribeInstanceStatus",
"ec2:DescribeAddresses",
"ec2:DescribeImageAttribute",
"ec2:DescribeVolumes"
],
"Resource": "*",
"Condition": {
"StringEquals": {
"aws:RequestedRegion": "us-east-2"
}
}
}
]
}
Next, we’ll describe each element that makes up an IAM policy like the one shown above.
In this section, we’ll walk through the elements that typically appear within an IAM policy—whether it’s an identity-based policy, resource-based policy, SCP, or permissions boundary. We’ll also share best practices for defining these elements.
All policies must contain a Version element, which specifies the version of the IAM policy language to use (typically the latest version, which is “2012-10-17” at the time of writing). The main body of a policy comprises one or more Statement elements, which define the permissions that will be applied when the policy is evaluated. A single policy can include multiple statements, which allows you to define groups of permissions—for example, allowing some actions on a resource while explicitly denying other actions.
Statements are made up of the following elements:
Sid (optional)
Effect
Action/NotAction
Resource / NotResource
Condition (optional)
Principal/NotPrincipal (only applicable to resource-based policies)
The order of elements does not affect evaluation logic. Any elements that are separated by a slash (e.g., Action/NotAction) cannot appear together in the same statement.
SidYou can optionally include Sid elements to identify each Statement in your policies. A Sid element comprises a string of alphanumeric characters that you can use to describe the purpose of the Statement.
EffectEffect specifies whether a policy should allow or deny the Action listed in the statement. By default, the Action is denied unless you specify an Effect of Allow.
Action/NotActionThe Action element specifies the API calls that are allowed or denied to an identity. In the case of a resource-based policy, Action specifies what requests against the associated resource are permitted by the Principal—the identity making the request.
The implication of NotAction depends on the corresponding Effect. When used with Allow, it allows the identity to make all API calls except those listed in NotAction. When used with Deny, it denies all actions except those specified in NotAction.
Some workflows may require multiple Action elements to achieve the desired permissions. For example, if an engineer works with the EC2 service, they might need the ec2:RunInstances Action permission to launch an instance, as well the ec2:CreateKeyPair Action permission to create a key pair and SSH into that instance.
Resource/NotResourceThe Resource/NotResource element specifies the Amazon Resource Name (ARN) of the resource that will (or will not) be actioned on. Resource/NotResource can also be a list of ARNs (e.g., to specify multiple Lambda functions).
Specifying resources in your permissions policies lets you provide granular access to the infrastructure and services in your AWS environment. But if your environment includes ephemeral infrastructure such as spot instances, it can become difficult to manage permissions for individual resources. Later, we’ll look at how you can use wildcards in your Resource values to manage access to these dynamic resources.
ConditionThe Condition element is optional, but it can help you ensure least privileges by granting permissions only under specific conditions.
This element uses keys, which identify attributes of the request that will be tested to determine whether the permission applies. For example, you can limit access to a subset of your S3 objects by using the s3:prefix condition key. Different AWS services support different condition keys, but global condition keys like aws:RequestedRegion are available to all services.
A condition is formatted as an operator which tests each key to see, for example, whether it’s greater than a defined value or whether it contains a matching string. This test must hold true in order for a Statement to apply its Action. In the following example, aws:RequestedRegion is a variable that is evaluated at the time of the request and indicates where the API call is coming from. The following snippet only allows access to the resource if the API call is coming from the us-east-1 region:
[...]
"Condition": {
"StringEquals": {
"aws:RequestedRegion": "us-east-1"
}
[...]
This statement is useful if, for example, your app only lives in one region and you would never expect it to receive legitimate requests from other regions. Using a condition to allow API requests only from that region would help reduce the impact radius if the app were ever to become compromised.
Conditions are useful in other scenarios as well. For example, you can use conditions to enforce MFA when users authenticate or make API requests. You can also use conditions to require certain resources to be created with tags, and then limit access to resources based on their tag values.
Principal/NotPrincipalUsed only in resource-based policies, a Principal is the IAM identity that receives the permission specified in the policy. The value you use in the Principal element specifies the identity that should be granted access to the resource. You can use NotPrincipal combined with an Effect value of Deny to prevent access by all identities except those specified.
AWS IAM policy evaluation logic can be complex, particularly when policies contain many Statements. Furthermore, multiple policies can be attached to the same identities, so they all need to be evaluated together. Next, we will explore a few key points to keep in mind about IAM policies and how they are evaluated.
To prevent a policy from unintentionally granting more permissions than necessary, all actions are implicitly denied unless otherwise specified. In other words, if a policy does not include an explicit Allow for an action, that action will not be allowed. Keep in mind that an implicit Deny can be overruled by an Allow statement in a separate policy, which we’ll cover next.
An explicit Deny overrides the presence of an explicit Allow in any applicable policy. If two contradictory statements apply to an identity—one statement that explicitly denies an action and another that allows it—the action will be denied. This is true regardless of whether the statements are in the same policy or different policies.
When an identity sends a request to perform an action against a service, AWS evaluates the identity’s applicable IAM policies. The identity’s effective permissions comprise the union of permissions defined by all of those policies. The effective permissions for an identity are determined when all applicable policies are evaluated, since, for example, one policy might allow a particular action but another might explicitly deny it. Further, the request is authorized only if it’s allowable according to all applicable SCPs and permissions boundaries, since permissions granted by an identity-based policy are ineffective if a permissions boundary or SCP doesn’t allow them. Let’s look at an example of this in action.
The code snippet below illustrates a permissions boundary that allows an identity to access S3 resources. Because no other services are specified, the identity is implicitly denied access to them:
{
"Version": "2012-10-17",
"Statement": [
{
"Effect": "Allow",
"Action": [
"s3:*"
],
"Resource": "*"
}
]
}
The following identity policy is also applied to the identity, providing permission to create EC2 instances:
{
"Version": "2012-10-17",
"Statement": {
"Effect":"Allow",
"Action":["ec2:RunInstances"],
"Resource":"*"
}
}
But when this policy is applied to a role, that role cannot launch EC2 instances, because that action is not allowed by the permissions boundary, which allows only permissions that enable the role to perform actions on S3. The identity-based policy grants permission for the identity to run EC2 instances, but because this action is outside of the permissions boundary, it’s left out of the identity’s effective permissions when the policy is evaluated.
If a resource-based policy allows an identity to access a resource, that access is allowed even if there is no identity-based policy explicitly allowing the access. It’s important to understand this interaction in order to ensure that you achieve the effective permissions you intend for your least-privilege IAM policies.
Another interesting note to keep in mind is that IAM statements don’t always grant permissions. Some policies, such as the following example, only deny permissions. This code sample below illustrates an identity-based policy that uses an explicit Deny to reject API calls on all resources except the actions listed in NotAction if the identity does not use MFA. This statement prevents users who have not authenticated using MFA from taking any actions other than managing their account’s MFA configuration.
{
"Version": "2012-10-17",
"Statement": [
{
"Sid": "DenyAllExceptListedIfNoMFA",
"Effect": "Deny",
"NotAction": [
"iam:CreateVirtualMFADevices",
"iam:EnableMFADevice",
"iam:GetUser",
"iam:ListMFADevices",
"iam:ListVirtualMFADevices",
"iam:ResyncMFADevice",
"sts:GetSessionToken"
],
"Resource": "*",
"Condition": {
"BoolIfExists": {"aws.MultiFactorAuthPresent": "false"}
}
}
]
}
A policy like this does not grant any permissions to the associated entity, but you can use it to ensure that the actions named here are not explicitly allowed by another policy. In order to allow the identity to perform an action, you either need to grant that permission by adding a Statement that allows the action in the same policy or allow the action in a separate policy and attach it to the identity.
You can use AWS Organizations to create and centrally manage multiple accounts, and cross-account access lets you efficiently provide access to resources while still maintaining least-privilege permissions. You can use IAM policies to allow principals in one account to access resources in other accounts. For example, let’s say that an S3 bucket in account A holds files that you want to make available to a principal in account B. To provide this access, you need to create two policies: a resource-based policy in account A that allows access to the resource by a principal in account B, and an identity-based policy in account B that’s associated with the principal requesting access.
AWS provides several tools to help you create IAM policies and validate that they are working as expected. In this section, we’ll provide an overview of these tools.
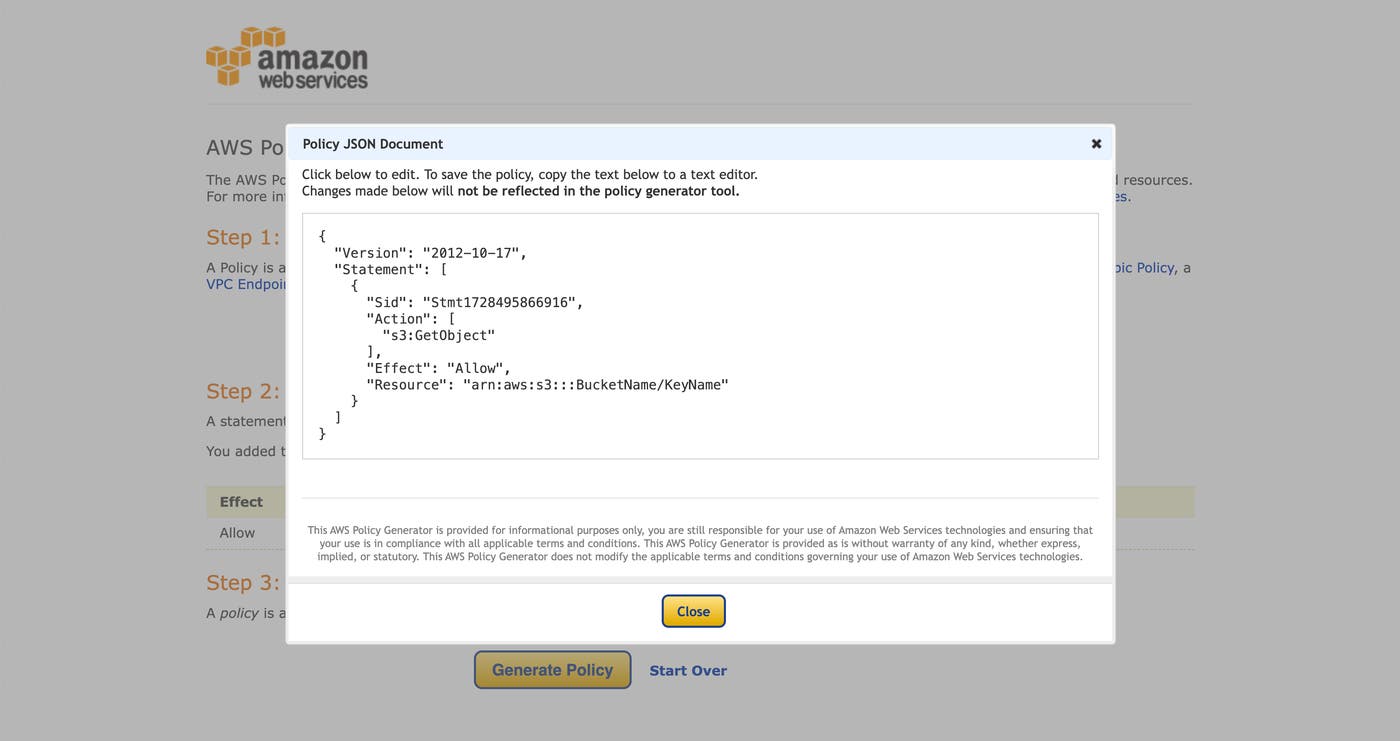
The AWS Policy Generator is an interactive tool that helps you create policies from scratch. You can specify what actions should be allowed on which resources, along with any conditions, and the tool will automatically generate the statements for you. Once you’ve finished adding statements, you can generate the policy.
The AWS IAM policy simulator provides a way to test your policies and ensure that they work before you deploy them. As you’re testing a policy, the simulator shows you why each action was allowed or denied (i.e., either implicitly due to an absence of an Allow statement or explicitly via a Deny statement).
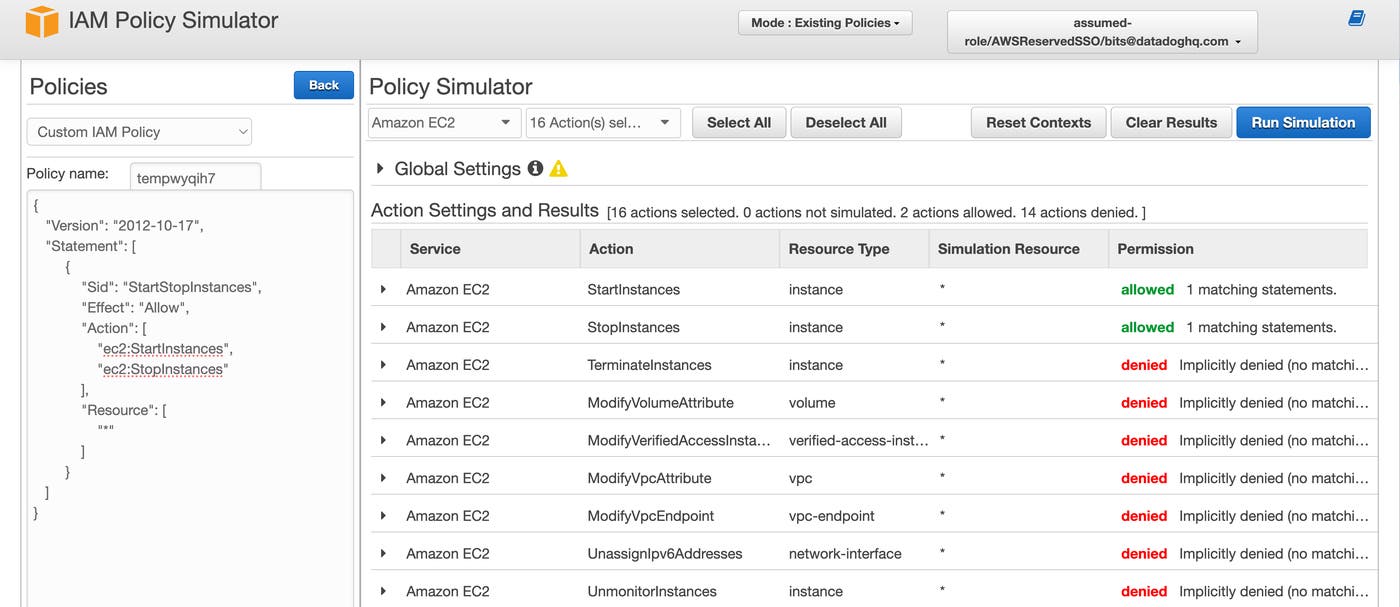
You can optionally include SCPs and permissions boundaries in your policy tests to observe the combined effects and evaluate your policy’s effective permissions.
Once you’ve used the IAM policy simulator to evaluate your policies, you can use the AWS IAM Access Analyzer to check whether they align with best practices and your organization’s security standards. Access Analyzer also reviews actual activity in your environment to identify users, roles, and permissions that are unused, giving you opportunities to reduce risk by removing unnecessary privileges.
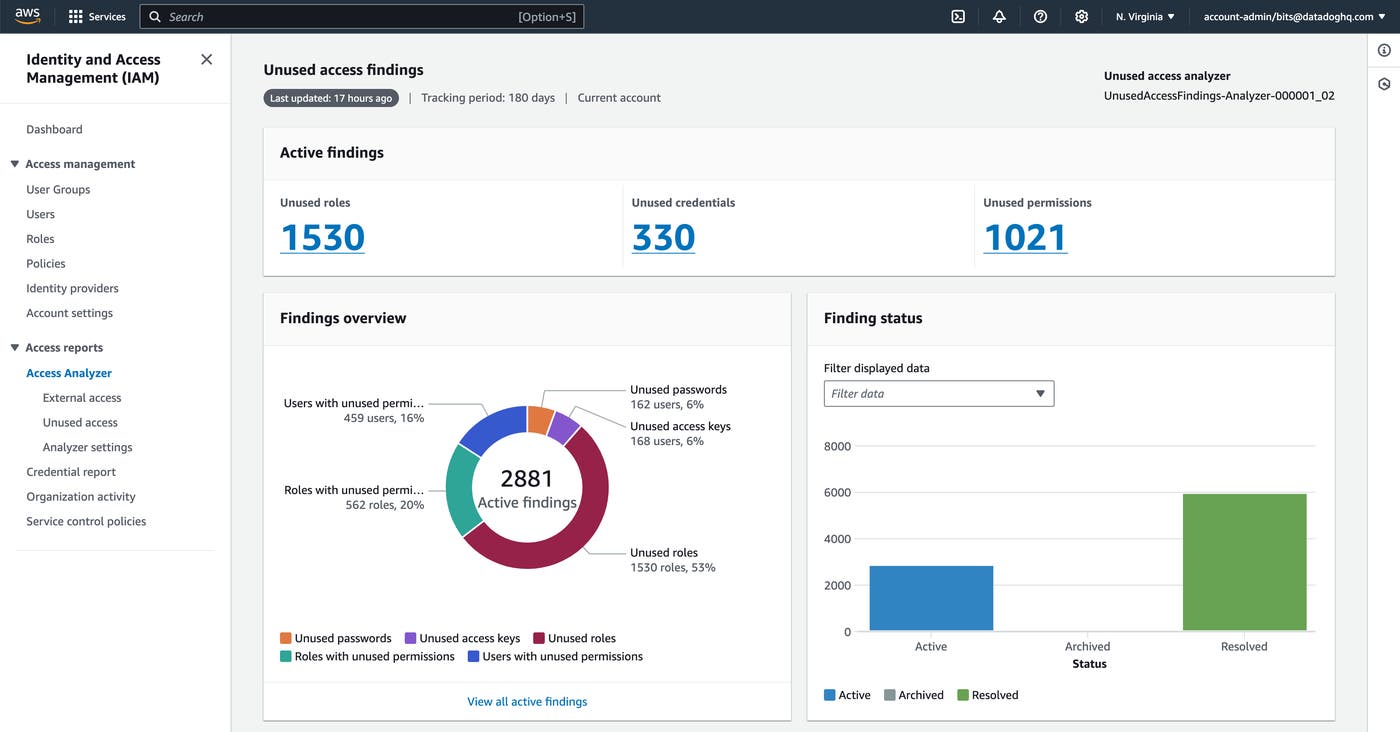
You can drill down to explore the Analyzer’s unused access findings to see the last time an unused entity accessed a service, as well as which policies granted permissions to that service. See the AWS documentation for more information about the Access Analyzer, including which resource types you can analyze.
In addition to the tools provided by AWS, you can take advantage of open source tools, including iamlive, which generates IAM policies that grant the necessary permissions to allow a request that you send via the AWS CLI. For example, if you issue the command aws emr list-clusters, iamlive will generate a policy that includes "Action:" "elasticmapreduce:ListClusters".
As your organization’s AWS environment grows, it becomes increasingly important—and challenging—to proactively manage your IAM policies. To find the right balance of flexibility and scalability, you can choose from two types of policy management—inline policies and managed policies. Each type has distinct advantages and disadvantages—which we’ll discuss next—and your optimal permissions strategy may make use of both types. We’ll also explore how you can use a posture management solution to manage policies at scale while ensuring that you are following best practices for creating least-privilege policies.
But first we’ll look at how you can use wildcards in your IAM policies to efficiently create and manage permissions in a dynamic and evolving AWS environment.
As we saw earlier in this post, you can combine policy elements to create permissions that apply to specific entities and resources. But as your organization grows, you may need a permissions strategy that dynamically supports new teams and applications, as well as a high rate of infrastructure churn. Specifying individual entities and resources under these conditions can be unsustainable—your policies may become too large and too numerous to manage. So to scale your permissions management, you can use wildcards to create more generalized permissions policies.
You can use wildcards in your Resource and Action elements to specify multiple values. For example, the asterisk in the following Resource element functions as a wildcard and specifies all RDS databases belonging to the account 123456789012 in the us-west-1 region:
[...]
"Resource": ["arn:aws:rds:us-west-1:123456789012:*"]
[...]
As a best practice, wildcards should be used sparingly because they often grant more permissions than needed. In the following example, the Sid element suggests that the creator of this policy may have wanted to grant only the CreateImage permission on the specified instance. However, the wildcard grants all EC2 permissions that start with “Create”, not just CreateImage. In this case, the wildcard would also allow the entity to execute actions such as CreateKeyPair and CreateInstanceExportTask.
{
"Version": "2012-10-17",
"Statement": [
{
"Sid": "CreateImage",
"Effect": "Allow",
"Action": [
"ec2:Create*"
],
"Resource": ["*"]
}
]
}
You can achieve some of the scalability and flexibility offered by IAM wildcards—and mitigate the risks that come with that approach—by using attribute-based access control (ABAC) to create policies that allow a range of actions and access to resources but only to designated requesters. When the example policy below is associated with a role, it allows that role to start and stop EC2 instances only if the role’s environment-access tag matches the one on the target instance. For example, a role must be tagged environment-access:production to start or stop an instance that has that tag.
{
"Version": "2012-10-17",
"Statement": [
{
"Sid": "StartStopInstances",
"Effect": "Allow",
"Action": [
"ec2:StartInstances",
"ec2:StopInstances"
],
"Resource": [
"*"
],
"Condition": {
"StringEquals": {
"aws:ResourceTag/environment-access": "${aws:PrincipalTag/environment-access}"
},
"StringEqualsIfExists": {
"aws:RequestTag/environment-access": "${aws:PrincipalTag/environment-access}"
}
}
}
]
}
By using the Condition element to test the attributes of the identity requesting the action, a policy like this allows access to a range of resources—such as instances that are automatically added to an autoscaling group—while still preventing unauthorized requests. ABAC policies are particularly helpful in shared environments, where organizations need to efficiently manage permissions to dynamic resources owned by different teams, services, and applications.
An inline policy is attached directly to a specific identity (e.g., IAM user, group, or role), enabling you to specify permissions that apply only to that identity. Any changes you make to an inline policy affect only the associated identity and have no broader impact, giving you a granular tool for assigning permissions.
For example, you can assign a unique combination of permissions to an individual user who requires special access to an AWS resource without extending those permissions to other users. And when an employee leaves the company, you can simply delete the inline policy attached to their identity. But writing, managing, and auditing inline policies can become unwieldy when you’re managing a lot of employees and resources, and this type of policy may not scale well as your organization grows. In this case, you might be better served by using managed policies.
A managed policy exists independent of any AWS identity. You can create and maintain policies that manage specific permission sets, then associate them with multiple entities to efficiently manage their permissions. AWS lets you create your own managed policies (known as customer-managed policies) or use out-of-the-box (OOTB) policies (known as AWS-managed policies). By combining multiple statements in a single policy and attaching the same policy to all identities that need those permissions, you can easily scale IAM management across your teams and environments.
However, one disadvantage of this approach is that it makes it more likely that you might unintentionally grant extraneous permissions. For example, the AWS ReadOnlyAccess managed permission allows read access to resources that may contain secrets. This could expose your environment to security risks—since a compromised user could take advantage of that sensitive data, potentially amplifying the effects of a security incident.
Another disadvantage is that as you apply multiple managed policies to your entities, you may be constrained by the default limit of 10 policies that can be associated with a single identity. This can limit your ability to grant permissions across a large organization and may require that you combine inline and managed policies in your IAM practice.
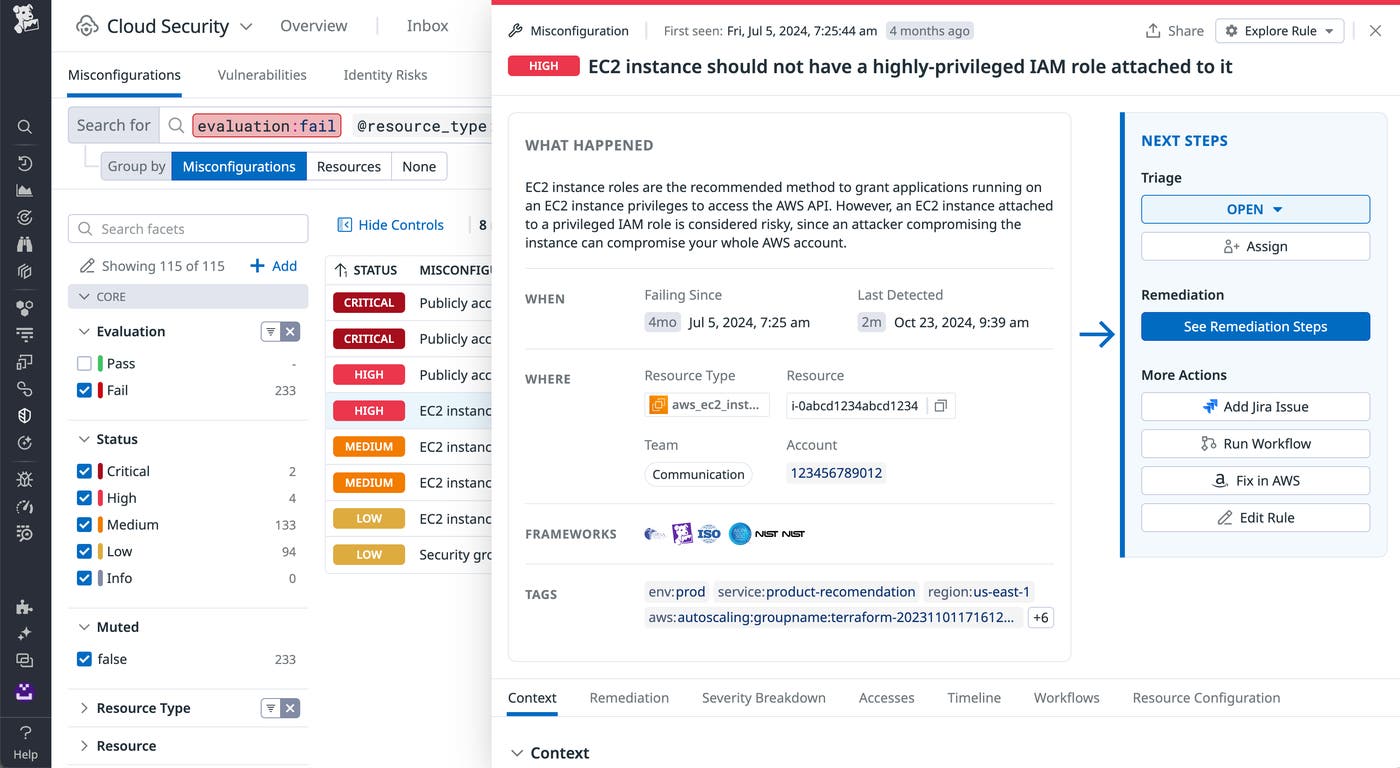
Although tools like Access Analyzer can help you understand whether permissions are being used within a given policy, it can be time-consuming to review those findings when you’re operating on a larger scale. A solution like Datadog Cloud Security Misconfigurations can help track the security posture of your environment by analyzing your IAM policies and highlighting misconfigurations that are commonly found in overly permissive policies.
Datadog Cloud Security provides OOTB rules that help address misconfigurations in IAM resource policies, including publicly accessible S3 buckets. It can also call attention to policies that may not follow best practices, such as when an EC2 instance has a highly-privileged role attached, or when old, inactive IAM access keys are detected.
IAM policies provide a lot of flexibility for granting permissions in your AWS environment, but it can be challenging to determine the best approach for each use case. With the strategies covered in this post, you can create least-privilege AWS IAM policies that grant the minimum level of permissions required to keep workloads moving. See our State of Cloud Security report for deeper insight into these risks and remediations. And if you’re not already using Datadog, you can start today with a free 14-day trial.
此内容由惯性聚合(RSS阅读器)自动聚合整理,仅供阅读参考。 原文来自 — 版权归原作者所有。