







Editor’s note: Puppet uses the term “master” to describe its architecture and certain metrics. When possible, Datadog does not use this term, so in this post we will use “primary server” instead.
Puppet is a widely used configuration management/orchestration tool that simplifies defining, managing, and deploying changes across your entire infrastructure. Developed by Luke Kanies in 2005, Puppet is written in Ruby and is available as both open source and commercial software. More than 30,000 companies, including Intel, Uber, and Salesforce, use Puppet to deploy and orchestrate their applications.
When using Puppet, it’s important to make sure it’s actually doing what you expect it to do. How often are files updated? How many events were successful in the past day? When was the last failed run, and did it correlate with any other noteworthy events from the rest of your stack? Datadog’s integration helps you monitor Puppet’s performance so that you can find the answers to all of these questions, and others.
Similar to other configuration management tools like Chef and Ansible, Puppet can provision infrastructure and enforce desired configurations across new and existing servers.
Puppet is declarative rather than imperative: it declares what it wants the desired final state to be, without spelling out how to reach it. It is also idempotent—once the desired state is reached, subsequent runs don’t have any effect.
Puppet is typically deployed as a server/client configuration, in which you have a Puppet primary server and one or more agent nodes.
Every 30 minutes, agents send facts about their configuration (operating system, hardware, package versions) to the primary server, which starts a Puppet run. A Puppet run is composed of the following steps:
Agent sends facts to the Puppet primary server.
The Puppet primary server uses these facts and a manifest file of the desired state to compile a catalog that declares how the client node should be configured.
The agent applies the catalog by making any changes required to reach the desired configuration.
The agent sends a report back to the Puppet primary server.
The report describes what happened to the state of the node in the last run, including:
Resources changed
Duration of the last run
The time at which the run was completed
Total time spent on each of the resource types: package, filebucket, service, exec, etc.
Information about the state of the client’s resources (total number, skipped, changed, scheduled, out of sync, failed to restart, restarted, failed)
With a name like Puppet, it’s easy to imagine that you’re the one pulling the strings—but as Puppet applies changes across your entire infrastructure, it’s a good idea to keep an eye on these reports, so you can be ready to take action when issues arise.
Datadog’s integration helps you monitor Puppet performance metrics and events, which means that you can easily:
Find out when Puppet runs occur
Track how long each run takes
See how often resources have changed, skipped, or failed to update
Set alerts to find out if a large percentage of resources has failed to update
Correlate Puppet runs with metrics and events from other parts of your infrastructure to investigate what is causing a problem
Every time Puppet completes a run, it will report the status of the run in Datadog’s event stream, including details on failed runs and changed resources.
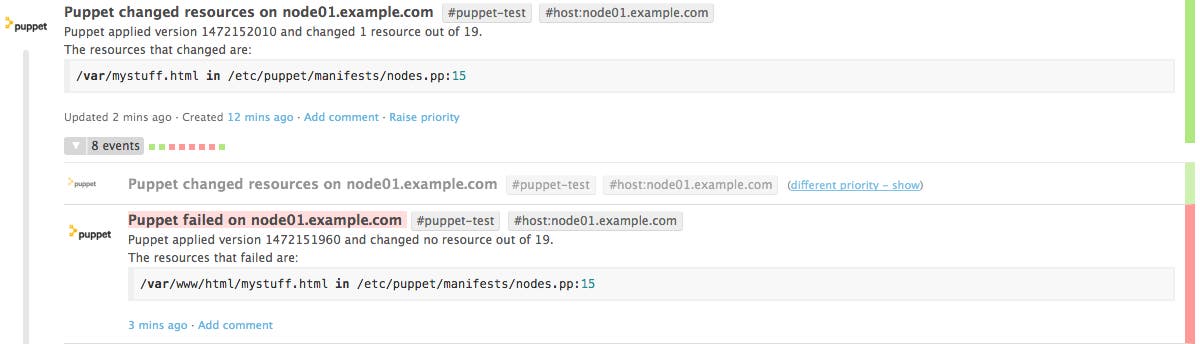
Once you’ve set up the Puppet-Datadog module on your Puppet primary server, it will automatically start populating events and metrics into Datadog. The Datadog Agent is automatically installed on any nodes that contain the datadog_agent class in the manifest file.
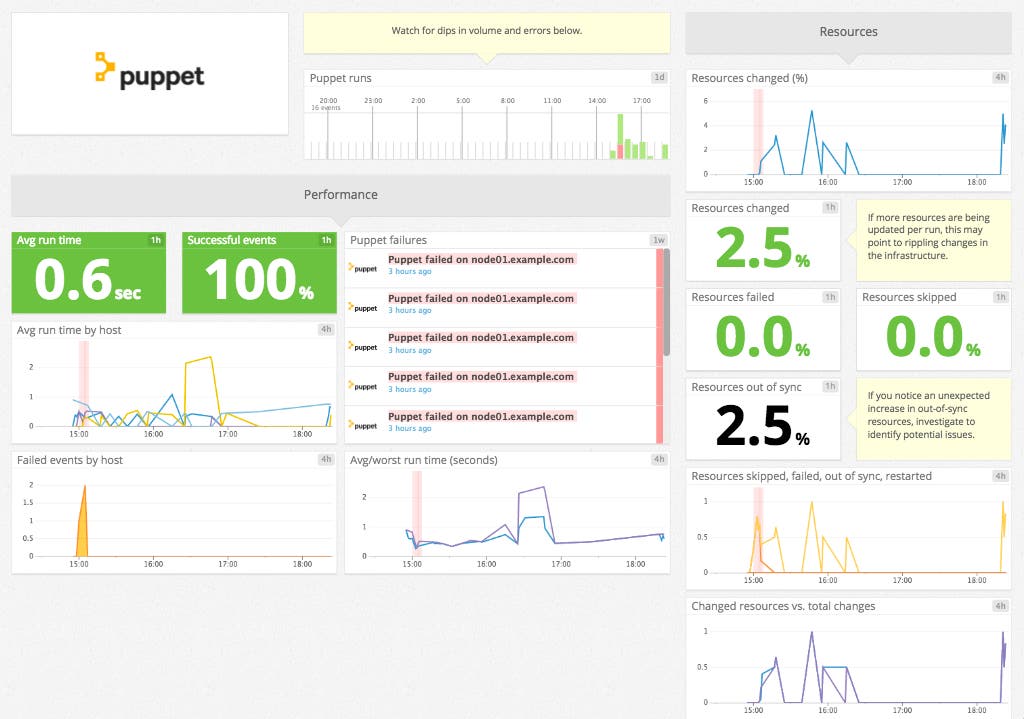
You can also view, clone, and customize Datadog’s out-of-the-box dashboard to gain an overview of Puppet performance and correlate failures with other metrics. The screenshot below compares the average and maximum Puppet run times, overlaid with failed runs.
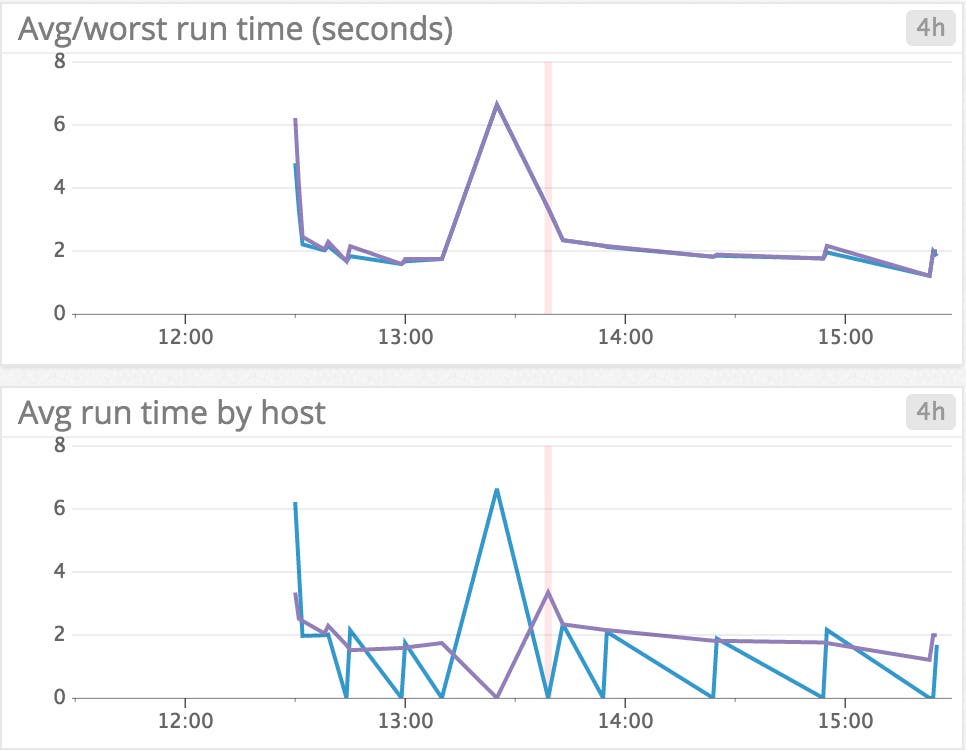
For more targeted Puppet monitoring, you can slice and dice metrics by host or any other tag. In Datadog, Puppet metrics are automatically tagged with host, but you can also use the module to apply additional custom tags to each of your nodes. Specify the desired tag(s) within the node’s datadog_agent class in your nodes.pp manifest file like so:
node 'node01.example.com', {
class { 'datadog_agent':
api_key => '<YOUR_DD_API_KEY>',
tags => ['env:production', 'linux'],
}
}
As mentioned earlier, Puppet doesn’t just help you install and deploy the Agent on your primary server and agent nodes. The module also includes manifests that give you a head start on configuring each node’s Agent to monitor more than 30 of our integrations, including Cassandra and HAProxy.
After installing the Puppet-Datadog module on your primary server, you can configure any integration by adding a single line to any node’s manifest. For example, you can have Puppet automatically configure Elasticsearch monitoring on node01.example.com with a one-liner in your nodes.pp manifest file:
node 'node01.example.com' {
class { 'datadog_agent':
api_key => '<YOUR_DD_API_KEY>',
tags => ['<YOUR_TAGS>'],
}
include 'datadog_agent::integrations::elasticsearch'
}
Once you run Puppet on node01.example.com, the primary server will use the updated manifest to compile a catalog that instructs it to configure Datadog’s Elasticsearch integration. The node will automatically create an elastic.yaml file like the one shown below, filled in with the default settings.
# MANAGED BY PUPPET
init_config:
instances:
- url: http://localhost:9200
cluster_stats: false
pshard_stats: false
pending_task_stats: true
If you want to change any of the configuration settings for any particular node, edit the nodes.pp manifest. For example, if you wanted to change the url to http://localhost:9201 you would change include 'datadog_agent::integrations::elasticsearch' to the below:
node 'node01.example.com' {
class { 'datadog_agent::integrations::elasticsearch' :
url => 'http://localhost:9201'
}
}
Datadog customers can monitor Puppet by following the installation and configuration instructions on the module’s GitHub page. If you don’t yet have a Datadog account, try it out by signing up for a free trial.
此内容由惯性聚合(RSS阅读器)自动聚合整理,仅供阅读参考。 原文来自 — 版权归原作者所有。