








Security teams require complete visibility into their hosts, containers, and functions in order to detect, prioritize, and remediate their most pressing security risks. The Datadog Agent helps you achieve this visibility by collecting deep insights in your environment through logs, distributed traces, infrastructure metrics, and other key telemetry.
As a complement to using the Datadog Agent for finding security risks in your environment, we are excited to announce the launch of Datadog Agentless Scanning.
Datadog Agentless Scanning provides visibility into risks and vulnerabilities within your hosts, running containers, and serverless functions—all without requiring teams to install agents on every host or where agents cannot be installed. This enables you to comprehensively monitor entire cloud accounts within minutes, in addition to misconfigurations, identity risks, and other capabilities provided by Datadog Cloud Security.
Agentless Scanning is now generally available for AWS cloud environments. In this post, we’ll show you:
How Agentless Scanning works
Best practices for getting started with Agentless Scanning
How to roll out the Datadog Agent across your cloud infrastructure to gain deep visibility without compromising coverage
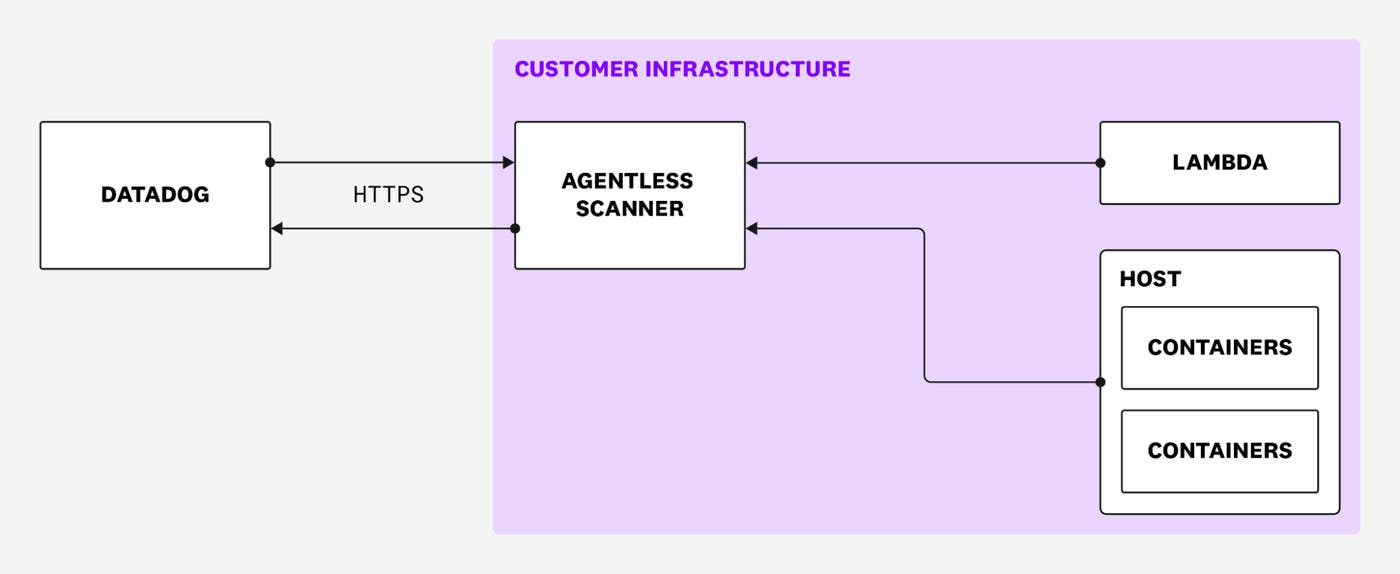
Datadog’s Agentless scanners are EC2 instances that run within your environment. When they perform a scan, they analyze the hosts and Lambda functions that are deployed on your cloud accounts to identify all of their associated packages and running containers.
First, Datadog schedules a scan and sends a list of resources to an Agentless scanner through Remote Configuration. This initial list includes all hosts and Lambda functions in the associated cloud account. Before the list is read by the scanner, Datadog filters out:
Any cloud resources running the Datadog Agent with Cloud Security enabled
Any cloud resources to which the user has added the DatadogAgentlessScanner:false tag
Then, the Agentless scanner downloads and analyzes the dependencies of all Lambda functions it scans. In addition, the scanner makes snapshots of all host root volumes and identifies their packages and running containers. It will also analyze the Amazon Machine Images (AMIs) used in your cloud accounts; because a single AMI is typically used across many instances, the ability to identify and fix issues at the AMI level helps make remediations more impactful.
After a snapshot is read, it is promptly deleted and the Agentless scanner only forwards the list of packages it uncovers back to Datadog—no customer code or snapshots, encrypted or unencrypted, are sent back to Datadog. Often, such a list of packages is referred to as a Software Bill of Materials (SBOM).
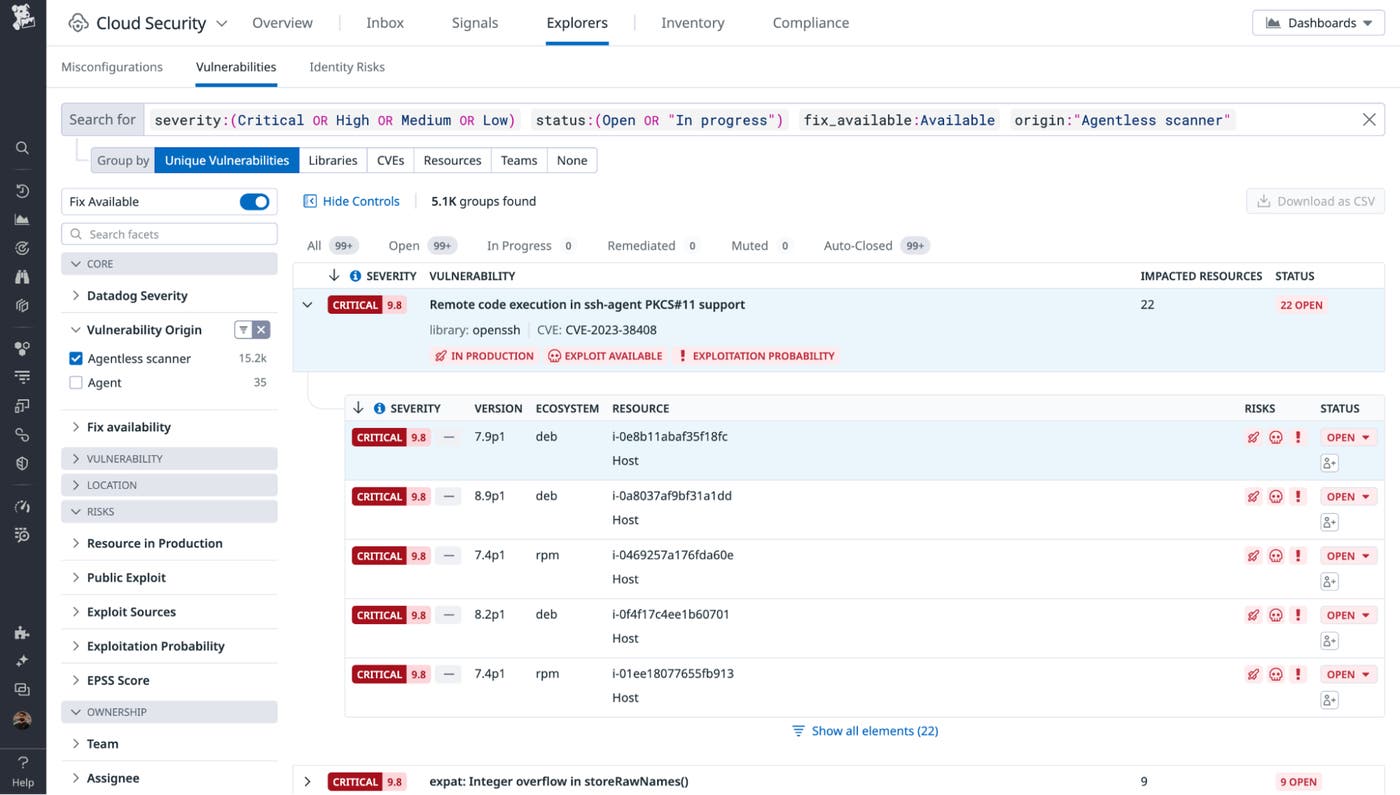
Finally, Datadog checks these packages, containers, and AMIs against a list of known open source vulnerabilities and surfaces any findings via Cloud Security. Cloud Security leverages insights from security research alongside observability data from your infrastructure to prioritize vulnerabilities, taking into account the exploitability of the vulnerability and whether it is running in a production environment. You can find vulnerabilities uncovered by Agentless scanners by navigating to the Cloud Security Explorer view and filtering your results by the origin:”Agentless scanner” tag.
Now that we understand how Agentless Scanning works, we’ll look at how you can deploy Agentless scanners across your AWS cloud environments.
With this option, Agentless scanners are deployed to a single cloud account and distributed across multiple regions within the account. For example, if you have four AWS accounts spanning five regions, this option would deploy five scanners—one scanner per region in the AWS account you specify.
As a result, this deployment model grants Agentless scanners visibility across multiple accounts so as to avoid the high networking costs associated with cross-region scanning. Each scanning instance scans multiple accounts within the same region where it is located.
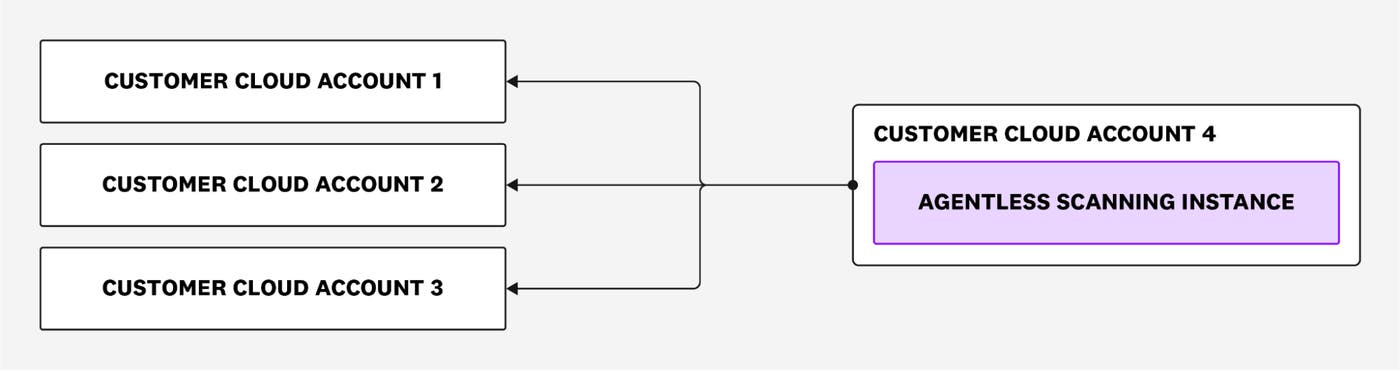
We recommend this option for most organizations, as it is cost-effective and makes it easy to manage your Agentless scanners since they are in one account. You can either create a dedicated account for your Agentless scanners or choose an existing one. In addition, you can perform scans on the account where the Agentless scanners are located.
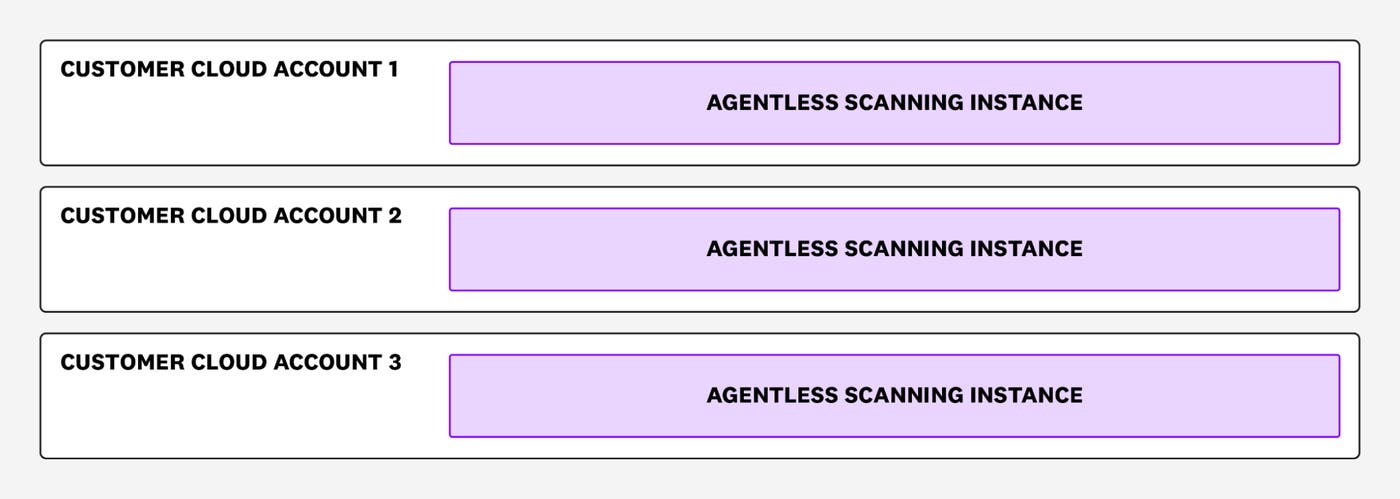
This option involves deploying a single Agentless scanner to each account. For example, if you have three AWS accounts spanning four regions, this option would deploy three scanners—one scanner per AWS account.
We recommend this option if your organization is sensitive to granting cross-account permissions. Note that this approach can be more expensive since it will require each Agentless scanner to perform cross-region scans for the account it runs in.
To get started with either option using CloudFormation or Terraform, or to create your own custom deployment model, view our documentation.
Agentless Scanning makes it easy to get started with Cloud Security in minutes, so you can get visibility into risks across your cloud resources right away, with minimal configuration and upkeep. However, we still recommend installing the Datadog Agent where and when possible. In addition to getting results in real time instead of on a schedule, deploying the Agent will enable you to gain additional context through Cloud Security, including suspicious file, process, and network activity signals related to your cloud workloads.
We recommend that after enabling Agentless Scanning, you start to install the Datadog Agent on your core assets—Fleet Automation can help you simplify this process, especially if you are working with complex environments that contain many hosts. This way, you can work toward complete vulnerability coverage while receiving real-time updates on the health of your critical cloud resources.
Agentless Scanning for Datadog Cloud Security is now generally available for AWS cloud environments—check out our documentation to get started. You can also check out the Cloud Security documentation for more information about getting started with Datadog Cloud Security. If you aren’t already a Datadog user, you can sign up for a 14-day free trial.
此内容由惯性聚合(RSS阅读器)自动聚合整理,仅供阅读参考。 原文来自 — 版权归原作者所有。