惯性聚合 高效追踪和阅读你感兴趣的博客、新闻、科技资讯
阅读原文 在惯性聚合中打开

推荐订阅源

B
Blog
V
Vulnerabilities – Threatpost
Apple Machine Learning Research
V
V2EX
博客园 - 叶小钗
阮一峰的网络日志
阮一峰的网络日志
人人都是产品经理
人人都是产品经理
Latest news
Latest news
博客园 - 三生石上(FineUI控件)
美团技术团队
aimingoo的专栏
aimingoo的专栏
Google Online Security Blog
Security Archives - TechRepublic
T
Threatpost
Y
Y Combinator Blog
T
Tailwind CSS Blog
CTFtime.org: upcoming CTF events
A
Arctic Wolf
C
Cyber Attacks, Cyber Crime and Cyber Security
小众软件
小众软件
Recent Commits to openclaw:main
T
Tenable Blog
W
WeLiveSecurity
L
LINUX DO - 热门话题
D
Docker
Cyberwarzone
Cyberwarzone
量子位
A
About on SuperTechFans
The Last Watchdog
The Last Watchdog
雷峰网
雷峰网
C
CERT Recently Published Vulnerability Notes
P
Palo Alto Networks Blog
The Hacker News
The Hacker News
Blog — PlanetScale
Blog — PlanetScale
P
Proofpoint News Feed
OSCHINA 社区最新新闻
OSCHINA 社区最新新闻
F
Full Disclosure
The Cloudflare Blog
T
The Blog of Author Tim Ferriss
T
The Exploit Database - CXSecurity.com
Engineering at Meta
Engineering at Meta
O
OpenAI News
Hacker News - Newest:
Hacker News - Newest: "LLM"
Scott Helme
Scott Helme
IT之家
IT之家
S
Secure Thoughts
MongoDB | Blog
MongoDB | Blog
L
Lohrmann on Cybersecurity
博客园 - 司徒正美
Google DeepMind News

Derek Seaman's Tech Blog

SmartWings Blinds Review: Matter over Thread Zebra Shades Aqara Camera Hub G350: World’s First Matter v1.5 Camera ESPHome: Micro-Air EasyStart Integration ESPHome: Introducing the Seeed Studio Xiao ESP32-C5 Seeed Studio ESP32 Showdown: C3 vs. C6 vs. S3 (ESPHome Edition) Home Assistant: Updating Aqara FP300 Zigbee Firmware How-To: Using my ESPHome Bluetooth IRK Capture Package Vibe Coding: My ESPHome Bluetooth IRK Capture Tool Home Assistant: Track Who’s in Each Room with ESPHome + Bermuda BLE 3-2-1-1 Go: Implementing Foolproof Backups Proxmox Backup Server (PBS) 4.0 Blog Series How To: Backblaze B2 as a Proxmox Backup Server 4 S3 Datastore How To: Synology NFS for Proxmox Backup Server Datastore (2025) How To: Proxmox Backup Server 4 (VM) Installation How MVNOs Like US Mobile Can Save You Money on Your Cell Phone Bill Data Brokers Exposed: How to Opt Out and Secure Your Personal Data Digital Privacy Decoded: Simple Ways to Secure Your Information Part 2: Ruckus Unleashed (200.18+) Best Practices Guide Part 1: Ruckus Unleashed (200.18+) Best Practices Guide 3-2-1 Go: A Step-by-Step Guide to Implementing Foolproof Backups Geek Chic Eyewear: My Optometrist Saga, Eyewear Collection & More Geek Chic Eyewear: Optometry Tools, Eye Health and Insurance Geek Chic Eyewear: Understanding Lens Materials and Designs Essential Tips for a Stable Matter over Thread Network Aqara U200 Thread/Matter/Homekey Smart Lock Impressions Home Assistant: The Ultimate Light Automation Blueprints 6 GHz Wi-Fi: Are Your Devices ready for Standard Power? Demystifying Ruckus Home Wi-Fi: Getting Started Guide Mastering Home Wi-Fi: A Guide to Predictive RF Planning Part 2: Ruckus Unleashed Best Practices Guide Part 2: Ruckus One Home Wi-Fi Best Practices Guide Part 1: Ruckus One Home Wi-Fi Best Practices Guide Smartwings Thread/Matter Blinds Review Ruckus One: Provisioning ICX Switches Goodbye NextDNS, Hello Control D : My New DNS Service Ruckus Unleashed to Ruckus One Migration Guide Unleashing the Power of 6 GHz Wi-Fi: Re-Think Everything Enterprise Grade Home Wi-Fi: Ruckus Unleashed vs. Ruckus One Home Assistant: Ecowitt Weather Station Setup Configuring Netgear M4300 IGMP & MLD Multicast Snooping Configuring TP-Link IGMP & MLD Multicast Snooping Part 3: Smart Home Matter and Thread Deep Dive Part 2: Smart Home Matter and Thread Deep Dive Part 1: Smart Home Matter and Thread Deep Dive Unraveling Apple Shortcuts: A Journey with the Apple Watch Ultra Top macOS App picks (mid-2023) Stecker: Trigger macOS Shortcuts with USB Devices (FREE) Home Assistant: Tracking Apple's Sleep Focus Mode How-to: Proxmox Backup Server 2.4 to 3.0 Upgrade Guide Proxmox VE 8: Windows 11 vGPU (VT-d) Passthrough with Intel Alder Lake Home Assistant: Auto-renewing Let’s Encrypt SSL Designing your own Custom Under Desk Mounting Bracket Home Assistant: Hands-on Adding a Matter Smart Plug (Eve Energy) Ubuntu Kernel Upgrades: The Easy Button Hands On: Beelink Mini-PCs for Proxmox, Home Assistant and Plex Migration Guide: Plex on Synology to Proxmox LXC Proxmox Let’s Encrypt SSL: The Easy Button InfluxDB + Chronograf: Configuring Let’s Encrypt SSL Getting your Cloudflare DNS Zone API Key and Account ID Home Assistant: Installing Grafana (LXC) with Let’s Encrypt SSL Home Assistant: InfluxDB Data Management (LXC) InfluxDB 1.x Automated Backups Home Assistant: Proxmox VE 7.4 Quick Start Guide Home Assistant: Getting Started Guide My Stream Deck Productivity Setup (2023 Edition) Home Network Upgrade (2023 Edition) My Dream Desk Setup (2023 Edition) NOTICE: RSS Feed URL Changing (Action Needed) Email aliases: How to easily protect your inbox from spam Top macOS App picks for 2023
How To: Proxmox Backup Server 4 as a Synology VM
2025-08-18 · via Derek Seaman's Tech Blog

Many home labs have both Proxmox VE hosts (for running VMs and LXCs) as well as a Synology NAS. If you want to run Proxmox Backup Server on your Synology NAS as a VM, this post is for you. I’ll show you how to install PBS as VM on your NAS, as well as configure a local disk (EXT4) as a datastore for the backups.

Not all Synology NAS devices can run VMs. In addition, I recommend using 4GB of RAM for the PBS VM, so your NAS should have at least 8GB of RAM or more. If you meet the base requirements for a VM of this size, this article is for you. 

Related Synology Posts

Install Virtual Machine Manager

1. Login to your Synology and go to Package Center. Verify that Virtual Machine Manager is installed. If not, install it.
2. Open Virtual Machine Manager. If this is your first launch, click Start.
3. Review Host Settings and click Next.
4. If any settings need to be automatically changed, click Yes.
5. Select the volume for your VMs. Click Next.
6. If the wizard appears to freeze, refresh your browser and navigate back to Virtual Machine Manager.

Create Proxmox Backup Server VM

1. Download the latest Proxmox Backup Server ISO. (4.0 as of August 2025). 
2. Upload the ISO to a folder on your Synology NAS. 
3. Open the Synology VMM console, and in the left pane click on Virtual Machine.
4. Click Create. Select Linux. Click Next.
5. Select your Storage and click Next.
6. Configure the following:
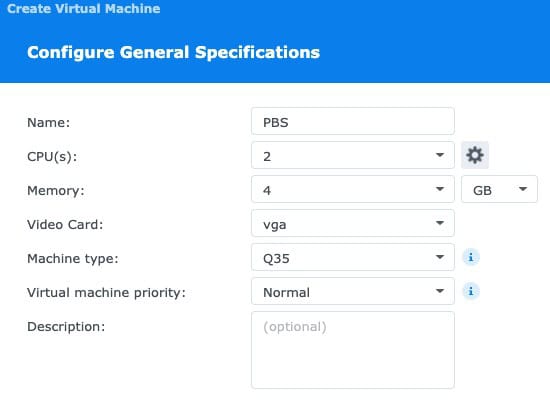
  • Name: Choose any VM name
  • CPU(s): Suggest at least 2
  • Memory: 4GB or more
  • Video Card: vga
  • Machine Type: Q35
  • VM Priority: Normal

7. Click Next.
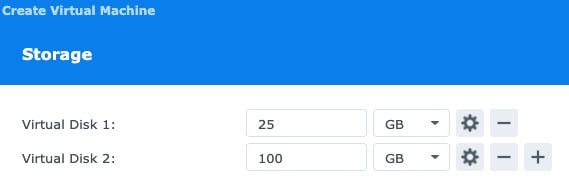
8. For the first disk (OS), I suggest 25GB.
9. Add a second disk, and make it as large as you want to store all of your backups over time. I’ll use 100GB here as an example. 

Note: If you want to use ability of PBS 4.0 to use S3 storage, Proxmox recommends adding a dedicated disk as the S3 cache. They suggest 64-128GB. If you are interested in using S3 storage, I would add a third disk that’s 64-128GB. Follow the same formating/mounting procedure but it will likely be called /dev/sdc. Use this disk exclusively for the S3 cache. It could be mounted as /mnt/s3cache, for example. 
10. Click Next.
11. Don’t change the network settings unless necessary. Click Next.
12. Configure Other Settings:

  • ISO file for bootup: Select the PBS ISO you downloaded
  • Additional ISO file: None
  • Autostart: Yes
  • Firmware: UEFI
  • Keyboard Layout: Choose as appropriate
  • Serial Port: Disable
  • Virtual USB Controller: Disabled

13. Click Next.
14. Assign the appropriate user(s) power management features. Click Next.
15. Review the settings, check the box to power on the VM, and click Done.
16. Wait for the VM to fully provision and change to the Running status.
Installing Proxmox Backup Server 4.0

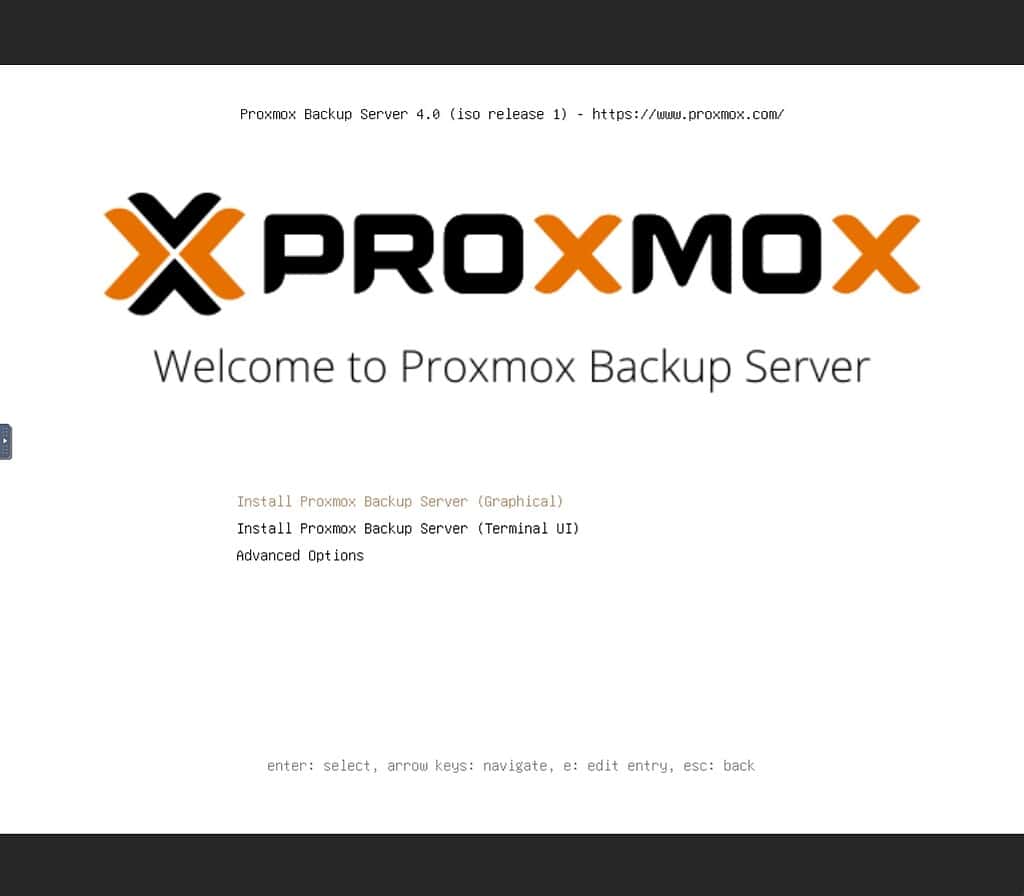
  1. Inside VMM click on the running PBS VM and click Connect. You should see the Proxmox Backup Server welcome screen.
  2. Press Enter on the welcome screen.

3. Click I agree on the license terms.
4. On the Target Harddisk screen make sure the boot OS disk size is listed, and click Next.
5. Change your Countrytime zone and keyboard as needed.
6. Enter a complex root password and alerting email address.
7. Enter a HostnameIPgateway and DNS server.
8. Review Summary for accuracy and click Install.
9. Wait for the install to complete.
10. Once completed, in DSM VMM locate the VM, click on it, click Action, then Edit. On the Others tab, and change the PBS ISO to Unmounted. Click OK.

Proxmox Backup Server Initial Config

1. Open a browser and go to https://<IP>:8007 and verify you get the Proxmox Login window. Acknowledge SSL certificate warnings as needed.
2. Login (User name: root, Password: <your password>, Realm: Linux PAM). Acknowledge the subscription warning.
3. On the left click on Shell and run the following commands:

				
					apt update
apt-get install qemu-guest-agent
systemctl start qemu-guest-agent
lsblk -d -o NAME,SIZE,MODEL,TYPE
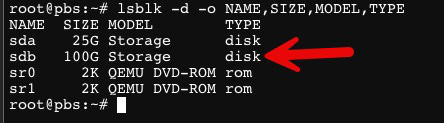


4. Look for the second disk which you created, very likely sdb. Verify the size is correct.
5. Create a new partition table for sdb:

				
					fdisk /dev/sdb


n # Create new partition
p # Primary partition
1 # Partition number
# Press Enter for default first sector
# Press Enter for default last sector (use whole disk)
w # Write changes and exit

6. Format the disk with EXT4.

				
					mkfs.ext4 /dev/sdb1


7. Mount the new disk by UUID and make it permanent: 

				
					mkdir -p /mnt/pbs &amp;amp;&amp;amp; UUID=$(blkid -s UUID -o value /dev/sdb1) &amp;amp;&amp;amp; grep -q "UUID=$UUID" /etc/fstab || echo "UUID=$UUID /mnt/pbs ext4 defaults 0 2" | tee -a /etc/fstab &amp;amp;&amp;amp; mount /mnt/pbs


8. Reload fstab:

				
					systemctl daemon-reload


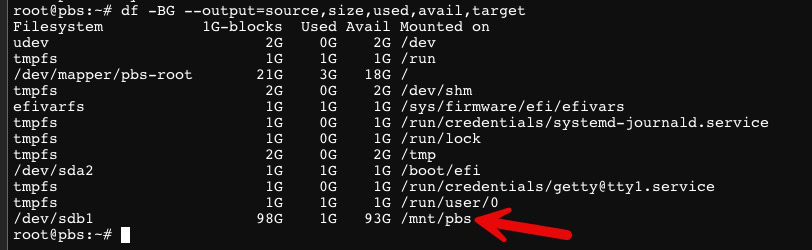
9. Run the following command and validate /mnt/pbs exists with the expected disk size.

				
					df -BG --output=source,size,used,avail,target


Add Datastore in PBS

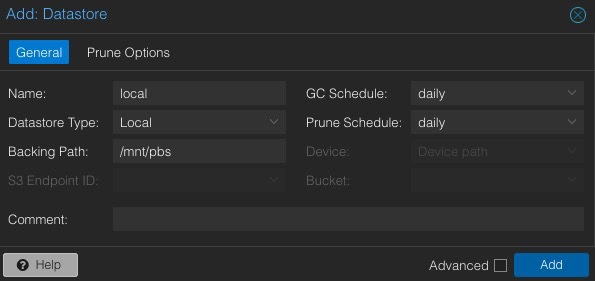
1. In the left pane of PBS click on Add Datastore.
2. Configure the following:

  • Name: Any name you choose
  • Datastore Type: Local
  • Backing Path: /mnt/pbs
  • GC Schedule: daily
  • Prune Schedule: daily

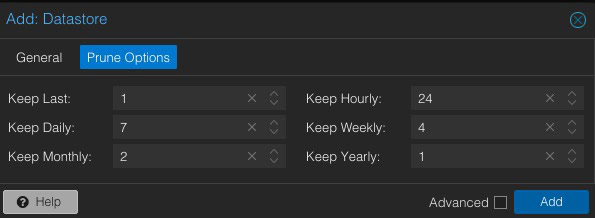
3. Click on Prune Options and configure as you see fit.
4. Click Add.
5. Click on the new datastore on the left and verify everything looks good.
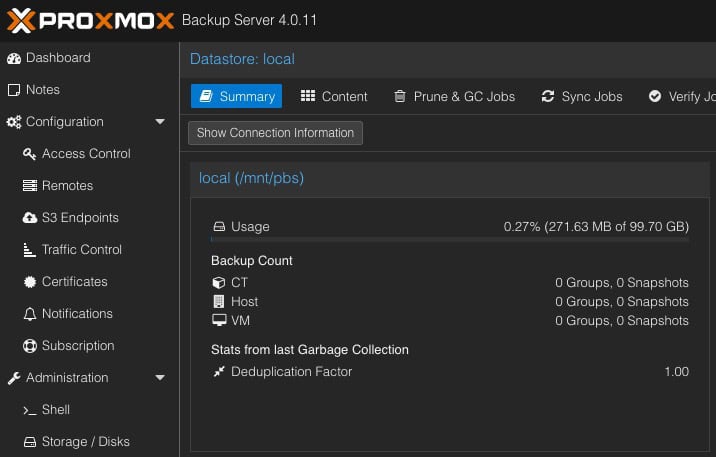
6. Reboot the PBS VM, login, and validate that the local datastore is present.

Future Disk Expansion

If down the road your datastore disk is running low on space, you can do an online expansion.

  1. In Synology VMM locate the VM, click on it, and from the Action menu select Edit.
  2. Click on the Storage tab and extend disk 2 as needed. Acknowledge any warnings. 
  3. Open a PBS shell and run the following command. Enter the letter of the drive that needs to be expanded (e.g. for sdb, enter ‘b’). 
				
					read -p "Enter the disk letter (e.g. b, c): " x &amp;amp;&amp;amp; apt update &amp;amp;&amp;amp; apt install -y cloud-guest-utils &amp;amp;&amp;amp; echo 1 &amp;gt; /sys/block/sd${x}/device/rescan &amp;amp;&amp;amp; growpart /dev/sd${x} 1 &amp;amp;&amp;amp; resize2fs /dev/sd${x}1 &amp;amp;&amp;amp; fdisk -l /dev/sd${x}


4. Validate that /dev/sdb1 is the new size. Run the following command to validate /mnt/pbs has increased in size.

				
					df -BG --output=source,size,used,avail,target


Additional PBS Configuration

Now that you have your PBS VM running and a local datastore configured, there’s a number of other configuration steps, such as:

  • Updating to free PBS repos
  • Adding SSH keys
  • Let’s Encrypt SSL Certificate
  • Backup account configuration
  • Backup Job Configuration
  • Creating Proxmox VE backup jobs

For a step-by-step procedure for all of those items, check out my post: How To: Proxmox Backup Server 4 (VM) Installation and skip down to the section titled “Proxmox Backup Server 4 Configuration“. Follow the remainder of the post to tackle all of the areas above.

Summary

If your Synology NAS has enough physical resources (CPU, RAM, disk) to run a small Proxmox Backup Server 4.0 VM, this article was for you. By running the PBS VM on your NAS, it provides a centralized way to consolidate backups from all of your Proxmox hosts. Most NAS CPUs are very dated and slow, so don’t expect blistering backup speeds. However, for a small home environment it may work quite well.