








本文题图为GPT-Image-2生成
这篇文章描述的逆向与代码编写过程全部由Claude Code完成,你可以认为本文的“我”也是GPT-5.5。文中的电脑是我室友的在2025年购买的拯救者Y9000P。官方驱动对温控支持不佳,所以我们消耗了大量token自己修复了。为了减少重复劳动,我将思路记录于此,当然本文也是AI写就
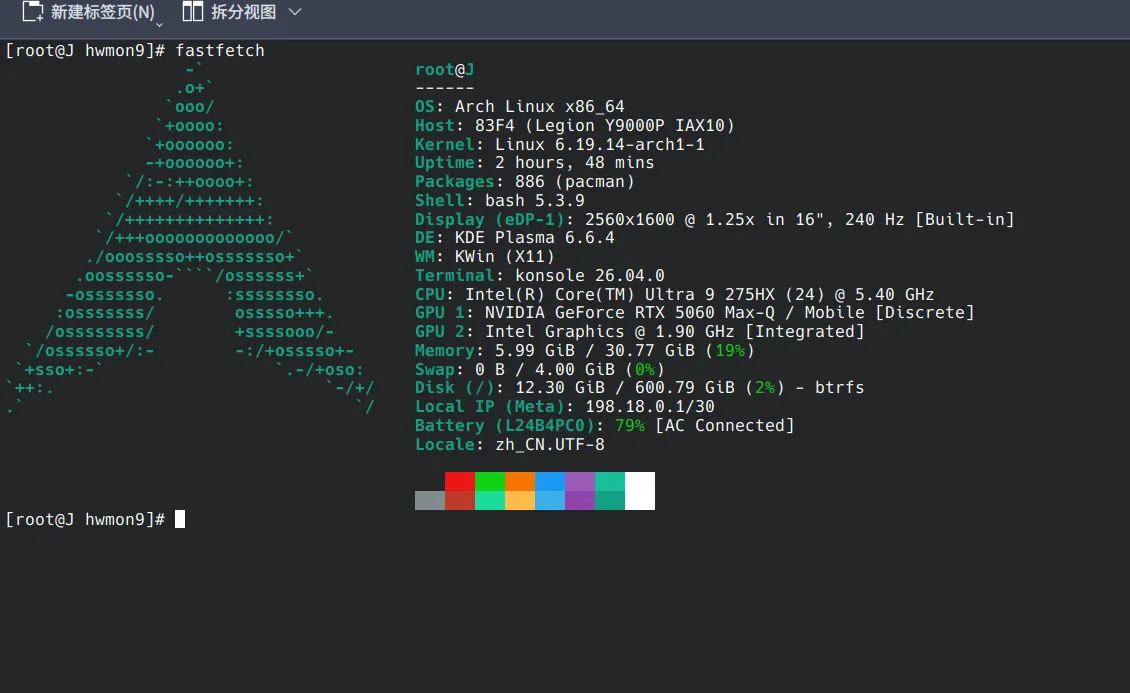
这次问题发生在一台 Lenovo Legion Y9000P IAX10 上,系统是 Arch Linux。
现象很直接:插着电,跑 CPU 压力测试,风扇会转,但不怎么激动;频率掉到 2GHz 出头;CPU package power 长时间只有 30W 左右。
CPU package power 指整个 CPU 封装的功耗,不是单个核心的功耗。对 HX 级别平台来说,满载 30W 显然不正常。最容易怀疑的是风扇、散热、Linux 电源模式或者 RAPL 限制,但最后问题落在了联想 WMI 驱动和固件接口的细节上。
本文不只记录最后的命令,还会说明每个名字、method、feature ID 是从哪里来的。否则只写“method 17 是 GetFeatureValue”没有意义,读者看完也没法迁移到自己的机器上。
最终定位到两层问题:
max-power 不是这台机器上真正允许写 CPU PPT 的状态。Lenovo GameZone provider 的 custom profile 对应 firmware thermal mode 0xff,而 max-power 对应 0xe0。lenovo-wmi-other 驱动在 current_value get/set 路径里使用了带 mode/type 的 attribute ID,但本机固件的 WMI method 17/18 要求的是 plain device+feature ID。修补 lenovo-wmi-other 后,通过标准 sysfs 写入:
1 | ppt_pl1_spl=145 |
再用直接 WMI probe 读回:
1 | 0x01010000 -> 210 |
最后压力测试中,CPU package power 从原来的 30W 提升到约 170W 持续区间。
实际排查主要用了四类证据:
modinfo 里的 WMI GUID alias;legion_laptop DKMS 源码里的常量;wmi_evaluate_method() 验证固件实际返回值。RAPL 是 Intel 的 Running Average Power Limit 机制,负责 CPU 功耗限制和能耗统计。Linux 会把一部分 RAPL 状态暴露到:
1 | /sys/class/powercap/intel-rapl:0/ |
查看方式很简单:
1 | for f in /sys/class/powercap/intel-rapl:0/enabled \ |
记录到的关键输出是:
1 | /sys/class/powercap/intel-rapl:0/name=package-0 |
单位是 microwatt,所以这里是 165W / 210W。RAPL sysfs 里没有 30W。
这一步只能排除“显式 RAPL sysfs 限制为 30W”,不能排除所有固件功耗策略。笔记本厂商还可能通过 EC、WMI、BIOS thermal policy、平台 profile 等路径限制 CPU。
顺便解释一下 PL1/PL2:PL 是 power limit。PL1 通常是长期持续功耗,PL2 通常是短时睿频功耗,这是Intel的表述。不同厂商会换名字,比如 SPL、SPPT、FPPT,但本质仍然是围绕 CPU package 的功耗窗口。
先看模块:
1 | lsmod | grep -E '^(lenovo_wmi|legion_laptop|platform_profile|intel_rapl|processor_thermal|intel_pstate)' |
关键输出:
1 | lenovo_wmi_gamezone |
接着看模块信息:
1 | modinfo lenovo_wmi_gamezone lenovo_wmi_other lenovo_wmi_capdata01 lenovo_wmi_helpers |
这里第一次把两个重要名字和 GUID 对上:
1 | filename: .../lenovo-wmi-gamezone.ko.zst |
这几个名字是什么意思?
GameZone 是联想在游戏本上使用的一组 WMI 接口。Linux 里的 lenovo-wmi-gamezone 驱动使用 GUID 887B54E3-DDDC-4B2C-8B88-68A26A8835D0 绑定到这组接口,主要处理 thermal mode、platform profile、部分风扇/性能模式相关功能。
Lenovo Other 是另一组 WMI 接口。Linux 里的 lenovo-wmi-other 驱动使用 GUID DC2A8805-3A8C-41BA-A6F7-092E0089CD3B 绑定到它。CPU/GPU power limit 这类 firmware attributes 就是通过这个驱动暴露出来的。
capdata01 是 Capability Data 01。可以把它理解成“固件能力描述表”的 WMI 侧数据来源。lenovo-wmi-other 需要通过 capdata 查询 ppt_pl1_spl 这类 attribute 的范围、默认值和步进。
也就是说,GameZone 管“当前是什么热/性能模式”,Lenovo Other 管“有哪些可调参数和怎么读写”,capdata01 给这些参数提供范围信息。
Linux 有一个通用 platform profile 接口:
1 | cat /sys/firmware/acpi/platform_profile |
这台机器输出:
1 | custom |
但这个路径是汇总入口。实际提供 profile 的可能不止一个驱动,所以还要看具体 provider。记录里用的是:
1 | provider=/sys/devices/platform/PNP0C14:02/wmi_bus/wmi_bus-PNP0C14:02/887B54E3-DDDC-4B2C-8B88-68A26A8835D0-4/platform-profile/platform-profile-0 |
输出:
1 | .../platform-profile-0/name=lenovo-wmi-gamezone |
这条长路径可以拆开读:
1 | /sys/devices/platform/PNP0C14:02 |
PNP0C14 是 ACPI WMI 设备 ID。WMI 全称 Windows Management Instrumentation,很多笔记本厂商会把风扇、性能模式、电源限制等 OEM 功能放在 WMI 接口后面。Linux 支持这些功能时,通常是写一个 WMI driver 绑定到对应 GUID。
1 | wmi_bus/wmi_bus-PNP0C14:02 |
Linux WMI 子系统为这个 ACPI WMI 设备创建的 bus 节点。
1 | 887B54E3-DDDC-4B2C-8B88-68A26A8835D0-4 |
Lenovo GameZone WMI GUID 对应的设备节点,后面的 -4 是内核枚举出的实例后缀。
1 | platform-profile/platform-profile-0/profile |
lenovo-wmi-gamezone 注册出的 platform profile provider。写这个文件,就是直接切 GameZone provider 的 profile。
实际脚本里不建议固定 PNP0C14:02 和 platform-profile-0,因为这些编号可能变化。更稳妥的写法是按 GUID 和 name 找:
1 | for p in /sys/devices/platform/*/wmi_bus/wmi_bus-*/887B54E3-DDDC-4B2C-8B88-68A26A8835D0-4/platform-profile/platform-profile-*/profile; do |
max-power 为什么不是 custom最开始容易被 max-power 这个名字误导。按常识,它应该就是最高性能。实测不是。
在 max-power 下,日志显示:
1 | before profile_provider=max-power aggregate=max-power pl1=0 pl2=0 pl3=0 pkg_w=30 fan1=2000 fan2=2000 temp1=55000 temp3=55000 |
直接写 provider 为 custom 后:
1 | printf custom > /sys/devices/platform/PNP0C14:02/wmi_bus/wmi_bus-PNP0C14:02/887B54E3-DDDC-4B2C-8B88-68A26A8835D0-4/platform-profile/platform-profile-0/profile |
功耗马上变化:
1 | after_custom profile_provider=custom aggregate=custom pl1=0 pl2=0 pl3=0 pkg_w=91 fan1=2000 fan2=2000 temp1=75000 temp3=55000 |
还没写 PL,单是进入 custom,CPU package power 就从 30W 到了 91W。这说明 GameZone 的固件模式已经改变。
max-power 和 custom 的区别来自哪里?有两个来源。
第一个来源是旧 legion_laptop DKMS 源码。它不是最终方案依赖,但里面有较完整的联想 WMI 常量。通过下面的命令查:
1 | grep -n 'LEGION_WMI_POWERMODE\|WMI_METHOD_ID_GETSMARTFANMODE\|WMI_METHOD_ID_SETSMARTFANMODE\|OtherMethodFeature_CPU\|ppt' \ |
输出里有:
1 | #define WMI_METHOD_ID_GETSMARTFANMODE 45 |
第二个来源是当前内核的 lenovo-wmi-gamezone 行为。通过驱动源码/反汇编可以确认 profile 到 firmware thermal mode 的映射:
1 | low-power -> 0x01 |
firmware thermal mode 是联想固件内部使用的热/性能模式编号,不等于 Linux 展示给用户的字符串。max-power 对应 0xe0,custom 对应 0xff,两者不是同一个状态。
这个映射还用 WMI probe 验证过。处于 max-power 时,GameZone method 45/55 返回:
1 | y9000p_wmi_probe 887B54E3-DDDC-4B2C-8B88-68A26A8835D0 method=45 ... integer=224 hex=0xe0 |
进入 custom 后返回:
1 | y9000p_wmi_probe 887B54E3-DDDC-4B2C-8B88-68A26A8835D0 method=45 ... integer=255 hex=0xff |
这样,max-power 不是 custom 就不再是猜测,而是驱动映射和固件返回共同证明的事实。
当前系统里能看到:
1 | for f in /sys/devices/virtual/firmware-attributes/lenovo-wmi-other-0/attributes/ppt_pl{1_spl,2_sppt,3_fppt}/{display_name,type,min_value,max_value,default_value,scalar_increment,current_value}; do |
关键输出:
1 | ppt_pl1_spl/display_name=Set the CPU sustained power limit |
这些文件不是手写出来的,也不是 udev 规则生成的。它们由 lenovo-wmi-other 驱动注册到 Linux 的 firmware_attributes_class。
驱动代码里有对应的 attribute 定义:
1 | static struct tunable_attr_01 ppt_pl1_spl = { |
ppt_pl1_spl、ppt_pl2_sppt 的命名也来自驱动,不是本次排查临时造的名字。
这里的 CPU PPT 可以理解成 CPU package power tracking。ppt_pl1_spl 近似长期功耗限制,SPL 是 sustained power limit;ppt_pl2_sppt 近似短时/慢跟踪功耗限制,SPPT 是 slow package power tracking;ppt_pl3_fppt 是更快的峰值跟踪,但这台机器上读范围返回 EINVAL,因此没有写它。
custom 下才能写 PL进入 custom 后写 PL:
1 | write .../ppt_pl1_spl/current_value <- 90: ok |
而在 max-power 下写 PL 会返回 EBUSY。这不是 shell 的问题,而是驱动里的检查。
lenovo-wmi-other 的 attr_current_value_store() 在真正写 WMI 之前,会通过 notifier 问 lenovo-wmi-gamezone 当前 thermal mode:
1 | ret = lwmi_om_notifier_call(&mode); |
也就是说,PL 写入被驱动限制在 LWMI_GZ_THERMAL_MODE_CUSTOM 下。前面已经验证 custom=0xff,max-power=0xe0,所以 max-power 下返回 EBUSY 是符合代码逻辑的。
这一步把现象、驱动代码、WMI 返回值连起来了。
前面提到:
1 | 17 GetFeatureValue |
这些数字有两个来源。
第一个来源是 Linux 当前驱动源码。wmi-other.c 里定义:
1 | #define LENOVO_OTHER_MODE_GUID "DC2A8805-3A8C-41BA-A6F7-092E0089CD3B" |
这里能得出:
1 | method 17 = LWMI_FEATURE_VALUE_GET |
第二个来源是旧 legion_laptop DKMS 源码。前面的 grep 输出里能看到:
1 | OtherMethodFeature_CPU_SHORT_TERM_POWER_LIMIT = 0x01010000 |
Linux 驱动里的 bit mask 也能算出相同结果:
1 | SPPT: device_id=0x01, feature_id=0x01 -> 0x01010000 |
所以 feature ID 不是读 ACPI 表直接读出来的,而是由驱动常量和旧驱动常量交叉确认,然后用 WMI probe 验证。
为了避免只相信 sysfs,又写了一个只读 kernel module:
1 | src/y9000p-wmi-probe.c |
核心不是复杂逆向,就是调用内核 WMI API:
1 | st = wmi_evaluate_method(guid, 0, method, &in, &out); |
对于 Lenovo Other,probe 用 32-bit 参数调用 method 17:
1 | static void eval_u32(const char *guid, u32 method, u32 arg) |
probe 里列出要读的 feature:
1 | static const u32 features[] = { |
这里的 OTHER_GUID 就是 Lenovo Other:
1 | #define OTHER_GUID "DC2A8805-3A8C-41BA-A6F7-092E0089CD3B" |
构建方式和普通 out-of-tree kernel module 一样,Makefile 内容大致是:
1 | obj-m += y9000p-wmi-probe.o |
加载后从内核日志读取结果。归档日志 logs/y9000p-wmi-probe-20260429-131059.log 里有:
1 | y9000p_wmi_probe begin read-only probe |
这说明固件 method 17 直接读到:
1 | 0x01010000 -> 125 |
也就是说,当 sysfs 的 current_value 显示 0 时,不能直接认为固件里就是 0。至少在这台机器上,直接 WMI method 17 读到的真实值是 125/90。
lenovo-wmi-other 有两类操作容易混在一起:
1 | capdata/range 查询:查 min/max/default/step |
capdata/range 查询需要完整 attribute ID:
1 | device + feature + mode + type |
驱动里是这样构造的:
1 | attribute_id = |
这段用于 capdata 查询是合理的,因为它要查某个模式下的范围信息。
问题在于旧代码接着把同一个 attribute_id 传给 WMI method 18:
1 | args.arg0 = attribute_id; |
在 custom=0xff 下,这样会把参数变成:
1 | ppt_pl2_sppt: 0x0101ff00 |
但前面的直接 WMI probe 证明,本机 firmware method 17/18 要的是:
1 | ppt_pl2_sppt: 0x01010000 |
差别就是中间的 ff。对 capdata 来说,ff 表示 custom mode;对 current value get/set 来说,它反而让固件读写不到真实值。
attr_current_value_show() 也有同样问题。旧代码把带 mode/type 的 attribute_id 传给 method 17,因此 current_value 读回不可信。
修法不能把所有 ID 构造都改掉,否则 min/max/default 可能坏掉。正确边界是:
1 | capdata/range 查询继续用 device + feature + mode + type |
补丁新增一个 helper:
1 | static u32 lwmi_om_feature_value_id(struct tunable_attr_01 *tunable_attr) |
然后只改 method 17/18 的参数:
1 | @@ attr_current_value_store |
补丁小,但验证必须完整。加载修补后的 lenovo-wmi-other 后,通过标准 sysfs 写:
1 | set .../platform-profile-0/profile = custom |
再用 WMI probe 读回:
1 | y9000p_wmi_probe ... method=17 arg32=0x01010000 status=0x0 integer=210 hex=0xd2 |
这一步证明:修补后不是绕过 sysfs 私下写 firmware,而是标准 firmware attributes 路径已经能正确写入。
最后用 stress-ng 压 CPU,同时通过 RAPL energy 采样算 package power:
1 | stress-ng --cpu 32 --cpu-method matrixprod --timeout 60s |
记录到的采样:
1 | t=002.0s package_power_w=0162.2 |
汇总:
1 | max_w=173.7 |
这说明原来的 30W 墙已经解除。PL2 写 210W 不代表 CPU 会长期保持 210W;实际长期功耗还受 PL1、温度、EC 固件、适配器、BIOS thermal policy 等因素共同影响。约 170W 的持续 package power 已经足以证明问题不在原来的 30W 状态。
EC 固件是 Embedded Controller firmware,笔记本里的键盘热键、充电、风扇曲线、温度响应等常由 EC 参与控制。最开始看到“风扇不积极”,并不等于风扇驱动坏了。CPU 被压在 30W 时,温度上不去,EC 没有理由把风扇拉高。
运行时脚本放在:
1 | /usr/local/sbin/legion-y9000p-performance.sh |
它做几件事:
1 | 1. 动态找到 Lenovo GameZone provider |
CPU 策略没有固定成 performance,而是:
1 | governor=powersave |
EPP 是 Energy Performance Preference,表示能耗/性能偏好。balance_power 比 power 更愿意在负载上来时提功耗;power 空闲差不多低,但满载响应明显慢。
对比测试结果:
1 | balance_performance: idle≈12W,load 很快到 125W,吞吐最高 |
因此固化为 balance_power。这样低负载功耗可以下探,满载时也不会被 30W 按住。
systemd 服务是:
1 | /etc/systemd/system/legion-y9000p-init.service |
内容:
1 | [Unit] |
第一条 ExecStart 前面的 - 表示即使 legion_laptop DKMS 加载失败,service 也继续执行下一条。
DKMS 是 Dynamic Kernel Module Support,用于在内核升级后自动重建第三方内核模块。它适合维护额外模块,但不应该成为这次解锁 30W 墙的硬依赖。真正关键的是内核自带的:
1 | lenovo-wmi-gamezone |
本地修补模块安装到内核 updates 目录,例如:
1 | /usr/lib/modules/6.19.14-arch1-1/updates/y9000p/lenovo-wmi-other.ko |
为了不靠 DKMS 维护这个补丁,使用 pacman hook:
1 | /etc/pacman.d/hooks/99-y9000p-lenovo-wmi-other-patch.hook |
配套脚本:
1 | /usr/local/sbin/y9000p-build-patched-lenovo-wmi-other.sh |
内核升级时,它下载匹配版本的 Linux source tarball,应用补丁,只构建 lenovo-wmi-other.ko,安装到 updates 目录,再执行 depmod。这是上游修复合并前的过渡方案。
这类问题不能直接抄数值。不同机型、BIOS、内核版本可能使用同样 GUID,但 feature 行为不完全相同。比较稳的流程是:
1 | 1. 读 RAPL sysfs,确认 30W 不是显式 RAPL 限制 |
几个命令很有用:
1 | modinfo lenovo_wmi_gamezone lenovo_wmi_other lenovo_wmi_capdata01 |
如果能看到 sysfs 写入成功,但功耗没变,或者 current_value 读回和直接 WMI 读回不一致,就要警惕驱动参数构造问题。
最终链路可以整理成:
1 | Linux profile=max-power |
修复链路:
1 | 写 GameZone provider=custom |
这次排查最有价值的不是某个固定命令,而是证据链:sysfs 只能说明 Linux 驱动暴露了什么;驱动源码说明 Linux 打算怎么调用固件;WMI probe 说明固件实际怎么回应;压力测试说明这些设置是否真的改变了机器行为。
只看其中一个,很容易误判。
这篇文章描述的逆向与代码编写过程全部由Claude Code完成,你可以认为本文的“我”也是GPT-5.5。文中的电脑是我室友的在2025年购买的拯救者Y9000P。官方驱动对温控支持不佳,所以我们消耗了大量token自己修复了。为了减少重复劳动,我将思路记录于此,当然本文也是AI写就
此内容由惯性聚合(RSS阅读器)自动聚合整理,仅供阅读参考。 原文来自 — 版权归原作者所有。