





I enjoy the process of designing and building a custom personal website. It’s a great way to experiment with different technologies and have fun learning new tools and concepts along the way.
This time, I was eager to learn how to use serverless functions.
The Challenge
I use a static site generator called Jekyll to build and publish my website. The result is a collection of static HTML, CSS, and JS files that are lightweight, fast, and easy to maintain. It reduces my overhead, both in cost and time because I don’t need to manage a server. But it does have one drawback: I can’t easily handle small background actions, like form submissions.
After all the effort I put into building my personal website, the last thing I wanted to do was slap a pre-designed newsletter subscription form on it. Most email providers offer forms you can quickly embed on your website, but they come with a series of tradeoffs. They are difficult to customize to exactly match your website’s design, and they usually require users to load third-party scripts and styles. Often these third-party resources get blocked by browser privacy settings, and even if they don’t, they can be slow to load.
Eventually, this led me to serverless functions. A serverless function is really just a piece of code that runs like an API endpoint, independently of your website or app. Despite the name, serverless functions do, indeed, run on a server. It’s just a server you don’t have to build or maintain.
The Team: Netlify and Buttondown
I use a service called Netlify to build and deploy my website. It’s key for this project because it publishes the static HTML, CSS, and JavaScript assets from my static site generator to a global CDN and runs the serverless function for my email subscription form.
I’m using Buttondown as my email list provider. Buttondown is a simple, privacy-first newsletter platform. It offers an API with extensive documentation, including an OpenAPI Specification file. Buttondown is free for up to 100 subscribers, after which it costs $9 a month for up to 1,000. The API is available for paying customers starting at the $9/mo plan.
As a side note, Buttondown offers extensive customization options for HTML form embeds, so you can accomplish almost everything in this tutorial with less work. But this is a good starting point to learn how to build serverless functions and as an introduction to creating advanced automation with the Buttondown API.
Here is a brief overview of the steps involved:
- Prepare your environment
- Create the newsletter subscription form
- Write the serverless function
- Deploy with Netlify
Ok, let’s get started!
1. Prepare your environment
To begin, you need to configure a few settings within Netlify before you can start building serverless functions.
Configure your Netlify.toml file
First, you need to tell Netlify where it should find and process your serverless functions. If you don’t have one already, create a file in your root directory called netlify.toml. The most basic version should include information about how to build and publish your website. Refer to the Netlify documentation for additional information.
In this example, publish tells Netlify to deploy the HTML and CSS files saved in the public folder for a simple, static website. This example also includes a command Netlify should run (npm install). Netlify will install the single node module dependency you will need later.
[build]
  publish = "public"
  command = "npm install"
Now you can add the path to the functions directory. The default functions directory is YOUR_BASE_DIRECTORY/netlify/functions. You will need to use the node-fetch v3 module later. Due to a change to node-fetch, you will need to enable ESM for the site by adding node_bundler = "esbuild" under the [functions] section of your netlify.toml file:
[functions]
  directory = "netlify/functions/"
  node_bundler = "esbuild"
For this tutorial, your completed netlify.toml file should look like this:
[build]
  publish = "public"
  command = "npm install"

[functions]
  directory = "netlify/functions/"
  node_bundler = "esbuild"
Save your API Key as an environment variable
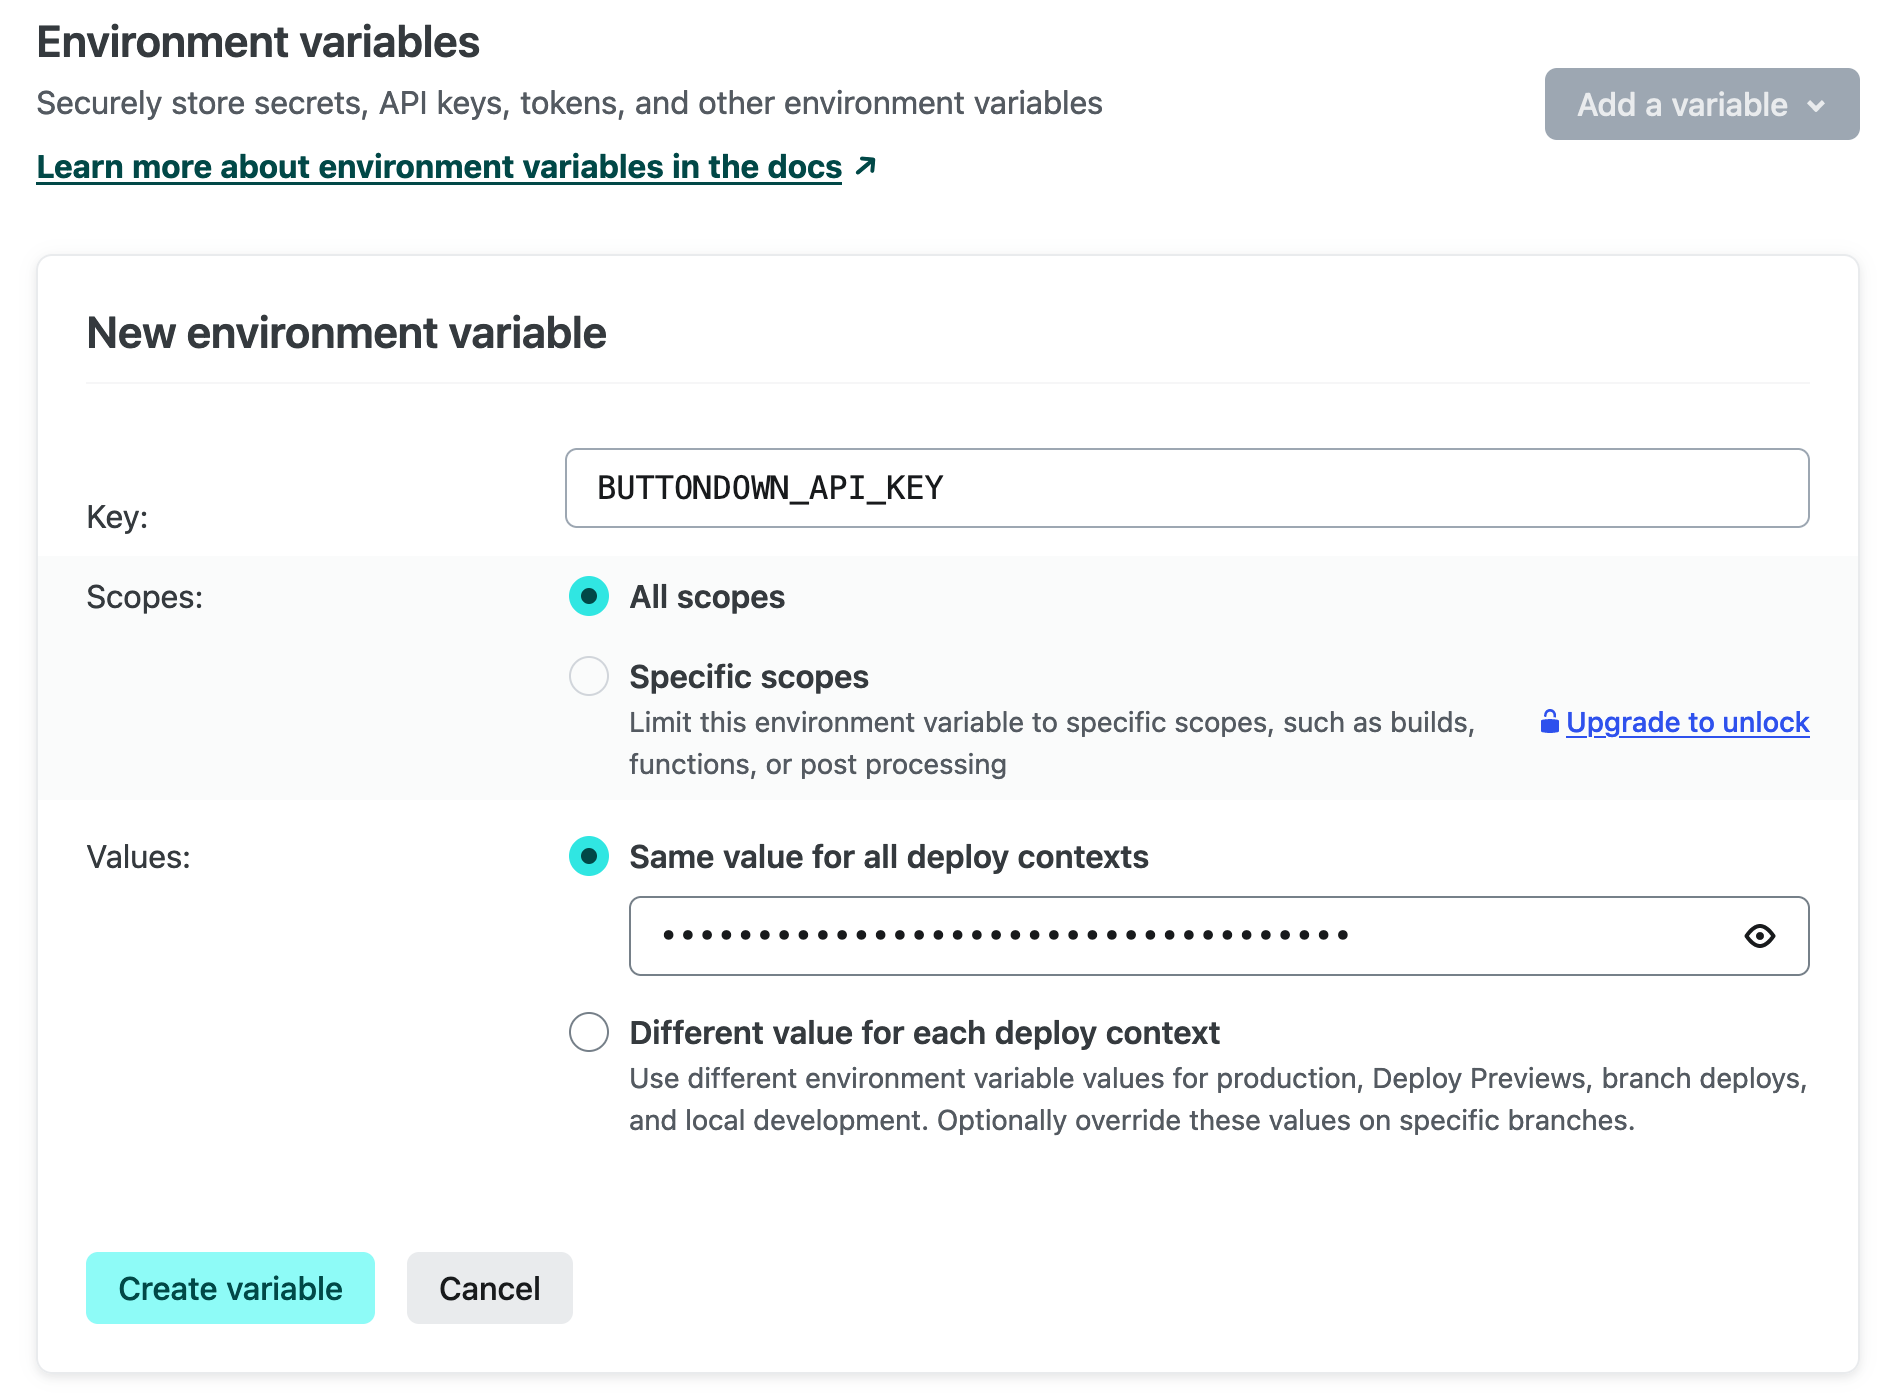
Next, you must add your Buttondown API Key as an environment variable for your Netlify site. Environment variables are useful to hold information that we don’t want to make public, like API Keys.
Find and create your API Key in Buttondown under Settings > Power Tools > API. Copy this value and then add it as an environment variable using the Netlify Admin interface under Site Settings > Environment Variables.
For this tutorial, we’ll name the key BUTTONDOWN_API_KEY, add the value from Buttondown, and save it.
2) Create the newsletter subscription form
Now that Netlify is set up, I need a way to collect email submissions. The HTML for my email subscription form is very basic to start:
<form name="newsletter" method="POST" action="/success/" data-netlify="true">
  <label for="email">Your Email Address:</label>
  <input type="email" name="email" required />
  <button type="submit">Subscribe</button>
</form>
There are a few important things to note. First, I need to tell Netlify to process the form. All I need to do is add the data-netlify="true" attribute to the form tag.
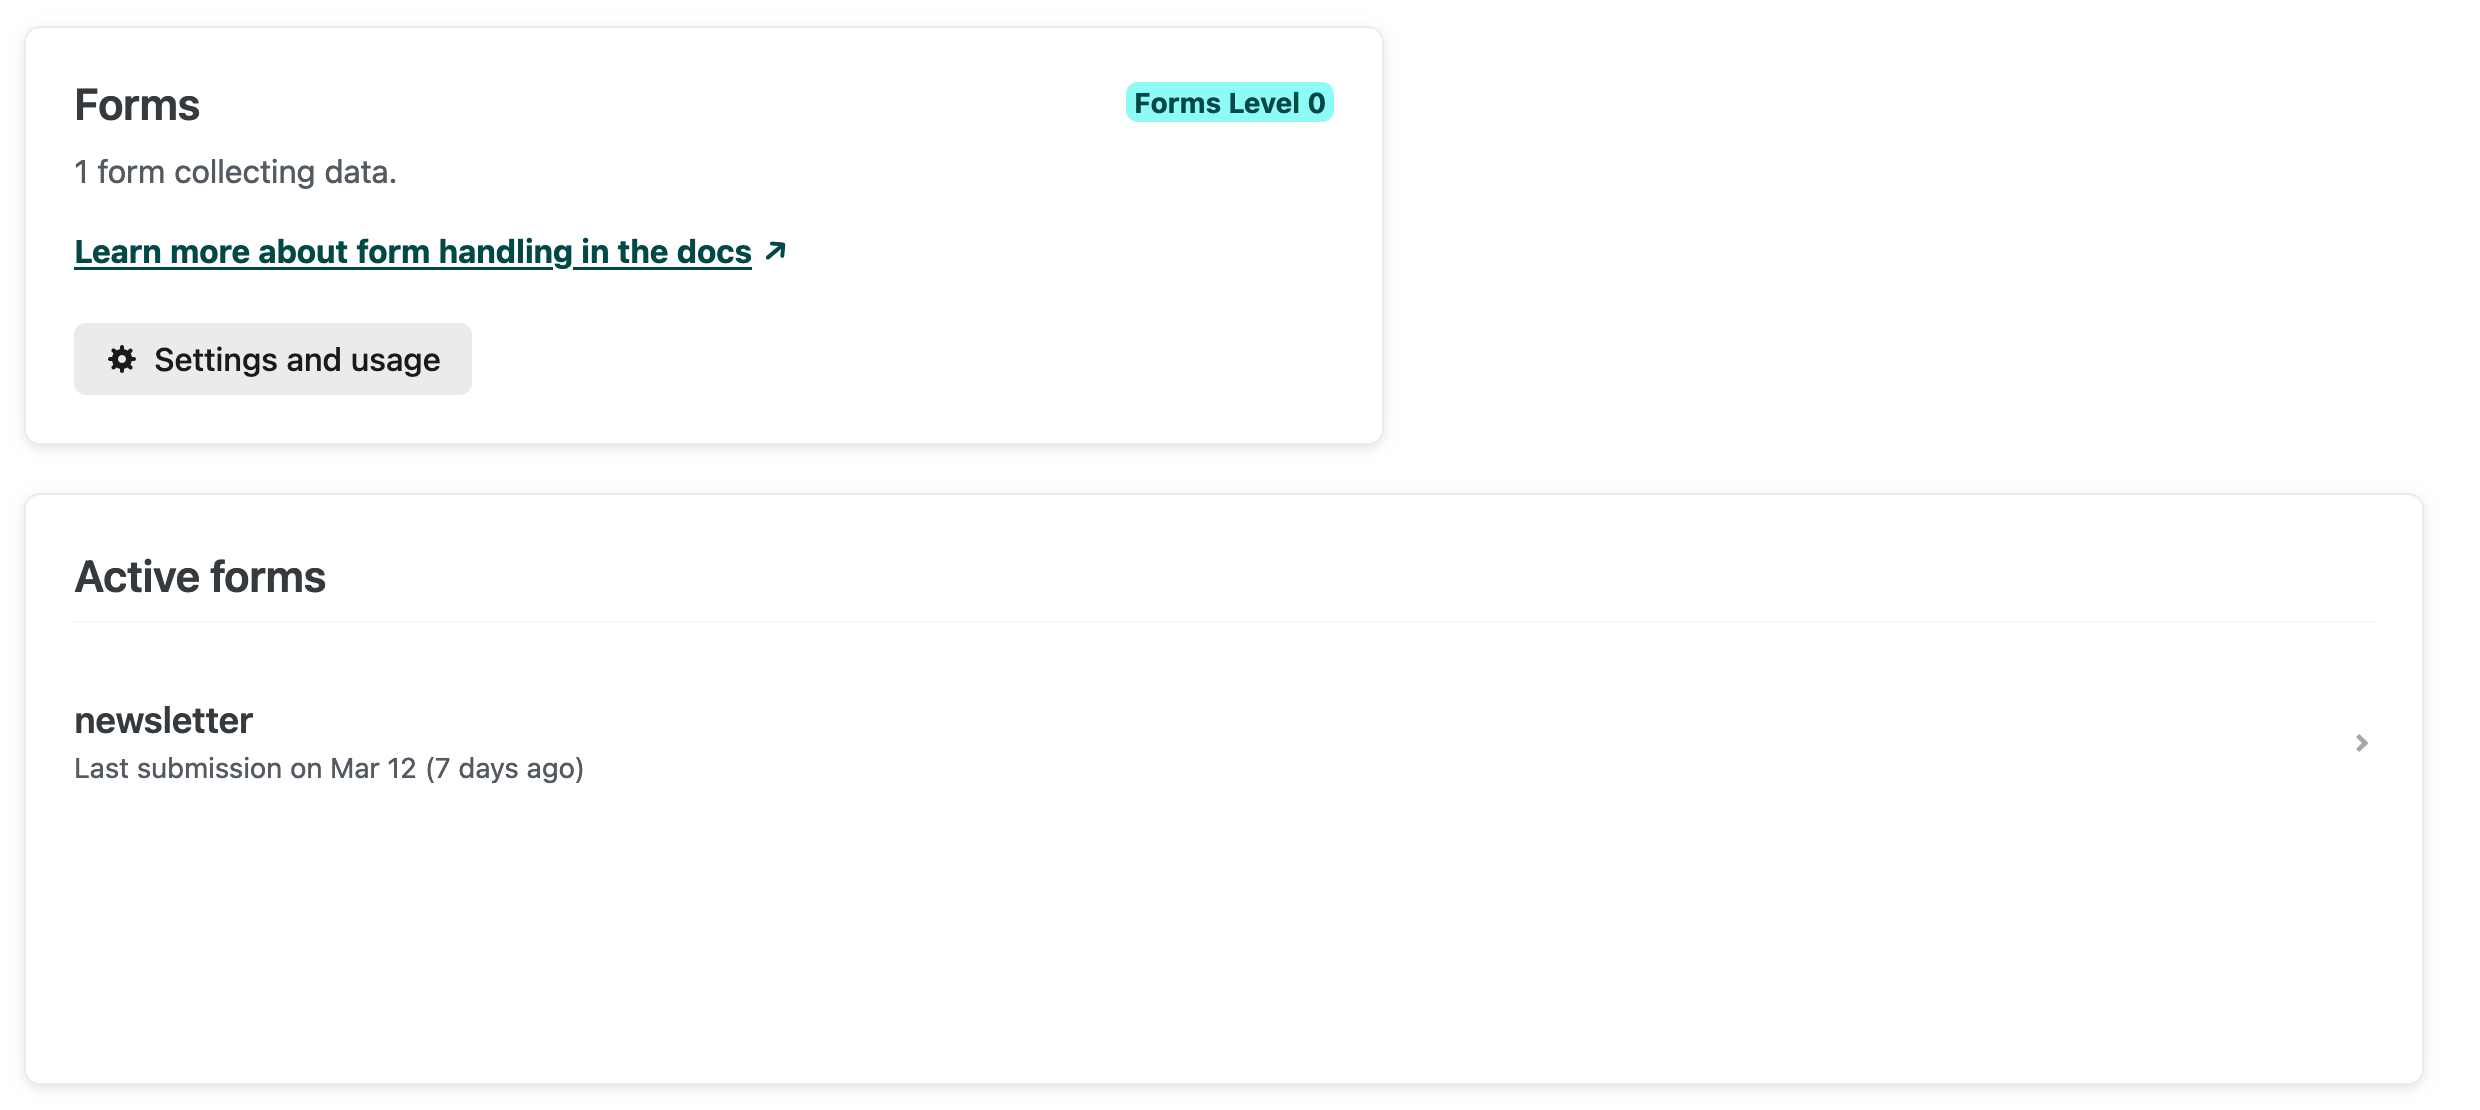
Next, I must give the form a unique name using the name attribute. In this case, that’s simply name="newsletter". The form’s name attribute determines what shows up in the Netlify interface:
I wanted to redirect users to a confirmation page, so I added action="/success/" to display a page that contains the success message.
The next input in the form is named email. That’s where we collect the email addresses. You could name it anything, but make sure you note what you call it for the next step.
I’ve specified the input type as email and indicated that is required. This means that the browser will do all my validation for me, and won’t let users submit anything besides a valid email address.
Enable bot and spam protection
I’m going to take advantage of the built-in anti-spam and bot protection that comes with Netlify Forms, so I'll tweak the form a bit. I added the netlify-honeypot="bot-field" attribute and created a hidden label and input:
<label class="hidden">Don’t fill this out:</label>
<input class="hidden" name="bot-field" />
This should catch any bots and filter them out before they ever hit my subscriber list. Here is the completed HTML for the newsletter subscription form:
<form
  name="newsletter"
  method="POST"
  action="/success/"
  netlify-honeypot="bot-field"
  data-netlify="true"
>
  <label class="hidden">Don’t fill this out:</label>
  <input class="hidden" name="bot-field" />
  <label for="email">Your Email Address:</label>
  <input type="email" name="email" required />
  <button type="submit">Subscribe</button>
</form>
3) Write the serverless function
Now that I have a working email submission form, it’s time to create the serverless function. To start, create a file in the functions folder called submission-created.js. If you used the default functions directory, you should save your function at YOUR_BASE_DIRECTORY/netlify/functions.
I’m going to use the submission-created event trigger, which will tell Netlify to run my function every time the form is submitted. To accomplish that, I have to make sure the file is named submission-created.js.
Here’s the code for the serverless function:
const { BUTTONDOWN_API_KEY } = process.env;
import fetch from "node-fetch";

exports.handler = async (event, context) => {
  const email = JSON.parse(event.body).payload.email;
  console.log(`Received a submission: ${email}`);

  const response = await fetch("https://api.buttondown.com/v1/subscribers", {
    method: "POST",
    headers: {
      Authorization: `Token ${BUTTONDOWN_API_KEY}`,
      "Content-Type": "application/json",
    },
    body: JSON.stringify({ email }),
  });

  let responseText = await response.text();
  console.log("Response:", responseText);

  return {
    statusCode: 200,
    body: JSON.stringify({}),
  };
};
Let’s look at this line-by-line to understand how it works.
Configure prerequisites
First, I import the Buttondown API key I saved earlier as an environment variable for my function:
const { BUTTONDOWN_API_KEY } = process.env;
On line 2, I import a small library called node-fetch. This allows me to use Javascript’s Fetch API, which is how we’ll format an API POST request to send data to our email service:
import fetch from "node-fetch";
NOTE: When I was writing this post, many of the tutorials available used the require method to import the Fetch API, which resulted in errors when I tried to deploy the function. Make sure you use the method I described above. If you upgrade to node-fetch v3, you'll also need to update either your netlify.toml file or package.json to use ESM.
[functions]
  node_bundler = "esbuild"
You can find more information about how to make a fetch request using node-fetch v3 in an excellent guide by Tatyana Novell on the Netlify blog.
Define the serverless function
Line 4 is where I define the function. The exports.handler value is where Netlify expects to find the function. This is the basic syntax I’ll use to create the serverless function:
exports.handler = async function (event, context) {
  // your server-side functionality
};
Parse the form submission
The first thing I need to do is retrieve the email address from the form submission. I’m going to use JSON.parse. Since I’m using an event to trigger the function, we’ll use event.body to parse the submission and payload.email to retrieve the value of the email input field.
const email = JSON.parse(event.body).payload.email;
Then log the data in the console for debugging:
console.log(`Received a submission: ${email}`);
Create the API request
After retrieving the email address from the event value using JSON.parse, I’m ready to add the email to my list of subscribers using the Buttondown API. I’ll use the node-fetch library I imported earlier to create the POST request.
I need to authorize the API request by passing the BUTTONDOWN_API_KEY environment variable in the headers, and I’ll need to add the email address to the body of the request as a string:
const response = await fetch("https://api.buttondown.com/v1/subscribers", {
  method: "POST",
  headers: {
    Authorization: `Token ${BUTTONDOWN_API_KEY}`,
    "Content-Type": "application/json",
  },
  body: JSON.stringify({ email }),
});
Log the response
Then capture and log the response from the email service. We do this to diagnose any issues that happened. Netlify makes it easy to check your function’s logs, so use console.log often!
let responseText = await response.text();
console.log("Response:", responseText);
And finally, we return the response from the function with an empty body:
return {
  statusCode: 200,
  body: JSON.stringify({}),
};
4) Deploy the function
Now that I’ve written my function, configured my netlify.toml file, and added my environment variables, everything is ready to go. Deploying is painless: just set up Netlify’s GitHub integration, push your changes, and your function will be deployed.
Conclusion
It took me less than 50 lines of code to build a custom newsletter subscription form using a serverless function. I wrote it all in HTML, CSS, and JavaScript, and everything is served from my domain. Plus, my website visitors get a nice experience whether they have JavaScript enabled or not, and I’m protected from bot and spam submissions by default.
If you’d like to experiment with creating your own custom newsletter form, you can clone and deploy the GitHub Repository below to Netlify. It comes with a minimal HTML landing page, a simple form, and everything you need to deploy the Netlify Function:
Good luck, and I hope you have fun building a custom newsletter subscription form for your website!
A version of this article originally appeared at andrewstiefel.com on August 28, 2022.