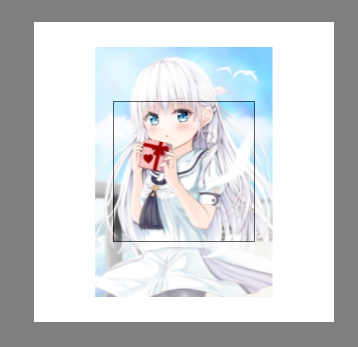
原生 JavaScript 实现图片裁剪
由于最近做的一个项目里,需要把用户头像上传。但是要求用户头像必须是正方形,所以需要将矩形图片裁剪为正方形
在花了接近 5 个小时之后,总算是将功能上线了,在此记录下整个思路经过
前提
首先,单纯靠前端,是不可能实现将图片截取其中的部分,然后将部分上传到后端。
所以,需要靠伪装裁剪效果的方式来实现裁剪
思路
首先把裁剪图片的页面进行分层
思路1——clip
| 层级 | 内容 |
|---|
| 1 | 一个灰白色的背景的 div |
| 2 | 半透明的原图 |
| 3 | 不透明的原图的裁剪部分 |
层级 3 的效果,打算靠 css 的 clip-path 来实现,
思路2
反手打开 Google,打开 Google 的头像上传页面,然后检查元素
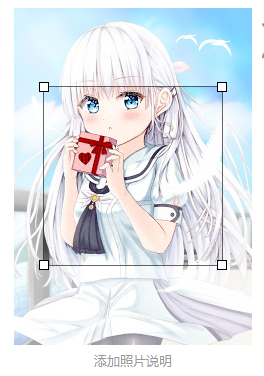
1
2
3
4
5
6
7
8
9
10
11
12
13
14
15
16
17
18
19
20
21
22
23
24
25
26
| <div class="ee-dm-Ch">
<img src="https://lh3.googleusercontent.com/-ij1qBucmZrI/YJ5t2R6hBPI/AAAAAAAAAJY/DyrS8qSCb4keWB2-fIvIv42m9oW8B9ZnQCLcBGAsYHQ/s180/79468803_p0_master1200.jpg"
style="transform: rotate(0deg); width: 127px; height: 180px; opacity: 1; left: 279px; top: 0px; position: absolute;">
<div style="width: 127px; height: 180px; left: 279px; top: 0px; position: absolute;">
<div class="ee-im" style="top: 42px; left: 16px; width: 95px; height: 95px;"></div>
<div class="ee-fm" style="cursor: ne-resize; left: 96px; top: 27px;">
<div class="ee-gm"></div>
</div>
<div class="ee-fm" style="cursor: sw-resize; left: 1px; top: 122px;">
<div class="ee-gm"></div>
</div>
<div class="ee-fm" style="cursor: se-resize; left: 96px; top: 122px;">
<div class="ee-gm"></div>
</div>
<div class="ee-fm" style="cursor: nw-resize; left: 1px; top: 27px;">
<div class="ee-gm"></div>
</div>
<div>
<div class="ee-km" style="width: 127px; top: 0px; left: 0px; height: 42px;"></div>
<div class="ee-km" style="top: 42px; left: 111px; width: 16px; height: 95px;"></div>
<div class="ee-km" style="left: 0px; width: 127px; top: 137px; height: 43px;"></div>
<div class="ee-km" style="left: 0px; top: 42px; width: 16px; height: 95px;"></div>
</div>
<div class="ee-em" style="top: 41px; left: 15px; width: 95px; height: 95px;"></div>
</div>
</div>
|
- 首先是一个
img 作为底图,而且其宽和高同时被限制在 180px 中(上传了一张高大于宽的图片),这可以用 max-height 和 max-width 实现 - 其次是一个
div ,而且恰好与上面的 img 重合,这应该是作为覆盖在图片上,然后其中有一堆的 div- 第一个
div 应该是作为上传图片时,覆盖在最中央的透明方块,用来接受鼠标的拖拽和缩放事件 - 第二个至第五个,是中间选择框的四个角落,用来拖拽缩放图片
- 第六个又是一个
div,内部有四个 div,观察后发现,这四个 div 分别是“左上+正上+右上”,“正右”,“右下+正下+左下”,“正左”,而且这四个 div 都是带有半透明属性,且背景为纯白色
- 最后一个
div 其恰好比图片大一个像素,恰好可以作为黑色的外框
分析
虽然看起来,第一个的思路更加的简单容易,但是第二个思路更合理,毕竟对于低版本的浏览器,更适合此方案
实现
首先需要一个能够选择文件的 UI,由于 <input type="file"> 的页面实在过于丑陋,于是我先对其进行美化
首先准备一个 relative 的 div 用于容纳新的 UI,同时将 <input type="file"> 设置为 absolute,并使其覆盖整个 div,然后将不透明度调整为 0
1
2
3
| <div class="upload">
<input id="file" type="file" class="fileInput">
</div>
|
1
2
3
4
5
6
7
8
9
10
11
12
13
14
15
| .upload {
position: relative;
width: 100px;
height: 100px;
}.fileInput {
position: absolute;
overflow: hidden;
width: 100%;
height: 100%;
top: 0;
left: 0;
opacity: 0;
}
|
然后找来了一个上传图片的 svg,直接丢进去
1
2
3
4
5
6
7
8
9
10
11
12
13
| <div class="upload">
<svg t="1620918057417" class="icon" viewBox="0 0 1024 1024" version="1.1" xmlns="http://www.w3.org/2000/svg"
width="100" height="100">
<path d="M1035.3664 1035.82151111h-86.47111111v-27.30666666h59.16444444v-59.16444445h27.30666667zM881.69813333 1035.82151111H747.30382222v-27.30666666h134.39431111v27.30666666z m-201.59146666 0H545.71235555v-27.30666666h134.39431112v27.30666666z m-201.59146667 0H344.12088889v-27.30666666h134.39431111v27.30666666z m-201.59146667 0H142.52942222v-27.30666666h134.39431111v27.30666666zM75.33226667 1035.82151111h-86.47111112v-86.47111111h27.30666667v59.16444445h59.16444445zM16.16782222 882.15324445h-27.30666667V747.75893333h27.30666667v134.39431112z m0-201.59146667h-27.30666667V546.16746667h27.30666667v134.39431111z m0-201.59146667h-27.30666667V344.576h27.30666667v134.39431111z m0-201.59146666h-27.30666667V142.98453333h27.30666667v134.39431112zM16.16782222 75.78737778h-27.30666667v-86.47111111h86.47111112v27.30666666h-59.16444445zM881.69813333 16.62293333H747.30382222v-27.30666666h134.39431111v27.30666666z m-201.59146666 0H545.71235555v-27.30666666h134.39431112v27.30666666z m-201.59146667 0H344.12088889v-27.30666666h134.39431111v27.30666666z m-201.59146667 0H142.52942222v-27.30666666h134.39431111v27.30666666zM1035.3664 75.78737778h-27.30666667v-59.16444445h-59.16444444v-27.30666666h86.47111111zM1035.3664 882.15324445h-27.30666667V747.75893333h27.30666667v134.39431112z m0-201.59146667h-27.30666667V546.16746667h27.30666667v134.39431111z m0-201.59146667h-27.30666667V344.576h27.30666667v134.39431111z m0-201.59146666h-27.30666667V142.98453333h27.30666667v134.39431112z"
fill="#bfbfbf"></path>
<path d="M599.74674456 523.1642475H424.34544577c-6.10760857 0-11.06283816-4.95062007-11.06283815-11.06283815 0-6.10760857 4.95522958-11.06283816 11.06283814-11.06283815h175.4012988c6.10760857 0 11.06283816 4.95522958 11.06283816 11.06283815 0 6.11221808-4.95062007 11.06283816-11.06283816 11.06283815z"
fill="#bfbfbf"></path>
<path d="M512.04609516 610.86489689c-6.10760857 0-11.06283816-4.95522958-11.06283816-11.06283815V424.40075995c0-6.10760857 4.95522958-11.06283816 11.06283816-11.06283814s11.06283816 4.95522958 11.06283814 11.06283814v175.40129879c0 6.11221808-4.95522958 11.06283816-11.06283814 11.06283815z"
fill="#bfbfbf">
</path>
</svg>
<input id="file" type="file" class="fileInput">
</div>
|
准备覆盖物
直接创建了一堆的 div,为了简化,我把 Google 的拖动缩放的方块改为了滚轮缩放
1
2
3
4
5
6
7
8
9
10
11
12
| <div id="clip" class="overlay" style="display: none">
<div class="overlayInline">
<img id="img" src="" alt="" class="image"/>
<div id="base" class="imageOverlayBase">
<div class="imageOverlay" id="top"></div>
<div class="imageOverlay" id="bottom"></div>
<div class="imageOverlay" id="left"></div>
<div class="imageOverlay" id="right"></div>
<div class="imageOverlayCenter" id="center"></div>
</div>
</div>
</div>
|
1
2
3
4
5
6
7
8
9
10
11
12
13
14
15
16
17
18
19
20
21
22
23
24
25
26
27
28
29
30
31
32
33
34
35
36
37
38
39
40
41
42
43
| .overlay {
background-color: rgba(0, 0, 0, 0.5);
position: fixed;
width: 100%;
height: 100%;
left: 0;
top: 0;
z-index: 2021
}.overlayInline {
position: absolute;
background: white;
width: 300px;
height: 300px;
left: 50%;
top: 50%;
transform: translate(-50%, -50%);
} .image {
position: absolute;
max-width: 250px;
max-height: 250px;
left: 50%;
top: 50%;
transform: translate(-50%, -50%);
} .imageOverlayBase {
position: relative;
} .imageOverlay {
background-color: #fff;
opacity: 0.5;
position: absolute;
} .imageOverlayCenter {
position: absolute;
border: 1px solid rgba(0, 0, 0, 0.6);
}
|
我准备了一个 overlay 用于让整个屏幕的剩下部分变成灰色,这样可以避免在拖动的时候点击到其他元素
然后就是无尽的 JavaScript 时间
JavaScript
1
2
3
4
5
6
7
| let width = 300 // 最大图片宽度
let height = 300 // 最大图片高度
let scroll = 0.1 // 单次滚轮缩放的最大比例
let imageWidth, imageHeight // 当前图片的大小
let clipLeft, clipTop, clipWidth, clipHeight
let topOverlay, bottomOverlay, leftOverlay, rightOverlay, centerOverlay
let lastX, lastY // 记录鼠标上次位置
|
其中 clipLeft, clipTop, clipWidth, clipHeight 分别是“裁剪图片距离左边界的百分比”,“裁剪图片距离上边界的百分比”,“裁剪图片宽度百分比”,“裁剪图片高度百分比”
而 topOverlay, bottomOverlay, leftOverlay, rightOverlay, centerOverlay 则是一些保存所有的元素的变量
然后是当渲染完成时
1
2
3
4
5
6
7
8
9
10
11
12
13
14
| window.onload = function () {
let input = document.getElementById("file")
input.onchange = function (e) {
let reader = new FileReader()
reader.readAsDataURL(input.files[0])
reader.onload = () => {
let img = document.getElementById("img")
img.src = reader.result;
img.onload = function () {
prepareClip() // 准备裁剪
}
}
}
}
|
获取 input 中的图片,并将其读出,然后让 img 显示出来
然后是一些渲染的准备工作
1
2
3
4
5
6
7
8
9
10
11
12
13
14
15
16
17
18
19
20
21
22
23
24
25
26
27
28
29
30
31
32
33
34
35
36
37
38
39
40
41
42
43
44
| function prepareClip() {
// 获取图片的尺寸
let clip = document.getElementById("clip")
clip.style.display = "block"
let base = document.getElementById("base")
let img = document.getElementById("img")
imageWidth = img.width
imageHeight = img.height
// 将一个 div 移动至恰好覆盖整个图片,方便后续的相对位移的计算
base.style.width = imageWidth
base.style.height = imageHeight
base.style.left = ((width - imageWidth) / 2).toString()
base.style.top = ((height - imageHeight) / 2).toString()
// 保存下所有的遮罩 div
topOverlay = document.getElementById("top")
bottomOverlay = document.getElementById("bottom")
leftOverlay = document.getElementById("left")
rightOverlay = document.getElementById("right")
centerOverlay = document.getElementById("center")
// 为部分的 div 设置不会改变的固定值
topOverlay.style.left = "0"
topOverlay.style.top = "0"
topOverlay.style.right = "0" bottomOverlay.style.left = "0"
bottomOverlay.style.bottom = "0"
bottomOverlay.style.right = "0" leftOverlay.style.left = "0" rightOverlay.style.right = "0"
// 由于项目要求,所以图片将会是正方形,在最开始的时候,裁剪图片的尺寸为最短边的 80%
let tmp = Math.min(imageWidth * 0.8, imageHeight * 0.8)
clipWidth = tmp / imageWidth
clipHeight = tmp / imageHeight clipLeft = (1 - clipWidth) / 2
clipTop = (1 - clipHeight) / 2 // 添加事件
centerOverlay.addEventListener("mousedown", mouseDown)
centerOverlay.addEventListener("mousewheel", mouseWheel)
resetOverlay()
}
|
然后为每一块 div 计算出他们的位置
1
2
3
4
5
6
7
8
9
10
11
12
13
14
15
16
17
18
19
20
21
22
23
24
| function resetOverlay() {
let position = {
left: clipLeft * imageWidth,
right: (1 - clipLeft - clipWidth) * imageWidth,
top: clipTop * imageHeight,
bottom: (1 - clipTop - clipHeight) * imageHeight
}
topOverlay.style.bottom = (imageHeight - position.top).toString() bottomOverlay.style.top = (imageHeight - position.bottom).toString() leftOverlay.style.top = position.top.toString()
leftOverlay.style.bottom = position.bottom.toString()
leftOverlay.style.right = (imageWidth - position.left).toString() rightOverlay.style.top = position.top.toString()
rightOverlay.style.bottom = position.bottom.toString()
rightOverlay.style.left = (imageWidth - position.right).toString() centerOverlay.style.left = position.left.toString()
centerOverlay.style.right = position.right.toString()
centerOverlay.style.top = position.top.toString()
centerOverlay.style.bottom = position.bottom.toString()
}
|
然后是三个事件的处理过程
1
2
3
4
5
6
7
8
9
10
11
12
13
14
15
16
17
18
19
20
21
22
23
24
25
26
27
28
29
30
31
32
33
34
35
36
37
38
39
40
| function clamp(l, r, v) {
if (v < l) return l
else if (v > r) return r
return v
}function mouseMove(event) {
clipLeft += (event.pageX - lastX) / imageWidth
clipLeft = clamp(0, 1 - clipWidth, clipLeft)
clipTop += (event.pageY - lastY) / imageHeight
clipTop = clamp(0, 1 - clipHeight, clipTop)
lastX = event.pageX
lastY = event.pageY
resetOverlay()
} function mouseUp(event) {
centerOverlay.removeEventListener('mousemove', mouseMove);
} function mouseDown(event) {
lastX = event.pageX
lastY = event.pageY
centerOverlay.addEventListener("mousemove", mouseMove)
centerOverlay.addEventListener("mouseup", mouseUp)
} function mouseWheel(event) {
let op = event.wheelDelta / Math.abs(event.wheelDelta)
let maxDelta = op > 0 ?
Math.min(imageWidth * (1 - clipWidth), imageHeight * (1 - clipHeight), scroll * Math.min(imageWidth, imageHeight)) :
Math.min(imageWidth * (clipWidth - 0.1), imageHeight * (clipHeight - 0.1), scroll * Math.min(imageWidth, imageHeight))
clipWidth += maxDelta / imageWidth * op
clipHeight += maxDelta / imageHeight * op
clipLeft -= maxDelta / imageWidth / 2 * op
clipLeft = clamp(0, 1 - clipWidth, clipLeft)
clipTop -= maxDelta / imageHeight / 2 * op
clipTop = clamp(0, 1 - clipHeight, clipTop)
resetOverlay()
}
|
然后是效果图