





我们对于边缘站点考虑用树莓派 5 进行数据的初步处理,但是我手上只有一台树莓派 4B. 鉴于这两代之间的 gpio (General Purpose Input & Output) 是一样的,所以暂时先用 4B 来尝试一下.
首先说明一下,我的这台树莓派 4B 已经安装了 GMN 为树莓派设计的 RMS 流星监测系统.
本部分主要参考 这篇文章.
为了精确地同步任意两个站点之间的时间 (必须达到亚毫秒量级,否则最严重的情况是两地完全无法确定捕捉到的信号是同一颗流星、最好的情况则是定轨出现大幅度的误差.),我们会在树莓派上面安装 GPS 模块. 说是安装,实际上就是把买来的 GPS 模块用一组排线连接到树莓派上面. 而不像 Windows 一样使用 NTP 协议进行时间同步是因为,NTP 协议本身的精度就只能达到毫秒量级,远远不足以达到我们的要求. 其实之前在 流星监控项目 I 的阶段,我们也想过在 Windows 上用 PPS 做时间同步,但是并没有实现,因为一直没有找到相关的时间同步工具,唯一找到的只有 Meinberg NTP,这个玩意实在是过于难以使用 (而且是基于 NTP 协议),只好作罢. 那时候就已经发现了 Linux 系统上面有一个绝佳的工具 chrony,只可惜我当时读了很久的文档发现它仅仅支持 Linux. 不过既然我们已经有了装好 debian 的树莓派 4B,那么就该开始舒适地使用 chrony.
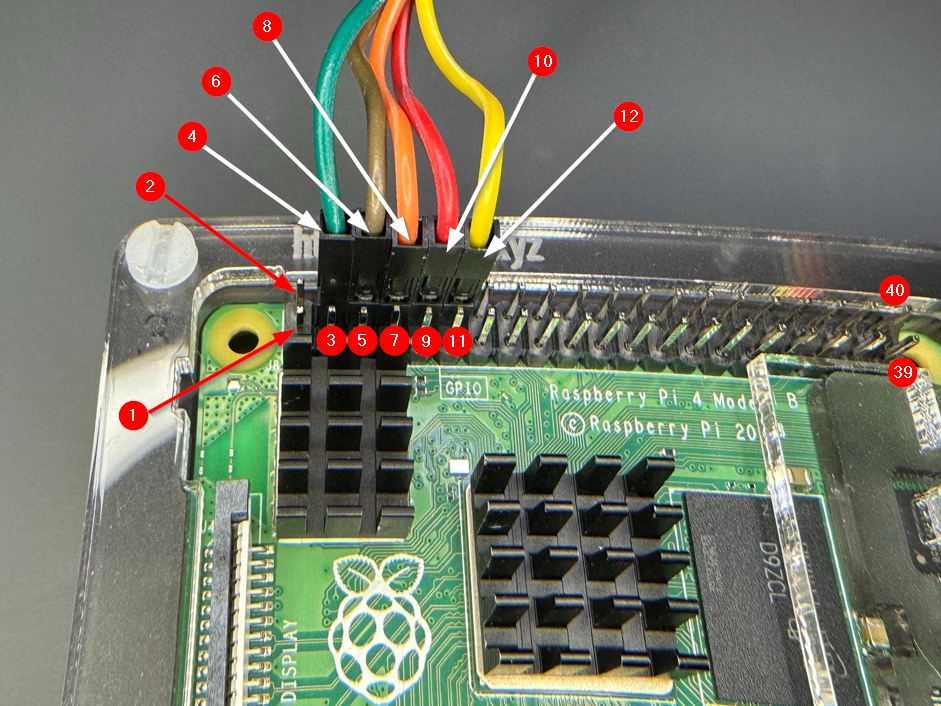
首先依旧是排线. 这一次的排线和 Windows 相比实际上差不多,用到的是树莓派的 4, 6, 8, 10, 12 接口. 具体接线如图:
其中树莓派上面引脚的编号按照下图所示:
提示
下面的操作假设已经安装了 debian 11 及之后的系统 (在 debian 13 上也测试过);假设已经安装了 vim (因为 nano 在做这种编辑的时候我实在是用不习惯.)
用管理员权限编辑 DHCP 客户端守护进程配置文件 /etc/dhcpcd.conf
在文件中加入下面几行:
interface eth0
static ip_address=192.168.0.2/24
static routers=192.168.0.1
static domain_name_servers=192.168.0.1
重启 DHCP 服务:
service networking restart配置时区 查看当前时区:
查看时区列表:
timedatectl list-timezones设定当前时区:
sudo timedatectl set-timezone Asia/Shanghai更新 apt 就是普通的更新步骤,为了防止出现额外的差错.
sudo apt update
sudo apt upgrade

sudo reboot
安装 PPS 时间同步所需要的软件包
sudo apt install pps-tools gpsd gpsd-clients python3-gps chrony它们分别的功能:
系统层面的准备 修改 /boot/config.txt:
sudo bash -c "echo 'dtoverlay=pps-gpio,gpiopin=18' >> /boot/config.txt"
sudo bash -c "echo 'enable_uart=1' >> /boot/config.txt"
sudo bash -c "echo 'init_uart_baud=9600' >> /boot/config.txt"
修改 /etc/modules:
sudo bash -c "echo 'pps-gpio' >> /etc/modules"进入树莓派硬件设置,enable 特定端口:
这之后会弹出一个界面,在界面中选择:
重启树莓派:
配置 PPS 端口 首先确认 PPS 被正确识别了:
这里的输出如果有 pps_gpio 后面一串数字就是有内容,反之则会显示无法找到. 为了看到 PPS 那个端口输出了什么东西,可以输入
这里能够看到一个每秒输出的信号,按 Ctrl + C 退出.
注意
这里的信号有可能每一条都返回的是 error -1 之类的内容,看起来有很大问题,但是实际上的原因可能只是天线没有拿到室外,导致 GPS 模块没接收到信号.
gpsd 配置 首先配置开机自启动:
sudo vi /etc/default/gpsd注意
原文这里没写 sudo,实测发现不行,还是要 root 权限.
修改成下面这样:
START_DAEMON="true"
DEVICES="/dev/ttyS0 /dev/pps0"
GPSD_OPTIONS="-n"
USBAUTO="true"
之后重启系统:
用 gpsd-clients 查看 GPS 信号的接收情况:
应该看到类似这样的界面:
(别来盒我 QωQQ\omega Q) 如果只有一长串报错信息,比如下面这种,就说明 GPS 模块没有被识别.
tcp://localhost:2947          JSON slave driver>
(82) {"class":"VERSION","release":"3.22","rev":"3.22","proto_major":3,"proto_minor":14}
(262) {"class":"DEVICES","devices":[{"class":"DEVICE","path":"/dev/ttyS0","activated":"2023-08-06T15:25:27.449Z","native":0,"bps":9600,"parity":"N","stopbits":1,"cycle":1.00},{"class"
:"DEVICE","path":"/dev/pps0","driver":"PPS","activated":"2023-08-06T15:25:27.472Z"}]}
(122) {"class":"WATCH","enable":true,"json":false,"nmea":false,"raw":2,"scaled":false,"timing":false,"split24":false,"pps":true}
注意
实际上这里有两种可能:我们在树莓派 5 上面测试的时候也出现了同样的问题,但是接线并没有出错,原因是树莓派 5 默认的接口不再是前面提到的 ttyS0,而有可能变成 serial0,导致配置文件里面写的和硬件连接对不上号,无法识别硬件.
chrony 设置 首先要编辑 chrony 的配置文件,
sudo vi /etc/chrony/chrony.conf进入之后加入下述内容:
server time-a-b.nist.gov iburst
server time-a-g.nist.gov
server time-c-wwv.nist.gov
server utcnist3.colorado.edu
server 0.us.pool.ntp.org
server time.cloudflare.com
server time.windows.com
server time.apple.com

local stratum 10

refclock SHM 0 refid NMEA precision 1e-1 offset 0.5 delay 0.2 noselect
refclock SHM 1 refid PPS precision 1e-7 lock NMEA

allow 192.168.0.0/16
前面几行指定 server 是为了在 GPS 不工作的情况下,通过网络连接到全球各地的服务器上面进行时间同步. 另外,我这里的 refclock 配置和参考文章中写得不太一样,这是因为我之前用参考文章里面的代码没有成功,所以问了 Gemini,得到现在配置文件中的这个代码. 之后重启 chrony:
sudo systemctl restart chrony警告
这里要特别注意一下,refclock 配置中 SHM 后面的那一个数字,代表了读取的时候的窗口序号. 用命令 sudo ntpshmmon 测试,应该能够看到每秒有两条输出,每条输出中都含有类似 NTP0、NTP1、NTP2 之类的内容,这里的数字表明了之前 SHM 那里的数字我们应该填写什么. 我配置的时候输出的是 NTP0 和 NTP2,所以应该把配置文件的第二个 refclock 改成 SHM 2.
验证时间同步服务 有三条验证的命令. 首先是查看所有时间同步方式的状态:
输出结果是每个同步服务器的偏移和延迟等等.
Name/IP Address            NP  NR  Span  Frequency  Freq Skew  Offset  Std Dev
==============================================================================
NMEA                        0   0     0     +0.000   2000.000     +0ns  4000ms
GPS                         0   0     0     +0.000   2000.000     +0ns  4000ms
132.163.96.1                1   0     0     +0.000   2000.000  +1585us  4000ms
129.6.15.28                 1   0     0     +0.000   2000.000  -1381us  4000ms
132.163.97.3                1   0     0     +0.000   2000.000   -750us  4000ms
128.138.140.211             1   0     0     +0.000   2000.000  -1720us  4000ms
5.78.71.97                  1   0     0     +0.000   2000.000  +1208us  4000ms
162.159.200.1               1   0     0     +0.000   2000.000  -2466us  4000ms
40.119.6.228                1   0     0     +0.000   2000.000  -2860us  4000ms
17.253.126.253              1   0     0     +0.000   2000.000  -2831us  4000ms
第二个命令是查看当前所使用的源和其他所有源的可用性:
输出结果比较复杂,是下面的形式:
  .-- Source mode  '^' = server, '=' = peer, '#' = local clock.
/ .- Source state '*' = current best, '+' = combined, '-' = not combined,
| /             'x' = may be in error, '~' = too variable, '?' = unusable.
||                                                 .- xxxx [ yyyy ] +/- zzzz
||      Reachability register (octal) -.           |  xxxx = adjusted offset,
||      Log2(Polling interval) --.      |          |  yyyy = measured offset,
||                                \     |          |  zzzz = estimated error.
||                                 |    |           \
MS Name/IP address         Stratum Poll Reach LastRx Last sample
===============================================================================
#? NMEA                          0   4   377    14    +44ms[  +44ms] +/-  108ms
#* GPS                           0   4   377    14   +936ns[+1316ns] +/-  177ns
^- 132.163.96.1                  1  10   377   967  +1556us[+1573us] +/-   18ms
^- 129.6.15.28                   1  10   377   241  -1953us[-1952us] +/-   23ms
^- 132.163.97.3                  1  10   377   121  -1576us[-1576us] +/-   22ms
^- 128.138.140.211               1  10   377   24m  -1938us[-1923us] +/-   21ms
^- 5.78.71.97                    2  10   377   409  +1838us[+1835us] +/-   37ms
^- 162.159.200.1                 3  10   377   458  -5633us[-5637us] +/-   19ms
^- 40.119.6.228                  3  10   377   396  -6626us[-6629us] +/-   37ms
^- 17.253.126.253                1  10   377   447  -4726us[-4729us] +/- 7672us
注意
这里的 -v 是用来 print 上面那一大坨提示信息的. 第一列和第二列的符号含义分别是:
* 表示我们正在从这个源同步信号.+ 表示这个源的信号可用.- 表示这个源的信号可用但是被排除.? 表示这个源无法连接. 任何一个源最开始都是这个状态,接收到三个以上的连续信号之后才能摆脱这一状态.x 表示一个坏的源.~ 表示一个不稳定的源. ::: 第三个命令用来查看当前的时间同步源信息:输出结果应该是一些时间同步的信息,比如当前时间、和源之间的延迟之类,
Reference ID    : 47505300 (GPS)
Stratum         : 1
Ref time (UTC)  : Sat Aug 06 00:55:22 2023
System time     : 0.000000141 seconds fast of NTP time
Last offset     : +0.000000302 seconds
RMS offset      : 0.000000300 seconds
Frequency       : 11.530 ppm fast
Residual freq   : +0.000 ppm
Skew            : 0.004 ppm
Root delay      : 0.000000001 seconds
Root dispersion : 0.000016511 seconds
Update interval : 16.0 seconds
Leap status     : Normal
调整 offset 最后通过 chronyc -n sourcestats 输出结果的 offset 值,修改之前 chrony 配置文件中的 offset 后面的数字即可. 如果不做调整,很可能出现无法对上时间的问题.
树莓派 5 的有些定义不一样,针对这个我们需要做下面的修改:
/boot/firmware/config.txt 文件末尾增加:
  # PPS on GPIO18 (physical pin 12)
  dtoverlay=pps-gpio,gpiopin=18

  # Enable UART on GPIO14/15 (physical pins 8/10) for Pi 5
  dtoverlay=uart0

  # UART basics
  enable_uart=1
  init_uart_baud=9600
然后确保 PPS 模块加载:输入命令
grep -q '^pps-gpio$' /etc/modules || echo 'pps-gpio' | sudo tee -a /etc/modules最关键的是把 gpsd 的 DEVICES 从 /dev/ttyS0 改掉,
sudo vi /etc/default/gpsdDEVICES 改成:
START_DAEMON="true"
DEVICES="/dev/ttyAMA0 /dev/pps0"
GPSD_OPTIONS="-n"
USBAUTO="true"我把上面的内容写成了脚本:
setup.sh
#!/bin/bash

# Unified Raspberry Pi Setup Script (GPS/PPS/NTP)
# Supports: Raspberry Pi 4 & Raspberry Pi 5

# 1. Check root permission
if [ "$EUID" -ne 0 ]; then
  echo "Error: Please run this script with sudo."
  echo "Usage: sudo ./setup_pi.sh"
  exit 1
fi

# User Selection: Pi Model
echo "------------------------------------------------"
echo "Please select your Raspberry Pi model:"
echo "1) Raspberry Pi 4 (Legacy)"
echo "2) Raspberry Pi 5 (Newer)"
echo "------------------------------------------------"
read -p "Enter choice [1 or 2]: " pi_choice

# Set variables based on selection
if [[ "$pi_choice" == "2" ]]; then
    echo ">> Selected: Raspberry Pi 5"
    TARGET_PI="5"
    SERIAL_PORT="/dev/ttyAMA0"

    # Check for Bookworm/Pi5 specific config path
    if [ -f "/boot/firmware/config.txt" ]; then
        CONFIG_FILE="/boot/firmware/config.txt"
    else
        CONFIG_FILE="/boot/config.txt"
    fi
elif [[ "$pi_choice" == "1" ]]; then
    echo ">> Selected: Raspberry Pi 4"
    TARGET_PI="4"
    SERIAL_PORT="/dev/ttyS0"
    CONFIG_FILE="/boot/config.txt"
else
    echo "Invalid selection. Exiting."
    exit 1
fi

echo ">> Configuration File: $CONFIG_FILE"
echo ">> Serial Port: $SERIAL_PORT"
echo "------------------------------------------------"

# Common Variables
STATIC_IP="192.168.0.2/24"
ROUTER_IP="192.168.0.1"
DNS_IP="192.168.0.1"

# Step 1: Network Configuration
echo "[1/6] Configuring Network..."

DHCP_CONF="/etc/dhcpcd.conf"

if [ -f "$DHCP_CONF" ]; then
    # Backup
    if [ ! -f "${DHCP_CONF}.bak" ]; then
        cp "$DHCP_CONF" "${DHCP_CONF}.bak"
        echo "Backed up $DHCP_CONF"
    fi

    # Check existence
    if grep -q "static ip_address=$STATIC_IP" "$DHCP_CONF"; then
        echo "Static IP configuration already exists. Skipping."
    else
        cat <<EOF >> "$DHCP_CONF"

# Added by setup script
interface eth0
static ip_address=$STATIC_IP
static routers=$ROUTER_IP
static domain_name_servers=$DNS_IP
EOF
        echo "Static IP configuration added."

        # Try to restart networking (compatible with different OS versions)
        service networking restart 2>/dev/null || systemctl restart NetworkManager 2>/dev/null
        echo "Network service restarted."
    fi
else
    echo "Warning: $DHCP_CONF not found. If you are using NetworkManager exclusively, please configure IP manually."
fi

# Step 2: Timezone
echo "[2/6] Setting Timezone (Asia/Shanghai)..."
timedatectl set-timezone Asia/Shanghai
echo "Current Timezone:"
timedatectl | grep "Time zone"

# Step 3: Software Installation
echo "[3/6] Updating system and installing software..."
apt update
apt install -y pps-tools gpsd gpsd-clients python3-gps chrony vim

# Step 4: Hardware Configuration
echo "[4/6] Configuring Hardware ($CONFIG_FILE & /etc/modules)..."

if [ ! -f "$CONFIG_FILE" ]; then
    echo "Error: Config file $CONFIG_FILE not found!"
    exit 1
fi

# Backup config
cp "$CONFIG_FILE" "${CONFIG_FILE}.bak_$(date +%s)"

# 4.1 PPS GPIO Config (Common)
grep -q "dtoverlay=pps-gpio,gpiopin=18" "$CONFIG_FILE" || echo "dtoverlay=pps-gpio,gpiopin=18" >> "$CONFIG_FILE"

# 4.2 Pi 5 Specific: Enable UART0 overlay
if [[ "$TARGET_PI" == "5" ]]; then
    echo "Applying Pi 5 specific UART0 overlay..."
    grep -q "dtoverlay=uart0" "$CONFIG_FILE" || echo "dtoverlay=uart0" >> "$CONFIG_FILE"
fi

# 4.3 General UART Config (Common)
grep -q "enable_uart=1" "$CONFIG_FILE" || echo "enable_uart=1" >> "$CONFIG_FILE"
grep -q "init_uart_baud=9600" "$CONFIG_FILE" || echo "init_uart_baud=9600" >> "$CONFIG_FILE"

# 4.4 Kernel Modules
MODULES_FILE="/etc/modules"
grep -q "^pps-gpio$" "$MODULES_FILE" || echo "pps-gpio" >> "$MODULES_FILE"

# 4.5 Enable Serial (Legacy raspi-config method, mostly for Pi 4)
if [[ "$TARGET_PI" == "4" ]] && command -v raspi-config >/dev/null; then
    raspi-config nonint do_serial 2
    echo "Ensured Serial Port is enabled via raspi-config."
fi

echo "Hardware configuration updated."

# Step 5: GPSD Configuration
echo "[5/6] Configuring GPSD..."

GPSD_CONF="/etc/default/gpsd"
cp "$GPSD_CONF" "${GPSD_CONF}.bak"

# Write configuration with the dynamic SERIAL_PORT variable
cat <<EOF > "$GPSD_CONF"
# Default settings for the gpsd init script and the hotplug wrapper.

# Start the gpsd daemon automatically at boot time
START_DAEMON="true"

# Use USB hotplugging to add new USB devices automatically to the daemon
USBAUTO="true"

# Devices gpsd should collect to at boot time.
# Configured for: Raspberry Pi $TARGET_PI
DEVICES="$SERIAL_PORT /dev/pps0"

# Other options you want to pass to gpsd
GPSD_OPTIONS="-n"
EOF

echo "GPSD configured with devices: $SERIAL_PORT /dev/pps0"

# Step 6: Chrony Configuration
echo "[6/6] Configuring Chrony NTP..."

CHRONY_CONF="/etc/chrony/chrony.conf"
cp "$CHRONY_CONF" "${CHRONY_CONF}.bak"

# Only append if custom section doesn't exist
if ! grep -q "refclock SHM" "$CHRONY_CONF"; then
    cat <<EOF >> "$CHRONY_CONF"

# --- Added by Setup Script ---
server time-a-b.nist.gov iburst
server time-a-g.nist.gov
server time-c-wwv.nist.gov
server utcnist3.colorado.edu
server 0.us.pool.ntp.org
server time.cloudflare.com
server time.windows.com
server time.apple.com

allow 192.168.0.0/16

# GPS/PPS Reference Clock
# Note: SHM 0 usually corresponds to NMEA, SHM 1 to PPS.
local stratum 10
refclock SHM 0 refid NMEA precision 1e-1 offset 0.5 delay 0.2 noselect
refclock SHM 1 refid PPS precision 1e-7 lock NMEA
EOF
    echo "Chrony configuration appended."
else
    echo "Chrony configuration seems already present. Skipping append."
fi

echo "Restarting Chrony service..."
systemctl restart chrony

# Completion
echo "------------------------------------------------"
echo "Setup Completed Successfully!"
echo "------------------------------------------------"
echo "Summary of changes:"
echo "1. Device Model : Raspberry Pi $TARGET_PI"
echo "2. Config File  : $CONFIG_FILE"
echo "3. Serial Port  : $SERIAL_PORT"
echo "4. IP Address   : $STATIC_IP"
echo "------------------------------------------------"
echo "IMPORTANT NOTES:"
echo "1. If you cannot connect after reboot, check your router settings regarding the static IP."
echo "2. Run 'sudo ntpshmmon' after reboot to verify the SHM indices (0/1/2)."
echo "   If they differ, edit $CHRONY_CONF."
echo "------------------------------------------------"

read -p "A system reboot is required to apply hardware changes. Reboot now? (y/n) " -n 1 -r
echo
if [[ $REPLY =~ ^[Yy]$ ]]; then
    reboot
fi
之后我准备把它和一个 Bullseye 或者 Bookworm (debian 12) 一起烧进同一个 .iso 文件中,方便我们后续的批量制作小型树莓派站点.
此内容由惯性聚合(RSS阅读器)自动聚合整理,仅供阅读参考。 原文来自 — 版权归原作者所有。