










I use a (rather oldish) MacBook for my day-to-day development tasks. But I prefer keeping my host operating system free of development stuff. This strategy has the following benefits:
Since I usually work on several projects at the same time, I need not one but many isolated development environments. And every environment should be project-tailored, easy to spin up, suspend, and, eventually, dispose. I figured a way to achieve that by using only a few tools installed on my host operating system, and I'm going to share it here.
The approach may be helpful for folks using macOS or Linux:
Level up your server-side game — join 20,000 engineers getting insightful learning materials straight to their inbox.
Besides everyday things like a browser or a video player, I need only the following tools installed on the host operating system:
I deliberately keep this list short because of the reasons mentioned above. By this time, it's probably clear that the key component here is Vagrant. But I still have Docker installed on my macOS.
Having Docker on the host operating systems allows me to:
alias jq='docker run -i stedolan/jq').Docker provides fairly good isolation (assuming I trust the things I run), and it's easy to get rid of things I don't need anymore - just delete not-needed containers and images. At some point in time, I started thinking of replacing Docker with Podman. But recent Docker's promise to double down on the Development Experience gave me some extra hope for the bright future of this project.
Things I tried but abandoned in favor of the Docker + Vagrant approach:
rvm, nvm, gvm, etc - a fine option to manage multiple versions of the same language on one machine, but requires careful use.venv - same as above plus a Python version manager would be needed; haven't even tried searching for it.Vagrant makes it easy to use virtual machines as development environments. I use it with the VirtualBox provider. Vagrant can be installed using homebrew or by downloading a distributive from the official website. Additionally, I always install the VirtualBox Guest Additions plugin to activate some extra functionality, such as mounting host folders into virtual machines:
$ vagrant plugin install vagrant-vbguest
When I don't know what exactly I'll need for a project, I just start with a bare minimum VM:
$ mkdir project-skunkworks
$ cd project-skunkworks

$ vagrant init debian/buster64
# vagrant init centos/7
# vagrant init alpine/alpine64
# etc
It creates a new Vagrantfile with the future virtual machine configuration. I usually adjust it then as follows:
My typical initial Vagrant file looks like this:
Vagrant.configure("2") do |config|
  config.vm.box = "debian/buster64"
  config.vm.hostname = "skunkworks-01"
  config.vm.define "skunkworks-01"
  config.vagrant.plugins = ['vagrant-vbguest']

  config.vm.network "private_network", ip: "192.168.33.10"

  config.vm.synced_folder "./", "/home/vagrant/project"

  config.vm.provider "virtualbox" do |vb|
    vb.cpus = 4
    vb.memory = "2048"
  end

  config.vm.provision "shell", inline: <<-SHELL
    apt-get update
    apt-get install -y curl git cmake tmux vim  # ...
  SHELL

  config.vm.provision "docker" do |d|
    d.run "nginx"
  end
end
Yes, it's totally fine to have Docker running inside a Vagrant virtual machine! And the Docker installation is as simple as just listing the "docker" provisioner in the file. Vagrant automagically will take care of the rest.
I try to commit the Vagrantfile with the rest of the project's files. It'd allow other developers to spin up a development environment faster. When the project's dependency list starts getting clearer, I adjust the Vagrantfile to reflect the new requirements.
To start a virtual machine using a Vagrantfile file, I run vagrant up from the folder enclosing the file. The first start may take a couple of minutes due to the initial provisioning, but the consequent starts will be significantly faster. To have shell access to the machine, I use vagrant ssh, although I need it only to run commands there. The actual code editing happens in a shared folder from the host operating system using a code editor of choice. If I run a web service in that machine, I also can access it using a host's browser on the IP address specified in the Vagrantfile.
A running virtual machine consumes a considerable amount of CPU and RAM resources, so I strive to have as few VMs running simultaneously as just possible. Using vagrant halt, I can power down the machine and power it up again later with vagrant up. A slightly more advanced use case is to suspend the machine with vagrant suspend and resume it later with vagrant resume.
A stopped virtual machine may still occupy quite some disk space, so if I don't see myself coming back to the project anytime soon, I clean up everything but the Vagrantfile with vagrant destroy.
Another useful command is vagrant global-status. Unlike other commands that were mentioned here, it doesn't need to be run from a folder containing the Vagrantfile. I use this command periodically to check which virtual machines are still alive.
Vagrantifle's are a form of Infrastructure as Code. It means that having an up-to-date Vagrantfile, I can reproduce an environment without manually reconfiguring a virtual machine. Hence, when properly used, Vagrant development environments are fully disposable.
When my editor/IDE of choice isn't Vim, it's either Sublime Text or Visual Studio Code. Both tools require full-fledged graphical UI support, so it becomes important to be able to run the editor on the host machine.
With a project folder mounted into a Vagrant virtual machine, it's relatively simple to point the editor to this folder and just make all the changes locally. However, more advanced projects usually require additional tools to work with the code - linters, formatters, code completion servers, etc. Installing such tools on the host machine would defeat the purpose of the isolated and disposable dev environments.
Visual Studio Code Remote Development to the rescue!
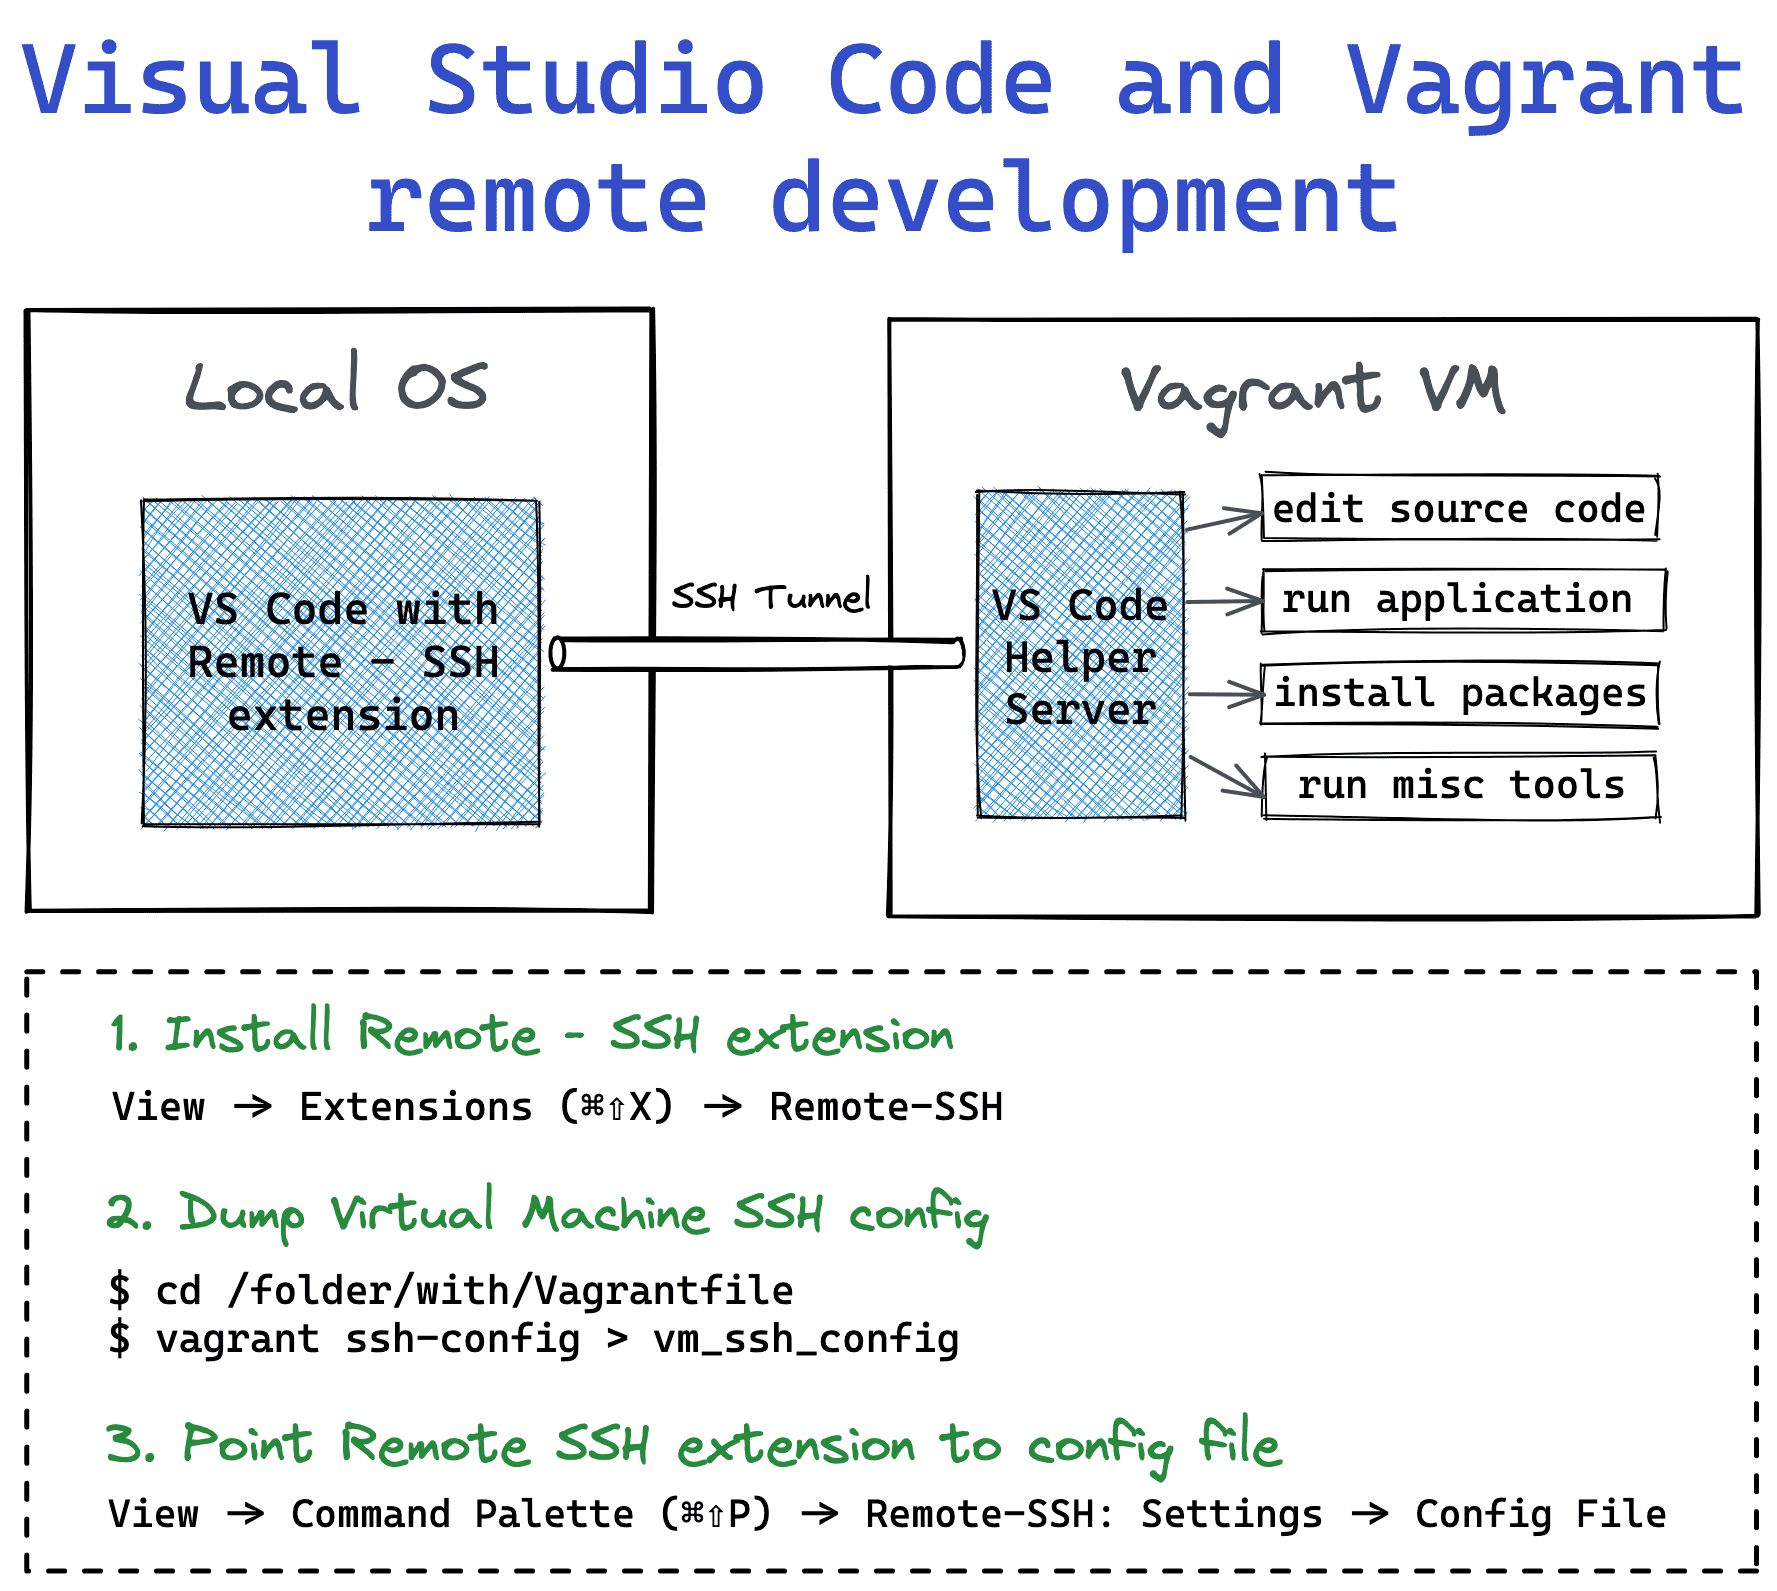
Visual Studio Code Remote - SSH extension works really well with Vagrant. All I need to do is to install the extension and teach it how to access the virtual machine by providing the dump of vagrant ssh-config.
After adding the virtual machine SSH credentials, the extension will automatically install the VS Code Server on the VM. Pairing the VS Code with this server makes launching code, installing packages, and running tools remotely really seamless.
I often hack on Cloud Native stack. Or hack the Cloud Native stack. In both cases, arkade comes in handy. It's a portable binary that can download and install other command-line tools such as kubectl, kustomize, helm, kind, and many more. It also comes with tens of helm charts, so one could install a docker registry, grafana, traefik2, or even linkerd or istio service mesh into a Kubernetes cluster with just a single arkade command. Farewell, the annoying Internet search of the fresh installation instructions.
Another cool thing about it is that arkade itself can be installed with a single command:
$ curl -sLS https://get.arkade.dev | sudo sh

$ arkade --help
So, assuming I already have Docker running on my virtual machine, I can get an up and running Kubernetes cluster with an Nginx Ingress Controller in a matter of seconds!
$ arkade get kubectl
$ arkade get kind

$ kind create cluster

$ arkade install ingress-nginx

$ kubectl get all
NAME                                           READY   STATUS    RESTARTS   AGE
pod/ingress-nginx-controller-7d98fb5bd-956fq   1/1     Running   0          38s

NAME                                         TYPE           CLUSTER-IP      EXTERNAL-IP   PORT(S)                      AGE
service/ingress-nginx-controller             LoadBalancer   10.96.239.161   <pending>     80:31973/TCP,443:31901/TCP   38s
service/ingress-nginx-controller-admission   ClusterIP      10.96.11.19     <none>        443/TCP                      38s
service/kubernetes                           ClusterIP      10.96.0.1       <none>        443/TCP                      84s
...
I find it super useful for quick experimentations. Learning about arkade broke some sort of a psychological barrier for me - now I'm less afraid of messing up with my local Kubernetes clusters because I know that I can reproduce the setup with just a few arkade get/install lines.
Combining the power of arkade with disposable vagrant virtual machines allows me to move blazingly fast on the initial phase of my projects.
I try to keep my approach pragmatic by choosing the tools and techniques that truly work. If you read till this point, I hope there was something helpful for you in the post. If so, you may also like to read about my approach to picking a language for a programming toolbox.
Level up your server-side game — join 20,000 engineers getting insightful learning materials straight to their inbox:
此内容由惯性聚合(RSS阅读器)自动聚合整理,仅供阅读参考。 原文来自 — 版权归原作者所有。