







本文主要是对kube-proxy的源码分析,了解其代码结构和实现原理。这里是根据kubernetes1.23.9 (opens new window)版本来进行分析的。在下面贴上的代码会一定裁剪,主要用于理解主流程。
kube-proxy入口文件在cmd/kube-proxy/proxy.go
func main() {
	command := app.NewProxyCommand()
	code := cli.Run(command)
	os.Exit(code)
}
1
2
3
4
5
查看app.NewProxyCommand()方法,使用的cobra命令行解析库来作为程序入口
func NewProxyCommand() *cobra.Command {
	opts := NewOptions()

	cmd := &cobra.Command{
		Use: "kube-proxy",
		Long: `The Kubernetes network proxy runs on each node. This
reflects services as defined in the Kubernetes API on each node and can do simple
TCP, UDP, and SCTP stream forwarding or round robin TCP, UDP, and SCTP forwarding across a set of backends.
Service cluster IPs and ports are currently found through Docker-links-compatible
environment variables specifying ports opened by the service proxy. There is an optional
addon that provides cluster DNS for these cluster IPs. The user must create a service
with the apiserver API to configure the proxy.`,
		RunE: func(cmd *cobra.Command, args []string) error {
			verflag.PrintAndExitIfRequested()
			cliflag.PrintFlags(cmd.Flags())

			if err := initForOS(opts.WindowsService); err != nil {
				return fmt.Errorf("failed os init: %w", err)
			}

			// 1. 加载配置文件kubeproxyconfig.KubeProxyConfiguration
			// 2. 监控文件变化
			if err := opts.Complete(); err != nil {
				return fmt.Errorf("failed complete: %w", err)
			}

			// 配置参数的校验
			if err := opts.Validate(); err != nil {
				return fmt.Errorf("failed validate: %w", err)
			}

			// 运行服务
			if err := opts.Run(); err != nil {
				klog.ErrorS(err, "Error running ProxyServer")
				return err
			}

			return nil
		},
		Args: func(cmd *cobra.Command, args []string) error {
			for _, arg := range args {
				if len(arg) > 0 {
					return fmt.Errorf("%q does not take any arguments, got %q", cmd.CommandPath(), args)
				}
			}
			return nil
		},
	}

	var err error
    // 填充一些默认配置
	opts.config, err = opts.ApplyDefaults(opts.config)
	if err != nil {
		klog.ErrorS(err, "Unable to create flag defaults")
		// ACTION REQUIRED: Exit code changed from 255 to 1
		os.Exit(1)
	}

	fs := cmd.Flags()
	opts.AddFlags(fs)
	// 将go的命令行参数也加到命令行参数中
	fs.AddGoFlagSet(goflag.CommandLine) // for --boot-id-file and --machine-id-file

	_ = cmd.MarkFlagFilename("config", "yaml", "yml", "json")

	return cmd
}
1
2
3
4
5
6
7
8
9
10
11
12
13
14
15
16
17
18
19
20
21
22
23
24
25
26
27
28
29
30
31
32
33
34
35
36
37
38
39
40
41
42
43
44
45
46
47
48
49
50
51
52
53
54
55
56
57
58
59
60
61
62
63
64
65
66
67
再来看opts.Run()服务启动的实现
func (o *Options) Run() error {
	defer close(o.errCh)

    // 如果配置了该字段,将配置文件写入指定位置,然后退出
	if len(o.WriteConfigTo) > 0 {
		return o.writeConfigFile()
	}

    // 创建代理服务
	proxyServer, err := NewProxyServer(o)
	if err != nil {
		return err
	}

	// 清除所有的iptables规则
	if o.CleanupAndExit {
		return proxyServer.CleanupAndExit()
	}

	// 启动代理服务
	o.proxyServer = proxyServer
	return o.runLoop()
}
1
2
3
4
5
6
7
8
9
10
11
12
13
14
15
16
17
18
19
20
21
22
23
再看NewProxyServer()的实现,主要是用来创建proxyServer对象,并且在其中根据当前的网络模式,通过iptables.NewProxier来创建proxier对象。
func NewProxyServer(o *Options) (*ProxyServer, error) {
	return newProxyServer(o.config, o.CleanupAndExit, o.master)
}

func newProxyServer(
	config *proxyconfigapi.KubeProxyConfiguration,
	cleanupAndExit bool,
	master string) (*ProxyServer, error) {

	// 执行本地命令的控制器
	execer := exec.New()

	kernelHandler = ipvs.NewLinuxKernelHandler()
    // 创建ipset命令的执行器
	ipsetInterface = utilipset.New(execer)
    // 判断是否支持ipvs
	canUseIPVS, err := ipvs.CanUseIPVSProxier(kernelHandler, ipsetInterface, config.IPVS.Scheduler)
	if string(config.Mode) == proxyModeIPVS && err != nil {
		klog.ErrorS(err, "Can't use the IPVS proxier")
	}

	if canUseIPVS {
        // 如果支持的话,创建ipvs执行器
		ipvsInterface = utilipvs.New()
	}

	// 创建事件记录器
	eventBroadcaster := events.NewBroadcaster(&events.EventSinkImpl{Interface: client.EventsV1()})
	recorder := eventBroadcaster.NewRecorder(scheme.Scheme, "kube-proxy")

	// 创建健康检查服务
	var healthzServer healthcheck.ProxierHealthUpdater
	if len(config.HealthzBindAddress) > 0 {
		healthzServer = healthcheck.NewProxierHealthServer(config.HealthzBindAddress, 2*config.IPTables.SyncPeriod.Duration, recorder, nodeRef)
	}

    // 获取当前的代理模式
	proxyMode := getProxyMode(string(config.Mode), canUseIPVS, iptables.LinuxKernelCompatTester{})

    // 获取当前的主要的IP协议
	primaryProtocol := utiliptables.ProtocolIPv4
	if netutils.IsIPv6(nodeIP) {
		primaryProtocol = utiliptables.ProtocolIPv6
	}

	// 创建iptables执行器
	iptInterface = utiliptables.New(execer, primaryProtocol)

	// 可能支持ipv4和ipv6两种执行器
	var ipt [2]utiliptables.Interface
	dualStack := true // While we assume that node supports, we do further checks below

	// 如果支持的是iptables模式
	if proxyMode == proxyModeIPTables {

		// 双端模式,支持IP4和IPV6
		if dualStack {
			proxier, err = iptables.NewDualStackProxier(
				ipt,
				utilsysctl.New(),
				execer,
				config.IPTables.SyncPeriod.Duration,
				config.IPTables.MinSyncPeriod.Duration,
				config.IPTables.MasqueradeAll,
				int(*config.IPTables.MasqueradeBit),
				localDetectors,
				hostname,
				nodeIPTuple(config.BindAddress),
				recorder,
				healthzServer,
				config.NodePortAddresses,
			)
		} else {
			proxier, err = iptables.NewProxier(
				iptInterface,
				utilsysctl.New(),
				execer,
				config.IPTables.SyncPeriod.Duration,
				config.IPTables.MinSyncPeriod.Duration,
				config.IPTables.MasqueradeAll,
				int(*config.IPTables.MasqueradeBit),
				localDetector,
				hostname,
				nodeIP,
				recorder,
				healthzServer,
				config.NodePortAddresses,
			)
		}

		if err != nil {
			return nil, fmt.Errorf("unable to create proxier: %v", err)
		}
		proxymetrics.RegisterMetrics()

	else if proxyMode == proxyModeIPVS {
		...
	}

	return &ProxyServer{
		Client:                 client,
		EventClient:            eventClient,
		IptInterface:           iptInterface,
		IpvsInterface:          ipvsInterface,
		IpsetInterface:         ipsetInterface,
		execer:                 execer,
		Proxier:                proxier,
		Broadcaster:            eventBroadcaster,
		Recorder:               recorder,
		ConntrackConfiguration: config.Conntrack,
		Conntracker:            &realConntracker{},
		ProxyMode:              proxyMode,
		NodeRef:                nodeRef,
		MetricsBindAddress:     config.MetricsBindAddress,
		BindAddressHardFail:    config.BindAddressHardFail,
		EnableProfiling:        config.EnableProfiling,
		OOMScoreAdj:            config.OOMScoreAdj,
		ConfigSyncPeriod:       config.ConfigSyncPeriod.Duration,
		HealthzServer:          healthzServer,
		UseEndpointSlices:      useEndpointSlices,
	}, nil
}
1
2
3
4
5
6
7
8
9
10
11
12
13
14
15
16
17
18
19
20
21
22
23
24
25
26
27
28
29
30
31
32
33
34
35
36
37
38
39
40
41
42
43
44
45
46
47
48
49
50
51
52
53
54
55
56
57
58
59
60
61
62
63
64
65
66
67
68
69
70
71
72
73
74
75
76
77
78
79
80
81
82
83
84
85
86
87
88
89
90
91
92
93
94
95
96
97
98
99
100
101
102
103
104
105
106
107
108
109
110
111
112
113
114
115
116
117
118
119
120
121
122
再来看iptables.NewProxier()方法
func NewProxier(ipt utiliptables.Interface,
	sysctl utilsysctl.Interface,
	exec utilexec.Interface,
	syncPeriod time.Duration,
	minSyncPeriod time.Duration,
	masqueradeAll bool,
	masqueradeBit int,
	localDetector proxyutiliptables.LocalTrafficDetector,
	hostname string,
	nodeIP net.IP,
	recorder events.EventRecorder,
	healthzServer healthcheck.ProxierHealthUpdater,
	nodePortAddresses []string,
) (*Proxier, error) {

	// 这个就是0x4000,也就是给数据包打上标记,在出主机的时候会进行SNAT
	masqueradeValue := 1 << uint(masqueradeBit)
	masqueradeMark := fmt.Sprintf("%#08x", masqueradeValue)

    // 创建健康检查服务
	serviceHealthServer := healthcheck.NewServiceHealthServer(hostname, recorder, nodePortAddresses)

	proxier := &Proxier{
		serviceMap:               make(proxy.ServiceMap),
		serviceChanges:           proxy.NewServiceChangeTracker(newServiceInfo, ipFamily, recorder, nil),
		endpointsMap:             make(proxy.EndpointsMap),
		endpointsChanges:         proxy.NewEndpointChangeTracker(hostname, newEndpointInfo, ipFamily, recorder, nil),
		syncPeriod:               syncPeriod,
		iptables:                 ipt,
		masqueradeAll:            masqueradeAll,
		masqueradeMark:           masqueradeMark,
		exec:                     exec,
		localDetector:            localDetector,
		hostname:                 hostname,
		nodeIP:                   nodeIP,
		recorder:                 recorder,
		serviceHealthServer:      serviceHealthServer,
		healthzServer:            healthzServer,
		precomputedProbabilities: make([]string, 0, 1001),
		iptablesData:             bytes.NewBuffer(nil),
		existingFilterChainsData: bytes.NewBuffer(nil),
		filterChains:             utilproxy.LineBuffer{},
		filterRules:              utilproxy.LineBuffer{},
		natChains:                utilproxy.LineBuffer{},
		natRules:                 utilproxy.LineBuffer{},
		nodePortAddresses:        nodePortAddresses,
		networkInterfacer:        utilproxy.RealNetwork{},
	}

	burstSyncs := 2
    // syncRunner是用来控制刷新iptables规则频率的运行器,proxier.syncProxyRules方法就是真正刷新iptables规则的方法
   	proxier.syncRunner = async.NewBoundedFrequencyRunner("sync-runner", proxier.syncProxyRules, minSyncPeriod, time.Hour, burstSyncs)

	// 这里启用一个goroutine。在三个表中都创建一个KUBE-PROXY-CANARY子链,通过子链是否存在来判断iptables是否被刷掉。
	// 如果该链不存在,说明iptables被刷掉了,再次执行syncProxyRules方法刷回来。
	go ipt.Monitor(kubeProxyCanaryChain, []utiliptables.Table{utiliptables.TableMangle, utiliptables.TableNAT, utiliptables.TableFilter},
		proxier.syncProxyRules, syncPeriod, wait.NeverStop)
	return proxier, nil
}
1
2
3
4
5
6
7
8
9
10
11
12
13
14
15
16
17
18
19
20
21
22
23
24
25
26
27
28
29
30
31
32
33
34
35
36
37
38
39
40
41
42
43
44
45
46
47
48
49
50
51
52
53
54
55
56
57
58
59
以上主要的对象已经初始化完成了。
回到o.Run()方法中,先是创建ProxyServer对象,然后在其中又创建proxier对象,做了一系列初始化动作,接下来就是运行代理服务了,现在看向runLoop方法
func (o *Options) runLoop() error {
	// 开启文件监听
	if o.watcher != nil {
		o.watcher.Run()
	}

	// run the proxy in goroutine
	go func() {
		err := o.proxyServer.Run()
		o.errCh <- err
	}()

    // 如果接受到errCh则停止服务
	for {
		err := <-o.errCh
		if err != nil {
			return err
		}
	}
}
1
2
3
4
5
6
7
8
9
10
11
12
13
14
15
16
17
18
19
20
再看向o.proxyServer.Run()方法,运行代理服务的主流程。
func (s *ProxyServer) Run() error {
	// 设置当前进程的OOM参数,资源紧张时,不优先kill掉kube-proxy
	var oomAdjuster *oom.OOMAdjuster
	if s.OOMScoreAdj != nil {
		oomAdjuster = oom.NewOOMAdjuster()
		if err := oomAdjuster.ApplyOOMScoreAdj(0, int(*s.OOMScoreAdj)); err != nil {
			klog.V(2).InfoS("Failed to apply OOMScore", "err", err)
		}
	}

	// 开启健康检查服务
	serveHealthz(s.HealthzServer, errCh)

	// 开启指标上报服务
	serveMetrics(s.MetricsBindAddress, s.ProxyMode, s.EnableProfiling, errCh)

	// 创建informer
	informerFactory := informers.NewSharedInformerFactoryWithOptions(s.Client, s.ConfigSyncPeriod,
		informers.WithTweakListOptions(func(options *metav1.ListOptions) {
			options.LabelSelector = labelSelector.String()
		}))

	// 监听service和endpoint并注册事件,当发生变化时,则会进行刷新iptables规则
	serviceConfig := config.NewServiceConfig(informerFactory.Core().V1().Services(), s.ConfigSyncPeriod)
	serviceConfig.RegisterEventHandler(s.Proxier)
	go serviceConfig.Run(wait.NeverStop)

	if endpointsHandler, ok := s.Proxier.(config.EndpointsHandler); ok && !s.UseEndpointSlices {
		endpointsConfig := config.NewEndpointsConfig(informerFactory.Core().V1().Endpoints(), s.ConfigSyncPeriod)
		endpointsConfig.RegisterEventHandler(endpointsHandler)
		go endpointsConfig.Run(wait.NeverStop)
	} else {
		endpointSliceConfig := config.NewEndpointSliceConfig(informerFactory.Discovery().V1().EndpointSlices(), s.ConfigSyncPeriod)
		endpointSliceConfig.RegisterEventHandler(s.Proxier)
		go endpointSliceConfig.Run(wait.NeverStop)
	}

	informerFactory.Start(wait.NeverStop)

	// 发送启动事件
	s.birthCry()

	go s.Proxier.SyncLoop()

	return <-errCh
}
1
2
3
4
5
6
7
8
9
10
11
12
13
14
15
16
17
18
19
20
21
22
23
24
25
26
27
28
29
30
31
32
33
34
35
36
37
38
39
40
41
42
43
44
45
46
程序中是通过informer来实现对service和endpoint发生变化的监听,感知变化,并触发事件并进行相应的处理。
先看一下NewServiceConfig()方法,其中注册了当service发生增、删、改事件时,分别执行result.handleAddService、result.handleUpdateService、result.handleDeleteService方法。
func NewServiceConfig(serviceInformer coreinformers.ServiceInformer, resyncPeriod time.Duration) *ServiceConfig {
	result := &ServiceConfig{
		listerSynced: serviceInformer.Informer().HasSynced,
	}

	// 注册变更事件
	serviceInformer.Informer().AddEventHandlerWithResyncPeriod(
		cache.ResourceEventHandlerFuncs{
			AddFunc:    result.handleAddService,
			UpdateFunc: result.handleUpdateService,
			DeleteFunc: result.handleDeleteService,
		},
		resyncPeriod,
	)

	return result
}
1
2
3
4
5
6
7
8
9
10
11
12
13
14
15
16
17
再看看其中的handleAddService()方法,传入的参数obj就是新增的service对象,然后传入eventHandler.OnServiceAdd()方法进行处理。
func (c *ServiceConfig) handleAddService(obj interface{}) {
	service, ok := obj.(*v1.Service)
	if !ok {
		utilruntime.HandleError(fmt.Errorf("unexpected object type: %v", obj))
		return
	}
	for i := range c.eventHandlers {
		klog.V(4).InfoS("Calling handler.OnServiceAdd")
		c.eventHandlers[i].OnServiceAdd(service)
	}
}
1
2
3
4
5
6
7
8
9
10
11
这里c.eventHanlders其实就是proxier对象,在RegisterEventHandler()方法中将其添加进去的。
serviceConfig.RegisterEventHandler(s.Proxier)
1
也就是说,proxier.OnServiceAdd()才是需要触发的处理方法
func (proxier *Proxier) OnServiceAdd(service *v1.Service) {
	proxier.OnServiceUpdate(nil, service)
}
1
2
3
第一个参数为旧的service,第二参数为新的参数。该方法给可以OnServiceAdd复用,传入的第一个参数为nil,第二个参数不为nil,就是新增的操作。
func (proxier *Proxier) OnServiceUpdate(oldService, service *v1.Service) {
	if proxier.serviceChanges.Update(oldService, service) && proxier.isInitialized() {
		proxier.Sync()
	}
}
1
2
3
4
5
还可以看到删除操作也能复用,有旧的service,而新service为nil代表删除。
// OnServiceDelete is called whenever deletion of an existing service
// object is observed.
func (proxier *Proxier) OnServiceDelete(service *v1.Service) {
	proxier.OnServiceUpdate(service, nil)
}
1
2
3
4
5
无论是增、删、改都会执行到proxier.Sync()方法
func (proxier *Proxier) Sync() {
	if proxier.healthzServer != nil {
		proxier.healthzServer.QueuedUpdate()
	}
	metrics.SyncProxyRulesLastQueuedTimestamp.SetToCurrentTime()
	proxier.syncRunner.Run()
}
1
2
3
4
5
6
7
最终到proxier.syncRunner.Run()方法,可以看出它会发送一个信号到bfr.run管道中。该方法除了是service发生事件执行操作的终点外,endpoint发生事件后最终也会执行到这里。
func (bfr *BoundedFrequencyRunner) Run() {
	// If it takes a lot of time to run the underlying function, noone is really
	// processing elements from <run> channel. So to avoid blocking here on the
	// putting element to it, we simply skip it if there is already an element
	// in it.
	select {
	case bfr.run <- struct{}{}:
	default:
	}
}
1
2
3
4
5
6
7
8
9
10
我们再回到代理服务的ProxyServe.Run方法,最后执行了s.Proxier.SyncLoop()
func (proxier *Proxier) SyncLoop() {
	// Update healthz timestamp at beginning in case Sync() never succeeds.
	if proxier.healthzServer != nil {
		proxier.healthzServer.Updated()
	}

	// synthesize "last change queued" time as the informers are syncing.
	metrics.SyncProxyRulesLastQueuedTimestamp.SetToCurrentTime()
	proxier.syncRunner.Loop(wait.NeverStop)
}
1
2
3
4
5
6
7
8
9
10
然后再执行proxier.syncRunner.Loop()方法
func (bfr *BoundedFrequencyRunner) Loop(stop <-chan struct{}) {
	klog.V(3).Infof("%s Loop running", bfr.name)
	bfr.timer.Reset(bfr.maxInterval)
	for {
		select {
		case <-stop:
			bfr.stop()
			klog.V(3).Infof("%s Loop stopping", bfr.name)
			return
		case <-bfr.timer.C():
			bfr.tryRun()
		case <-bfr.run:
			bfr.tryRun()
		case <-bfr.retry:
			bfr.doRetry()
		}
	}
}
1
2
3
4
5
6
7
8
9
10
11
12
13
14
15
16
17
18
可以看到如果bfr.run管道接收到了信号,会执行brf.tryRun()方法,在这个方法中会执行proxier.syncProxyRules()进行刷新iptables规则。
// assumes the lock is not held
func (bfr *BoundedFrequencyRunner) tryRun() {
	bfr.mu.Lock()
	defer bfr.mu.Unlock()

    // 这里会限制访问速率,看是否可以执行。
	if bfr.limiter.TryAccept() {
        // 这里的fn就是proxier.syncProxyRules方法
		bfr.fn()
		bfr.lastRun = bfr.timer.Now()
		bfr.timer.Stop()
		bfr.timer.Reset(bfr.maxInterval)
		klog.V(3).Infof("%s: ran, next possible in %v, periodic in %v", bfr.name, bfr.minInterval, bfr.maxInterval)
		return
	}

	// It can't run right now, figure out when it can run next.
	elapsed := bfr.timer.Since(bfr.lastRun)   // how long since last run
	nextPossible := bfr.minInterval - elapsed // time to next possible run
	nextScheduled := bfr.timer.Remaining()    // time to next scheduled run
	klog.V(4).Infof("%s: %v since last run, possible in %v, scheduled in %v", bfr.name, elapsed, nextPossible, nextScheduled)

	// It's hard to avoid race conditions in the unit tests unless we always reset
	// the timer here, even when it's unchanged
	if nextPossible < nextScheduled {
		nextScheduled = nextPossible
	}
	bfr.timer.Stop()
	bfr.timer.Reset(nextScheduled)
}
1
2
3
4
5
6
7
8
9
10
11
12
13
14
15
16
17
18
19
20
21
22
23
24
25
26
27
28
29
30
该方法主要是更新节点上的iptables规则。
func (proxier *Proxier) syncProxyRules() {

	// 获取service和endpoint发生变化的数据
	serviceUpdateResult := proxier.serviceMap.Update(proxier.serviceChanges)
	endpointUpdateResult := proxier.endpointsMap.Update(proxier.endpointsChanges)


	// 创建一些必要的iptables链
	for _, jump := range iptablesJumpChains {
		if _, err := proxier.iptables.EnsureChain(jump.table, jump.dstChain); err != nil {
			klog.ErrorS(err, "Failed to ensure chain exists", "table", jump.table, "chain", jump.dstChain)
			return
		}
		args := append(jump.extraArgs,
			"-m", "comment", "--comment", jump.comment,
			"-j", string(jump.dstChain),
		)
		if _, err := proxier.iptables.EnsureRule(utiliptables.Prepend, jump.table, jump.srcChain, args...); err != nil {
			klog.ErrorS(err, "Failed to ensure chain jumps", "table", jump.table, "srcChain", jump.srcChain, "dstChain", jump.dstChain)
			return
		}
	}

	for _, ch := range iptablesEnsureChains {
		if _, err := proxier.iptables.EnsureChain(ch.table, ch.chain); err != nil {
			klog.ErrorS(err, "Failed to ensure chain exists", "table", ch.table, "chain", ch.chain)
			return
		}
	}

	// 将当前filter表中所有存在的规则写入existingFilterChainsData中
	proxier.existingFilterChainsData.Reset()
	err := proxier.iptables.SaveInto(utiliptables.TableFilter, proxier.existingFilterChainsData)

	// 将nat表中所有存在的规则写入iptablesData中
	proxier.iptablesData.Reset()
	err = proxier.iptables.SaveInto(utiliptables.TableNAT, proxier.iptablesData)

	// 将filter和nat链中必要添加的子链,通过字符串拼接的方式写入变量filterChains和natChains中
	for _, chainName := range []utiliptables.Chain{kubeServicesChain, kubeExternalServicesChain, kubeForwardChain, kubeNodePortsChain} {
		if chain, ok := existingFilterChains[chainName]; ok {
			proxier.filterChains.WriteBytes(chain)
		} else {
			proxier.filterChains.Write(utiliptables.MakeChainLine(chainName))
		}
	}
	for _, chainName := range []utiliptables.Chain{kubeServicesChain, kubeNodePortsChain, kubePostroutingChain, KubeMarkMasqChain} {
		if chain, ok := existingNATChains[chainName]; ok {
			proxier.natChains.WriteBytes(chain)
		} else {
			proxier.natChains.Write(utiliptables.MakeChainLine(chainName))
		}
	}

	// 后面就是将各种的iptables规则通过字符串拼接起来
    ...

	// 将所有链和规则的iptables全部集成到一起iptablesData,然后再通过iptables-restore命令刷新到节点中。
	proxier.iptablesData.Reset()
	proxier.iptablesData.Write(proxier.filterChains.Bytes())
	proxier.iptablesData.Write(proxier.filterRules.Bytes())
	proxier.iptablesData.Write(proxier.natChains.Bytes())
	proxier.iptablesData.Write(proxier.natRules.Bytes())
	err = proxier.iptables.RestoreAll(proxier.iptablesData.Bytes(), utiliptables.NoFlushTables, utiliptables.RestoreCounters)
	if err != nil {
		klog.ErrorS(err, "Failed to execute iptables-restore")
		metrics.IptablesRestoreFailuresTotal.Inc()
		return
	}
1
2
3
4
5
6
7
8
9
10
11
12
13
14
15
16
17
18
19
20
21
22
23
24
25
26
27
28
29
30
31
32
33
34
35
36
37
38
39
40
41
42
43
44
45
46
47
48
49
50
51
52
53
54
55
56
57
58
59
60
61
62
63
64
65
66
67
68
69
70
总结
思考
因为每一次都会将当前所有的iptables规则全部刷新到节点上,如果规则量过大的话,性能会受到影响,所以才有ipvs模式。
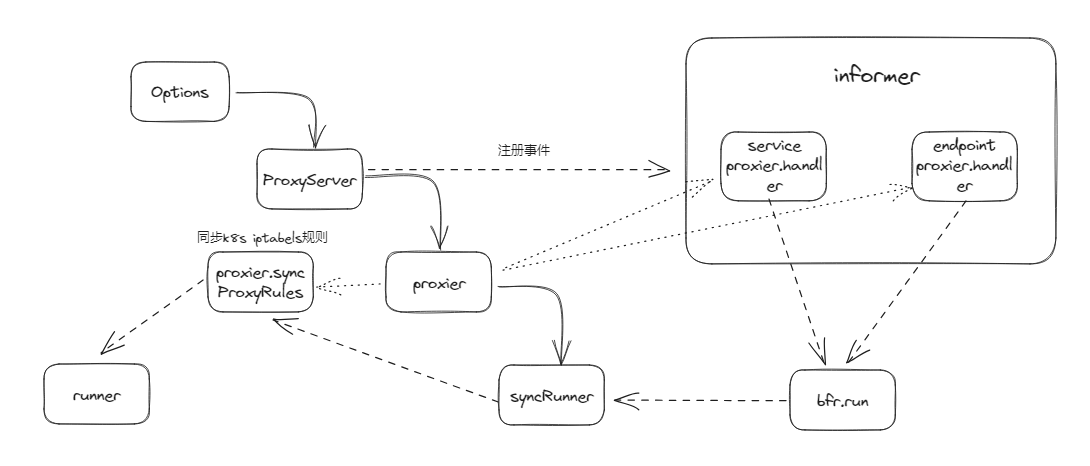
整体代码流程如下:
kubernetes 源码-kube-proxy 原理和源码分析(一) (opens new window)
kube-proxy 源码解析 (opens new window)
kube-proxy 保姆级别源码阅读 (opens new window)
连接跟踪 conntrack (opens new window)
kubernetes 之 client-go 之 informer 工作原理源码解析 (opens new window)
Kubernetes EndpointSlice 和 Endpoint 对象的区别 (opens new window)
此内容由惯性聚合(RSS阅读器)自动聚合整理,仅供阅读参考。 原文来自 — 版权归原作者所有。