







Meta
目录
V16.8.6
克隆react源码, github 地址:https://github.com/facebook/react.git
安装 gulp, npm 有些版本会报错所以我们直接用 gulp
npm install gulp -g
gulp install
gulp build
然后 build 文件夹就可以看到 react 的源码
JSX 其实就是 React.createElement(component, props, ...children) 的语法糖, 最终就会被 Babel 解析成 React.createElement() 方法
V16 之后, 每一个 Component 都会使用 createElement() 方法处理成 ReactElement 实例
一般我们的渲染会从这一段开始:
ReactDOM.render( < App / > , document.getElementById('root'));
// 我们使用 `ReactDOM.render()` 的时候就会将 App 这个 ReactElement 传给第一个参数我们看一下 ReactDOM.render() 的代码:
render: function(element, container, callback) {
  ...
  return
  legacyRenderSubtreeIntoContainer(null, element, container, false, callback);
},
可以看到最终调用了 legacyRenderSubtreeIntoContainer 方法:
function legacyRenderSubtreeIntoContainer(parentComponent, children, container, forceHydrate, callback) {
  /* 省略 warning 部分 */
  var root = container._reactRootContainer;
  var fiberRoot = void 0;
  if (!root) {
    // Initial mount
    root = container._reactRootContainer = legacyCreateRootFromDOMContainer(container, forceHydrate);
    fiberRoot = root._internalRoot;
    if (typeof callback === 'function') {
      /* 省略 callback 处理部分 */
    }
    // Initial mount should not be batched.
    unbatchedUpdates(function() {
      updateContainer(children, fiberRoot, parentComponent, callback);
    });
  } else {
    fiberRoot = root._internalRoot;
    if (typeof callback === 'function') {
      /* 省略 callback 处理部分 */
    }
    // Update
    updateContainer(children, fiberRoot, parentComponent, callback);
  }
  return getPublicRootInstance(fiberRoot);
}
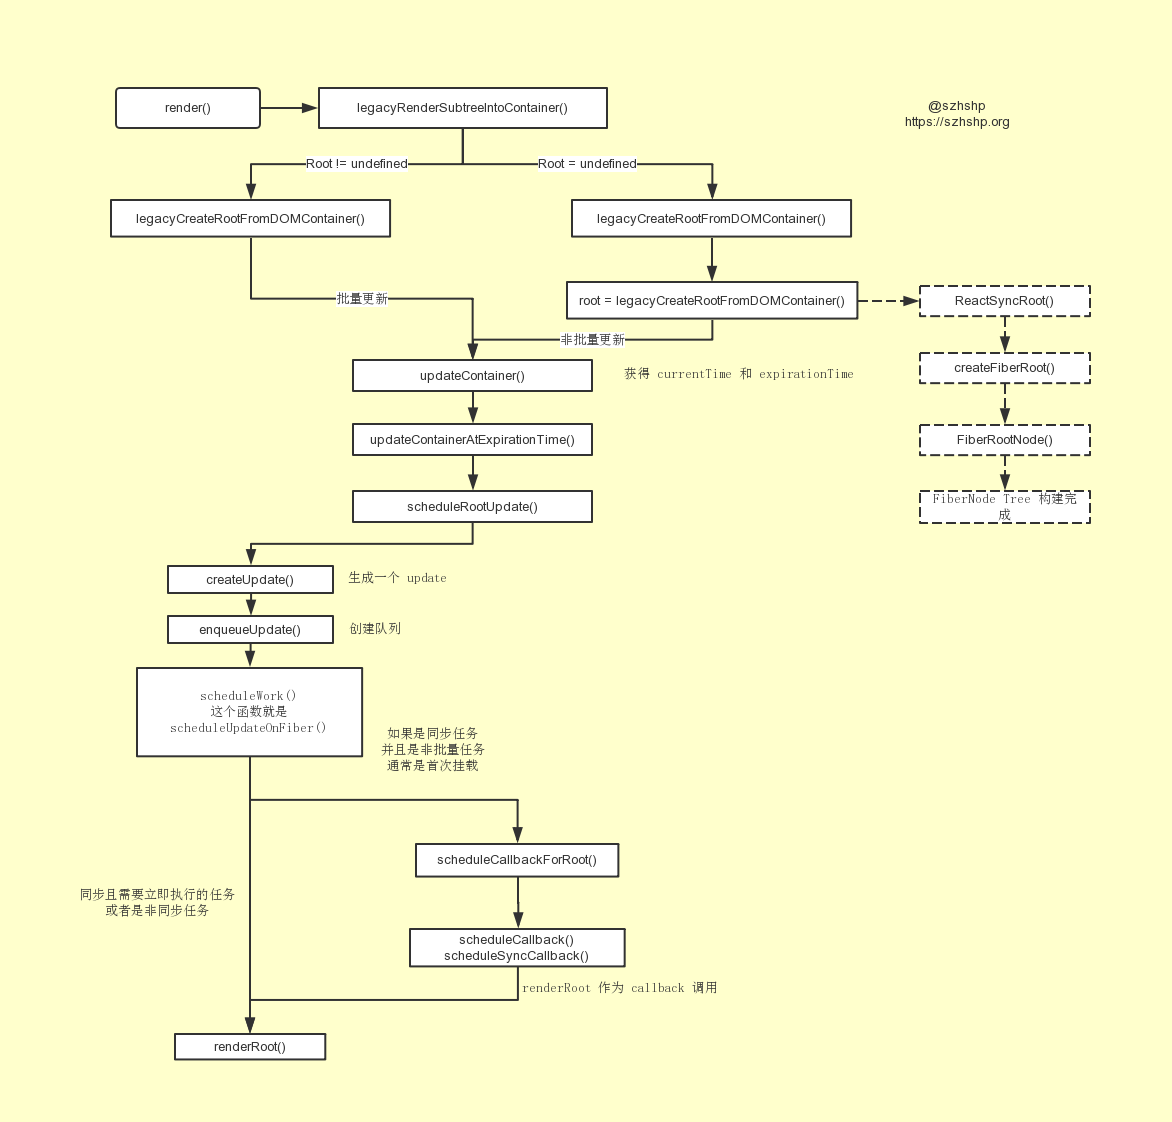
所以实际上做了以下操作:
然后我们看向 initial mount 时执行的函数 legacyCreateRootFromDOMContainer()
function legacyCreateRootFromDOMContainer(container, forceHydrate) {

  /* 省略 hydrate 逻辑 */

  return new ReactSyncRoot(container, LegacyRoot, shouldHydrate);
}
最终 root 会获得一个 ReactSyncRoot
function ReactSyncRoot(container, tag, hydrate) {
  // 根据 container 生成一个 FiberRoot
  var root = createContainer(container, tag, hydrate);
  this._internalRoot = root;
}

function createContainer(containerInfo, tag, hydrate) {
  return createFiberRoot(containerInfo, tag, hydrate);
}

function createFiberRoot(containerInfo, tag, hydrate) {
  var root = new FiberRootNode(containerInfo, tag, hydrate);

  var uninitializedFiber = createHostRootFiber(tag);
  root.current = uninitializedFiber;
  uninitializedFiber.stateNode = root;

  return root;
}
然后最终可以看到 _internalRoot 最终等于一个 FiberRootNode .
A Fiber is work on a Component that needs to be done or was done. There can be more than one per component.
一个 Fiber 对应一个或多个 Component, Fiber 保存了和 DOM 树一样的结构
组件的各种操作就由 Fiber 节点负责, Fiber 会通过碎片化模式管理更新过程, 其中包含了各种事务优先级管理以及调配, 使得大量的计算可以被拆解以及异步化
这种分片设计极大地提升了效率。
Filber 控制的更新分为以下两个阶段:
定用这样的 root 节点在控制台输入代码:
document.getElementById('root')._reactRootContainer._internalRoot

<div id="root">
  <div class="App">
    <header class="App-header">
      <img src="" class="App-logo" alt="logo">
      <p>Hellow</p><a>React</a>
    </header>
  </div>
</div>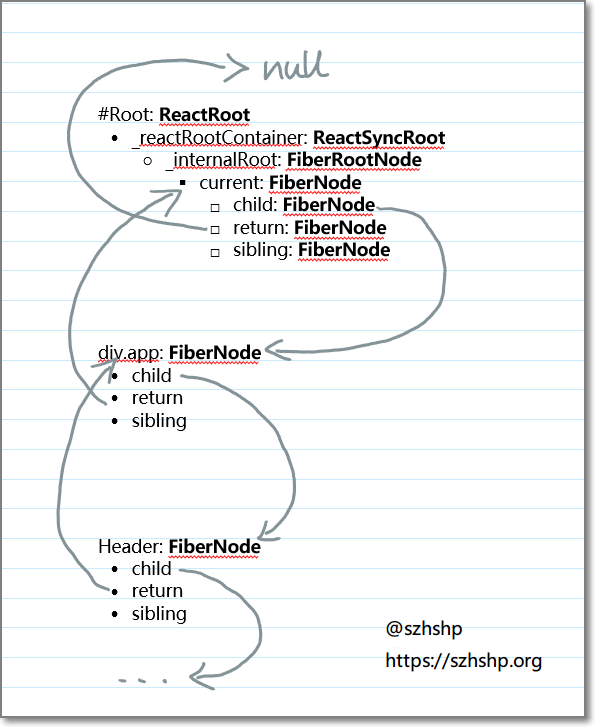
获得 root 之后我们会执行 updateContainer() , 调用逻辑:
updateContainer(element, container, parentComponent, callback)
computeExpirationForFiber() 计算出 expirationTimeupdateContainerAtExpirationTime(element, container, parentComponent, expirationTime, suspenseConfig, callback)
scheduleRootUpdate()scheduleRootUpdate(current$1, element, expirationTime, suspenseConfig, callback)
function scheduleRootUpdate(current$1, element, expirationTime, suspenseConfig, callback) {
  /* 省略 warning */
  var update = createUpdate(expirationTime, suspenseConfig);
  // Caution: React DevTools currently depends on this property
  // being called "element".
  update.payload = {
    element: element
  };

  /* 省略 callback handling*/
  enqueueUpdate(current$1, update);
  scheduleWork(current$1, expirationTime);

  return expirationTime;
}
这个函数又做了这么几个操作:
创建一个 update
enqueueUpdate(fiber, update)
scheduleWork()
接下来我们主要关注这个 scheduleWork 函数, 我们可以看到这个函数就是 scheduleUpdateOnFiber
那么 scheduleUpdateOnFiber 做了什么事情呢?
function scheduleUpdateOnFiber(fiber, expirationTime) {
  checkForNestedUpdates();
  warnAboutInvalidUpdatesOnClassComponentsInDEV(fiber);
  // 获取到 FiberRoot
  var root = markUpdateTimeFromFiberToRoot(fiber, expirationTime);
  if (root === null) {
    warnAboutUpdateOnUnmountedFiberInDEV(fiber);
    return;
  }
  root.pingTime = NoWork;
  checkForInterruption(fiber, expirationTime);
  recordScheduleUpdate();
  var priorityLevel = getCurrentPriorityLevel();
  // 如果是同步事件
  if (expirationTime === Sync) {
    if (
      // 如果是非批量事件
      (executionContext & LegacyUnbatchedContext) !== NoContext &&
      // Check if we're not already rendering
      (executionContext & (RenderContext | CommitContext)) === NoContext) {
      schedulePendingInteractions(root, expirationTime);
      // 那么就执行 renderRoot
      var callback = renderRoot(root, Sync, true);
      while (callback !== null) {
        callback = callback(true);
      }
    } else {
      // 否则就执行 scheduleCallbackForRoot
      scheduleCallbackForRoot(root, ImmediatePriority, Sync);
      if (executionContext === NoContext) {
        flushSyncCallbackQueue();
      }
    }
  } else {
    // 如果不是同步事件那么也执行 scheduleCallbackForRoot
    scheduleCallbackForRoot(root, priorityLevel, expirationTime);
  }
  /* ... */
}
这上面有几个比较核心的逻辑:
1. 同步任务并且非批量任务: 直接执行 renderRoot()
2. 其他情况都会去执行 scheduleCallbackForRoot()
然后其实 scheduleCallbackForRoot() 最终也会将 renderRoot 作为 callback 所以归为一条线.
renderRoot 方法非常长, 我们关注这部分:
do {
  try {
    if (isSync) {
      workLoopSync();
    } else {
      workLoop();
    }
    break;
  } catch (thrownValue) {
    /* ... */
  }
} while (true);
主要其实是 WorkLoop 这部分进行了循环工作调度
下一篇详细观察一下 WorkLoop 以及如何 render 到实际 DOM
此内容由惯性聚合(RSS阅读器)自动聚合整理,仅供阅读参考。 原文来自 — 版权归原作者所有。