






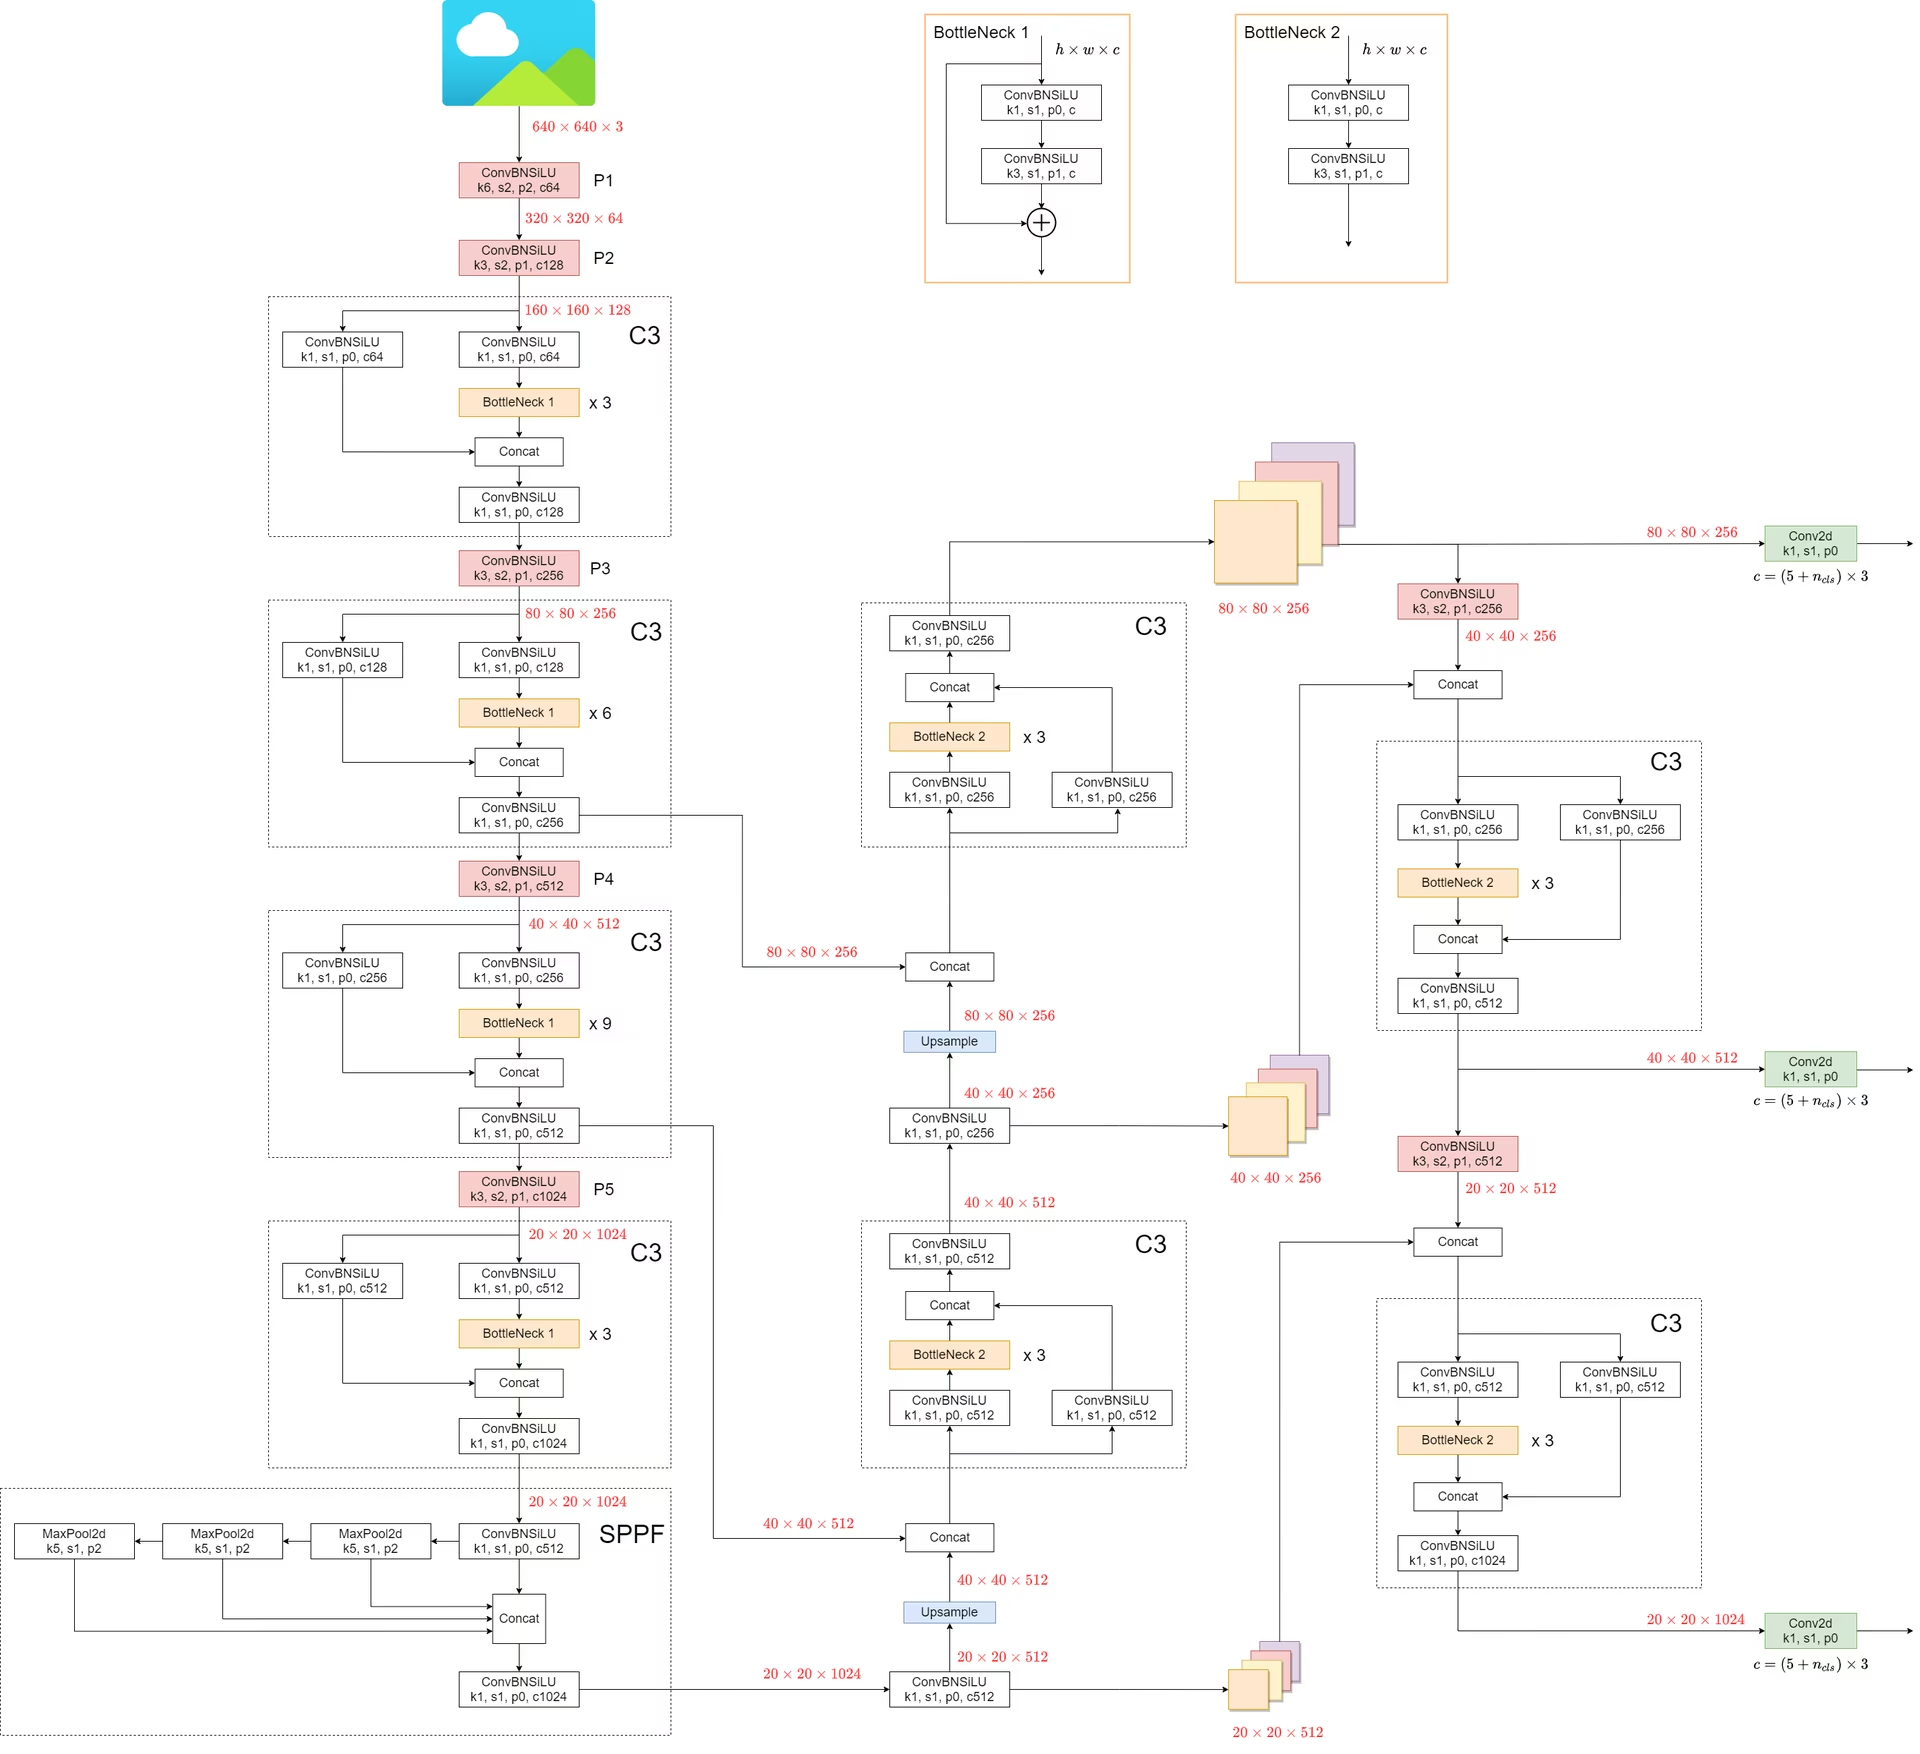
第一部分:Backbone (主干网络) —— 提取特征的“鹰眼”
Backbone 的任务是把图片不断的下采样(Downsample),让特征图越来越小,但包含的语义信息越来越丰富(从“这是线条”变成“这是车轮”再到“这是车”)。
YOLOv5 的 Backbone 是 CSPDarknet 的改进版。
1. Focus 层 (但在 v6.0 版本已被替换)
- 注意: 在你要学习的代码(v6.0/v6.1)中,原来的
Focus模块已经被一个简单的Conv(卷积核大小 6,步长 2)取代了。 - 代码对应:
models/yolov5s.yaml的第 0 层:[-1, 1, Conv, [64, 6, 2, 2]]。 - 作用: 这是一个 6x6 的卷积,步长为 2。它直接把图片的宽和高减半,通道数从 3 扩充到 64。这是效率极高的下采样。
2. CBS 模块 (Conv-BatchNorm-SiLU)
这是网络里最基本的“细胞”。你在 YAML 里看到的 Conv 其实不是 pytorch 原生的卷积,而是封装过的。
- 代码对应:
models/common.py中的class Conv。 - 构成:
Conv2d+BatchNorm2d+SiLU(Sigmoid Linear Unit 激活函数)。 - 细节: SiLU () 是这一代 YOLO 的标配,比 ReLU 更平滑,梯度传导更好。
class Conv(nn.Module):
    """Applies a convolution, batch normalization, and activation function to an input tensor in a neural network."""

    default_act = nn.SiLU()  # default activation

    def __init__(self, c1, c2, k=1, s=1, p=None, g=1, d=1, act=True):
        """Initializes a standard convolution layer with optional batch normalization and activation."""
        super().__init__()
        self.conv = nn.Conv2d(c1, c2, k, s, autopad(k, p, d), groups=g, dilation=d, bias=False)
        self.bn = nn.BatchNorm2d(c2)
        self.act = self.default_act if act is True else act if isinstance(act, nn.Module) else nn.Identity()

    def forward(self, x):
        """Applies a convolution followed by batch normalization and an activation function to the input tensor `x`."""
        return self.act(self.bn(self.conv(x)))

    def forward_fuse(self, x):
        """Applies a fused convolution and activation function to the input tensor `x`."""
        return self.act(self.conv(x))
3. C3 模块 (CSP Bottleneck with 3 convolutions) —— 核心组件
这是 YOLOv5 的灵魂,用来替换原来的 ResBlock。它的全称是 CSPNet (Cross Stage Partial Network) 结构。
- 代码对应:
models/common.py中的class C3。 - 原理(一定要看懂这个): 输入信号进入 C3 后被分流成两条路:
- 主路: 经过一系列残差组件(Bottlenecks)。
- 旁路: 经过一个简单的卷积。
- 汇合: 最后两路
Concat(拼接)在一起。
class C3(nn.Module):
    """Implements a CSP Bottleneck module with three convolutions for enhanced feature extraction in neural networks."""

    def __init__(self, c1, c2, n=1, shortcut=True, g=1, e=0.5):
        """Initializes C3 module with options for channel count, bottleneck repetition, shortcut usage, group
        convolutions, and expansion.
        """
        super().__init__()
        c_ = int(c2 * e)  # hidden channels
        self.cv1 = Conv(c1, c_, 1, 1)
        self.cv2 = Conv(c1, c_, 1, 1)
        self.cv3 = Conv(2 * c_, c2, 1)  # optional act=FReLU(c2)
        self.m = nn.Sequential(*(Bottleneck(c_, c_, shortcut, g, e=1.0) for _ in range(n)))

    def forward(self, x):
        """Performs forward propagation using concatenated outputs from two convolutions and a Bottleneck sequence."""
        return self.cv3(torch.cat((self.m(self.cv1(x)), self.cv2(x)), 1))
YOLOv5 C3 Module Structure
Input x
↓
Path 1 (主路)
Conv 1x1
(self.cv1)
↓
Bottleneck x N
ResBlock: Conv 1x1 → Conv 3x3
(Shortcut + Residual)
Path 2 (辅路)
Conv 1x1
(self.cv2)
Feature Bypass
Concat (拼接)
dim = 1
↓
Conv 1x1 Output
(self.cv3)
- 为什么这么做? 这让梯度在反向传播时有“高速公路”可以走(旁路),同时主路又能专心提取深层特征。它在减少参数量的同时,防止了网络太深导致的梯度消失。
- YAML 里的体现: 比如
[-1, 3, C3, [128]],意思是这一层有 3 个 Bottleneck 串联,输出通道是 128。
4. SPPF (Spatial Pyramid Pooling - Fast)
放在 Backbone 的最末端(第 9 层)。
- 代码对应:
models/common.py中的class SPPF。 - 结构: 它不像以前的 SPP 并行跑 3 个不同大小的池化核,而是串行跑 3 次 5x5 的 MaxPool。
- 公式: Output = Concat(Input, Pool(Input), Pool(Pool(Input)), Pool(Pool(Pool(Input))))。
- 作用: 不管图片里物体是大是小,通过这种多次池化的融合,都能把特征提取出来(多尺度融合),而且速度飞快。
class SPPF(nn.Module):
    """Implements a fast Spatial Pyramid Pooling (SPPF) layer for efficient feature extraction in YOLOv5 models."""

    def __init__(self, c1, c2, k=5):
        """Initializes YOLOv5 SPPF layer with given channels and kernel size for YOLOv5 model, combining convolution and
        max pooling.

        Equivalent to SPP(k=(5, 9, 13)).
        """
        super().__init__()
        c_ = c1 // 2  # hidden channels
        self.cv1 = Conv(c1, c_, 1, 1)
        self.cv2 = Conv(c_ * 4, c2, 1, 1)
        self.m = nn.MaxPool2d(kernel_size=k, stride=1, padding=k // 2)

    def forward(self, x):
        """Processes input through a series of convolutions and max pooling operations for feature extraction."""
        x = self.cv1(x)
        with warnings.catch_warnings():
            warnings.simplefilter("ignore")  # suppress torch 1.9.0 max_pool2d() warning
            y1 = self.m(x)
            y2 = self.m(y1)
            return self.cv2(torch.cat((x, y1, y2, self.m(y2)), 1))
YOLOv5 SPPF Module Structure
(Serial Pooling = Larger Receptive Field)
Input x
↓
Conv 1x1 (cv1)
Channel Halved (c_)
Serial MaxPool Pipeline
- Each step expands the receptive field by 4 (5x5 kernel)
Concat ( x, y1, y2, y3 )
dim = 1 (Channel Stacking)
↓
Conv 1x1 Output (cv2)
Fusion & Dim Reduction
第二部分:Neck (颈部) —— 特征融合的“集散地”
如果 Backbone 只是负责看,Neck 就负责“把看到的各种细节拼起来”。YOLOv5 使用了 FPN (Feature Pyramid Network) + PAN (Path Aggregation Network) 结构。
想象一下:
- P3 层(浅层):分辨率高,适合看小物体(细节多)。
- P5 层(深层):分辨率低,适合看大物体(语义强)。
Neck 的工作就是让 P3 和 P5 互相交流。
1. 自顶向下 (FPN 路径) —— 传达语义
- 流程: 1. 拿 Backbone 最后的输出(P5),先上采样(
Upsample,变大)。
- 然后和上一层(P4)的特征进行 Concat(拼接)。
- 再经过
C3融合。 - 继续上采样,和 P3 拼接。
- 目的: 让底层的特征图(看小物体用的)也能拥有高层的语义信息(知道“这是什么”)。
2. 自底向上 (PAN 路径) —— 传达定位
- 流程: 1. 刚才融合好的浅层特征,再通过卷积(stride=2)下采样(变小)。
- 和深层特征再次 Concat。
- 目的: 让高层的特征图(看大物体用的)也能拥有底层的定位信息(知道“准确轮廓在哪”)。
第三部分:Head (头部) —— 最终判决
最后是 Detect 模块,它负责根据 Neck 提供的 3 张特征图(大、中、小)输出结果。
-
代码对应:
models/yolo.py中的class Detect。 -
输入: 3 个特征图(P3, P4, P5)。
-
P3 (80x80): 负责检测小物体。
-
P4 (40x40): 负责检测中物体。
-
P5 (20x20): 负责检测大物体。 (注:假设输入图片是 640x640)
-
1x1 卷积: 每个特征图都会通过一个
1x1卷积,将通道数调整为: -
Anchors (na): 通常是 3(每个网格预设 3 个框)。
-
5: 代表 。
-
Classes (nc): 比如 COCO 数据集是 80。
-
所以对于 COCO,输出通道是 3×(5+80)=2553 \times (5 + 80) = 255。
总结图谱 (Memory Map)
为了方便记忆,你可以把整个流程浓缩成这一串动作:
- 图片进 (640x640x3)
- 切片 (Conv 6x6) -> 320x320
- 下采样与提炼 (Conv + C3) -> 160 -> 80 -> 40 -> 20 (这里就是 P3, P4, P5)
- SPPF (在 P5 处做多尺度增强)
- FPN 上采样 (让 P3 看到 P5 的语义)
- PAN 下采样 (让 P5 找回 P3 的定位)
- Detect (在 P3, P4, P5 三个层面上同时预测)
后处理
把 3 个头的输出拼在一起,运行NMS
- 注意:训练模型的时候,是不需要 NMS 的。网络吐出 3 个头的预测结果后,直接拿着它们去和Labels 对比算误差(Loss),然后反向传播更新参数。