






捡这台机器已经是去年(2020) 12 月份时候的事了,上周末收拾寝室顺便把它找回来理了下线、清了下灰装上了最新的 Debian GNU/Linux 11 (bullseye) 作为它的系统,然后局域网络 SSH 访问来代替自己笔记本的 WSL 系统,WSL2 和 VMware 总有奇奇怪怪的兼容性问题。
| 部件 | 型号 | 说明 | 费用 |
|---|---|---|---|
| 主板 | 梅捷 SY-H61L-M | iTX 板型、带 HDMI、mSATA 接口 | ¥110.00 |
| CPU | 英特尔 i3-3245(集显 HD 4000) | 22nm、2 核心 4 线程、3.4GHz | ¥95.00 |
| 显卡 | 索泰 GTS 450 | 1GB、nVIDIA GeForce GTS 450 | ¥0.00 |
| 硬盘 | 西部数据 WD5000AAKX 500GB | 3.5寸、1423 次/2530 小时 | ¥50.00 |
| 内存 | 金士顿 DDR3 2GB*2 | 1600MHz、SSTL 1.5V、¥23.00/条 | ¥46.00 |
| 机箱 | AY P6 机箱 | mATX、薄铁皮、略强于鞋盒 | ¥35.90 |
| 电源 | 全汉 FSP 350W | 主板 24P、SATA 及 IDE*1、CPU 4P、显卡 6+6 | ¥32.15 |
| 散热 | 酷冷至尊 I30 | 铝、风冷、2600 RPM±10% | ¥16.50 |
| 合计 | / | / | ¥385.55 |
配置可以说是非常渣了,但不装图形界面其实真的够用了,本来是准备直接用 i3-3245 的核显的,后来学长给了块二手索泰 GTS 450 显卡就把它给装上了,顺便屏蔽了核显
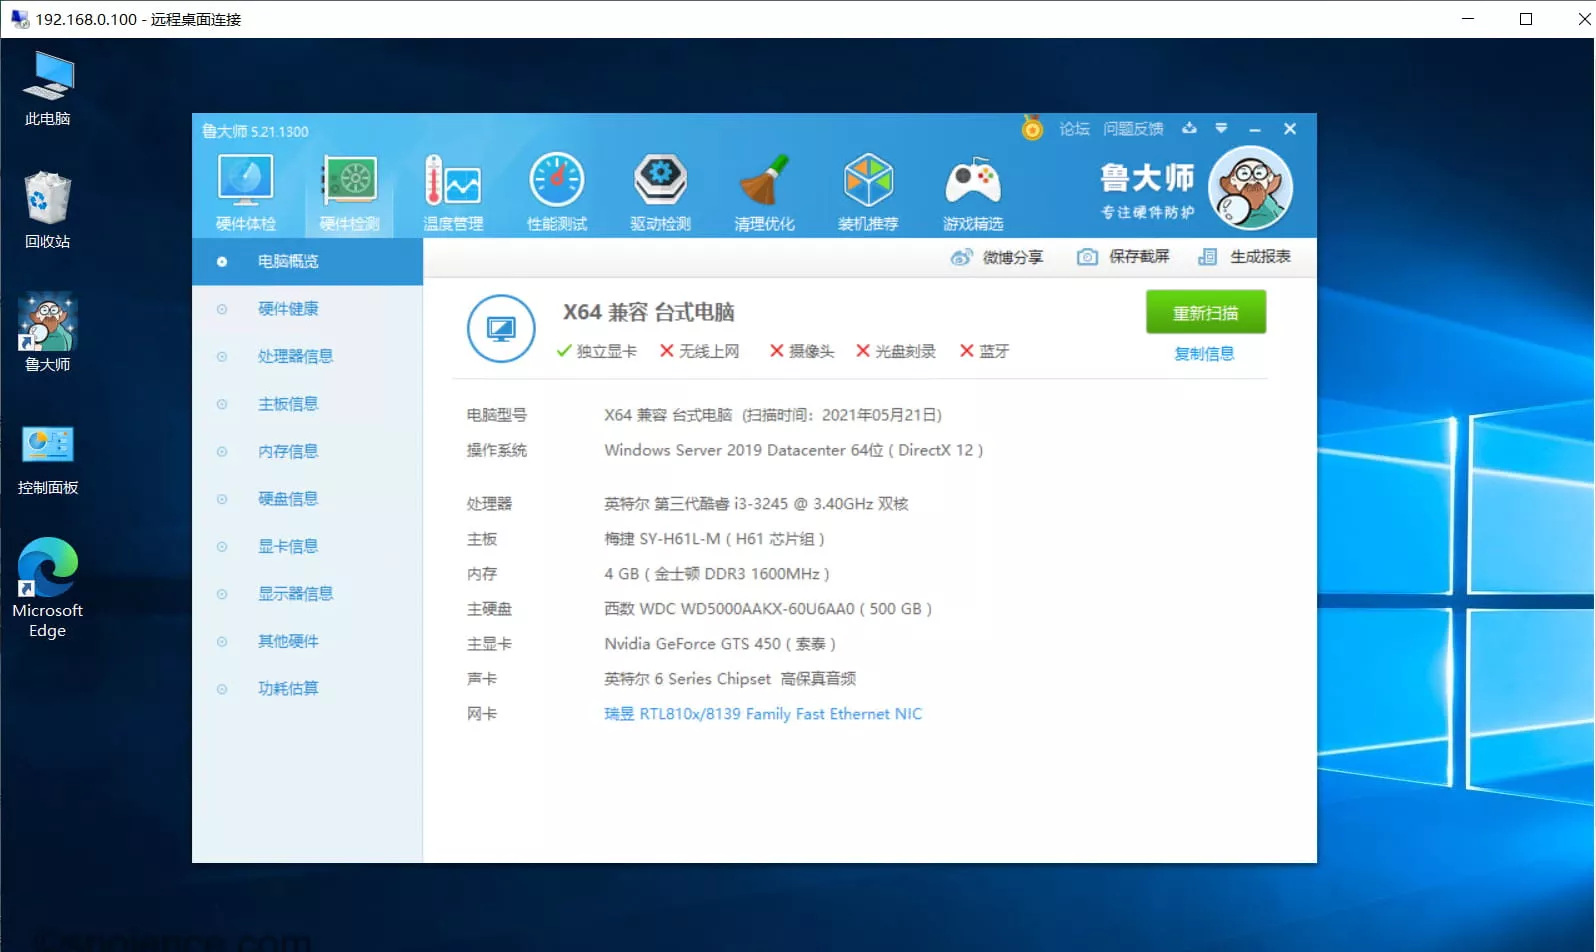
Debian 下查看 CPU 信息:
dejavu@debian:~lscpu
Architecture:                    x86_64
CPU op-mode(s):                  32-bit, 64-bit
Byte Order:                      Little Endian
Address sizes:                   36 bits physical, 48 bits virtual
CPU(s):                          4
On-line CPU(s) list:             0-3
Thread(s) per core:              2
Core(s) per socket:              2
Socket(s):                       1
NUMA node(s):                    1
Vendor ID:                       GenuineIntel
CPU family:                      6
Model:                           58
Model name:                      Intel(R) Core(TM) i3-3245 CPU @ 3.40GHz
Stepping:                        9
CPU MHz:                         1737.696
CPU max MHz:                     3400.0000
CPU min MHz:                     1600.0000
BogoMIPS:                        6784.52
Virtualization:                  VT-x
L1d cache:                       64 KiB
L1i cache:                       64 KiB
L2 cache:                        512 KiB
L3 cache:                        3 MiB
NUMA node0 CPU(s):               0-3
Vulnerability Itlb multihit:     KVM: Mitigation: VMX disabled
Vulnerability L1tf:              Mitigation; PTE Inversion; VMX conditional cache flushes, SMT vulnerable
Vulnerability Mds:               Vulnerable: Clear CPU buffers attempted, no microcode; SMT vulnerable
Vulnerability Meltdown:          Mitigation; PTI
Vulnerability Spec store bypass: Vulnerable
Vulnerability Spectre v1:        Mitigation; usercopy/swapgs barriers and __user pointer sanitization
Vulnerability Spectre v2:        Mitigation; Full generic retpoline, STIBP disabled, RSB filling
Vulnerability Srbds:             Not affected
Vulnerability Tsx async abort:   Not affected
Flags:                           fpu vme de pse tsc msr pae mce cx8 apic sep mtrr pge mca cmov pat pse36 clflush dts acpi mmx fxsr sse sse2 ss ht tm pbe syscall nx rdtscp lm
                                  constant_tsc arch_perfmon pebs bts rep_good nopl xtopology nonstop_tsc cpuid aperfmperf pni pclmulqdq dtes64 monitor ds_cpl vmx est tm2 sss
                                 e3 cx16 xtpr pdcm pcid sse4_1 sse4_2 popcnt tsc_deadline_timer xsave avx f16c lahf_lm cpuid_fault epb pti tpr_shadow vnmi flexpriority ept v
                                 pid fsgsbase smep erms xsaveopt dtherm arat pln pts
在 Debian GNU/Linux 官网
下载最新的镜像文件 debian-11.0.0-amd64-netinst.iso
使用 Rufus
写入 U盘;主板设置 UEFI 启动,设置写好镜像的 U盘为第一启动项即可。因为只通过局域网络 SSH 访问,所以也不需要桌面环境了,安装最后在 choose software to install 的时候只选择安装 SSH server 即可,等待安装完成重启即可
登录无线路由器管理后台查看 Debian 的局域网络 IP 地址,并记下

为了方便,直接使用 Windows Terminal 访问,打开 Windows Terminal 配置添加配置文件
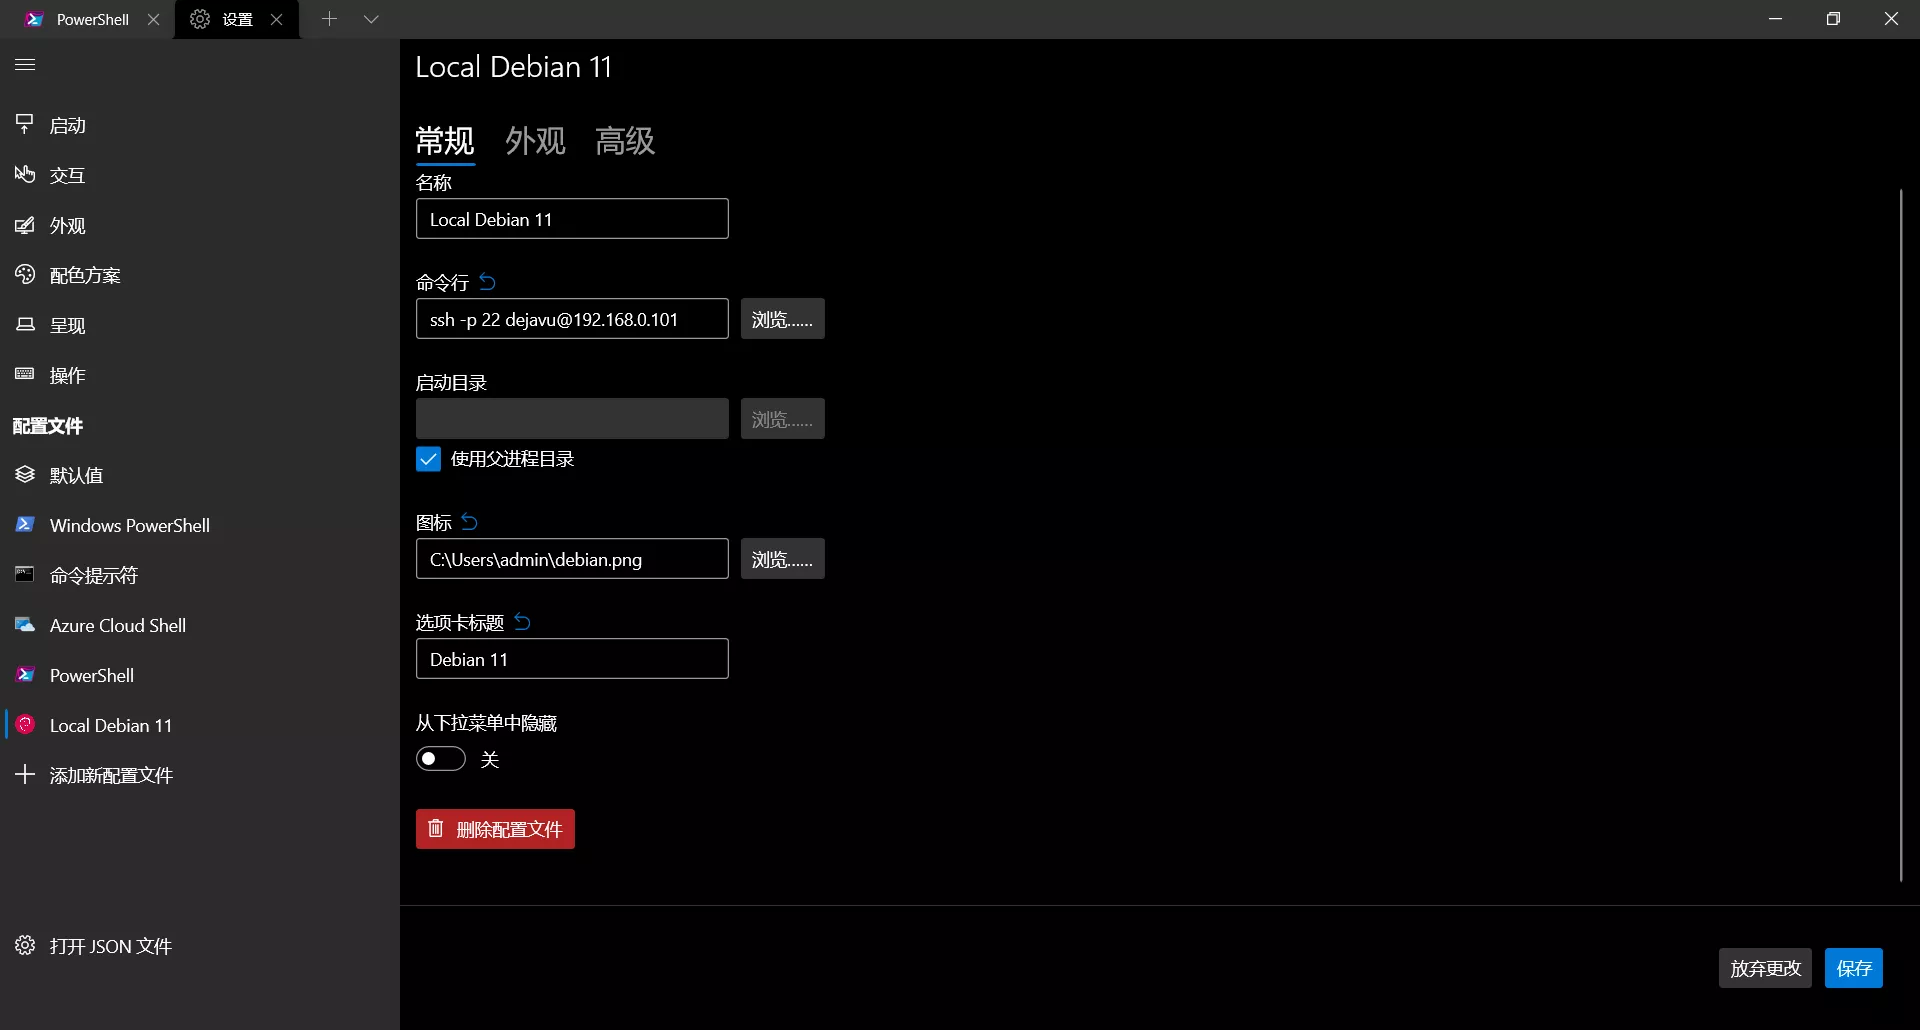
配置新的配置文件里面的命令行为
👉 Debian Logo (下载保存)
The authenticity of host '192.168.0.101 (192.168.0.101)' can't be established.
ECDSA key fingerprint is SHA256:/GENLehSKZfNxJ4bDSaAc5byAaLcROZ+kh70F9E08jI.
Are you sure you want to continue connecting (yes/no/[fingerprint])? yes
Warning: Permanently added '192.168.0.101' (ECDSA) to the list of known hosts.
[email protected]'s password:
Linux debian 5.10.0-8-amd64 #1 SMP Debian 5.10.46-4 (2021-08-03) x86_64

The programs included with the Debian GNU/Linux system are free software;
the exact distribution terms for each program are described in the
individual files in /usr/share/doc/*/copyright.

Debian GNU/Linux comes with ABSOLUTELY NO WARRANTY, to the extent
permitted by applicable law.
Last login: Mon Sep  6 08:23:23 2021 from 192.168.0.104
dejavu@debian:~$
国内可以使用清华大学的 Tuna Debian 镜像源
# 切换到 root 用户
su
# 刷新软件源
apt update && apt upgrade
# 安装基本的软件包
apt install apt-transport-https ca-certificates vim curl wget sudo tree net-tools bind9-utils dnsutils
# 修改镜像源
vim /etc/apt/sources.list
# 将下面内容加到最前面

# 默认注释了源码镜像以提高 apt update 速度,如有需要可自行取消注释
deb https://mirrors.tuna.tsinghua.edu.cn/debian/ bullseye main contrib non-free
# deb-src https://mirrors.tuna.tsinghua.edu.cn/debian/ bullseye main contrib non-free
deb https://mirrors.tuna.tsinghua.edu.cn/debian/ bullseye-updates main contrib non-free
# deb-src https://mirrors.tuna.tsinghua.edu.cn/debian/ bullseye-updates main contrib non-free

deb https://mirrors.tuna.tsinghua.edu.cn/debian/ bullseye-backports main contrib non-free
# deb-src https://mirrors.tuna.tsinghua.edu.cn/debian/ bullseye-backports main contrib non-free

deb https://mirrors.tuna.tsinghua.edu.cn/debian-security bullseye-security main contrib non-free
# deb-src https://mirrors.tuna.tsinghua.edu.cn/debian-security bullseye-security main contrib non-free
虽然在安装的时候为了安全我们新建了一个普通用户,但是在执行需要权限的操作还要切换 root 用户,这样很麻烦,可以给这个用户配置下 sudo 提权
# 切换 root 用户并使用 root 用户的配置文件
su -
# 刷新软件源
apt update
# 安装 sudo
apt install sudo
# 将普通用户 dejavu 添加到 sudo 组
usermod -a -G sudo dejavu
# 编辑 sudoer 配置文件
vim /etc/sudoers
取消 sudo ALL=(ALL:ALL) ALL 前面的注释,在 root ALL=(ALL:ALL) ALL 下面添加一行 dejavu ALL=(ALL:ALL) ALL 然后按 :wq! 保存(注意替换为你的实际用户名)
现在输入 exit 退出 root 用户,普通用户应该可以用 sudo 来提权了
dejavu@debian:~sudo apt update

We trust you have received the usual lecture from the local System
Administrator. It usually boils down to these three things:

    #1) Respect the privacy of others.
    #2) Think before you type.
    #3) With great power comes great responsibility.

[sudo] password for dejavu:
Hit:1 https://mirrors.tuna.tsinghua.edu.cn/debian bullseye InRelease
Hit:2 https://mirrors.tuna.tsinghua.edu.cn/debian bullseye-updates InRelease
Get:3 https://mirrors.tuna.tsinghua.edu.cn/debian bullseye-backports InRelease [39.3 kB]
Get:4 https://mirrors.tuna.tsinghua.edu.cn/debian-security bullseye-security InRelease [44.1 kB]
Get:5 https://mirrors.tuna.tsinghua.edu.cn/debian bullseye/contrib amd64 Packages [50.4 kB]
Get:6 https://mirrors.tuna.tsinghua.edu.cn/debian bullseye/contrib Translation-en [46.9 kB]
Get:7 https://mirrors.tuna.tsinghua.edu.cn/debian bullseye/non-free amd64 Packages [93.8 kB]
Get:8 https://mirrors.tuna.tsinghua.edu.cn/debian bullseye/non-free Translation-en [91.5 kB]
Get:9 https://mirrors.tuna.tsinghua.edu.cn/debian bullseye-backports/main amd64 Packages [56.8 kB]
Get:10 https://mirrors.tuna.tsinghua.edu.cn/debian bullseye-backports/main Translation-en [42.9 kB]
Get:11 https://mirrors.tuna.tsinghua.edu.cn/debian-security bullseye-security/main amd64 Packages [29.6 kB]
Get:12 https://mirrors.tuna.tsinghua.edu.cn/debian-security bullseye-security/main Translation-en [16.0 kB]
Fetched 511 kB in 1s (696 kB/s)
Reading package lists... Done
Building dependency tree... Done
Reading state information... Done
All packages are up to date.
dejavu@debian:~$
因为局域网络服务器,在 Windows 下使用 WinSCP 的 SFTP 协议管理很方便,而局域网络(无公网,无穿透内网)的环境也不用担心安全,所以这里配置下 SSH 允许 root 用户登录,要不然 SFTP 在很多操作会遇到权限不足的情况 🤡
# 编辑 SSH 配置文件
sudo vim /etc/ssh/sshd_config
# 取消 PermitRootLogin prohibit-password 前面的注释并改为 PermitRootLogin yes
# 输入 :wq! 保存配置
# 重启 SSH 服务
sudo systemctl restart sshd.service
PS: 请尽量避免在生产环境允许 root 用户登录
已屏蔽核显,仅使用独显(参考 Debian 文档 )
# 前提已经安装配置好sudoer或者使用root账户操作
sudo apt update
# 安装nvidia-detect软件包
sudo apt install nvidia-detect
# 查看显卡信息
lspci -nn | egrep -i "3d|display|vga"
# 使用nvidia-detect查看推荐安装驱动软件包信息
nvidia-detect
# 根据输出提示的软件包名安装即可
It is recommended to install the nvidia-legacy-390xx-driver package.
完整输出如下
dejavu@debian:~sudo apt install nvidia-detect
Reading package lists... Done
Building dependency tree... Done
Reading state information... Done
The following NEW packages will be installed:
  nvidia-detect
0 upgraded, 1 newly installed, 0 to remove and 0 not upgraded.
Need to get 233 kB of archives.
After this operation, 307 kB of additional disk space will be used.
Get:1 https://mirrors.tuna.tsinghua.edu.cn/debian bullseye/non-free amd64 nvidia-detect amd64 460.91.03-1 [233 kB]
Fetched 233 kB in 0s (678 kB/s)
Selecting previously unselected package nvidia-detect.
(Reading database ... 25264 files and directories currently installed.)
Preparing to unpack .../nvidia-detect_460.91.03-1_amd64.deb ...
Unpacking nvidia-detect (460.91.03-1) ...
Setting up nvidia-detect (460.91.03-1) ...
dejavu@debian:~lspci -nn | egrep -i "3d|display|vga"
01:00.0 VGA compatible controller [0300]: NVIDIA Corporation GF116 [GeForce GTS 450 Rev. 2] [10de:1245] (rev a1)
dejavu@debian:~nvidia-detect
Detected NVIDIA GPUs:
01:00.0 VGA compatible controller [0300]: NVIDIA Corporation GF116 [GeForce GTS 450 Rev. 2] [10de:1245] (rev a1)

Checking card:  NVIDIA Corporation GF116 [GeForce GTS 450 Rev. 2] (rev a1)
Your card is only supported up to the 390 legacy drivers series.
It is recommended to install the
    nvidia-legacy-390xx-driver
package.
# 安装推荐的显卡驱动软件包
dejavu@debian:~sudo apt install nvidia-legacy-390xx-driver
按照 Docker 官方文档 的方法安装Docker
# 更新Debian软件源
sudo apt update
# 安装几个需要的软件包
sudo apt install apt-transport-https ca-certificates curl gnupg lsb-release
# 添加Docker的官方GPG密钥
curl -fsSL https://download.docker.com/linux/debian/gpg | sudo gpg --dearmor -o /usr/share/keyrings/docker-archive-keyring.gpg
# 默认情况下使用下面命令设置稳定版的存储库,推荐用于生产环境
 echo \
  "deb [arch=amd64 signed-by=/usr/share/keyrings/docker-archive-keyring.gpg] https://download.docker.com/linux/debian \
  $(lsb_release -cs) stable" | sudo tee /etc/apt/sources.list.d/docker.list > /dev/null
# 更新软件源
sudo apt update
# 安装Docker引擎和容器,根据网速情况,稍等片刻即可😎
sudo apt install docker-ce docker-ce-cli containerd.io
docker-compose 是用于定义和运行多容器 Docker 应用程序的工具,通过 compose,可以使用 YAML 文件来配置应用程序需要的所有服务,然后,只需一个命令,就可以从 YML 文件配置中创建并启动所有服务
# 安装最新版docker-compose,将版本号换成你需要的版本号
sudo curl -L "https://github.com/docker/compose/releases/download/v2.3.3/docker-compose-$(uname -s)-$(uname -m)" -o /usr/local/bin/docker-compose
# 给予权限
sudo chmod +x /usr/local/bin/docker-compose
# 创建软链接
sudo ln -s /usr/local/bin/docker-compose /usr/bin/docker-compose
# 验证安装成功
dejavu@debian:~docker-compose --version
Docker Compose version v2.3.3
zsh 和 oh-my-zsh 可以让终端用起来更加顺手
# 安装 git zsh
sudo apt update && sudo apt install git zsh
# 设置 zsh 为默认 shell
chsh -s $(which zsh)
# 安装 oh-my-zsh
sh -c "$(curl -fsSL https://raw.github.com/ohmyzsh/ohmyzsh/master/tools/install.sh)"
# 安装 zsh 插件 zsh-autosuggestions
git clone https://github.com/zsh-users/zsh-autosuggestions ${ZSH_CUSTOM:-~/.oh-my-zsh/custom}/plugins/zsh-autosuggestions
# 安装 zsh 插件 zsh-syntax-highlighting
git clone https://github.com/zsh-users/zsh-syntax-highlighting.git ${ZSH_CUSTOM:-~/.oh-my-zsh/custom}/plugins/zsh-syntax-highlighting
将 zsh-autosuggestions 和 zsh-syntax-highlighting 加进 zsh 配置文件中
# 编辑 zsh 配置文件
vim ~/.zshrc
# 在 plugin 字段加上插件名称即可
plugins=(git zsh-autosuggestions zsh-syntax-highlighting )
# 更新配置
source ~/.zshrc
因为是局域网络访问,所以延迟几乎可以忽略不计,完全可以使用 VScode 和 Jetbrains CLion 的 Remote Host 开发
# 安装 CLion 所需的工具链
sudo apt install cmake gcc g++ clang gdb
为了方便,这里我使用的是 OneInstack ,脚本需要以 Root 用户执行
编译安装组件如下:
wget -c http://mirrors.linuxeye.com/oneinstack-full.tar.gz && tar xzf oneinstack-full.tar.gz && ./oneinstack/install.sh --nginx_option 1 --php_option 9 --phpcache_option 1 --php_extensions fileinfo,redis --phpmyadmin --db_option 3 --dbinstallmethod 2 --dbrootpwd password --redis --memcached --iptables --reboot
等待漫长的编译安装过程……完成后会自动重启,至此基本的服务器配置环境就配置好了。
此内容由惯性聚合(RSS阅读器)自动聚合整理,仅供阅读参考。 原文来自 — 版权归原作者所有。