This is an opinionated step-by-step guide on how to publish Java library to Maven Central repository.
It assumes that:
All sample Maven invocations use Maven Wrapper (./mvnw) - either generate wrapper files with mvn wrapper:wrapper or just remember to use mvn instead of ./mvnw when following this tutorial
It uses JReleaser - I believe this is the simplest and the most straightforward way of signing and uploading artifacts.
This guide is based on Official guide from Sonatype but thanks JReleaser some steps are either heavily simplified or completely eliminated.
You do it only once - no matter how many projects you want to release or how many group ids you own.
Create a "New Project ticket in Sonatype JIRA.
This step is done once per group id. Meaning, for each domain you want to use as a group id - you must create a new project request.
Although the official Sonatype guide claims that Normally, the process takes less than 2 business days. in my case it took just few minutes.
Once ticket is created, a Sonatype JIRA bot will post comments with instructions what to do next:
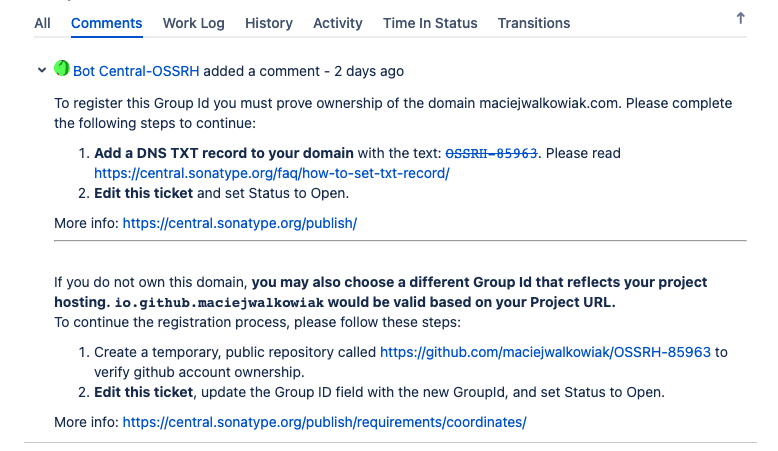
When you want to use a domain like com.maciejwalkowiak as a group id - you must own the domain - and be able to prove it. You must add a DNS TXT record with a JIRA ticket id to your domain - this is done in the admin panel where your domain is hosted.
Once you add the record, verify if it is added with command:
bash
$ dig -t txt maciejwalkowiak.com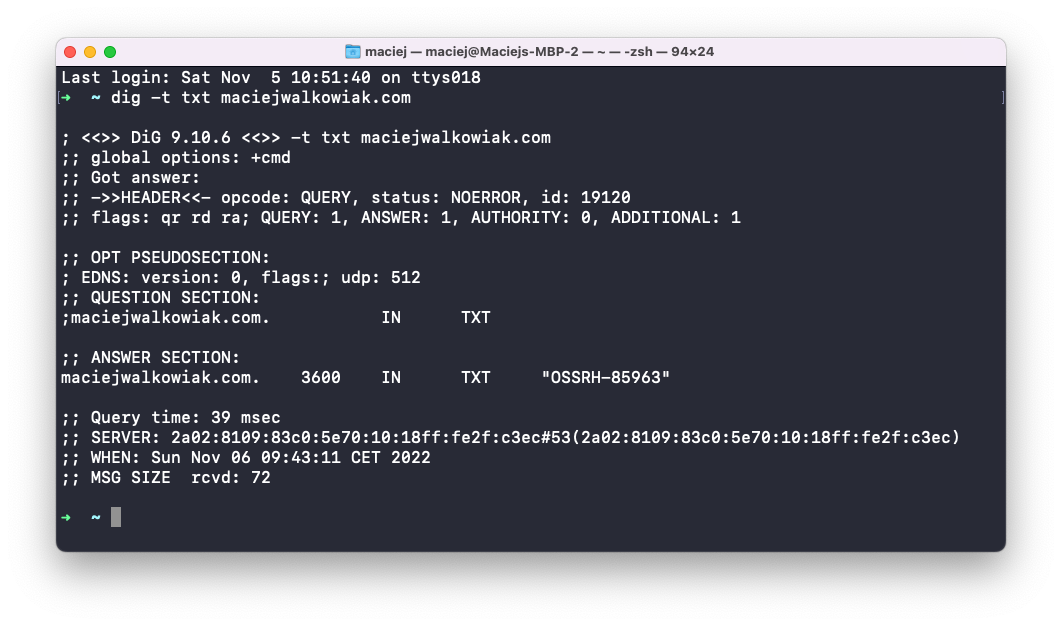
If you don't own the domain it is possible to use your GitHub coordinates as a group id. For example, my GitHub account name is maciejwalkowiak, so I can use io.github.maciejwalkowiak as a group id.
To prove that you own such GitHub account, create a temporary repository with a name reflecting the JIRA ticket id.
This can be done via github.com/new or with GitHub CLI:
bash
$ gh repo create OSSRH-85966 --publicThe comment posted by Sonatype bot says that once you are done with either creating a DNS record or creating a GitHub repository, "Edit this ticket and set Status to Open.".
I did not find any way to change status to "Open" in the edit form, but instead I had to click one of the buttons at the top of JIRA ticket, right next to "Agile Board" and "More" (unfortunately I did not make a screenshot on time).
Once you do it, another comment will be posted by Sonatype bot:

This means that our job in the Sonatype JIRA is done. Congratulations 🎉
(you can now drop the temporary GitHub repository if you've created one)
Artifacts sent to Maven Central must be signed. To sign artifacts you need to generate GPG keys.
This must be done only once - all artifacts you publish to Maven Central can be signed with the same pair of keys.
Create a key pair with:
Put your name, email address and passphrase.
List keys with command:
You will see output like this:
pub   ed25519 2022-11-05 [SC] [expires: 2024-11-04]
      05342E4134D1F7C1B08F900FC2377C0DD0494024
uid           [ultimate] john@doe.com
sub   cv25519 2022-11-05 [E] [expires: 2024-11-04]
In this example - 05342E4134D1F7C1B08F900FC2377C0DD0494024 is the key id. Find your own key id and copy it to clipboard.
Next you need to export public key to a key server with command (replace my key id with your key id):
bash
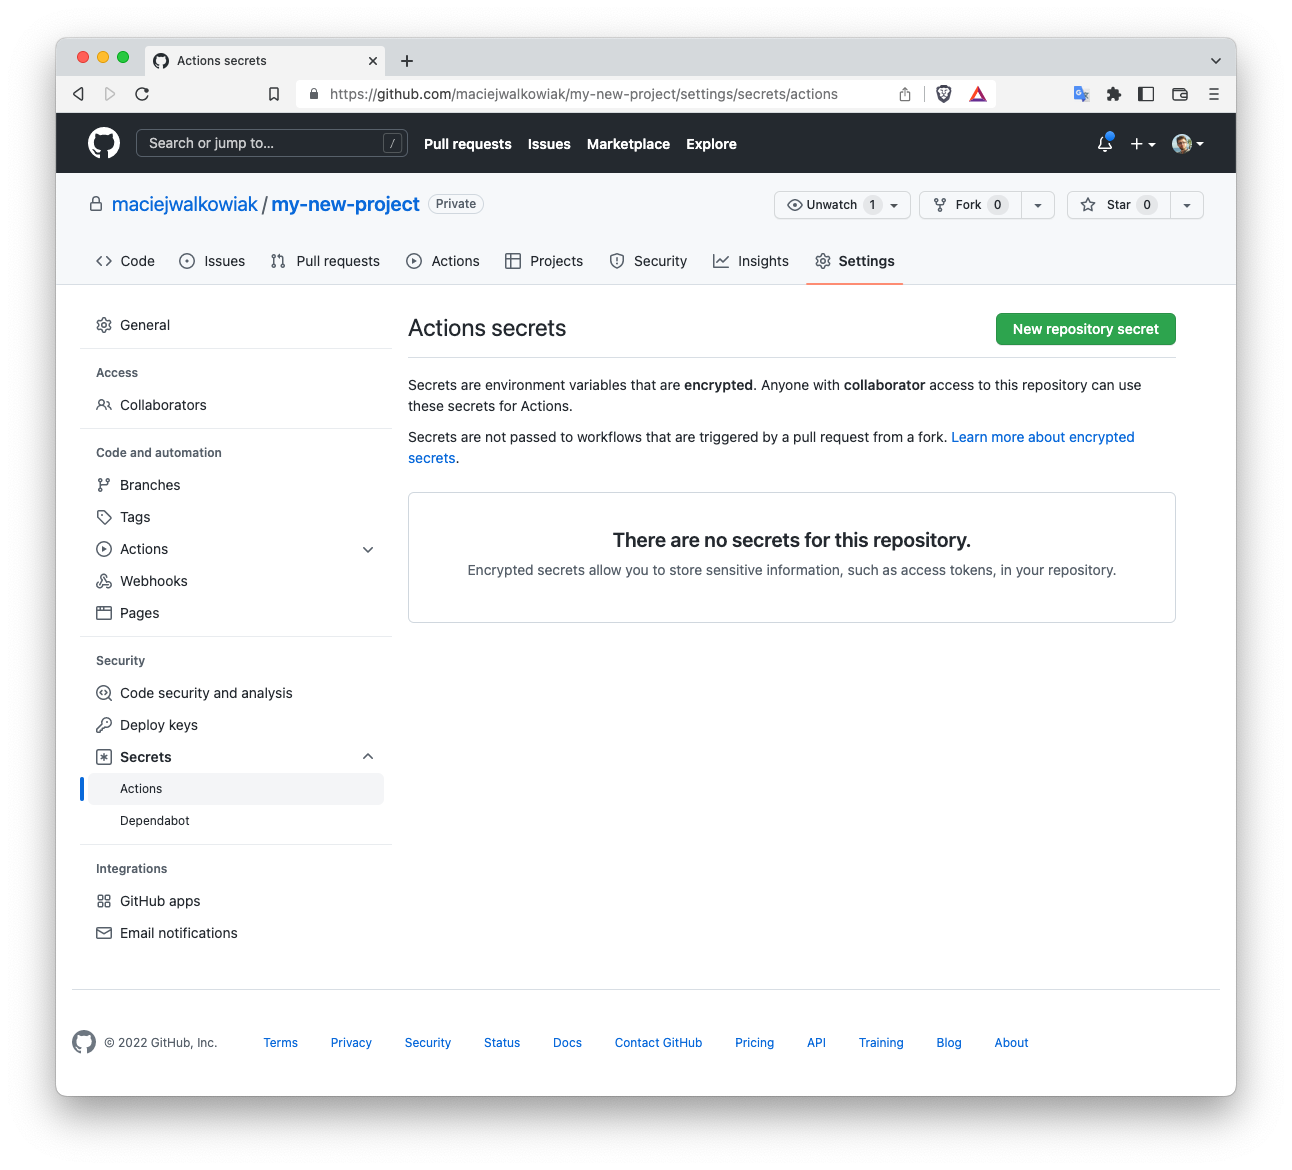
$ gpg --keyserver keyserver.ubuntu.com --send-keys <key id>JReleaser needs public and secret key to sign artifacts. Since signing will be done by a GitHub action, you need to export these keys as GitHub secrets.
Secrets can be set either on the GitHub repository website or with a GitHub CLI.
Go to repository Settings:
Create a key JRELEASER_GPG_PUBLIC_KEY with a value from running:
bash
$ gpg --export <key id> | base64Create a key JRELEASER_GPG_SECRET_KEY with a value from running:
bash
$ gpg --export-secret-keys <key id> | base64Create a key JRELEASER_GPG_PASSPHRASE with a value that is a passphrase you used when creating a key.
Two more secrets unrelated to GPG are needed to release to Maven Central:
Create a key JRELEASER_NEXUS2_USERNAME with a username you use to login to Sonatype JIRA.
Create a key JRELEASER_NEXUS2_PASSWORD with a username you use to login to Sonatype JIRA.
If you chose to use CLI instead, run following commands (replace things in < brackets > with real values) from the directory where your project is cloned:
bash
$ gh secret set JRELEASER_GPG_PUBLIC_KEY -b $(gpg --export <key id> | base64)
$ gh secret set JRELEASER_GPG_SECRET_KEY -b $(gpg --export-secret-keys <key id> | base64)
$ gh secret set JRELEASER_GPG_PASSPHRASE -b <passphrase>
$ gh secret set JRELEASER_NEXUS2_USERNAME -b <sonatype-jira-username>
$ gh secret set JRELEASER_NEXUS2_PASSWORD -b <sonatype-jira-password>pom.xml has to contain several extra information that likely you don't have there yet. The full list is available in the official guide but since we are using JReleaser, not all sections listed in the official guide are neccessary.
Specifically, you need to add name, url, scm section, license and developers.
To ensure that all information is there I recommend using pomchecker:
bash
$ pomchecker check-maven-central --file=./pom.xml

[INFO] Maven Central checks: pom.xml
[INFO] POM ./pom.xml passes all checks. It can be uploaded to Maven Central.Artifacts uploaded to Maven Central must have two extra jars: one with sources and one with Javadocs. Both are created by Maven plugins. I recommend configuring them in a separate Maven profile to avoid wasting time on running these plugins during development:
xml
<profiles>
  <profile>
    <id>release</id>
    <build>
      <plugins>
        <plugin>
          <groupId>org.apache.maven.plugins</groupId>
          <artifactId>maven-javadoc-plugin</artifactId>
          <version>3.4.1</version>
          <executions>
            <execution>
              <id>attach-javadoc</id>
              <goals>
                <goal>jar</goal>
              </goals>
            </execution>
          </executions>
        </plugin>
        <plugin>
          <groupId>org.apache.maven.plugins</groupId>
          <artifactId>maven-source-plugin</artifactId>
          <version>3.2.1</version>
          <executions>
            <execution>
              <id>attach-source</id>
              <goals>
                <goal>jar</goal>
              </goals>
            </execution>
          </executions>
        </plugin>
      </plugins>
    </build>
  </profile>
</profiles>
To run build with the release profile activated call:
bash
$ ./mvnw install -PreleaseJReleaser can be invoked either as a standalone CLI application or a Maven plugin. To keep it self-contained within a Maven project I prefer to use the Maven plugin.
Add following plugin configuration to the plugins section of the release profile:
xml
<plugin>
  <groupId>org.jreleaser</groupId>
  <artifactId>jreleaser-maven-plugin</artifactId>
  <version>1.3.1</version>
  <configuration>
    <jreleaser>
      <signing>
        <active>ALWAYS</active>
        <armored>true</armored>
      </signing>
      <deploy>
        <maven>
          <nexus2>
            <maven-central>
              <active>ALWAYS</active>
              <url>https://s01.oss.sonatype.org/service/local</url>;
              <closeRepository>false</closeRepository>
              <releaseRepository>false</releaseRepository>
              <stagingRepositories>target/staging-deploy</stagingRepositories>
            </maven-central>
          </nexus2>
        </maven>
      </deploy>
    </jreleaser>
  </configuration>
</plugin>
I recommend to set temporarily closeRepository and releaseRepository to false. At the end once you successfully release the first version to staging repository in Sonatype Nexus you can switch it to true.
The GitHub action will trigger the release each time a tag that starts with v is created, like v1.0, v1.1 etc.
Create a file in your project directory under .github/workflows/release.yml:
yml
name: Publish package to the Maven Central Repository
on:
  push:
    tags:
      - v*
  pull_request:
    branches: [ main ]
jobs:
  publish:
    runs-on: ubuntu-latest
    steps:
      - uses: actions/checkout@v3
      - name: Set up Java
        uses: actions/setup-java@v3
        with:
          java-version: '11'
          distribution: 'adopt'
      - name: Publish package
        env:
          JRELEASER_NEXUS2_USERNAME: ${{ secrets.JRELEASER_NEXUS2_USERNAME }}
          JRELEASER_NEXUS2_PASSWORD: ${{ secrets.JRELEASER_NEXUS2_PASSWORD }}
          JRELEASER_GPG_PASSPHRASE: ${{ secrets.JRELEASER_GPG_PASSPHRASE }}
          JRELEASER_GPG_SECRET_KEY: ${{ secrets.JRELEASER_GPG_SECRET_KEY }}
          JRELEASER_GPG_PUBLIC_KEY: ${{ secrets.JRELEASER_GPG_PUBLIC_KEY }}
          JRELEASER_GITHUB_TOKEN: ${{ secrets.GITHUB_TOKEN }}
        run: ./mvnw -Prelease deploy jreleaser:deploy -DaltDeploymentRepository=local::file:./target/staging-deploy
Adjust the Java version and the distribution to your needs.
The action will run Maven with a release profile. First it will stage artifact and then run jreleaser:deploy goal to publish artifact to Sonatype Nexus.
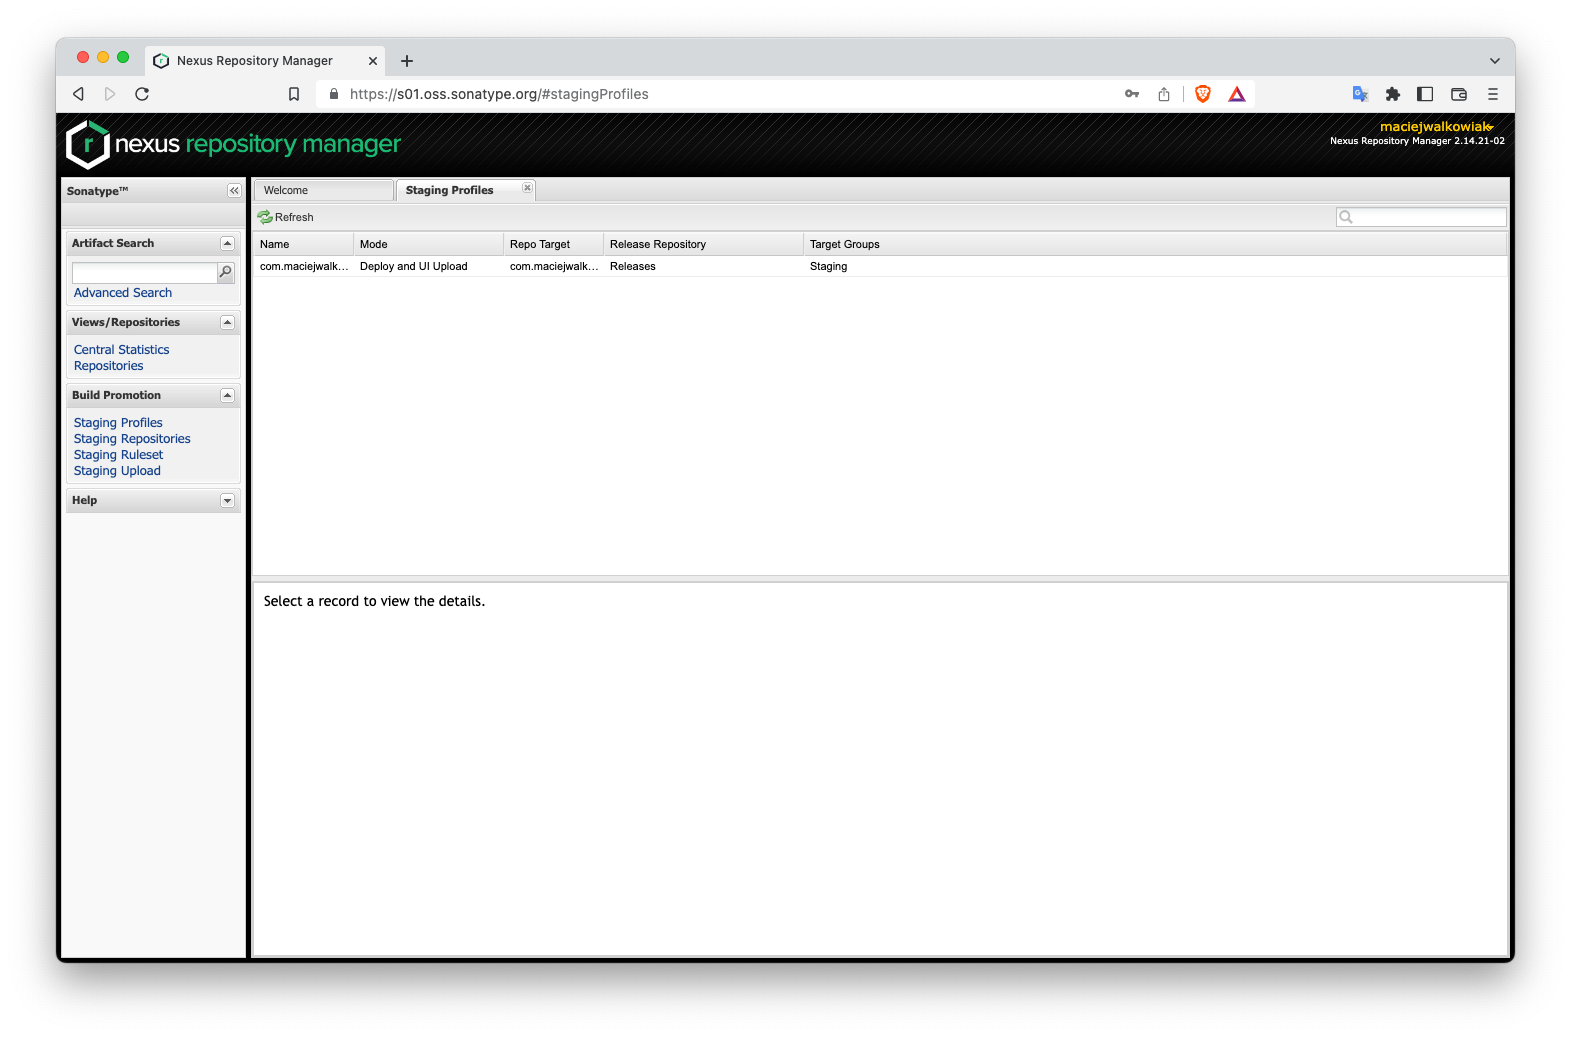
Once you create and push first tag and the GitHub Action finishes with success, you can log in to Sonatype Nexus with your Sonatype JIRA credentials to preview your staging repository.
In the Staging Profiles section you will see all the group ids you own:
If you set closeRepository and releaseRepository to false in JReleaser configuration, in the Staging Repositories section you will see an entry for the version that was released with a GitHub action:
 (image from https://help.sonatype.com/repomanager2/staging-releases/managing-staging-repositories)
Here you can Close the repository and Release. Both actions trigger series of verifications - if your pom.xml meets criteria, if packages are properly signed, if your GPG key is uploaded to the key server.
I recommend triggering these actions manually for the first version you release just to see if everything is fine. Once the Release action finishes with success, your library is considered as published to Maven Central. Congratulations 🎉
You can now set closeRepository and releaseRepository to true in JReleaser configuration.
The library is not immediately available after it is released. Official documentation says that it may take up to 30 minutes before the package is available, some folks claim that it can take few hours. In my case it took just 10 minutes.
Now your artifact can be referenced in pom.xml and Maven will successfully download it. If you try to do it before it is available, Maven will mark this library as unavailable and will not try to re-download it until the cache expires. Use -U flag to mvn command to force Maven to check for updates:
Don't be fooled by the results in search.maven.org or mvnrepository.com. Here your artifact or even a new version of the artifact will appear after around 24 hours.
I hope this guide was useful, and it helped you to release a library to Maven Central. If it did - please drop a comment! If you find anything unclear - either leave a comment or drop me a message on Twitter.
I would like to thank to Andres Almiray for creating both JReleaser and Pomchecker - both of these libraries significantly simplify the whole process to the point that it's not terribly overcomplicated anymore.
Let's stay in touch and follow me on Twitter: @maciejwalkowiak
Subscribe to RSS feed ![]()
此内容由惯性聚合(RSS阅读器)自动聚合整理,仅供阅读参考。 原文来自 — 版权归原作者所有。