A few things I enjoy: Photography, programming, the web, coffee. If you like this stuff too, stick around! If not, stick around anyways!
Let’s slap these things together and build an interesting image processing algorithm / visualization.
I’m gonna show you a tool + algorithm I’ve built for creating stylized, pixel-art-like images using a binning algorithm, and walk you through the process behind getting it up and running using Javascript and the <canvas> element.
Here’s a preview of where we are headed:
Try adding your own image to play around with using the “Choose File” button, and use the slider to compare the original and the binned versions.
The algorithm being used to create this image is a form of pixel binning, and allows for us to create some nicely stylized pixel-art imagery from an uploaded photo or graphic.
There are two main inputs for this algorithm that I’ll refer to as binSize and binGap.
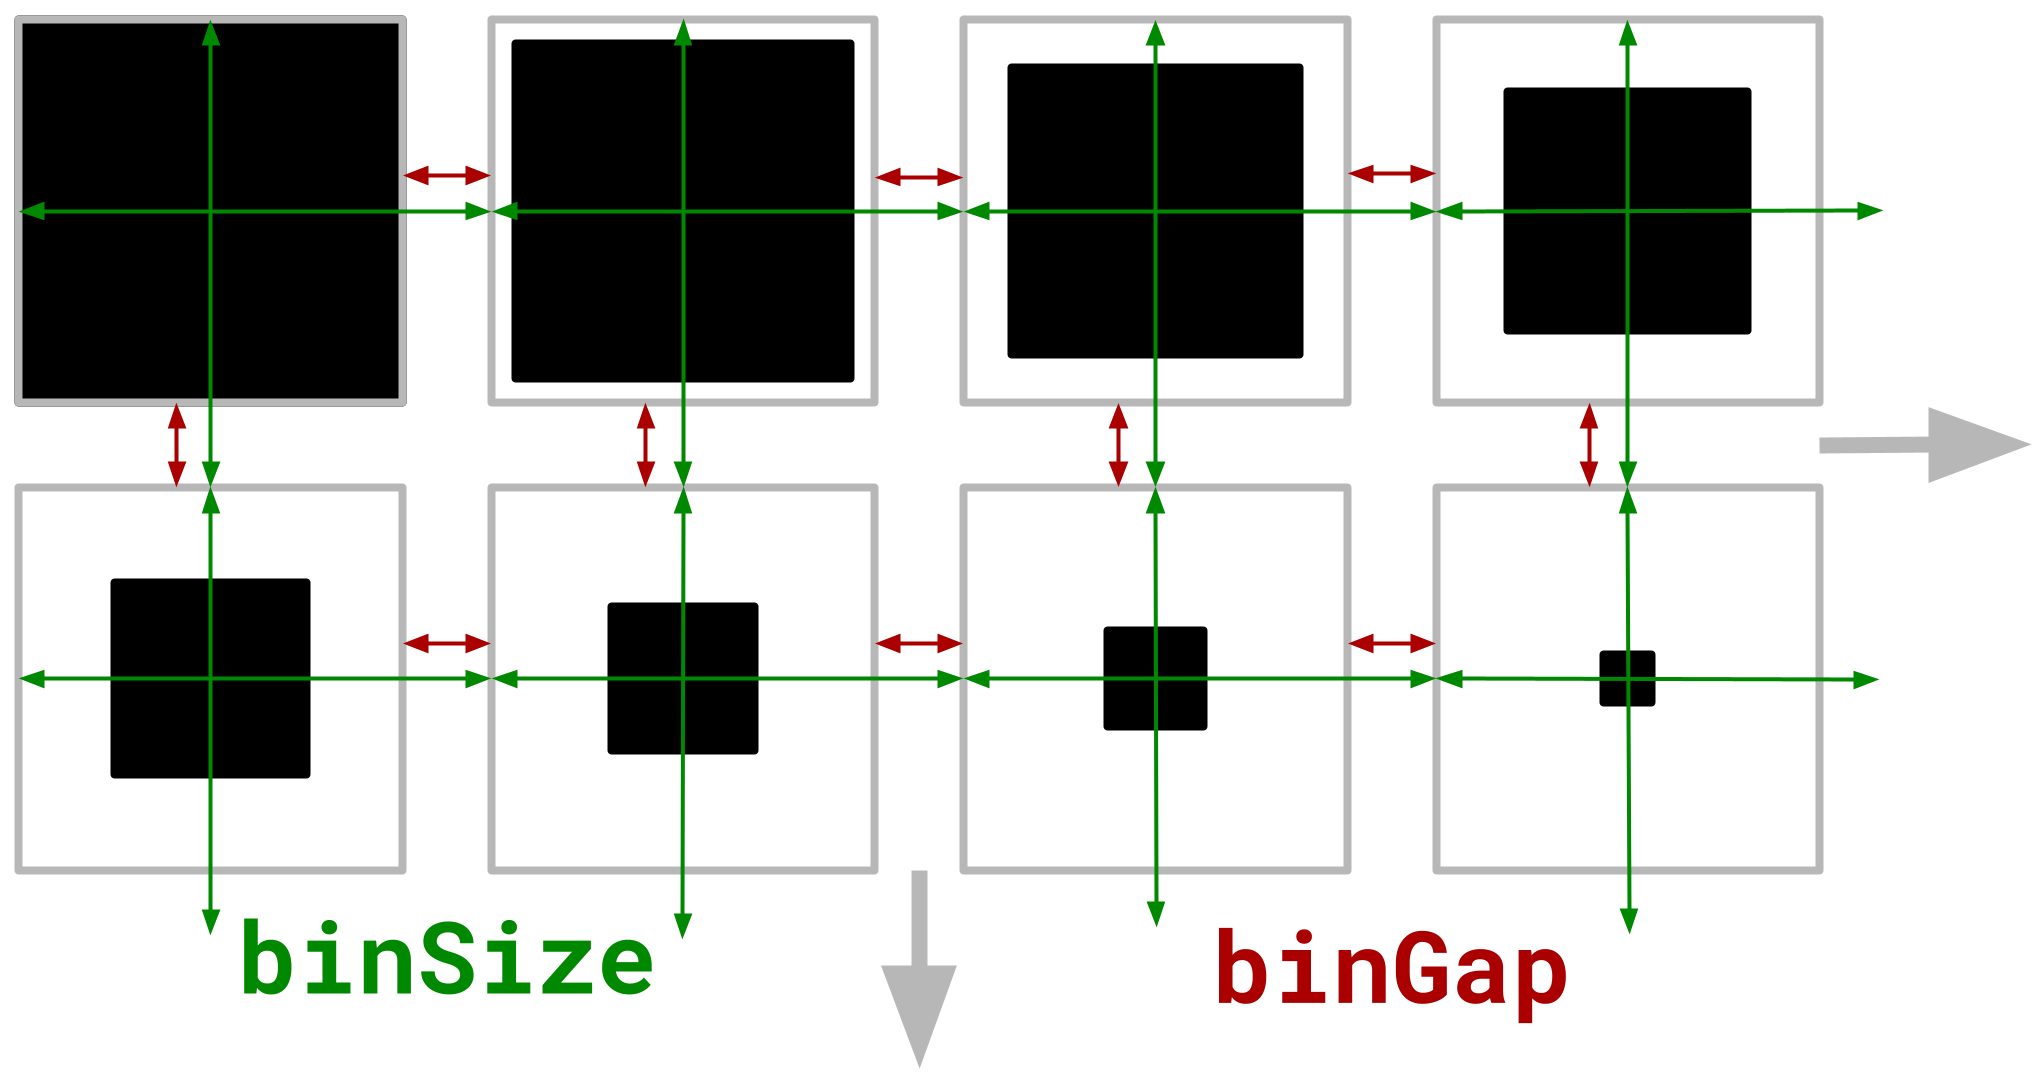
The binSize controls the size (width and height) of each bin that we’ll divide the input picture up into.
For example, if we have a 500x500 image and choose a bin size of 100, we’d end up with 25 total bins (5 rows of 5 100x100 bins).
A smaller number leads to smaller bins, which in turn leads to more “resolution” for our final product.
However, the smaller the bin, the less brightness values we have to work with - it’s a trade-off.
The binGap parameter controls how much space should exist between each bin.
This can be set to zero for less “wasted space” on the canvas, but for stylistic purposes you may choose a higher value.
Each bin will have a black square placed within. The size of this rectangle depends on the average brightness of all pixels contained within the bin. A bin with a high average brightness will end up getting a small black rectangle (to make that region of this image appear “lighter”) and ones with low average brightness will get a larger rectangle (making it look “darker”).
When this process is repeated across the entire image we get fun, stylized/pixelated look.
Some scaffolding
Before jumping into the algorithm implementation, let’s talk about some of the scaffolding that is needed to make this work, specifically as an interactive tool for the web. Since, of course, I want this to work in a browser, Javascript is the tool of choice. Js + the web is definitely not the optimal language + platform for doing heavy-duty image processing, but such is the sacrifice of making a web app :).
We’re going to be drawing this image data onto a <canvas> element.
One of the nice things about a <canvas> is it allows you to grab a big array of the full RGB pixel data to look at and manipulate.
To get this array, from a canvas, you do the following:
const canvas = document.getElementById("canvasID");
const ctx = canvas.getContext("2d");
const d = ctx.getImageData(0, 0, canvas.width, canvas.height);
const bigArrayOfRGBValues = d.data;
Later, this is how we’ll grab the image data to run the binning algorithm on.
To get the slider / overlay with both the original image and the binnified one, I used the img-comparizon-slider by Dimah Snisarenko.
Instead of using it with img tags, I place two canvases within, one of which I’ll modify and the other will be left with the original image.
<img-comparison-slider>
  <canvas slot="first" id="canvas"></canvas>
  <canvas slot="second" id="canvasBase"></canvas>
</img-comparison-slider>
I also need to get the sliders and image loading features set up as well.
The sliders are just some pretty basic <input> logic, and the image loading features requires a handful of custom Javascript functions.
I’m not going to show all of that here, but you can check out what I did in the gist with the full implementation.
We’ll also need a way to load images onto these canvases.
This can be accomplished by creating a new Image object, assigning its src value, listening for it to load, and finally using the drawImage function to get the pixels onto the canvas.
Here’s approximately what that looks like.
var image = new Image();
image.src = this.imageName;
image.addEventListener("load", e => {
  const ctx = yourCanvas.getContext("2d");
  ctx.imageSmoothingEnabled = false; // To keep things kwispy
  ctx.drawImage(image, 0, 0, width, height);
});
The binning algorithm
Now for the binning algorithm itself. Here’s the code:
binnify() {
  const binSize = Number(this.sliders[0].value);
  const binGap = Number(this.sliders[1].value);

  // The context / pixels for the base image canvas
  const ctx = this.baseCanvas.getContext("2d");
  const pData = ctx.getImageData(0, 0, this.width, this.height);
  const pixels = pData.data;

  // The context / pixels for the canvas to modify with binning
  const ctx2 = this.canvas.getContext("2d");
  const pData2 = ctx2.getImageData(0, 0, this.width, this.height);
  const pixels2 = pData2.data;

  // The actual bin size, accounting for gap
  const actual = binSize - binGap;

  // iterate through all bins
  for (let x = 0; x < this.width - binSize; x += binSize) {
    for (let y = 0; y < this.height - binSize; y += binSize) {
      let average = this.getAverageBrightness(pixels, x, y, x + binSize, y + binSize);
      let bracket = actual - Math.floor(average / (255 / actual));
      let pixelizeGap = Math.floor((actual - bracket) / 2) + binGap;
      this.fillRect(pixels2,
        x + pixelizeGap, y + pixelizeGap,
        x + binSize - pixelizeGap, y + binSize - pixelizeGap,
        [0,0,0]);
    }
  }

  ctx2.putImageData(pData2, 0, 0);
}
NOTE: these ultimately end up as functions in an ImageManipulator class, so you’ll see no preceding function and a few references to this.* here and there
The basic steps going on here are:
- Grab the
binSizeandbinGap - Get the pixel data for both the original image canvas and the one to be updated
- Calculate the actual bucket size (
binSize - binGapwith how I’m implementing it here) - Iterate through every bin (the nested loop) drawing the appropriately-sized black rectangle in each
In order to get the “drawing the appropriately-sized black rectangle” part to work, we need a few additional helper functions.
One of those is a function to determine the average brightness of a bin.
That’s what the getAverageBrightness function is for:
getAverageBrightness(pixels, x, y, x2, y2) {
  let total = 0;
  for (let x3 = x; x3 < x2; x3++) {
    for (let y3 = y; y3 < y2; y3++) {
      let i = this.pidx(pixels, x3, y3);
      total += pixels[i] + pixels[i + 1] + pixels[i + 2];
    }
  }
  return total / ((x2 - x) * (y2 - y) * 3);
}
The average brightness determines how big of a black rectangle to draw in this region.
The calculations for how large it should be are done within the nested loop of the binnify function.
Coordinates are then sent in to the fillRect function to draw the black squares.
The fillRect function is pretty basic, and looks like:
fillRect(pixels, x, y, w, h, rgb) {
  for (let x2 = x; x2 < w; x2++) {
    for (let y2 = y; y2 < h; y2++) {
      let pi = this.pidx(pixels, x2, y2);
      pixels[pi]   = rgb[0];
      pixels[pi+1] = rgb[1];
      pixels[pi+2] = rgb[2];
    }
  }
}
We also need to be able to blank-out the canvas so that we have a white backdrop for the image for the black bin rectangles to contrast against.
For this, I can use the fillCanvas function that basically wraps fillRect, but allows me to pass in a canvas instead of a pixels array.
fillCanvas(canvas, x, y, w, h, rgb) {
  const ctx = this.canvas.getContext("2d");
  const pData = ctx.getImageData(0, 0, this.width, this.height);
  const pixels = pData.data;
  this.fillRect(pixels, x, y, w, h, rgb);
  ctx.putImageData(pData, 0, 0);
}
And lastly, the pidx helper function.
pidx(pixels, x, y) {
  return Math.floor(pixels.length / this.height) * y + x * 4;
}
You might notice there’s a lot of loops going on here. Accounting for the function calls, at some point this code gets six for-loops deep! At a surface level this may seem like a bad thing, but actually in total, the whole process of binning an image only needs to make at most three passes over each pixel of the image. The first pass is just whiting-out the image, which is very efficient. In the binning algorithm, at most two passes are made over every pixel. One as a part of the process for getting the average, and another for drawing the black rectangle (which is actually not a full pass, only some of the pixels are “visited”). This could be made a bit more efficient by doing the white-out as a part of the process of filling in the black rectangles, but for the sake of organization and simplicity, it’s nice to have it as a separate pass.
Of course, I’ve skimmed over some details here, but these handful of functions make up the core of the algorithm to get the binning working. If you’re following along trying to implement this yourself, you’ll have to add a bit of additional logic to call this all at the correct times, set callbacks for the slider functions, allow for adding your own file, etc.
Wrapping up
Hopefully you have enjoyed this short explainer and walk through of how to get this binning algorithm working! You can find the full solution here on GitHub. Message me or drop a comment on the gist if you have any questions. Of course, you can throw in whatever image you want to play around with this, but I’ll place another one here at the end, for your enjoyment :).