ℹ️ This section is, for a most part, based on the official Kubernetes doc.
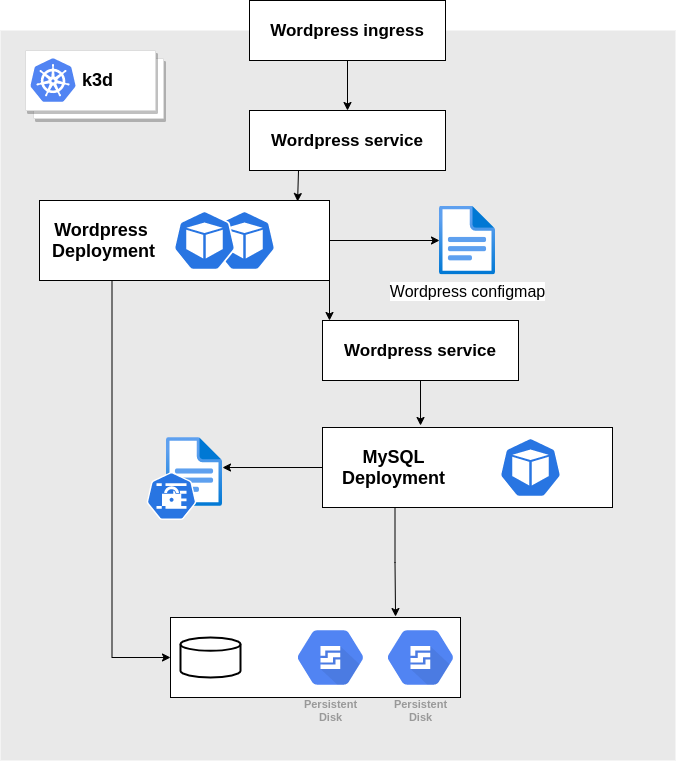
By the end of this lab we'll create the following components. You may want to come back to this schema from time to time in order to get the whole picture.
Check that your cluster is up and running and that your context is still configured with the namespace foo
1kubectl config get-contexts
2CURRENT   NAME           CLUSTER        AUTHINFO             NAMESPACE
3*         k3d-workshop   k3d-workshop   admin@k3d-workshop   foo
There are several options when it comes to persistent workloads on Kubernetes. For this workshop we'll use our local disks thanks to the local path provisionner.
Create a persistentVolumeClaim, it will stay pending until a pod consumes it
1kubectl apply -f content/resources/kubernetes_workshop/mysql/pvc.yaml
2persistentvolumeclaim/local-path-mysql created
3
4kubectl get pvc
5NAME               STATUS    VOLUME   CAPACITY   ACCESS MODES   STORAGECLASS   AGE
6local-path-mysql   Pending                                      local-path     16s
In Kubernetes sensitive data are stored in Secrets. Here we'll create a secret that stores the MySQL root password
1kubectl create secret generic mysql-pass --from-literal=password=YOUR_PASSWORD
2secret/mysql-pass created
Note that a secret is stored in an base64 encoded format and can be easily decoded. (There are best practices to enforce safe access to the secrets that we're not going to cover there)
 1kubectl get secrets mysql-pass -o yaml
 2apiVersion: v1
 3data:
 4  password: WU9VUl9QQVNTV09SRA==
 5kind: Secret
 6metadata:
 7  creationTimestamp: "2021-06-20T09:11:59Z"
 8  name: mysql-pass
 9  namespace: foo
10  resourceVersion: "2809"
11  uid: c96c58d6-8472-4d68-8554-5dcfb69d834c
12type: Opaque
13
14echo -n "WU9VUl9QQVNTV09SRA==" | base64 -d
15YOUR_PASSWORD
We will now create a MySQL deployment. It will be composed of a single replica as we're accessing to a local volume and it is configured to make use of the secret we've created previously.
1kubectl apply -f content/resources/kubernetes_workshop/mysql/deployment.yaml
2deployment.apps/wordpress-mysql created
3
4kubectl get po -w
5NAME                               READY   STATUS              RESTARTS   AGE
6wordpress-mysql-6c597b98bd-vcm62   0/1     ContainerCreating   0          9s
7wordpress-mysql-6c597b98bd-vcm62   1/1     Running             0          13s
8^C
In order to be able to call our MySQL deployment we may want to expose it using a service.
1kubectl apply -f content/resources/kubernetes_workshop/mysql/svc.yaml
2service/wordpress-mysql created
3
4kubectl get svc
5NAME              TYPE        CLUSTER-IP   EXTERNAL-IP   PORT(S)    AGE
6wordpress-mysql   ClusterIP   None         <none>        3306/TCP   6s
Kubernetes's service discovery is based on an internal DNS system. For instance a service A service is accessible using the following nomenclature: <service_name>.<Namespace>.svc.<Cluster_domain_name>
Let's try to access to the database server using a mysql client pod and create a database named foobar
 1kubectl run -ti --rm mysql-client --restart=Never --image=mysql:5.7 -- /bin/bash
 2If you don't see a command prompt, try pressing enter.
 3root@mysql-client:/# apt -qq update && apt install -yq netcat
 4...
 5Setting up netcat (1.10-41.1) ...
 6
 7
 8root@mysql-client:/# nc -vz wordpress-mysql.foo.svc.cluster.local 3306
 9DNS fwd/rev mismatch: wordpress-mysql.foo.svc.cluster.local != 10-42-1-8.wordpress-mysql.foo.svc.cluster.local
10wordpress-mysql.foo.svc.cluster.local [10.42.1.8] 3306 (?) open
11
12root@mysql-client:/# mysql -u root -h wordpress-mysql -p
13Enter password:
14...
15
16mysql> show databases;
17+--------------------+
18| Database           |
19+--------------------+
20| information_schema |
21| mysql              |
22| performance_schema |
23+--------------------+
243 rows in set (0.01 sec)
25
26mysql> create database foobar;
27Query OK, 1 row affected (0.00 sec)
28
29mysql> exit
30Bye
Note: You can either use the service name wordpress-mysql, or if your source pod is in another namespace use wordpress-mysql.foo
We may want to check how the data is stored. Now that we have a MySQL instance running and consuming the pvc, a persistent volume has been provision
1kubectl get pvc
2NAME               STATUS   VOLUME                                     CAPACITY   ACCESS MODES   STORAGECLASS   AGE
3local-path-mysql   Bound    pvc-4bb3c033-2261-4d5c-ba61-41e364769599   500Mi      RWO            local-path     14m
Having a closer look we notice that the volume is actually a directory within a worker node.
 1kubectl describe pv pvc-4bb3c033-2261-4d5c-ba61-41e364769599
 2Name:              pvc-4bb3c033-2261-4d5c-ba61-41e364769599
 3Labels:            <none>
 4Annotations:       pv.kubernetes.io/provisioned-by: rancher.io/local-path
 5Finalizers:        [kubernetes.io/pv-protection]
 6StorageClass:      local-path
 7Status:            Bound
 8Claim:             foo/local-path-mysql
 9Reclaim Policy:    Delete
10Access Modes:      RWO
11VolumeMode:        Filesystem
12Capacity:          500Mi
13Node Affinity:
14  Required Terms:
15    Term 0:        kubernetes.io/hostname in [k3d-workshop-agent-0]
16Message:
17Source:
18    Type:          HostPath (bare host directory volume)
19    Path:          /var/lib/rancher/k3s/storage/pvc-4bb3c033-2261-4d5c-ba61-41e364769599_foo_local-path-mysql
20    HostPathType:  DirectoryOrCreate
21Events:            <none>
1docker exec k3d-workshop-agent-0 ls /var/lib/rancher/k3s/storage/pvc-4bb3c033-2261-4d5c-ba61-41e364769599_foo_local-path-mysql
2auto.cnf
3foobar
4ib_logfile0
5ib_logfile1
6ibdata1
7mysql
8performance_schema
That means that even if you restart your laptop you should retrieve the data (here the database foobar we've created previously)
 1k3d cluster stop workshop
 2INFO[0000] Stopping cluster 'workshop'
 3
 4k3d cluster list
 5NAME       SERVERS   AGENTS   LOADBALANCER
 6workshop   0/1       0/1      true
 7
 8k3d cluster start workshop
 9INFO[0000] Starting cluster 'workshop'
10INFO[0000] Starting servers...
11INFO[0000] Starting Node 'k3d-workshop-server-0'
12INFO[0006] Starting agents...
13INFO[0006] Starting Node 'k3d-workshop-agent-0'
14INFO[0013] Starting helpers...
15INFO[0013] Starting Node 'k3d-workshop-serverlb'
16
17kubectl run -ti --rm mysql-client --restart=Never --image=mysql:5.7 -- mysql -u root -h wordpress-mysql --password="YOUR_PASSWORD"
18If you don't see a command prompt, try pressing enter.
19
20mysql> show databases;
21+--------------------+
22| Database           |
23+--------------------+
24| information_schema |
25| foobar             |
26| mysql              |
27| performance_schema |
28+--------------------+
294 rows in set (0.00 sec)
Now we will deploy the wordpress instance with a persistent volume.
So first of all create a pvc as follows
1kubectl apply -f content/resources/kubernetes_workshop/wordpress/pvc.yaml
2persistentvolumeclaim/wp-pv-claim created
Then create the deployment. Note that it is configured with our mysql database as backend.
1kubectl apply -f content/resources/kubernetes_workshop/wordpress/deployment.yaml
2deployment.apps/wordpress created
3
4$ kubectl get deploy
5NAME              READY   UP-TO-DATE   AVAILABLE   AGE
6wordpress-mysql   1/1     1            1           11h
7wordpress         1/1     1            1           4s
Most of the time, when we want to expose an HTTP service to the outside world (outside of the cluster), we would create an ingress
1kubectl apply -f content/resources/kubernetes_workshop/wordpress/svc.yaml
2service/wordpress created
3
4kubectl apply -f content/resources/kubernetes_workshop/wordpress/ingress.yaml
5ingress.networking.k8s.io/wordpress created
With k3d the ingress endpoint has been defined when we've created the cluster. With the parameter -p "8081:80@loadbalancer"
Our wordpress should therefore be accessible through http://localhost:8081

A ConfigMap is a kubernetes resource that stores non-sensitive data. Its content can be consumed as config files, environment variables or command args.
Let's consider that we need a configfile to be mounted in our wordpress deployment as well as an environment variable made available.
Create a dumb "hello world" config file
1echo "Hello World!" > /tmp/helloworld.conf
Then we'll create a configmap that contains a file and environment variable we want to make use of.
Note This following command doesn't actually apply the resource on our Kubernetes cluster. It just generate a local yaml file using --dry-run and -o yaml.
1kubectl create configmap helloworld --from-file=/tmp/helloworld.conf --from-literal=HELLO=WORLD -o yaml --dry-run=client > /tmp/cm.yaml
Check the configmap
1apiVersion: v1
2data:
3  HELLO: WORLD
4  helloworld.conf: |
5    Hello World!
6kind: ConfigMap
7metadata:
8  creationTimestamp: null
9  name: helloworld
And apply it
1$ kubectl apply -f /tmp/cm.yaml
2configmap/helloworld created
Now we're gonna make use of it by changing the wordpress deployment. For this kind of change it is recommended to use an IDE with a Kubernetes plugin that will highlight errors.
Edit the file located here: content/resources/kubernetes_workshop/wordpress/deployment.yaml
 1...
 2          env:
 3            - name: WORDPRESS_DB_HOST
 4              value: wordpress-mysql
 5            - name: WORDPRESS_DB_PASSWORD
 6              valueFrom:
 7                secretKeyRef:
 8                  name: mysql-pass
 9                  key: password
10            - name: HELLO
11              valueFrom:
12                configMapKeyRef:
13                  name: helloworld
14                  key: HELLO
15          volumeMounts:
16            - name: wordpress-persistent-storage
17              mountPath: /var/www/html
18            - name: helloworld-config
19              mountPath: /config
20      volumes:
21        - name: wordpress-persistent-storage
22          persistentVolumeClaim:
23            claimName: wp-pv-claim
24        - name: helloworld-config
25          configMap:
26            name: helloworld
27            items:
28              - key: helloworld.conf
29                path: helloworld.conf
Applying this change will trigger a rolling-update
1$ kubectl apply -f content/resources/kubernetes_workshop/wordpress/deployment.yaml
2deployment.apps/wordpress configured
3
4$ kubectl get po
5NAME                               READY   STATUS    RESTARTS   AGE
6wordpress-mysql-6c597b98bd-4mbbd   1/1     Running   2          41h
7wordpress-594f88c9c4-n9qqr         1/1     Running   0          5s
And the configuration will be available in the newly created pod
1$ kubectl exec -ti wordpress-594f88c9c4-n9qqr -- env | grep HELLO
2HELLO=WORLD
3
4$ kubectl exec -ti wordpress-594f88c9c4-n9qqr -- cat /config/helloworld.conf
5Hello World!
⚠️ Do not delete anything, we'll make use of these resources in the next section.
此内容由惯性聚合(RSS阅读器)自动聚合整理,仅供阅读参考。 原文来自 — 版权归原作者所有。