
This blog post walks you through working with Sealed Secrets by Bitnami.
If you want to learn how to deploy the Sealed Secrets operator, please read the following blog post:
https://devoriales.com/post/350/deploy-sealed-secrets-operator-via-argocd-a-step-by-step-guide
For those of us using GitOps principles in our solution, dealing with secrets can be a significant challenge. Since the single source of truth lies in the Git repository, we know that we cannot save secrets among the source code and manifest files.
There are various solutions to this problem. More comprehensive options include using Secrets Managers like AWS Secrets Manager or HashiCorp Vault. However, for smaller projects and smaller teams, Sealed Secrets by Bitnami offers a simpler alternative.
It’s simpler because we don’t need to use any Secrets Managers. The way it works is we create a Sealed Secret manifest file using a public key certificate from the Sealed Secrets controller running in Kubernetes. Only the controller can decrypt the secret data once the Sealed Secret is applied to Kubernetes. You will store the Sealed Secret among your other manifest files, not the Kubernetes secret itself. Once deployed to Kubernetes, the Sealed Secrets controller will create a Kubernetes secret, which is then available to your workloads as usual.
There are several ways to expose secret data to a pod:
Environment Variables: Secrets can be injected into a container as environment variables.
Volume Mounts: Secrets can be mounted as files within a pod, making them accessible from the file system.
Kubernetes Downward API: Secrets can be made available to applications via the Kubernetes Downward API, allowing containers to consume secrets as part of the pod’s metadata.
For the sake of simplicity, in this tutorial, we’ll inject the secret data as environment variables.
To follow along, you need to have the following:
kubeseal cli tool to interact with the Sealed Secrets controllerkubeseal cliThe kubeseal command-line interface (CLI) is a tool for managing Sealed Secrets in Kubernetes.
The kubeseal CLI allows you to encrypt your secrets into a SealedSecret, which can then be decrypted only by the Sealed Secrets controller running in your Kubernetes cluster.
I'd suggest that you install the kubeseal cli by following the official installation guide under the following link:
https://github.com/bitnami-labs/sealed-secrets?tab=readme-ov-file#kubeseal
The following diagram shows how Sealed Secrets workflow looks like:
kubeseal CLI and the fetched public key certificate, the developer encrypts the Kubernetes Secret.We will deploy a dummy web app that will cosume some secret data.
All the code you can find in the following repository which can be fetched (or you can create an own repository and folder structure):
https://github.com/devoriales/sealed-secrets-example
The folder and file structure looks like the following:
.
├── README.md
├── app
│   ├── Dockerfile
│   ├── app.py
│   └── requirements.txt
├── k8s-manifests
│   ├── deployment.yaml
│   ├── ingress.yaml
│   └── service.yaml
We will deploy this application via ArgoCD, as we did with Sealed Secrets Controller in the previous blog post. But if you want to keep it simple, you can apply the manifest files manually.
The application will read data from a secret and use it as environment variables.
We will have two key value pairs:
There is also an ingress, to be able to see the data in the browser. It may not make much sense for a real application, but it's just useful for demonstration purposes.
The application is based on flask and the code looks like this:
from flask import Flask
import os

app = Flask(__name__)

@app.route('/')
@app.route('/home')
def home():
    html = f'''
    <h1>Web App</h1>
    <p>Welcome to the home page</p>
    <p>Username: {os.environ.get('USERNAME')}</p>
    <p>Password: {os.environ.get('PASSWORD')}</p>
    '''
    return html

if __name__ == '__main__':
    app.run(debug=False, host='0.0.0.0', port=5050)
We're basically just getting the values from the environment variable that we will be exposed to the pod.
In the app folder, we have a Dockerfile to create a container image.
Go to the app folder and run:
docker build -t <my_registry>/web-app-sealed-secret:0.1.0 .Be aware, you need to enter your own registry as part of the image tag.
You can of course name the image as you wish and comply with your registry.
Next we need to push the image to the registry:
docker push -t <my_registry>/web-app-sealed-secret:0.1.0Example:
docker push 192.168.64.54:30500/web-app-sealed-secret:0.1.0
The push refers to repository [192.168.64.54:30500/web-app-sealed-secret]
0c2e3ac1346a: Layer already exists
3dfe04405ed5: Layer already exists
bf25b5d627d8: Layer already exists
fa3a4f5fdd2d: Layer already exists
6f57bdc863f1: Layer already exists
1bfa7d58f662: Layer already exists
e76924ca5848: Layer already exists
c015f78e2a88: Layer already exists
a5290e2b0bfb: Layer already exists
0.1.0: digest: sha256:ccf95b199b8e7129e33b33aca0840baa3debfa758dfd80571a955c603edea6a0 size: 2202
Great, now we have the image available in the registry.
In the k8s-manifests folder, there are already some manifests file.
The manifests files:
.
├── README.md
├── k8s-manifests
│   ├── deployment.yaml
│   ├── ingress.yaml
│ └── service.yamlMake sure to set the correct image name in your Deployment file:
spec:
  containers:
  - name: web-app
image: 192.168.64.54:30500/web-app-sealed-secret:0.1.0You need to change the host name in the ingress:
apiVersion: networking.k8s.io/v1
kind: Ingress
metadata:
  name: web-app-ingress
  namespace: gitops-sealed-secret-demo
  annotations:
    nginx.ingress.kubernetes.io/rewrite-target: /
spec:
  rules:
  - host: <set-your-hostname>
    http:
      paths:
      - path: /
        pathType: Prefix
        backend:
          service:
            name: web-app-service
            port:
              number: 80
If you don't have the ingress controller in place, you can port forward to the service.
Finally we got to the point where we are going to create the Sealed Secret manifest file.
The steps involve the following:
kubeseal using the public key certificate. This will generate a Sealed Secret manifest filekubeseal cli is working under the kubectl context, as long as you have permissions to your kubernetes cluster, it will work.
To fetch the certificate, run the following command:
kubeseal --fetch-cert --controller-name=sealed-secrets --controller-namespace=sealed-secrets > public-key-cert.pem–controller-name=sealed-secrets-controller:
• This option specifies the name of the Sealed Secrets controller. In most default installations, the controller is named sealed-secrets-controller.
After running the command, you should have a file named public-key-cert.pem in your current directory. This file contains the public certificate that kubeseal will use to encrypt your secrets.
Check that you have a valid public certificate by printing out the public-key-cert.pem file, it should show the public key:
-----BEGIN CERTIFICATE-----
JkIIEzDCCArSgAwIBAgIQb+VoA+cz7YJfXvk+NlRgvzANBgkqhkiG9w0BAQsFADAA
MB4XDTI0MDYyMTIwMzY1OVoXDTM0MDYxOTIwMzY1OVowADCCAiIwDQYJKoZIhvcN
AQEBBQADggIPADCCAgoCggIBAJ1vfKdoj+OLVcB4voW6V/Z/eHZIg4toZuJw9ORg
...
-----END CERTIFICATE-----Next, we will create a Kubernetes secret. What's important here, this secret we will not commit to the git repository. Instead, we will create another manifest file called Sealed Secret.
Create a Kubernetes secret:
kubectl create secret generic mysecret --dry-run=client --from-literal=username=admin --from-literal=password='supersecretpassword' -o yaml > mysecret.yamlVerify that you have a valid Kubernetes Secret:
cat my_secret.yaml
Output example:
apiVersion: v1
data:
  password: c3VwZXJzZWNyZXRwYXNzd29yZA==
  username: YWRtaW4=
kind: Secret
metadata:
  creationTimestamp: null
  name: mysecret
kubesealIn this step, we are going to encrypt the secret that we have created with kubeseal. This will generate a Sealed Secret manifest file.
kubeseal -n sealed-secret-demo --cert public-key-cert.pem --format yaml < mysecret.yaml > sealedsecret.yaml❗Please note, if you don’t specify the namespace using the -n option in the kubeseal command, the manifest file will contain the namespace configured in your kubectl context. So either you change the context or set the namespace flag.
What we are doing here is, when writing < mysecret.yaml, the command reads the input from the secret we created eariler.
Verify that you have a sealed secret by printing out the sealedsecret.yaml file:
---
apiVersion: bitnami.com/v1alpha1
kind: SealedSecret
metadata:
  creationTimestamp: null
  name: mysecret
  namespace: gitops-sealed-secret-demo
spec:
  encryptedData:
    password: AgB0rhJWYqojdSVcn+49XQGnKkN+j79cza08goDBJrMd3dX7qTbgJJ+Klko929f7VUBv0LOP1gQBz/XJEMmLze4iqIHhz/w9ZDmxEOOjufTSYQy1/lztSMKb6qVt54Hj038iKbq43zIL3YgUZiF5aqqpj+F9CIoQKhsPACtM/VTN3sYHy1JwWyH6M/89uPjj/jPE9Khblm9iKIsx2BfqipR0K8fMOo9XtX+fUA4L8ORJBYKjN4yaGihnyTZV/3HKZd3gOsuL70GL7oPrBWLOh1ERVhh+dnoIv2RMPMJ94le53Fi8QWdBGI3zznPrf9fWDSwJa/76Zx3leqSTcBTwSftdcFTDpFEKd30qllav8lTMvr/jWsHKKrIZLFLZZ+tyBopHyCx3DrWoI39v9w1TilrVtL6+W4Uc/UAxdyHRLio9glWxANH+GjvLHHRrxsnGHtRqSEHNP2PeZ+EEhAKYSdOXURMWAbpIVbTiwd4NT6mD14plYx0Gxn+KLJkwhLFKhVUZPCjv+0SJhzHseW+xgNyoMHdq4bvYaICmSmmZLbMaqaPVeSWCElpiSzVCFLpYQleP6CDnnoQMRliNd84WAv9SjKRFQcuqM3NOp8gREBG05ucNKPk26UUF1+3+Xef2i9LEAkHtVDBumYjx07SUiCZ6usU2xxLaDttpOlp9xQdA/Mm9LXvCGS/N6a9pxE0Hwllo+geU/nJWgHU0LKV+9w==
    username: AgBaNDSRzBL/FqZUZXoGuttfOdecsB5Jqfiau7dJJFvqW4PLwV513Bhv9NLe59zavxg+dZe27HGszSZfbt0mDtiw4Usjk5icWnF9ZrZNAlim4cPJNslnYUxU8A5bTPsuQ9ZBJ88z2CEa7O6I08i5CpIyp6L6A2r2Y/S5Tz4YKyKbXzTAW8kBoOCsCqJ/5XsfKpgNBedP+xDYi+U3UxvET95RS/1HFPE8mTERdrqzTflNmduccgyJ34yuANFbi7YXO8UPE+4Ogcpw6LEPRKHNi4sajPbxCnAXZtiw9X30/DGF64V4RtB413U5m+3N9OrkQmK/Uq/YBsz7pr66C0JUyMAOeEdITfWEy8qtT5N4eG1PESr75zKz/n45kSXkkqbbv6WXCtFhKFd0Lrn9YHIfImgny93ZhyCjEnKRpGmno82Ut1PuykiPBCxnECORGn7+GxlWScdkRYt4Tv2c4ZctZUsSzP3Hrh1IIACMDw7smB879cXgXebKkEyZltPyyBMLN4gxcRw59Vk495LEvUAp4cteVwywPlx6mhPUX1gLMpqiXk5SXHT296C8m5sjNtGmzgx9ddDnmIzL4uL2ComtnxkENDupPyHk/FX4XFahN+FvaGZ+5hQh9eg91zN37reXY2uS8Ss019YIoFUjUBcPDA9FPpF9RoN/KzcQaZRV1PPl886ZJT6FnnjHFqdbMmSwXE5wsdu4uA==
  template:
    metadata:
      creationTimestamp: null
      name: mysecret
      namespace: gitops-sealed-secret-demo
You can safely add sealedsecret.yaml to your among your other manifest files. It can only be decrypted by the Sealed Secrets controller since it keeps the private key certificate.
Also make sure that your deployment manifest file refers to the correct secret name, which is mysecret in our case:
    spec:
      containers:
      - name: web-app
        image: 192.168.64.54:30500/web-app-sealed-secret:0.1.0
        env:
        - name: USERNAME
          valueFrom:
            secretKeyRef:
              name: mysecret
              key: username
        - name: PASSWORD
          valueFrom:
            secretKeyRef:
              name: mysecret
              key: password
        ports:
- containerPort: 5000You can add the new Sealed Secret file to your git repository:
git add k8s-manifests/sealed_secret.yaml
git commit -m "Add SealedSecret for application credentials"
git push origin <branch-name>
Now it's up to you how you want to deploy the app.
In my case, I'm running ArgoCD. If you do the same, you need to have an Application manifest file for the web-app.
ArgoCD application manifest example:
apiVersion: argoproj.io/v1alpha1
kind: Application
metadata:
  name: gitops-secret-example
  namespace: argocd
spec:
  project: default
  source:
    repoURL: '[email protected]:devoriales/gitops-secret-example.git'
    path: k8s-manifests
    targetRevision: main
  destination:
    server: 'https://kubernetes.default.svc'
    namespace: gitops-sealed-secret-demo
  syncPolicy:
    automated:
      prune: true
      selfHeal: true
    syncOptions:
      - CreateNamespace=true
If you don't have argoCD, you can apply the manifests files directly with kubectl:
kubectl apply -f k8s-manifests/Output:
deployment.apps/web-app configured
ingress.networking.k8s.io/web-app-ingress configured
sealedsecret.bitnami.com/mysecret configured
service/web-app-service configuredIn this step, we will verify that our app is up and running.
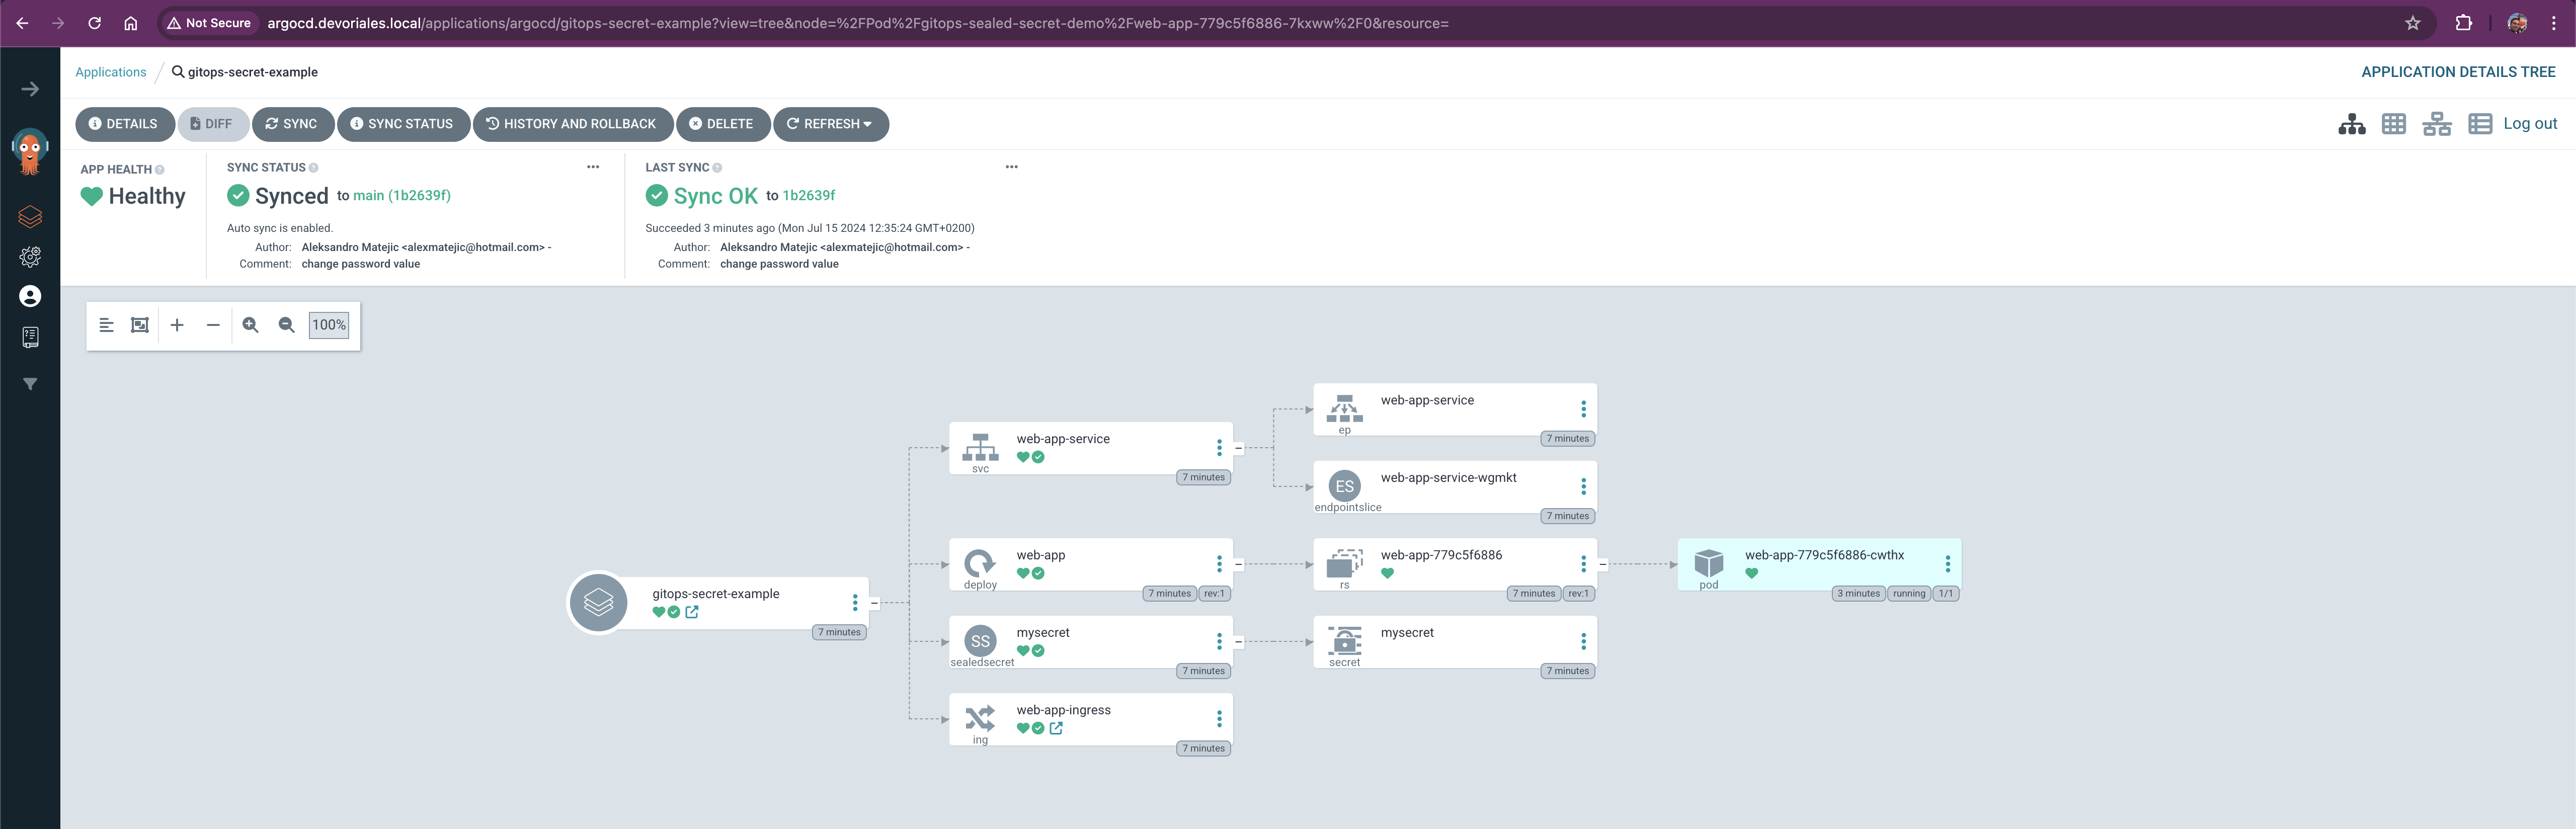
In my case, since I’ve deployed the web app with ArgoCD, I can visually see that the application is healthy. It’s important to note that the Sealed Secrets controller created a Kubernetes secret from the SealedSecret, and we can see both objects.
Let’s go to the web browser and check if the secret data has been exposed to our application:
Great! Our app is up and running and we got the password exposed to the whole world, exactly what we wanted 😂
Yes. But there is a bit of work.
Let's say you have installed Sealed Secrets operator in sealed-secrets namespace.
Then you need to get the private key from there.
Extract the private key (make sure you enter the correct secret name):
kubectl get secret sealed-secrets-keyv7jc7 -n sealed-secrets -o jsonpath="{.data.tls\.key}" | base64 --decode > sealed-secrets.keysealed-secrets.key example:
-----BEGIN RSA PRIVATE KEY-----
MIIJKQIBAAKCAgEAnW98p2iP44tVwHi+hbpX9n94dkiDi2hm4nD05GA1wnSkPKYT
Qk+w6ob8MNecnm2VG8zw784IvBeEHP6jwmtbgDThY8OcpJ+zJJTi9fS/SQ3kQ4f5
...
-----END RSA PRIVATE KEY-----
Clone the Sealed Secrets repository and build the kubeseal tool with decryption capabilities:
git clone https://github.com/bitnami-labs/sealed-secrets.git
cd sealed-secrets
go build -tags decrypt ./cmd/kubeseal
Use the kubeseal cli with the private key to decrypt the Sealed Secret:
❗Please note It has to be the new kubeseal that you have built with the decryption capabilities:
./kubeseal --recovery-unseal --recovery-private-key sealed-secrets.key < sealedsecret.yaml > decrypted-secret.yamlOpen decrypted-secret.yaml to see the decrypted Kubernetes Secret:
{
  "kind": "Secret",
  "apiVersion": "v1",
  "metadata": {
    "name": "mysecret",
    "namespace": "sealed-secret-demo",
    "creationTimestamp": null,
    "ownerReferences": [
      {
        "apiVersion": "bitnami.com/v1alpha1",
        "kind": "SealedSecret",
        "name": "mysecret",
        "uid": "",
        "controller": true
      }
    ]
  },
  "data": {
    "password": "c3VwZXJzZWNyZXRwYXNzd29yZA==",
    "username": "YWRtaW4="
  }
}
And if we base64 decode the password, we see that it's correct:
c3VwZXJzZWNyZXRwYXNzd29yZA==

is

supersecretpasswordSealed Secrets provides a solution for managing sensitive information in Kubernetes environments, particularly fitted well when following GitOps principles. By using Sealed Secrets controller, you can safely store the Sealed Secret manifest files in your Git repository without exposing the actual secret data.
This blog post guided you through the complete process, from setting up the necessary tools to deploying a sample web application using ArgoCD.
We covered:
As you implement this in your own projects, remember to keep your public key certificate secure and to review your deployment manifests to ensure they reference the correct SealedSecrets. Happy securing!
此内容由惯性聚合(RSS阅读器)自动聚合整理,仅供阅读参考。 原文来自 — 版权归原作者所有。