


When my first Raspberry Pi 3 arrived, the box had exactly four things in it: the board, a power cable, an SD card, and a small leaflet. No monitor, no keyboard, no mouse, no HDMI adapter. I’d ordered just the bare minimum because I wanted to use the Pi as a headless server, not a desktop. Two hours later it was running, SSH’d from my laptop, ready to host whatever I threw at it. This post is the playbook I worked out that afternoon, refined across the next dozen Pis I’ve set up since.
It works for the Pi 3, Pi 4, Pi 5, and Pi Zero W. The exact image you flash has changed over the years (Raspbian became Raspberry Pi OS), but the headless workflow is the same: flash an image, drop two files onto the boot partition, plug in power, find the IP, SSH in.

What you need: the Pi, a power supply, an SD card and reader, and a laptop on the same Wi-Fi network. That’s it. You don’t need a monitor, keyboard, mouse, or even an HDMI cable.
What you’ll need (and what you don’t)
Anything that mentions a “starter kit” with a screen and peripherals is selling you stuff you don’t need for a headless build. Here’s the actual list.
Required:
- Raspberry Pi: any model with networking will do. Pi 3, 4, 5, or Pi Zero W all work.
- Power supply: official adapter is best, but any USB-C (Pi 4/5) or micro-USB (Pi 3 / Zero) supply that can deliver 2.5A+ is fine.
- SD card: 16GB minimum. Class 10 / A1 rated for decent performance. Cheap cards die early; spend the extra $5.
- SD card reader: built-in on most laptops, otherwise a $5 USB adapter.
- Laptop or desktop: macOS, Linux, or Windows. All work.
- Wi-Fi network or LAN cable: your home network, basically.
Not required:
- Monitor or HDMI cable.
- Keyboard or mouse.
- Powered USB hub.
If you’ve ordered a Pi as part of a “kit” that came with a screen, you can absolutely use those, but for this post we’re going to do it the lean way.
Step 1: Flash Raspberry Pi OS with the official imager
The fastest path is the official Raspberry Pi Imager. It’s available for macOS, Windows, and Linux, and it bundles the headless setup options I used to manually configure with files. Skip Etcher and the manual flash flow if you can.
# macOS
brew install --cask raspberry-pi-imager

# Ubuntu/Debian
sudo apt install rpi-imager

# Windows: download the installer from raspberrypi.com/software
Open Imager, pick the OS (I recommend “Raspberry Pi OS Lite (64-bit)” for headless servers; you don’t need the desktop on a box you’ll never see), pick the SD card, then click the gear/settings icon. This is where the magic happens.
In the advanced options, set:
- Hostname:
raspberrypi(default) or something memorable likepicluster-1. - Enable SSH: check this. Set “use password authentication” or paste your public key, your call.
- Set username and password: pick a non-default username. Old default was
pi/raspberryand that’s a known target for botnets. - Configure wireless LAN: enter your Wi-Fi SSID and password.
- Set locale settings: timezone and keyboard layout to match your country.
Save the settings, click “Write”, and wait. Imager flashes, verifies, and ejects the card in 3-5 minutes.
If you need to use Etcher or dd for some reason (older OS images, custom builds), the next two steps cover the manual SSH and Wi-Fi config files. Otherwise skip to step 4.
Step 2: Manually enable SSH (if not using Imager’s settings)
If you flashed the image with Etcher, dd, or any non-Imager tool, SSH is disabled by default and you have to turn it on by hand. The trick: put an empty file called ssh (no extension) on the boot partition.
After flashing, eject and re-insert the SD card. A volume named bootfs (older images: boot) shows up. Open it and create an empty file named exactly ssh.
# macOS / Linux
touch /Volumes/bootfs/ssh
# or on Linux, depending on the mount point
touch /media/$USER/bootfs/ssh
On Windows, right-click in the boot folder, New > Text Document, and rename it to just ssh with no extension. Make sure Explorer’s “hide extensions” setting isn’t tricking you into creating ssh.txt. View > File name extensions, then check the actual filename.
This empty file tells the Pi: “the user has consented to SSH being on”, which is the same gate Imager flips for you.
Step 3: Manually configure Wi-Fi (if not using Imager)
Same situation as SSH: if Imager configured Wi-Fi, skip this. Otherwise create a file named wpa_supplicant.conf on the boot partition with your network details. Modern Raspberry Pi OS reads this file on first boot, copies it into /etc/wpa_supplicant/, and connects to your Wi-Fi.
country=US
ctrl_interface=DIR=/var/run/wpa_supplicant GROUP=netdev
update_config=1

network={
    ssid="your-wifi-name"
    psk="your-wifi-password"
    key_mgmt=WPA-PSK
}
Replace country=US with your two-letter country code. The Wi-Fi regulatory domain matters: if it’s wrong, the Pi may refuse to scan certain channels or boot with Wi-Fi disabled.
If you’re on the latest Raspberry Pi OS Bookworm, NetworkManager has replaced wpa_supplicant for the desktop image, but wpa_supplicant.conf on the boot partition is still respected for first-boot setup. The maintainers haven’t broken this workflow yet (and probably won’t, since hundreds of headless tutorials depend on it).
Step 4: Boot the Pi and find its IP address
Pop the SD card into the Pi, plug in power, and wait. The first boot takes 60-120 seconds because the Pi expands the filesystem to fill the SD card. Watch the green ACT LED: it should be blinking irregularly while the system boots, then settle into mostly-off with occasional blinks.
Now you need the Pi’s IP address. There are four reliable ways.
Method 1: Check your router’s admin panel. Log into your router (usually 192.168.0.1 or 192.168.1.1 in a browser), find the connected-devices or DHCP-leases page, and look for raspberrypi or whatever hostname you set. This is the easiest method and works on every router.
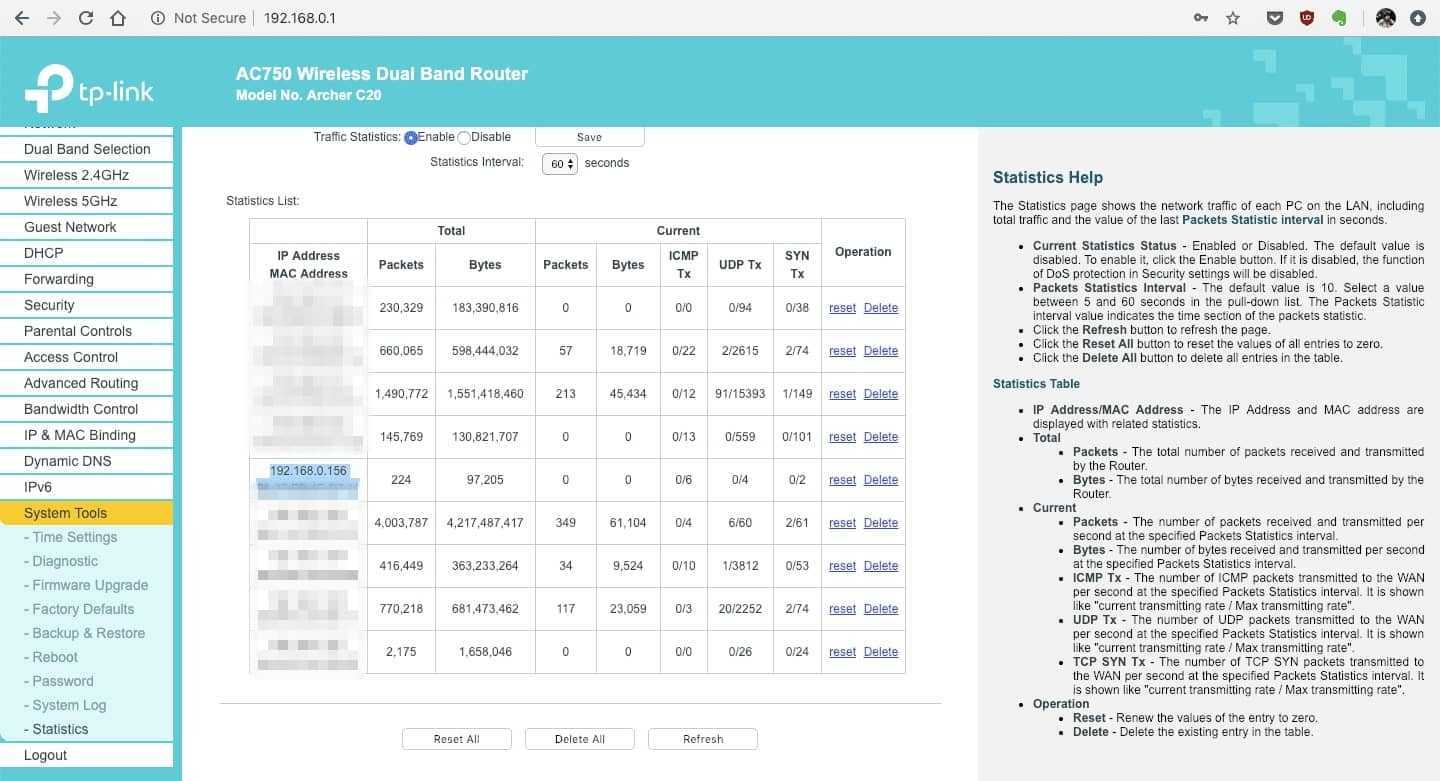
Method 2: Use mDNS/Bonjour. Modern Raspberry Pi OS publishes itself over mDNS, so on macOS, Linux with Avahi installed, and Windows 10+, you can usually just ssh pi@raspberrypi.local (or whatever hostname you set, plus .local). No IP needed.
# Test mDNS resolution
ping raspberrypi.local

# SSH directly via hostname
ssh hemant@raspberrypi.local
If ping raspberrypi.local works, the next four IP-discovery methods become optional and you can SSH straight in.
Method 3: nmap from your laptop. If .local isn’t resolving, scan your subnet:
# Install nmap
brew install nmap            # macOS
sudo apt install nmap        # Ubuntu/Debian
sudo dnf install nmap        # Fedora/RHEL

# Find your subnet first
ip route | grep default
# default via 192.168.1.1 dev eth0  ← your subnet is 192.168.1.0/24

# Scan the subnet
nmap -sn 192.168.1.0/24
The Pi shows up as a Raspberry Pi Foundation device (because of its MAC address vendor prefix), which makes it easy to spot. -sn does a ping scan only, no port scan, which is faster and less suspicious to your router.
Method 4: A network-scanner app. Fing (free, iOS and Android) and Angry IP Scanner (free, all platforms) both list every device on your network with vendor info. Open the app, scan, look for “Raspberry Pi”. Done.
Step 5: SSH in and harden the box
Once you have the IP (or you’re using .local), SSH in:
# By IP
ssh hemant@192.168.1.42

# By hostname (mDNS)
ssh hemant@raspberrypi.local
Use the password you set in Imager, or the default pi / raspberry if you skipped that. Either way, the first thing to do after logging in is harden the install.
# Update everything
sudo apt update && sudo apt full-upgrade -y

# If you're still using the default 'pi' user, change the password immediately
passwd

# Disable password SSH and use keys instead (do this AFTER you've copied your key)
ssh-copy-id hemant@raspberrypi.local

# Then, on the Pi, edit /etc/ssh/sshd_config:
# PasswordAuthentication no
# PermitRootLogin no
sudo nano /etc/ssh/sshd_config
sudo systemctl restart ssh

# Set a static IP via the router's DHCP reservation (easier than configuring it on the Pi)
# Or use the new nmtui (Bookworm and later) for a TUI network config
sudo nmtui
The Pi is now reachable, secure, and ready for whatever you came here to build. From here, the SSH commands post is a good refresher on what you can do in that shell, and if your project needs a VPN tunnel back to your home network, the sshuttle setup is what I use for that. For monitoring the Pi’s temperature, CPU load, or memory over time, the Pi temperature monitoring with Grafana post walks through a Prometheus + Grafana stack that runs comfortably on a Pi 4.
Frequently asked questions
Why is my Pi not appearing on the network after I plug it in?
Either Wi-Fi credentials were wrong (most common), the country code in wpa_supplicant.conf was missing or wrong, the SD card finished flashing but didn’t get the boot files (re-insert it after flashing to add ssh and wpa_supplicant.conf), or the SD card itself is bad. If you have an HDMI cable handy, plug it in to see boot logs. Otherwise: re-flash with Imager and use its built-in Wi-Fi config.
Can I do this without Wi-Fi, just over Ethernet?
Yes, and it’s simpler. Skip step 3 (Wi-Fi config), plug an Ethernet cable into the Pi and your router, and the Pi gets a DHCP lease. Find its IP with the same methods above. Wired-only is also more reliable for headless server use cases; I run my Pi servers wired whenever I can.
The default username “pi” is gone in newer images, what do I do?
Use the username you set in Imager’s advanced options. If you flashed without setting one, recent Raspberry Pi OS images require you to create the first user via a setup wizard on first boot (or via userconf.txt placed on the boot partition). Imager handles this for you transparently; manual flashing now requires the extra userconf.txt step.
My Wi-Fi is on the 5GHz band. Will the Pi connect?
Pi 3 has 2.4GHz Wi-Fi only. Pi 3B+, Pi 4, Pi 5, and Pi Zero 2 W support both 2.4 and 5 GHz. If your router runs separate SSIDs per band, point the Pi at the 2.4GHz SSID for compatibility. If it’s a unified SSID with band steering, the Pi will pick whichever band it can.
Do I need to configure a static IP?
No, but it makes life easier. The simplest method is a DHCP reservation in your router (find the Pi’s MAC address in the router’s admin, bind it to a fixed IP). That way the Pi always gets the same address without having to configure anything on the Pi itself. Cleaner and survives reflashes.
Happy labbing! 🍓
Last updated: January 2024