








Usually, when I start writing documentation, I always begin with a definition (often sourced from Wikipedia). Since the Wikipedia page for cert-manager is not very comprehensive (and also to be trendy and mention it at least once), I will ask ChatGPT to write this definition for me.
Cert-manager is a certificate management tool for Kubernetes. It automates the generation, renewal, and management of SSL/TLS certificates for your applications on the cluster. Cert-manager supports multiple certificate providers such as Let’s Encrypt, Vault, etc. By using Cert-manager, you can declare the need for a certificate for a specific application through a Kubernetes object called “Certificate” or “Issuer”. Cert-manager then takes care of generating or renewing the certificate according to the specifications defined in the object. Cert-manager is a key component to ensure the security and confidentiality of data in applications on Kubernetes. It simplifies certificate management for cluster administrators, avoiding human errors and ensuring a constant availability of valid certificates for applications. In summary, Cert-manager is a powerful tool for managing SSL/TLS certificates in a Kubernetes environment, enabling more efficient and secure certificate management for your applications.
Until now, I was using Traefik as an Ingress. It generated the certificates and stored them in a text file located in a Longhorn volume. (knowing full well that it wasn’t very clean)
Today, it’s time for cleanliness… we switch to Cert-Manager!

As of the day I write this page, we are at version v1.11.0.
kubectl apply -f https://github.com/cert-manager/cert-manager/releases/download/v1.11.0/cert-manager.yaml
Warning
Make sure to get the latest version of cert-manager. You can find the available versions here
The installation of Cert-Manager involves different objects. The ones that interest us are:
Issuers are the certificate providers. Cert-Manager is compatible with the following providers:
For now, only the LetsEncrypt provider interests us. (We may see the CA case someday)
The most common case when generating a certificate is to use LetsEncrypt with an HTTP challenge. (e.g., CertBot) Its configuration is quite quick, here is the manifest to add the LetsEncrypt ACME. (Remember to replace ‘istio’ with your IngressClass)
apiVersion: cert-manager.io/v1
kind: Issuer
metadata:
  name: letsencrypt
spec:
  acme:
    server: https://acme-v02.api.letsencrypt.org/directory
    email: votre_email@ici.tld
    privateKeySecretRef:
      name: letsencrypt
    solvers:
    - selector: {}
      http01:
        ingress:
          class: istio
Key takeaways:
Tip
If you fail too many challenges (or generate the same certificate too many times), you may be blocked by LetsEncrypt. When you just want to test the procedures, you can use the staging API (which has no rate limits).
The certificates will not be accepted by your browser, but for testing purposes, it’s ideal.
Simply replace the URL with https://acme-staging-v02.api.letsencrypt.org/directory
You can verify that the Issuer is present using the following command:
➜  kubectl describe issuers.cert-manager.io letsencrypt

Status:
  Acme:
    Last Registered Email:  redacted
    Uri:                    https://acme-v02.api.letsencrypt.org/acme/acct/941914187
  Conditions:
    Last Transition Time:  2023-01-31T10:05:12Z
    Message:               The ACME account was registered with the ACME server
    Observed Generation:   1
    Reason:                ACMEAccountRegistered
    Status:                True
    Type:                  Ready
Events:                    <none>
First of all, not all providers are compatible with this method. I am using CloudFlare which (thanks to its API) allows us to create entries in your domain to solve the challenge. This method has some advantages, such as not having to open a port to solve the challenge.
To use the API, you need to create a token to authenticate our request. Go to this page to create your token. The necessary permissions are:
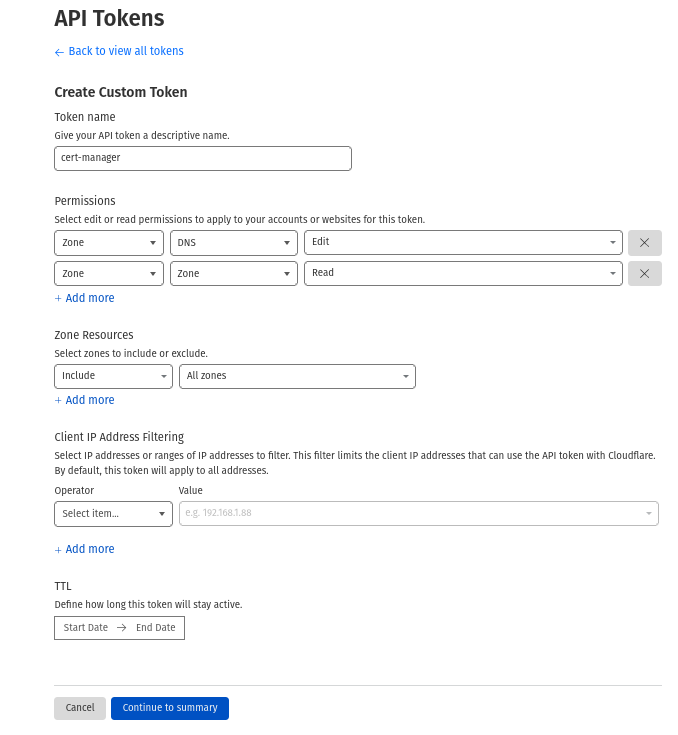
With the token, create this secret:
apiVersion: v1
kind: Secret
metadata:
  name: cloudflare-api-token-secret
type: Opaque
stringData:
  api-token: aaaaaabbbbbbbcccccccdddddd
And add our Cloudflare provider. (This will use our secret)
apiVersion: cert-manager.io/v1
kind: Issuer
metadata:
  name: cloudflare
spec:
  acme:
    email: votre_email@ici.tld
    server: https://acme-v02.api.letsencrypt.org/directory
    privateKeySecretRef:
      name: cloudflare
    solvers:
    - dns01:
        cloudflare:
          apiTokenSecretRef:
            name: cloudflare-api-token-secret
            key: api-token
We previously created an Issuer for the current namespace (which means we can only create certificates with this Issuer in this namespace).
But we rarely have only one namespace, and when we need to update the configuration of our Issuer, we have to do it in all namespaces (which is quite cumbersome and error-prone).
That’s why it is possible to create a valid Issuer across all namespaces: the ClusterIssuer.
apiVersion: cert-manager.io/v1
kind: ClusterIssuer
metadata:
  name: cloudflare
spec:
  acme:
    email: votre_email@ici.tld
    server: https://acme-v02.api.letsencrypt.org/directory
    privateKeySecretRef:
      name: cloudflare
    solvers:
    - dns01:
        cloudflare:
          apiTokenSecretRef:
            name: cloudflare-api-token-secret
            key: api-token
The ClusterIssuer has exactly the same parameters as the Issuer. The only change to consider is that the cloudflare-api-token-secret secret should be in the cert-manager namespace instead of the current namespace.
With the provider configured, it is now possible to create our certificate. I will generate mine for my domain test.a-cup-of.coffee.
apiVersion: cert-manager.io/v1
kind: Certificate
metadata:
  name: test-coffee
spec:
  secretName: test-coffee-tls
  issuerRef:
    name: letsencrypt
  commonName: test.a-cup-of.coffee
  dnsNames:
  - test.a-cup-of.coffee
Info
If you are using the ClusterIssuer object, make sure to specify the kind in the issuerRef:
apiVersion: cert-manager.io/v1
kind: Certificate
metadata:
  name: test-coffee
spec:
  secretName: test-coffee-tls
  issuerRef:
    name: letsencrypt
    kind: ClusterIssuer
  commonName: test.a-cup-of.coffee
  dnsNames:
  - test.a-cup-of.coffee
Make sure that the certificate is generated and available.
➜  kubectl describe certificate test-coffee
Events:
  Type    Reason     Age    From                                       Message
  ----    ------     ----   ----                                       -------
  Normal  Issuing    7m9s   cert-manager-certificates-trigger          Issuing certificate as Secret was previously issued by Issuer.cert-manager.io/letsencrypt
  Normal  Reused     7m9s   cert-manager-certificates-key-manager      Reusing private key stored in existing Secret resource "test-coffee-tls"
  Normal  Requested  7m8s   cert-manager-certificates-request-manager  Created new CertificateRequest resource "test-coffee-j8x9j"
  Normal  Issuing    5m46s  cert-manager-certificates-issuing          The certificate has been successfully issued
And make sure that the secret is created successfully:
➜  kubectl get secret test-coffee-tls
NAME                      TYPE                DATA   AGE
test-coffee-tls   kubernetes.io/tls   2      169m
A wildcard certificate is a certificate that secures a domain and all its subdomains. (e.g., *.a-cup-of.coffee). You will need to use DNS verification to generate this certificate.
The process of generating a wildcard certificate is the same as generating a regular certificate, except that you add a * before the domain name.
apiVersion: cert-manager.io/v1
kind: Certificate
metadata:
  name: wildcard-coffee
  namespace: default
spec:
  secretName: wildcard-coffee
  issuerRef:
    name: cloudflare
    kind: ClusterIssuer
  commonName: "*.a-cup-of.coffee"
  dnsNames:
  - "a-cup-of.coffee"
  - "*.a-cup-of.coffee"
Here is an example of YAML code to generate an Ingress using the secret.
apiVersion: networking.k8s.io/v1
kind: Ingress
metadata:
  name: test-coffee
  annotations:
    kubernetes.io/ingress.class: "istio"
spec:
  tls:
  - hosts:
    - test.a-cup-of.coffee
    secretName: test-coffee-tls
  rules:
  - host: "test.a-cup-of.coffee"
    http:
      paths:
        - pathType: Prefix
          path: "/"
          backend:
            service:
              name: srvc-coffee
              port:
                number: 80
Or with an IngressRoute object if (like me) you are using Traefik.
apiVersion: traefik.containo.us/v1alpha1
kind: IngressRoute
metadata:
  name: test-coffee
spec:
  entryPoints:
    - websecure
  routes:
    - match: Host(`test.a-cup-of.coffee`)
      kind: Rule
      services:
        - name: srvc-coffee
          port: 80
  tls:
    secretName: test-coffee-tls
此内容由惯性聚合(RSS阅读器)自动聚合整理,仅供阅读参考。 原文来自 — 版权归原作者所有。