


In the previous article on Kubernetes Ingress I showed you how you can configure the Ingress resource to route traffic to different URL paths or subdomains.
In addition to routing the incoming requests or exposing service API's through a single endpoint, the ingress gateways does other tasks, such as rate limiting, SSL termination, load balancing, authentication, circuit breaking and more.
In this article I will show you how to install the Ambassador Gateway and other components to be able to obtain an SSL certificate for your application. To go through this tutorial you will need a real domain name and a cloud-provider managed Kubernetes cluster.
SSL stands for secure socket layer protocol. The SSL termination or also called SSL offloading is the process of decrypting encrypted traffic. When encrypted traffic hits the ingress controller it gets decrypted there and then passed to the backend applications. Doing SSL termination at the ingress controller level also lessens the burden on your server, as you are only doing it once at the ingress controller level and not in each application.
I will be using a cloud-managed cluster and an actual domain name to demonstrate how to set up SSL termination. I'll be using the Ambassador controller, cert-manager for managing and issuing TLS certificates, Let's Encrypt as the certificate authority (CA), and Helm to install some of the components.
Before continuing, making sure you have installed Helm by following the instructions here. You can run helm version to make sure Helm is installed:
$ helm version
version.BuildInfo{Version:"v3.2.4", GitCommit:"0ad800ef43d3b826f31a5ad8dfbb4fe05d143688", GitTreeState:"dirty", GoVersion:"go1.14.3"}
Note
Helm is a package manager for Kubernetes. Instead of dealing with individual deployments, services, configuration maps, secrets, and other Kubernetes resources, Helm packages them into "charts". A chart is a collection of different Kubernetes resource files. You can then take thee charts and version, deploy, upgrade, and manage them as a single unit.
As a sample application, I will be using the Dog Pic website.
apiVersion: apps/v1
kind: Deployment
metadata:
  name: dogpic-web
  labels:
    app.kubernetes.io/name: dogpic-web
spec:
  replicas: 1
  selector:
    matchLabels:
      app.kubernetes.io/name: dogpic-web
  template:
    metadata:
      labels:
        app.kubernetes.io/name: dogpic-web
    spec:
      containers:
        - name: dogpic-container
          image: learncloudnative/dogpic-service:0.1.0
          ports:
            - containerPort: 3000
---
kind: Service
apiVersion: v1
metadata:
  name: dogpic-service
  labels:
    app.kubernetes.io/name: dogpic-web
spec:
  selector:
    app.kubernetes.io/name: dogpic-web
  ports:
    - port: 3000
      name: http
Save the above YAML in dogpic-app.yaml file and use kubectl apply -f dogpic-app.yaml to create the deployment and service.
We will deploy the cert-manager inside the cluster. As the name suggests, the cert-manager will deal with certificates. So, whenever we need a new certificate or we need to renew an existing certificate, the cert-manager will do that for us.
The first step is to create a namespace to deploy the cert-manager in:
$ kubectl create ns cert-manager
namespace/cert-manager created
Next, we will add the jetstack Helm repository and refresh the local repository cache:
$ helm repo add jetstack https://charts.jetstack.io
"jetstack" has been added to your repositories

$ helm repo update
Hang tight while we grab the latest from your chart repositories...
...Successfully got an update from the "jetstack" chart repository
Update Complete. ⎈ Happy Helming!⎈
Now we are ready to install the cert-manager. Run the following Helm command to install the cert-manager:
helm install \
  cert-manager jetstack/cert-manager \
  --namespace cert-manager \
  --version v0.15.1 \
  --set installCRDs=true
In the output, you will notice the message saying that cert-manager was deployed successfully.
Before we can use it though, we need to set up either a ClusterIssuer or an Issuer resource and configure it. This resource represents a certificate signing authority (CA) and allows cert-manager to issue certificates.
The difference between a ClusterIssuer and an Issuer is that the ClusterIssuer operates at the cluster level, while an Issuer resource works on a namespace. For example, you could configure different Issuer resources for each namespace. Alternatively, you could create a ClusterIssuer to issue certificates in any namespace.
Cert-manager supports multiple issuer types. Let's Encrypt uses the ACME protocol and therefore we will configure an ACME issuer type. These protocols support different challenge mechanisms to determine and verify domain ownership.
In the case of the ACME protocol, cert-manager supports two challenges to verify the domain ownership: the HTTP-01 and DNS-01 challenge. You can read more details about each one of these on Let's Encrypt website.
In short, the HTTP-01 challenge is the most common challenge type. The challenge involves a file with a token that you put in a certain location on your server. For example: http://[my-cool-domain]/.well-known/acme-challenge/[token-file].
The DNS-01 challenge involves modifying a DNS record for your domain. To pass this challenge, you need to create a TXT DNS record with a specific value under the domain you want to claim. Using the DNS-01 challenge only makes sense if your domain registrar has an API that can be used to automatically update the DNS records. See the full list of providers that integrate with the Let's Encrypt DNS validation.
I will be using the HTTP-01 challenge as it is more generic than the DNS-01 which depends on your domain registrar.
Let's deploy a ClusterIssuer we will be using. Make sure you replace the email with your email address:
apiVersion: cert-manager.io/v1alpha2
kind: ClusterIssuer
metadata:
  name: letsencrypt-prod
spec:
  acme:
    email: hello@example.com
    server: https://acme-v02.api.letsencrypt.org/directory
    privateKeySecretRef:
      name: letsencrypt-prod
    solvers:
      - http01:
          ingress:
            class: nginx
        selector: {}
Let's make sure ClusterIssuer gets created and it's ready by running kubectl describe clusterissuer and confirming that the ACME account was registered (i.e. the email address you provided):
...
Status:
  Acme:
    Last Registered Email:  hello@example.com
    Uri:                    https://acme-v02.api.letsencrypt.org/acme/acct/89498526
  Conditions:
    Last Transition Time:  2020-06-22T20:36:04Z
    Message:               The ACME account was registered with the ACME server
    Reason:                ACMEAccountRegistered
    Status:                True
    Type:                  Ready
Events:                    <none>
Similarly, if you run kubectl get clusterissuer you should see the indication that the ClusterIssuer is ready:
$ kubectl get clusterissuer
NAME               READY   AGE
letsencrypt-prod   True    2m30s
Later on, once we deployed the Ingress controller and set up the DNS record on the domain, we will also create a Certificate resource.
To install Ambassador gateway, run the two commands below. The first one will take care of installing all CRD (custom resource definitions) and the second one installs the RBAC (Role-Based Access Control) resources and creates the Ambassador deployment.
$ kubectl apply -f https://www.getambassador.io/yaml/ambassador/ambassador-crds.yaml
...
$ kubectl apply -f https://www.getambassador.io/yaml/ambassador/ambassador-rbac.yaml
Finally, we need to create a LoadBalancer service that exposes two ports: 80 for HTTP traffic and 443 for HTTPS.
apiVersion: v1
kind: Service
metadata:
  name: ambassador
spec:
  type: LoadBalancer
  ports:
    - name: http
      port: 80
      targetPort: 8080
    - name: https
      port: 443
      targetPort: 8443
  selector:
    service: ambassador
Save the above YAML in ambassador-svc.yaml file and run kubectl apply -f ambassador-svc.yaml.
Note
Deploying the above service will create a load balancer in your cloud providers' account.
If you list the services, you will notice an External IP assigned to the ambassador service:
$ kubectl get svc
NAME               TYPE           CLUSTER-IP    EXTERNAL-IP     PORT(S)          AGE
ambassador         LoadBalancer   10.0.78.66    51.143.120.54   80:31365/TCP     97s
ambassador-admin   NodePort       10.0.65.191   <none>          8877:30189/TCP   4m20s
kubernetes         ClusterIP      10.0.0.1      <none>          443/TCP          30d
Now that we have the External IP address you can go to the website where you registered your domain and create an A DNS record that will point the domain to the external IP. This will allow you to enter http://[my-domain.com] in your browser and it will resolve to the above IP address (the ingress controller inside the cluster).
I will be using my domain called startkubernetes.com. I will set up a subdomain dogs.startkubernetes.com to point to the IP address of my load balancer (e.g. 51.143.120.54) using an A record. Regardless of where you registered your domain, you should be able to update the DNS records. Check the documentation on your domain registrars website on how to do that.
Let's set up an Ingress resource, so we can reach the Dog Pic website we deployed on the subdomain (make sure you replace the dogs.startkubernetes.com with your domain or subdomain name):
apiVersion: networking.k8s.io/v1beta1
kind: Ingress
metadata:
  name: my-ingress
  annotations:
    kubernetes.io/ingress.class: ambassador
spec:
  rules:
    - host: dogs.startkubernetes.com
      http:
        paths:
          - backend:
              serviceName: dogpic-service
              servicePort: 3000
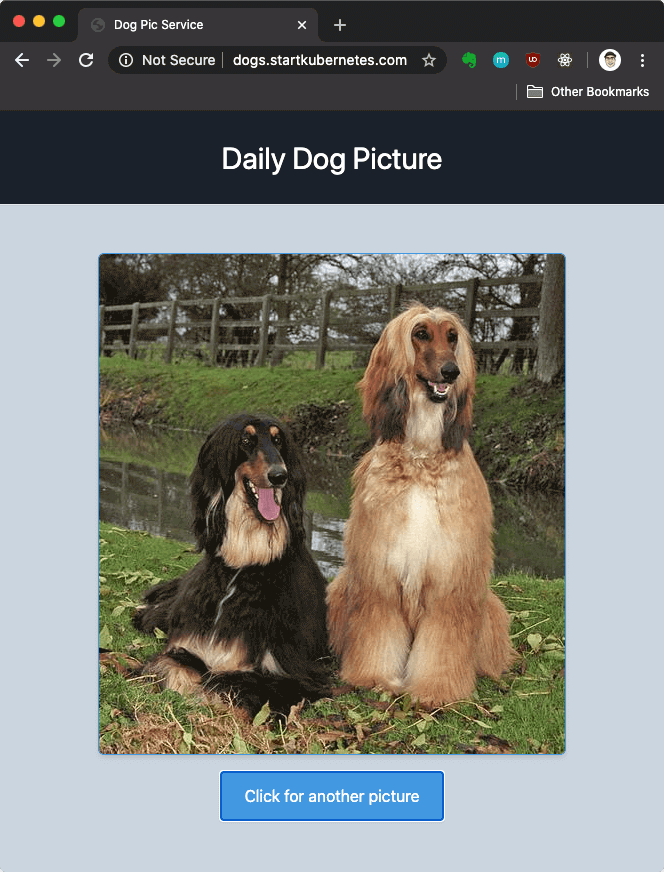
With ingress deploy you can open http://dogs.startkubernetes.com you should see the Dog Pic website as shown below.
To request a new certificate you need to create a Certificate resource. This resource includes the issuer reference (ClusterIssuer we created earlier), DNS names we want to request certificates for (dogs.startkubernetes.com), and the Secret name where the certificate will be stored.
apiVersion: cert-manager.io/v1alpha2
kind: Certificate
metadata:
  name: ambassador-certs
  namespace: default
spec:
  secretName: ambassador-certs
  issuerRef:
    name: letsencrypt-prod
    kind: ClusterIssuer
  dnsNames:
    - dogs.startkubernetes.com
Make sure you replace the dogs.startkubernetes.com with your domain name. Once you've done that, save the YAML in cert.yaml and create the certificate using kubectl apply -f -cert.yaml.
If you list the pods, you will notice a new pod called cm-acme-http-solver:
$ kubectl get po
NAME                          READY   STATUS    RESTARTS   AGE
ambassador-9db7b5d76-jlcdg    1/1     Running   0          22h
ambassador-9db7b5d76-qcwgk    1/1     Running   0          22h
ambassador-9db7b5d76-xsfw4    1/1     Running   0          22h
cm-acme-http-solver-qzh6l     1/1     Running   0          25m
dogpic-web-7bf547bd54-f2pff   1/1     Running   0          22h
Cert-manager created this pod to serve the token file as explained in the Challenges section and verify the domain name.
You can also look at the logs from the pod to see the values pod expects for the challenge:
$ kubectl logs cm-acme-http-solver-qzh6l
I0622 20:39:26.712391       1 solver.go:39] cert-manager/acmesolver "msg"="starting listener"  "expected_domain"="dogs.startkubernetes.com" "expected_key"="iqUZlG9v1K8czpAKaTpLfL278piwf-mN4VZNvuwD0Ks.xonKHFvEQg2Ox_mI0cPM7UpCUHfu6H4aKtRcdrpiLik" "expected_token"="iqUZlG9v1K8czpAKaTpLfL278piwf-mN4VZNvuwD0Ks" "listen_port"=8089
However, this pod is not exposed, so there's no way for Let's Encrypt to access it and do the challenge. So we need to expose this pod through an ingress. This involves creating a Kubernetes Service that points to the pod and updating the ingress. To update the ingress we will use the Mapping resource from Ambassador. This resource defines a mapping to redirect requests with prefix ./well-known/acme-challenge to the Kubernetes service that goes to the pod.
apiVersion: getambassador.io/v2
kind: Mapping
metadata:
  name: challenge-mapping
spec:
  prefix: /.well-known/acme-challenge/
  rewrite: ''
  service: challenge-service
---
apiVersion: v1
kind: Service
metadata:
  name: challenge-service
spec:
  ports:
    - port: 80
      targetPort: 8089
  selector:
    acme.cert-manager.io/http01-solver: 'true'
Store the above in challenge.yaml and deploy it using kubectl apply -f challenge.yaml. The cert-manager will retry the challenge and issue the certificate.
You can run kubectl get cert and confirm the READY column shows True, like this:
$ kubectl get cert
NAME               READY   SECRET             AGE
ambassador-certs   True    ambassador-certs   35m
Here are the steps we followed to request a certificate and a figure to visualize the process.
Certificate resource.http-solver pod (exposed through the challenge-service we created)Certificate and requests the certificates for the dnsNames from the authority (Let's Encrypt)http-solver to prove that we own the domains and checks that the challenges are solved (i.e. downloads the file from /.well-known/acme-challenge/)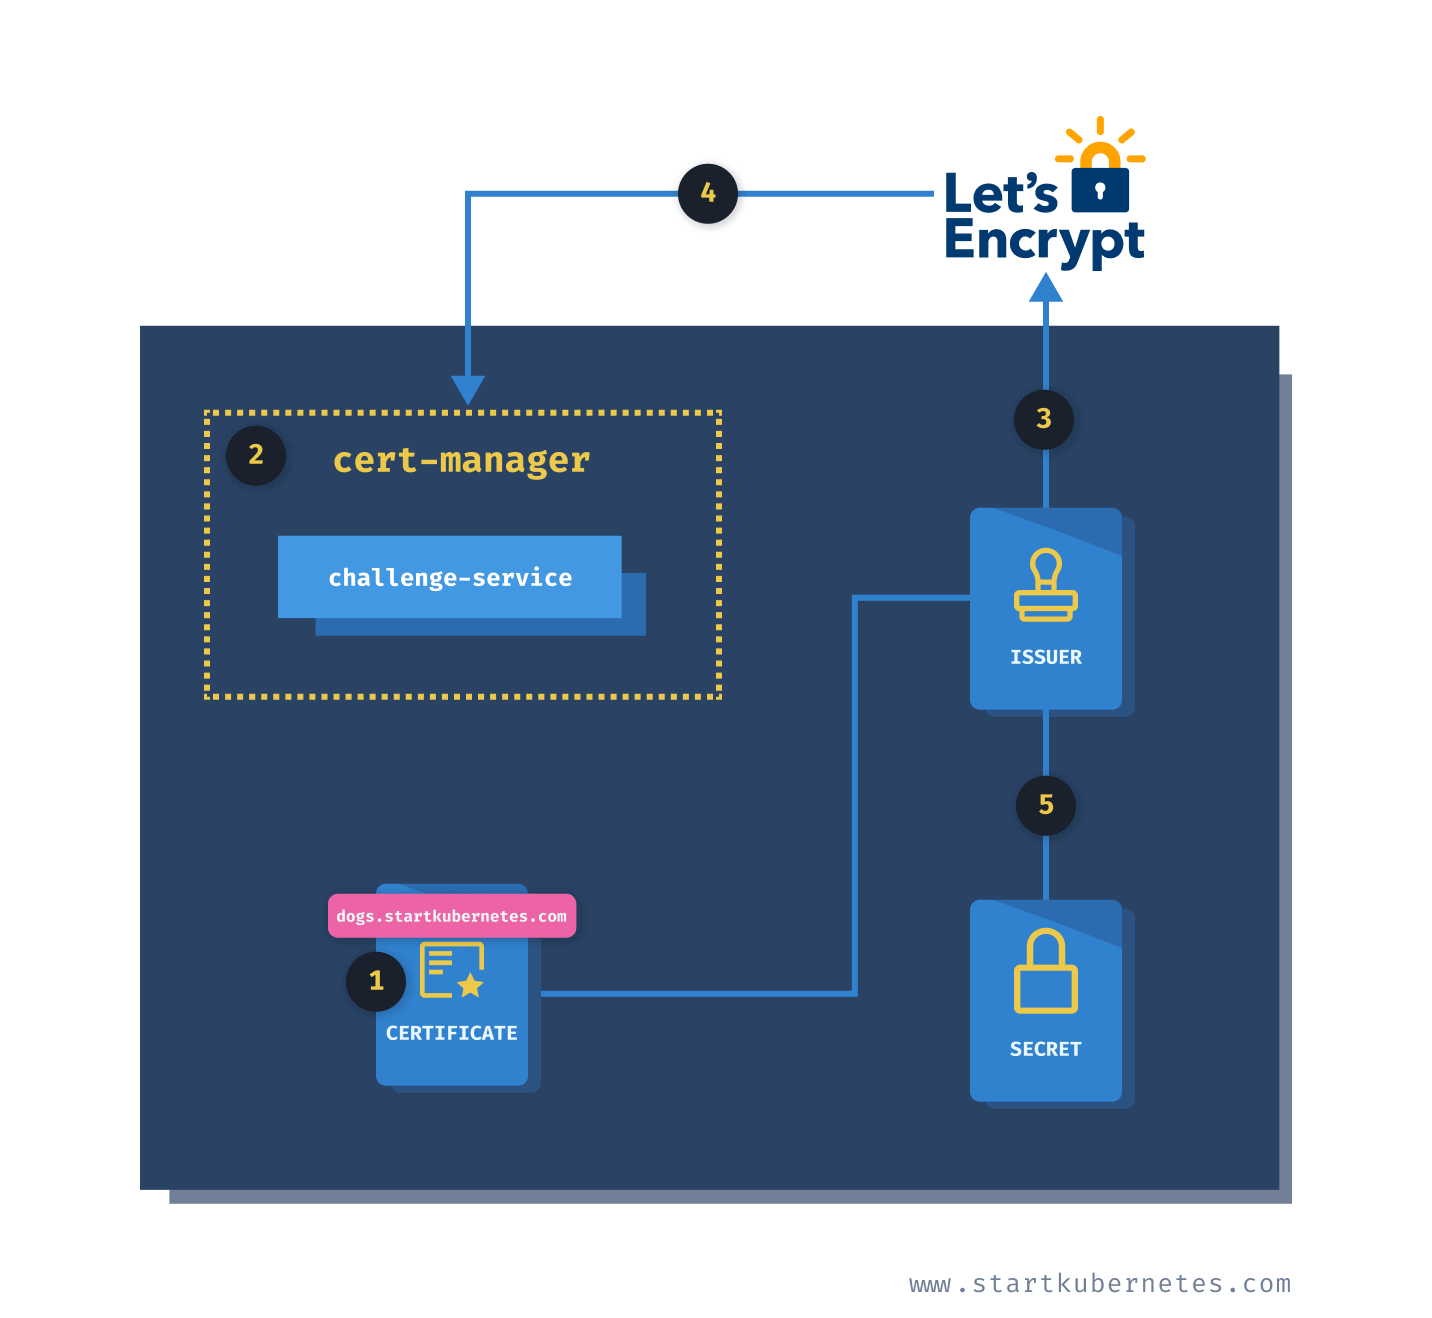
To secure an Ingress we have to specify a Secret that contains the certificate and the private key. We defined the ambassador-certs secret name in the Certificate resource we created earlier.
apiVersion: networking.k8s.io/v1beta1
kind: Ingress
metadata:
  name: my-ingress
  annotations:
    kubernetes.io/ingress.class: ambassador
spec:
  tls:
    - hosts:
        - dogs.startkubernetes.com
      secretName: ambassador-certs
  rules:
    - host: dogs.startkubernetes.com
      http:
        paths:
          - path: /
            backend:
              serviceName: dogpic-service
              servicePort: 3000
Under resource specification (spec), we use the tls key to specify the hosts and the secret name where the certificate and private key are stored.
Save the above YAML in ingress-tls.yaml and apply it with kubectl apply -f ingress-tls.yaml.
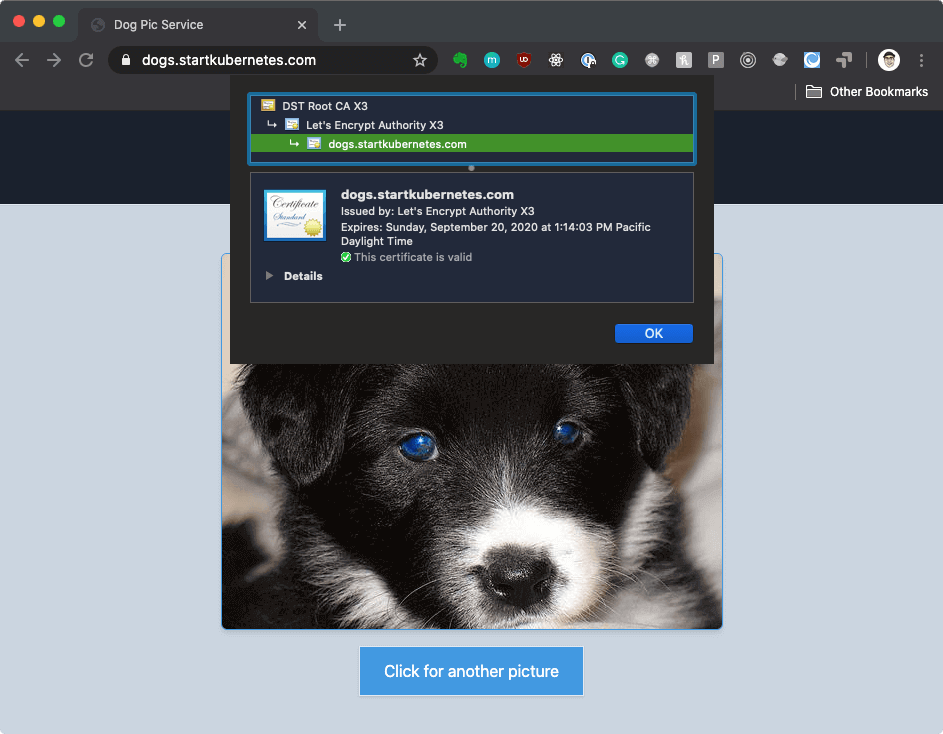
If you navigate to your domain using https (e.g. https://dogs.startkubernetes.com) you will see that the connection is secure and it is using a valid certificate from Let's Encrypt.
Use the commands below to remove the everything you installed in this section:
kubectl delete cert ambassador-certs
kubectl delete secret ambassador-certs
kubectl delete -f https://www.getambassador.io/yaml/ambassador/ambassador-crds.yaml
kubectl delete -f https://www.getambassador.io/yaml/ambassador/ambassador-rbac.yaml
kubectl delete svc ambassador
helm uninstall cert-manager -n cert-manager
kubectl delete svc dogpic-service challenge-service
kubectl delete deploy dogpic-web
kubectl delete ing my-ingress
In this article you learned how to protect your Ingress gateway. We've done that using the Ambassador gateway, however the same process could be followed for any other Kubernetes ingress controller.
Which ingress controller are you running in your Kubernetes cluster? You can Leave a comment below or send me a Tweet!
If you liked this article you will definitely like my new course called Start Kubernetes. This course includes everything I know about Kubernetes in an ebook, set of videos and practial labs.
I am always eager to hear your questions and comments. You can reach me on Twitter or leave a comment or question under this article.
此内容由惯性聚合(RSS阅读器)自动聚合整理,仅供阅读参考。 原文来自 — 版权归原作者所有。