


In this article, I'll talk a bit about data partitioning. Specifically, I'll talk about horizontal data partitioning or sharding. After a brief 'theoretical' part, I'll show you an example of how you can configure sharding with MongoDB. You will be able to run three MongoDB shards, a configuration server, and a router on your computer, using Docker compose.
Let's say you are running a database on a single server. As the volume of data increases, you get more users, etc. you will start reaching the limits of that single server.
The first step you can do to mitigate that is to scale up or scale vertically. Scaling vertically means that you start adding more hard drives or more memory and processors to your server. You can certainly do that. However, at some point, you will reach a limit. There is a point where you can't add more disk drivers, processors or memory.
Note
Scaling up or scaling vertically is done by adding more resources to the existing system. Adding more storage, memory, processors, improving the network, etc.
So, instead of upgrading your single server a more efficient solution would be to divide your data. Instead of running one database on one server, what if you could divide or partitions your data and run your database on multiple servers? That way, each server only contains a portion of data. This approach would allow you to scale out the whole system by adding more partitions (more servers).
Note
Scaling out or scaling horizontally means adding more servers or units, instead of upgrading those units as with scaling up.
There are benefits with scaling out - since you're not relying on a single server anymore, these servers don't have to be expensive or special. Remember, you will run multiple of these servers and the load will be distributed across all of them.
Partitioning your data in this way will also have other benefits. For example, the overall performance can improve as the workload is balanced across multiple partitions. You can also run these partitions closer to the users that will be accessing your data and consequently reducing the latency.
Horizontal data partitioning or sharding is a technique for separating data into multiple partitions. Each partition is a separate data store, but all of them have the same schema.
Each partition (also called a shard) contains a subset of data. Later in the example, we will use a collection of books. You could store those books in a single database, but after we create and enable sharding, all data will be relatively evenly stored across all three shards.
A shard can contain items that fall within a specified range. The range is determined by one or more attributes of the data, for example, a name, title, id, orderDate, etc. The collection of these data attributes forms a shard key.
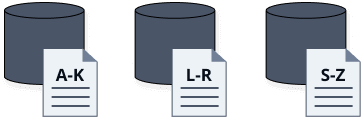
For example, we can store books in different shards, and each shard will contain a specific subset of data. In the figure above, we could store all books based on the book title. The first shard would contain all books where titles starts with the letters A through K, and the second shard would contain titles starting with L to R and so on.
The logic for deciding where the data ends up on, can either be implemented as part of your application or as part of the data storage system.
The most important factor when sharding data is deciding on a sharding key. The goal when picking a sharding key is to try and spread the workload as evenly as possible.
You don't want to create hot partitions as that can affect the performance and availability.
Note
A hot partition is a partition or shard that receives a disproportionate amount of traffic.
In the previous example, we picked the book title as a sharding key. That might not be an appropriate sharding key as there are probably titles that start with more common characters and that would cause an unbalanced distribution. A better solution is to use a hash of one or more values, so the data gets distributed more evenly.
I'll use MongoDB to show how you can configure sharding. Sharding in MongoDB is using groups of MongoDB instances called clusters. In addition to multiple shards that are just MongoDB instances, we also need a configuration server and a router.
Configuration server holds the information about different shards in the cluster, while the router is responsible for routing the client requests to appropriate backend shards.
You can fork the Github repo with all files, or just follow the steps below and do a bit of copy/pasting.
To make it easier to run multiple instances of MongoDB, I'll be the following Docker compose file to configure 3 shards, a configuration server, and a router.
version: "2"
services:
  # Configuration server
  config:
    image: mongo
    command: mongod --configsvr --replSet configserver --port 27017
    volumes:
      - ./scripts:/scripts
  # Shards
  shard1:
    image: mongo
    command: mongod --shardsvr --replSet shard1 --port 27018
    volumes:
      - ./scripts:/scripts
  shard2:
    image: mongo
    command: mongod --shardsvr --replSet shard2 --port 27019
    volumes:
      - ./scripts:/scripts
  shard3:
    image: mongo
    command: mongod --shardsvr --replSet shard3 --port 27020
    volumes:
      - ./scripts:/scripts
  # Router
  router:
    image: mongo
    command: mongos --configdb configserver/config:27017 --bind_ip_all --port 27017
    ports:
      - "27017:27017"
    volumes:
      - ./scripts:/scripts
    depends_on:
      - config
      - shard1
      - shard2
      - shard3
To start these containers, run docker-compose up from the same folder the docker-compose.yaml file is in.
You can run docker ps to see all running containers.
$ docker ps
CONTAINER ID        IMAGE               COMMAND                  CREATED             STATUS              PORTS                      NAMES
a4666f0b327a        mongo               "docker-entrypoint.s…"   8 minutes ago       Up 8 minutes        0.0.0.0:27017->27017/tcp   tutorial_router_1
a058e405aee1        mongo               "docker-entrypoint.s…"   8 minutes ago       Up 8 minutes        27017/tcp                  tutorial_config_1
db346afca10b        mongo               "docker-entrypoint.s…"   8 minutes ago       Up 8 minutes        27017/tcp                  tutorial_shard1_1
2fc3a5129f35        mongo               "docker-entrypoint.s…"   8 minutes ago       Up 8 minutes        27017/tcp                  tutorial_shard2_1
ea84bd82760b        mongo               "docker-entrypoint.s…"   8 minutes ago       Up 8 minutes        27017/tcp                  tutorial_shard3_1
Let's configure the configuration server! We will use a line of Javascript (from a file) to initialize a single configuration server. Create file called init-config.js with these contents:
rs.initiate({
  _id: 'configserver',
  configsvr: true,
  version: 1,
  members: [
    {
      _id: 0,
      host: 'config:27017',
    },
  ],
});
Next, we are going to use the exec command to run this script inside the configuration container:
$ docker-compose exec config sh -c "mongo --port 27017 < init-config.js"

MongoDB shell version v4.2.6
connecting to: mongodb://127.0.0.1:27017/?compressors=disabled&gssapiServiceName=mongodb
Implicit session: session { "id" : UUID("696d3b93-57c1-4d3e-8057-4f0b13e3ec0a") }
MongoDB server version: 4.2.6
{
        "ok" : 1,
        "$gleStats" : {
                "lastOpTime" : Timestamp(1589317607, 1),
                "electionId" : ObjectId("000000000000000000000000")
        },
        "lastCommittedOpTime" : Timestamp(0, 0),
        "$clusterTime" : {
                "clusterTime" : Timestamp(1589317607, 1),
                "signature" : {
                        "hash" : BinData(0,"AAAAAAAAAAAAAAAAAAAAAAAAAAA="),
                        "keyId" : NumberLong(0)
                }
        },
        "operationTime" : Timestamp(1589317607, 1)
}
bye
Make sure the above command runs without errors - check for "ok": 1 in the output that indicates the command ran successfully.
Next, we can configure the three shards by running the three shard scripts. Just like the previous initialization command, this one will initialize the MongoDB shards.
Create three files, one for each shard, with the following contents.
// -- start init-shard1.js --
rs.initiate({
  _id: 'shard1',
  version: 1,
  members: [{ _id: 0, host: 'shard1:27018' }],
});
// -- end init-shard2.js --

// -- init-shard2.js --
rs.initiate({
  _id: 'shard2',
  version: 1,
  members: [{ _id: 0, host: 'shard2:27019' }],
});
// -- end init-shard2.js --

// -- init-shard3.js --
rs.initiate({
  _id: 'shard3',
  version: 1,
  members: [{ _id: 0, host: 'shard3:27020' }],
});
// -- end init-shard3.js --
Once you have all three files you can configure each shard by running the following three commands:
docker-compose exec shard1 sh -c "mongo --port 27018 < init-shard1.js"
docker-compose exec shard2 sh -c "mongo --port 27019 < init-shard2.js"
docker-compose exec shard3 sh -c "mongo --port 27020 < init-shard3.js"
The only difference between the configurations is the ID and the host name. Just like before, the output of each command should include the "ok": 1 line in the result.
Finally, we can initialize the router container by adding all three shards to it. Create the init-router.js file with these contents:
sh.addShard('shard1/shard1:27018');
sh.addShard('shard2/shard2:27019');
sh.addShard('shard3/shard3:27020');
Now you can configure the router by running docker-compose exec command:
docker-compose exec router sh -c "mongo < init-router.js"
The command output should have three sections that confirm the shards were added:
{
        "shardAdded" : "shard1",
        "ok" : 1,
        "operationTime" : Timestamp(1586120900, 7),
        "$clusterTime" : {
                "clusterTime" : Timestamp(1586120900, 7),
                "signature" : {
                        "hash" : BinData(0,"AAAAAAAAAAAAAAAAAAAAAAAAAAA="),
                        "keyId" : NumberLong(0)
                }
        }
}
...
Not that we've configured everything, we can get a shell inside the router container and run mongo and then check the status:
docker-compose exec router mongo
Once you see the mongos> prompt, you can run sh.status() and you should get the status message that will contain the shards section that looks like this:
shards:
        {  "_id" : "shard1",  "host" : "shard1/shard1:27018",  "state" : 1 }
        {  "_id" : "shard2",  "host" : "shard2/shard2:27019",  "state" : 1 }
        {  "_id" : "shard3",  "host" : "shard3/shard3:27020",  "state" : 1 }
To exit the router container, you can type exit.
With the MongoDB sharded cluster running, we need to enable the sharding for a database and then shard a specific collection in that database.
MongoDB provides two strategies for sharding collections: hashed sharding and range-based sharding.
The hashed sharding uses a hashed index of a single field as a shard key to partition the data. The range-based sharding can use multiple fields as the shard key and will divide the data into adjacent ranges based on the shard key values.
he first thing that we need to do is to enable sharding on our database. We will be running all commands from within the router container. Run docker-compose exec router mongo to get the MongoDB shell.
Let's enable sharding in a database called test:
mongos> sh.enableSharding('test')
{
        "ok" : 1,
        "operationTime" : Timestamp(1589320159, 5),
        "$clusterTime" : {
                "clusterTime" : Timestamp(1589320159, 5),
                "signature" : {
                        "hash" : BinData(0,"AAAAAAAAAAAAAAAAAAAAAAAAAAA="),
                        "keyId" : NumberLong(0)
                }
        }
}
We can configure how we want to shard the specific collections inside the database. We will configure sharding for the books collection and we will add data later to observe how it gets distributed between shards. Let's enable the collection sharding:
mongos> sh.shardCollection("test.books", { title : "hashed" } )
{
        "collectionsharded" : "test.books",
        "collectionUUID" : UUID("deb3295d-120b-47aa-be78-77a077ca9220"),
        "ok" : 1,
        "operationTime" : Timestamp(1589320193, 42),
        "$clusterTime" : {
                "clusterTime" : Timestamp(1589320193, 42),
                "signature" : {
                        "hash" : BinData(0,"AAAAAAAAAAAAAAAAAAAAAAAAAAA="),
                        "keyId" : NumberLong(0)
                }
        }
}
Note
As a test, you could use the range-based approach. In that case, instead of use
{ title: "hashed" }you can set the value for the field to 1, like this:{ title: 1 }
Next, we will be importing sample data. You can type exit to exit this container before continuing.
With sharding enabled, we can import sample data and see how it gets distributed between different shards. Let's download the sample data books.json:
curl https://gist.githubusercontent.com/peterj/a2eca621bd7f5253918cafdc00b66a33/raw/b1a7b9a6a151b2c25d31e552350de082de65154b/books.json --output books.json
Now that we have a sample Books data in the books.json file, we can use the mongoimport command on the router container to import the data into the books collection.
Run the following command to import the data into the books collection of the test database:
docker-compose exec router mongoimport --db test --collection books --file books.json
The command output should look like this:
2020-05-12T22:01:58.469+0000    connected to: mongodb://localhost/
2020-05-12T22:01:58.529+0000    431 document(s) imported successfully. 0 document(s) failed to import.
Now that the data is imported, it was automatically partitioned between the three shards. To see how it was distributed, let's return back to the router container:
docker-compose exec router mongo
Once you're inside the container, you can run db.books.getShardDistribution(). The output shows the details per each shard (how much data and documents) as well as the totals:
2020-05-12T21:31:15.867+0000 I  CONTROL  [main]
mongos> db.books.getShardDistribution()

Shard shard1 at shard1/shard1:27018
 data : 152KiB docs : 135 chunks : 2
 estimated data per chunk : 76KiB
 estimated docs per chunk : 67

Shard shard3 at shard3/shard3:27020
 data : 164KiB docs : 142 chunks : 2
 estimated data per chunk : 82KiB
 estimated docs per chunk : 71

Shard shard2 at shard2/shard2:27019
 data : 188KiB docs : 154 chunks : 2
 estimated data per chunk : 94KiB
 estimated docs per chunk : 77

Totals
 data : 505KiB docs : 431 chunks : 6
 Shard shard1 contains 30.19% data, 31.32% docs in cluster, avg obj size on shard : 1KiB
 Shard shard3 contains 32.49% data, 32.94% docs in cluster, avg obj size on shard : 1KiB
 Shard shard2 contains 37.31% data, 35.73% docs in cluster, avg obj size on shard : 1KiB
You can type exit to exit out of the container. To stop running all containers, you can type docker-compose stop.
Thanks for making it to the end. If you followed along, you learned how to configure and run three MonogDB shards using docker compose. You enabled sharding, imported the sample data into the collection, and seen the data is automatically stored across multiple shards.
此内容由惯性聚合(RSS阅读器)自动聚合整理,仅供阅读参考。 原文来自 — 版权归原作者所有。