







This weekend I was playing a bit with Google Drive, specifically getting access to the files and folders through Next.js. The idea came from a tweet where one could select files and folders, process them (i.e. export the files, chunk and encode them and then save them in vector DB), so the contents could be used as context when interacting with an LLM.
I got a quick prototype of this working with @v0, @AnthropicAI in a couple of hours 🤯 Still a lot of rough edges, but the basic functionality is there. pic.twitter.com/0LzJFf3Icm
— Peter Jausovec (@pjausovec) September 22, 2024
In this post I'll just explain the access to Google Drive part, but if there's interest, I can do another post on explaining how I've doine the processing part. Let's get started!
I am going to assume you have a Next.js project set up or at least you know how to set up one (npx create-next-app@latest). If not, check the Next.js docs for more information on how to get started.
Since we're going to be accessing Google Drive, you'll need a GCP project with the Google Drive API enabled. Assuming you have a GCP account and project, you can search for "Google Drive API" and then enable it - it shouldn't take too long. Once enabled, click the "Credentials" from the sidebar and then create "OAuth client ID" credentials. Make sure you select "Web application" as the application type and add http://localhost:3000/api/auth/callback/google as an authorized redirect URI for development.
After you've added that and created the credentials, you'll get the Client ID and Client Secret which we'll use in the NextAuth.js setup. Put these values in the .env.local file in the root of your Next.js project:
GOOGLE_CLIENT_ID=your-client-id
GOOGLE_CLIENT_SECRET=your-client-secret
First, let's set up NextAuth.js with Google provider support. Create a file called [...nextauth]/route.ts in the app/api/auth directory of your Next.js project:
// app/api/auth/[...nextauth]/route.ts
import NextAuth from 'next-auth';
import type { NextAuthOptions } from 'next-auth';
import GoogleProvider from 'next-auth/providers/google';

export const authOptions: NextAuthOptions = {
  providers: [
    GoogleProvider({
      clientId: process.env.GOOGLE_CLIENT_ID!,
      clientSecret: process.env.GOOGLE_CLIENT_SECRET!,
      authorization: {
        params: {
          scope:
            'openid email profile https://www.googleapis.com/auth/drive.readonly',
          prompt: 'consent',
          access_type: 'offline',
          response_type: 'code',
        },
      },
    }),
  ],
  callbacks: {
    async jwt({ token, account, profile }) {
      if (account) {
        token.accessToken = account.access_token;
        token.refreshToken = account.refresh_token;
        token.expiresAt = account.expires_at;
      }
      if (profile) {
        token.id = profile.sub;
      }
      return token;
    },
    async session({ session, token }) {
      session.accessToken = token.accessToken as string;
      session.refreshToken = token.refreshToken as string;
      session.expiresAt = token.expiresAt as number;
      if (session.user) {
        session.user.id = token.id as string;
      }
      return session;
    },
  },
  session: {
    strategy: 'jwt',
  },
};

const handler = NextAuth(authOptions);
export { handler as GET, handler as POST };
This setup it more or less a default setup for NextAuth.js with Google provider, but in our case we are additionally requesting the https://www.googleapis.com/auth/drive.readonly scope. Note I am also setting the access_type to offline, so I can refresh the token later on in the backend.
Now, let's create an API route to fetch the folder structure from Google Drive. Create a new file called folders.ts in the app/api directory:
import { NextRequest, NextResponse } from 'next/server';
import { getToken } from 'next-auth/jwt';
import { google } from 'googleapis';

async function fetchFolderContents(
  drive: any,
  folderId: string = 'root'
): Promise<any[]> {
  const response = await drive.files.list({
    q: `'${folderId}' in parents`,
    fields: 'files(id, name, mimeType, fileExtension, size, iconLink)',
  });

  const items = await Promise.all(
    response.data.files.map(async (file: any) => {
      const item: any = {
        id: file.id,
        name: file.name,
        type:
          file.mimeType === 'application/vnd.google-apps.folder'
            ? 'folder'
            : 'file',
        extension: file.fileExtension,
        size: file.size,
        icon: file.iconLink,
      };

      if (item.type === 'folder') {
        item.children = await fetchFolderContents(drive, file.id);
      }

      return item;
    })
  );

  return items;
}

export async function GET(req: NextRequest) {
  const token = await getToken({ req, secret: process.env.NEXTAUTH_SECRET });

  if (!token || !token.accessToken) {
    return NextResponse.json({ error: 'Not authenticated' }, { status: 401 });
  }

  try {
    const auth = new google.auth.OAuth2(
      process.env.GOOGLE_CLIENT_ID,
      process.env.GOOGLE_CLIENT_SECRET
    );

    auth.setCredentials({
      access_token: token.accessToken as string,
      refresh_token: token.refreshToken as string,
      expiry_date: token.expiresAt
        ? (token.expiresAt as number) * 1000
        : undefined,
    });

    const drive = google.drive({ version: 'v3', auth });
    const structure = await fetchFolderContents(drive);

    return NextResponse.json({ structure });
  } catch (error) {
    console.error('Error fetching folder structure:', error);
    return NextResponse.json(
      { error: 'Failed to fetch folder structure' },
      { status: 500 }
    );
  }
}
In this API route I am using the Google Drive SDK to recursively fetch the folder contents. To initialize the SDK, I am using the OAuth2 class, instantiating it with the client and secret we got from the GCP project. Then, I am attaching the access and refresh token that was sent from the frontend when the user authenticated.
Using the SDK is fairly straighh forward - using the list function to get the files and folders in a specific folder (folderId), specifying the fields I want to get back, and then recursively fetching the children if the item is a folder.
With the authentication and API route set up, let's create a React component to display the folder structure and allow users to select files. I am using shadcn here for the components.
'use client';

import React, { useState, useEffect } from 'react';
import { useSession } from 'next-auth/react';
import { Button } from '@/components/ui/button';
import { Card, CardContent, CardHeader, CardTitle } from '@/components/ui/card';
import { Checkbox } from '@/components/ui/checkbox';
import { ScrollArea } from '@/components/ui/scroll-area';

interface Item {
  id: string;
  name: string;
  type: 'folder' | 'file';
  extension?: string;
  children?: Item[];
  size?: number;
  icon?: string;
}

export default function GoogleDriveComponent() {
  const { data: session, status } = useSession();
  const [structure, setStructure] = useState<Item[]>([]);
  const [selectedItems, setSelectedItems] = useState<Item[]>([]);
  const [isLoading, setIsLoading] = useState(true);

  useEffect(() => {
    const fetchStructure = async () => {
      if (status === 'authenticated') {
        try {
          setIsLoading(true);
          const response = await fetch('/api/folders');
          if (!response.ok) throw new Error('Failed to fetch folder structure');
          const data = await response.json();
          setStructure(data.structure);
        } catch (error) {
          console.error('Error fetching folder structure:', error);
        } finally {
          setIsLoading(false);
        }
      }
    };

    fetchStructure();
  }, [session, status]);

  const toggleItemSelection = (item: Item) => {
    setSelectedItems((prev) => {
      const index = prev.findIndex((i) => i.id === item.id);
      if (index > -1) {
        return prev.filter((i) => i.id !== item.id);
      } else {
        return [...prev, item];
      }
    });
  };

  const renderItem = (item: Item) => (
    <li key={item.id} className="mb-1">
      <div className="flex items-center space-x-2">
        <Checkbox
          checked={selectedItems.some((i) => i.id === item.id)}
          onCheckedChange={() => toggleItemSelection(item)}
        />
        <span className="text-sm font-medium">{item.name}</span>
      </div>
      {item.type === 'folder' && item.children && (
        <ul className="pl-6 mt-1">
          {item.children.map((child) => renderItem(child))}
        </ul>
      )}
    </li>
  );

  if (status === 'loading' || isLoading) {
    return <div>Loading...</div>;
  }

  if (status === 'unauthenticated') {
    return <div>Please sign in to view folders</div>;
  }

  return (
    <Card>
      <CardHeader>
        <CardTitle>Select Items from Google Drive</CardTitle>
      </CardHeader>
      <CardContent>
        <ScrollArea className="h-[300px] w-full border rounded-md p-4">
          <ul>{structure.map((item) => renderItem(item))}</ul>
        </ScrollArea>
        <div className="mt-4">
          <p>{selectedItems.length} item(s) selected</p>
          <Button onClick={() => console.log(selectedItems)}>
            Process Selected Files
          </Button>
        </div>
      </CardContent>
    </Card>
  );
}
This component fetches the folder structure when the user is authenticated, displays it as a tree, and allows users to select files and folders.
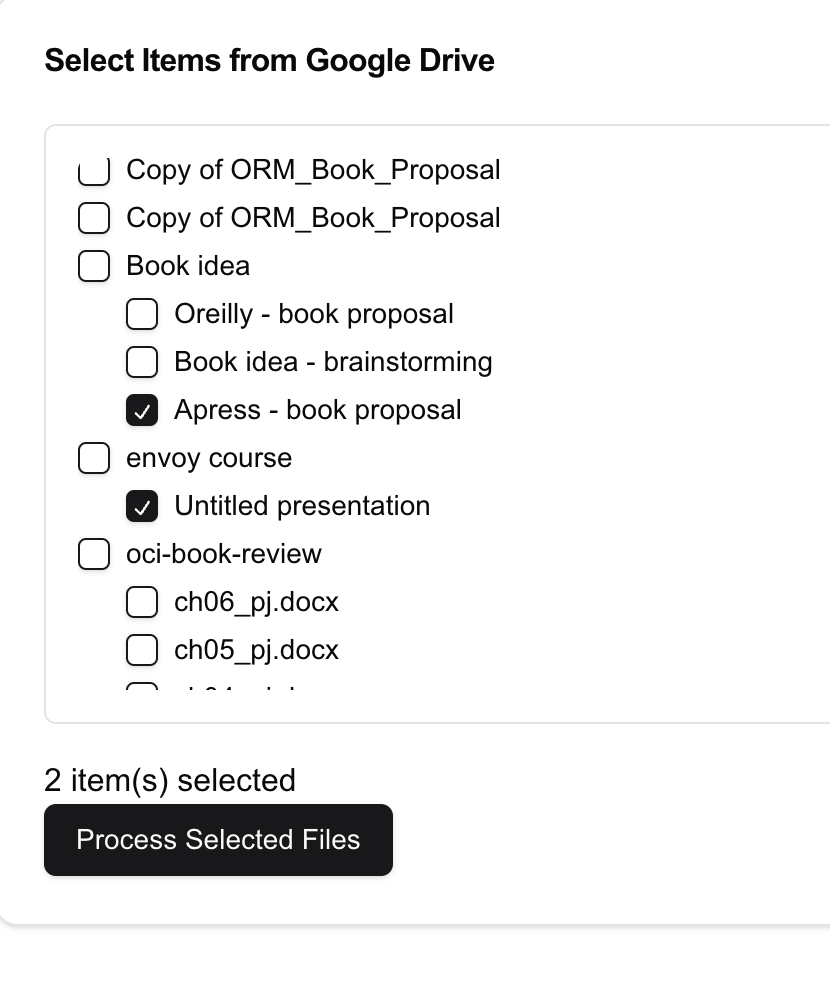
In this post, we've set up NextAuth.js with Google provider support, created an API route to fetch the folder structure from Google Drive, and built a simple React component to display the folder structure and allow users to select files. This is just a starting point, and you can extend this further by adding more features like file download, upload, and more.
此内容由惯性聚合(RSS阅读器)自动聚合整理,仅供阅读参考。 原文来自 — 版权归原作者所有。