


The ambassador container pattern aims to hide the primary container's complexity and provide a unified interface through which the primary container can access services outside of the Pod.

These outside or external services might present different interfaces and have other APIs. Instead of writing the code inside the main container that can deal with these external services' multiple interfaces and APIs, you implement it in the ambassador container. The ambassador container knows how to talk to and interpret responses from different endpoints and pass them to the main container. The main container only needs to know how to talk to the ambassador container. You can then re-use the ambassador container with any other container that needs to talk to these services while maintaining the same internal interface.
Another example would be where your main containers need to make calls to a protected API. You could design your ambassador container to handle the authentication with the protected API. Your main container will make calls to the ambassador container. The ambassador will attach any needed authentication information to the request and make an authenticated request to the external service.
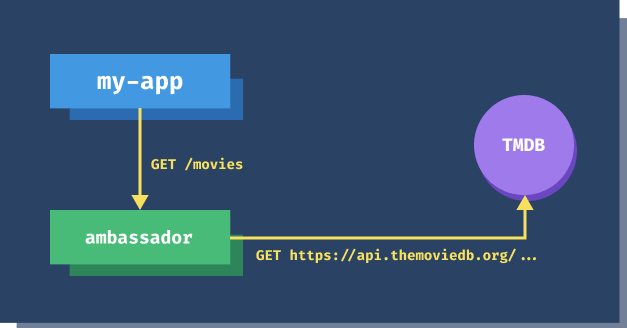
To demonstrate how the ambassador pattern works, we will use The Movie DB (TMBD). Head over to the website and register (it's free) to get an API key.
The Movie DB website offers a REST API where you can get information about the movies. We have implemented an ambassador container that listens on path /movies, and whenever it receives a request, it will make an authenticated request to the API of The Movie DB.
Here's the snippet from the code of the ambassador container:
func TheMovieDBServer(w http.ResponseWriter, r *http.Request) {
	apiKey := os.Getenv("API_KEY")
	resp, err := http.Get(fmt.Sprintf("https://api.themoviedb.org/3/discover/movie?api_key=%s", apiKey))
    // ...
    // Return the response
}
We will read the API_KEY environment variable and then make a GET request to the URL. Note if you try to request to URL without the API key, you'll get the following error:
$ curl https://api.themoviedb.org/3/discover/movie
{"status_code":7,"status_message":"Invalid API key: You must be granted a valid key.","success":false}
I have pushed the ambassador's Docker image to startkubernetes/ambassador:0.1.0.
Just like with the sidecar container, the ambassador container is just another container that's running in the Pod. We will test the ambassador container by calling curl from the main container.
Here's how the YAML file looks like:
apiVersion: v1
kind: Pod
metadata:
  name: themoviedb
spec:
  containers:
    - name: main
      image: radial/busyboxplus:curl
      args:
        - sleep
        - '600'
    - name: ambassador
      image: startkubernetes/ambassador:0.1.0
      env:
        - name: API_KEY
          valueFrom:
            secretKeyRef:
              name: themoviedb
              key: apikey
      ports:
        - name: http
          containerPort: 8080
Before we can create the Pod, we need to create a Secret with the API key. Let's do that first:
$ kubectl create secret generic themoviedb --from-literal=apikey=<INSERT YOUR API KEY HERE>
secret/themoviedb created
You can now store the Pod YAML in ambassador-container.yaml file and create it with kubectl apply -f ambassador-container.yaml.
When Kubernetes creates the Pod (you can use kubectl get po to see the status), you can use the exec command to run the curl command inside the main container:
$ kubectl exec -it themoviedb -c main -- curl localhost:8080/movies

{"page":1,"total_results":10000,"total_pages":500,"results":[{"popularity":2068.491,"vote_count":
...
Since containers within the same Pod share the network, we can make a request against localhost:8080, which corresponds to the port on the ambassador container.
You could imagine running an application or a web server in the main container, and instead of making requests to the api.themoviedb.org directly, you are making requests to the ambassador container.
Similarly, if you had any other service that needed access to the api.themoviedb.org you could add the ambassador container to the Pod and solve access like that.
此内容由惯性聚合(RSS阅读器)自动聚合整理,仅供阅读参考。 原文来自 — 版权归原作者所有。