

惯性聚合 高效追踪和阅读你感兴趣的博客、新闻、科技资讯
阅读原文 在惯性聚合中打开

推荐订阅源

人人都是产品经理
人人都是产品经理
博客园_首页
IT之家
IT之家
让小产品的独立变现更简单 - ezindie.com
Vercel News
Vercel News
美团技术团队
D
Docker
WordPress大学
WordPress大学
T
Tailwind CSS Blog
酷 壳 – CoolShell
酷 壳 – CoolShell
The Cloudflare Blog
Y
Y Combinator Blog
F
Fortinet All Blogs
freeCodeCamp Programming Tutorials: Python, JavaScript, Git & More
G
Google Developers Blog
爱范儿
爱范儿
奇客Solidot–传递最新科技情报
奇客Solidot–传递最新科技情报
月光博客
月光博客
MongoDB | Blog
MongoDB | Blog
S
SegmentFault 最新的问题
GbyAI
GbyAI
Hugging Face - Blog
Hugging Face - Blog
Microsoft Azure Blog
A
About on SuperTechFans

秋水逸冰

丽萨主机:双ISP家宽住宅IP VPS/CN2 GIA精品网/G口大带宽 | 秋水逸冰 Linux Kernel 6.18.x 编译版 | 秋水逸冰 思考未来人与 AI 的关系 | 秋水逸冰 3X-UI 面板安装和使用教程 | 秋水逸冰 Xray-UI 面板安装和使用教程 | 秋水逸冰 WCMP (Windows + Caddy + MariaDB + PHP) Nginx for Windows | 秋水逸冰 Aria2 for Windows | 秋水逸冰 Curl for Windows | 秋水逸冰 Wget for Windows | 秋水逸冰 Windows 11 Enterprise LTSC DD 镜像 Windows Server 2025 Datacenter DD 镜像 重新编译 curl 以支持 HTTP3 | 秋水逸冰 tiny10 和 tiny11 23H2 的 Windows DD 镜像 从 Apache httpd 切换到 Caddy2 LCMP (Linux + Caddy + MariaDB + PHP) Windows 11 Pro for Workstations 22H2 DD 镜像 Shadowsocks 编译版 by Teddysun | 秋水逸冰 适用于 UEFI 启动的多个 Windows 系统 DD 镜像 Linux Kernel 5.15.x 编译版 | 秋水逸冰 制作适用于 WSL 的任意 Linux 镜像 Windows 11 Pro for Workstations 21H2 DD 镜像 Windows 10 Enterprise LTSC DD 镜像 Linux Kernel 5.14.x 编译版 | 秋水逸冰 Linux Kernel 5.13.x 编译版 | 秋水逸冰 Windows Server 2022 Datacenter DD 镜像 在 Windows 10 上安装 Rocky Linux 系统 Linux Kernel 5.12.x 编译版 | 秋水逸冰 Linux Kernel 5.11.x 编译版 | 秋水逸冰 在 Windows 10 上安装 CentOS 系统
Windows系统下安装dig命令 | 秋水逸冰
秋水逸冰 · 2015-04-01 · via 秋水逸冰

技术 秋水逸冰 59217浏览 15评论

Linux

dig 是一个 Linux 下用来 DNS 查询信息的工具,全称是Domain Information Groper,与 nslookup 类似,但比 nslookup 功能更强大。Windows 下只有 nslookup,如果也想用到 dig 命令,就只能自己动手安装了。
dig 作为 bind 的一部分,官方网站如下:
http://www.bind9.net/download
下面来具体说说步骤,如何安装。

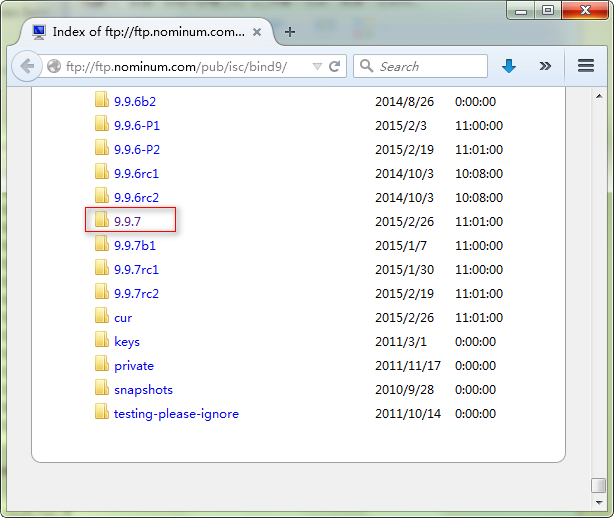
选择一个镜像站点,点击进入,比如:
ftp://ftp.iij.ad.jp/pub/network/isc/bind9/
选择最新版 9.11.3,如下图(演示的图是老版本的,懒得换了,将就着看吧):

如果是 64 位,下载地址如下:
ftp://ftp.iij.ad.jp/pub/network/isc/bind9/9.11.3/BIND9.11.3.x64.zip
如果是 32 位,下载地址如下:
ftp://ftp.iij.ad.jp/pub/network/isc/bind9/9.11.3/BIND9.11.3.x86.zip

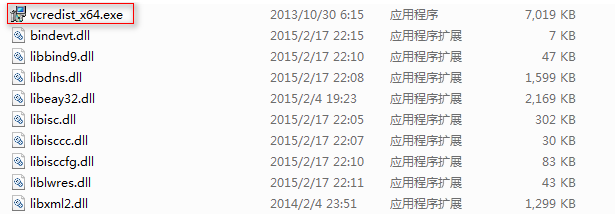
这里以在 Windows 7 64 位下安装为例,解压 BIND9.11.3.x64.zip,双击 vcredist_x64.exe (如果是 32 位,则文件名为 vcredist_x86.exe)安装 Microsoft Visual C++ 2012 Redistribution。
然后再将所有的 dll 文件复制至 C:\Windows\System32\ 目录下。如下图所示:
然后再将 dig.exe 也复制至 C:\Windows\System32\ 目录下。

至此,安装完成。
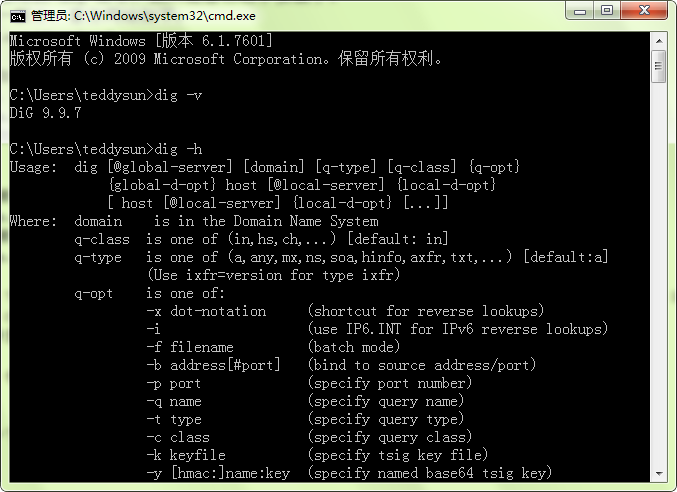
打开 cmd ,验证一下。如下图所示:
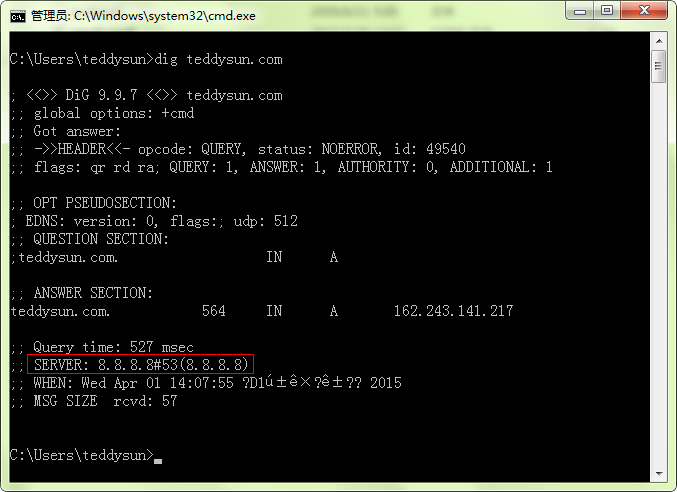
如果你想使用 Google Public DNS 来进行 dig 查询的话,那么需要在 C:\Windows\System32\drivers\etc\ 目录下添加一个名为 resolv.conf 的文件。
内容如下:
nameserver 8.8.8.8
nameserver 8.8.4.4

查询结果如下图所示(演示的图是老版本的,懒得换了,将就着看吧):
参考链接:
http://www.bind9.net/download

转载请注明:秋水逸冰 » Windows系统下安装dig命令