







一般Linux的VPS比Windows的便宜,所以手上的几个VPS清一色Linux发行版CentOS系统。拿到root权限的账号,系统随机生成的密码比较复杂,一般我们为了方便记忆都会改成自己能记得住的,然而这是不安全的。但凡用到密码的地方都只是看似安全。所以,在开通了Linux系统的VPS后,我们有必要对SSH登录做一些基本的安全设置。
这其中利用公钥和私钥就能实现SSH无密码登录。按照如下步骤操作:
1、生成公钥和私钥
Linux系统中绝大部分的发行版都是用OpenSSH,所以生成公钥私钥的时候最好用ssh-keygen命令,如果用putty自带的PUTTYGEN.EXE生成会不兼容OpenSSH,从而会导致登录时出现server refused our key错误。
用root登录后运行命令如下。
ssh-keygen -t rsa
Generating public/private rsa key pair.
Enter file in which to save the key (/root/.ssh/id_rsa):    ##直接回车默认路径
Created directory '/root/.ssh'.
Enter passphrase (empty for no passphrase):                 ##输入密码短语(留空则直接回车)
Enter same passphrase again:                                ##重复密码短语
Your identification has been saved in /root/.ssh/id_rsa.
Your public key has been saved in /root/.ssh/id_rsa.pub.
The key fingerprint is:
04:e1:93:92:95:ba:55:21:58:05:7d:57:58:92:32:d3 root@vpn
The key's randomart image is:
+--[ RSA 2048]----+
|     oB*o. ..=o  |
|    .+.+o = E.   |
|    o.+... =     |
|    ...o         |
|     o  S        |
|    .            |
|                 |
|                 |
|                 |
+-----------------+
在/root/.ssh/目录下生成了2个文件,id_rsa为私钥,id_rsa.pub为公钥。私钥自己下载到本地电脑妥善保存,公钥则可以任意公开。
2、导入公钥
运行命令如下。
cat /root/.ssh/id_rsa.pub >> /root/.ssh/authorized_keys
3、更改SSH配置文件
修改SSH的配置文件/etc/ssh/sshd_config,找到下面3行:
#RSAAuthentication yes
#PubkeyAuthentication yes
#AuthorizedKeysFile	.ssh/authorized_keys
将前面的#去掉后保存。
重启SSH服务,运行命令:
service sshd restart
4、制作用于putty的私钥
将VPS上的/root/.ssh/id_rsa下载到本地,利用PUTTYGEN.EXE转换为putty用的ppk文件。
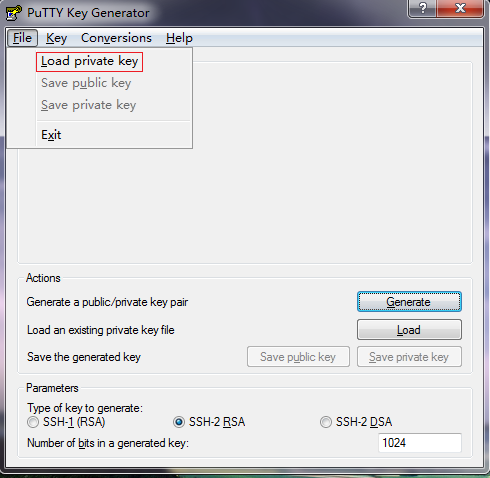
点击File,Load private key,导入/root/.ssh/id_rsa文件。成功后的图片如下所示:
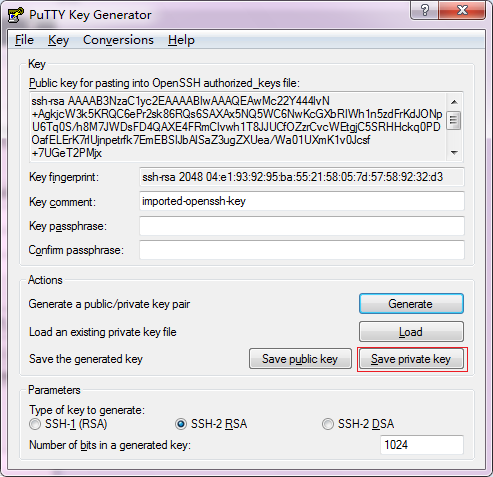
点击Save private key按钮,生成一个后缀为ppk的文件,比如起名为teddysun.ppk,这个文件就是已经制作好的用于putty无密码登录的私钥了,妥善保存。
5、配置putty
最简便的一个方法是创建一个桌面快捷方式,双击即可无密码登录到VPS。
找到putty.exe文件,然后右键创建桌面快捷方式,再到桌面上编辑这个快捷方式,在目标一栏中,修改参数如下。
"C:\Program Files\PUTTY\PUTTY.EXE" -i "D:\key\teddysun.ppk" [email protected]
修改为存放私钥的完整路径,将xxx.xxx.xxx.xxx替换为你的VPS的IP地址即可。
现在,你可以双击建好的putty快捷方式,看看是否已经可以无密码登录了。
6、关闭SSH密码登陆
在上述第5步验证OK后,出于安全需要就可以关闭SSH的密码登录。
修改SSH的配置文件/etc/ssh/sshd_config,找到下面1行:
PasswordAuthentication yes
修改为:
PasswordAuthentication no
重启SSH服务,运行命令:
service sshd restart
搞定,收工。至此,就只能用私钥登录到VPS了,安全性大大增强了。最后,顺便说一句,别跟我说私钥弄丢了怎么办(我都说了要妥善保存的了)。
转载请注明:秋水逸冰 » SSH无密码登录及putty设置