








Important
This article was originally written in Dec 2021, but I’ve updated it to showcase my new config.
I’ve been an avid user of XFCE for a very long time. I’m fond of its lightweight nature, and I feel productive in it. But when I first discovered tiling window managers, I was mind-blown. I’ve wanted to use one forever.
My first experience with one was a few years ago, before I understood how Linux
window managers worked. I couldn’t yet wrap my head around the fact that you
could install more than one window manager and choose what you wanted during
login. I think I’ve grown since then. I faintly remember trying to install
i3wm, the most famous tiling window manager at the time. I
think I was taken aback by the black screen, and more so with the mouse pointer
which just said X.
A year or so ago, I came across DistroTube’s Youtube Channel, where he talks about xmonad, the tiling window manager that’s written in Haskell. While I’ve been wanting to learn Haskell for a very long time, my career trajectory hasn’t afforded me the chance to learn it so far.
I’ve since moved jobs and completely shifted to Linux everywhere. I no longer want to use a non-linux machine ever again. I’m sure there’s a whole blog article about how much of a Linux person I’ve become in the past year or so, somewhere in me.
Last week, I came across dt’s video on Qtile, the tiling window manager written entirely in Python. Now that was truly enticing. I’m adept enough in Python to be able to manage complex configurations all on my own. And after skimming through the documentation, I spent a day modularizing the default qtile config since the default config gives me goosebumps, and not in a good way.
In this article, I’ll describe what I did, and how I went about it.
I decided to abstract away the entire configuration so that it doesn’t live in my dotfiles repository. I wanted to create a python library for myself so that it would have a bunch of utilities for my own consumption.
Additionally, I disagreed with the default way of installing Qtile. As a
principle, I never sudo pip install anything. Instead, I asked my friend
Karthikeyan Singaravel, who is a Python core
developer, and he recommended using the
deadsnakes PPA for Ubuntu
to install any version of Python that I chose. I tried compiling python 3.10
myself, installing to /opt/qtile/ using configure --prefix /opt/qtile/
during the configuration stage of the source code. However, I admit that using
deadsnakes is a far better idea since I could create a virtual environment
based on python3.10 into /opt/qtile/ instead. I had to change the owner of
the folder to my user account. Note that I could store the virtual environment
in my home folder and just use that, but I wanted to isolate this outside of
my home folder.
Installation Approach
The key principle here is isolation - keeping Qtile’s dependencies separate from the system Python and user Python environments. This prevents conflicts and makes updates easier.
So, I installed python3.10-full and python3.10-dev (the development header
files are necessary for building some of the dependencies of qtile), and I
created a virtual environment using the venv module in /opt/qtile. Then, I
changed the owner of the folder to my regular user account.
Then, it was time to install qtile.
Since I use the fish shell, I had to
source activate /opt/qtile/bin/activate.fish to activate the virtual
environment. And then I followed up by installing qtile. I didn’t pick a
version right away, I decided to go with the latest version.
Qtile doesn’t setup an entry for your xsessions, so you need to do that
yourself.
I created /usr/share/xsessions/qtile.desktop and filled it with the following:
| |
Notice how I used the absolute path for qtile.
After this, I logged out of my previous window manager and switched to the new entry for Qtile.
On loading qtile for the first time, I was fairly surprised with the default config. It wasn’t as blank as i3wm and xmonad were. It had a panel, a helpful text field on the panel about how to start the launcher, and it was very easy to use. I was liking it already.
But I wanted to configure it so that I could mess with the design.
The first thing that bothered me was the lack of a wallpaper. I’d used nitrogen before, so I installed it and started it up, setting a wallpaper. I restarted qtile and then… nothing.
That was me being silly and forgetting that Explicit is better than Implicit.
Like all tiling window managers, Qtile did none of the work for us. You have to
ensure that the wallpaper manager loads when Qtile is done loading. That’s
where the .xsessionrc file comes in.
Since nitrogen can restore a wallpaper with ease, all I needed to do was:
This went into the ~/.xsessionrc file.
Qtile’s config file rests at ~/.config/qtile/config.py. On start, Qtile will
read this file. Since this file is just Python code, that also means every
single line in this file is executed.
When you look at the default config, you will notice:
This meant that all you needed to configure Qtile was to ensure you set the values of a few global variables in the config file. And Qtile would take care of the rest.
This was useful. All I needed to do was set some variables.
The default config constructs all these variables as it sets them, which is something I don’t recommend. Python’s error handling will not point out the right place where the error is occurring, and while Python 3.11 seeks to improve this, it’s generally not a good practice to have a long variable declaration step in your code.
For example, where the config does this:
| |
If you want to reuse these objects, it’s better to just construct them separately and then use them in a panel. The same goes for reusing panels.
After months of tweaking and refinement, here’s what my current Qtile setup looks like. The key principles I’ve followed are:
| |
I use a consistent color palette and have custom icons for different system components. The straw hat is a personal touch - a nod to One Piece!
One of my favorite custom functions handles multi-monitor setups elegantly:
| |
This automatically moves the mouse cursor to the center of the next monitor when
I press Super + ., making multi-monitor workflows much smoother.
My keybindings follow a logical pattern:
| |
One of the most powerful aspects of a Python-based window manager is the ability to create intelligent, hardware-aware components:
| |
These functions automatically detect hardware capabilities and adjust the interface accordingly. The battery widget only appears on laptops, and the IP address widget shows the current network status.
Since I run AMD hardware, I’ve integrated amdgpu_top for real-time GPU
monitoring:
| |
This provides real-time VRAM usage information directly in the status bar.
The screen configuration automatically adapts to the number of connected monitors:
| |
The main screen gets additional widgets like system tray and network information, while secondary screens get a simplified layout.
Qtile provides hooks for running scripts at startup:
| |
This lets me separate one-time setup (like setting wallpapers) from things that should happen on every reload.
My current setup includes:
Font Choice
Using a Nerd Font is crucial for proper icon rendering in Qtile widgets. JetBrains Mono provides excellent readability while supporting all the necessary symbols.
After using Qtile daily for months, here are the key insights:
Having your window manager configuration in Python means you can:
Don’t try to recreate someone else’s rice immediately. Start with the defaults and gradually customize:
Modern systems vary significantly. Your configuration should adapt to:
Since widgets can run arbitrary Python code, be mindful of:
This configuration is continuously evolving. Some planned improvements:
Custom Widgets:
Better Multi-Monitor Support:
Integration Improvements:
Here’s a look at what my config looks like today.
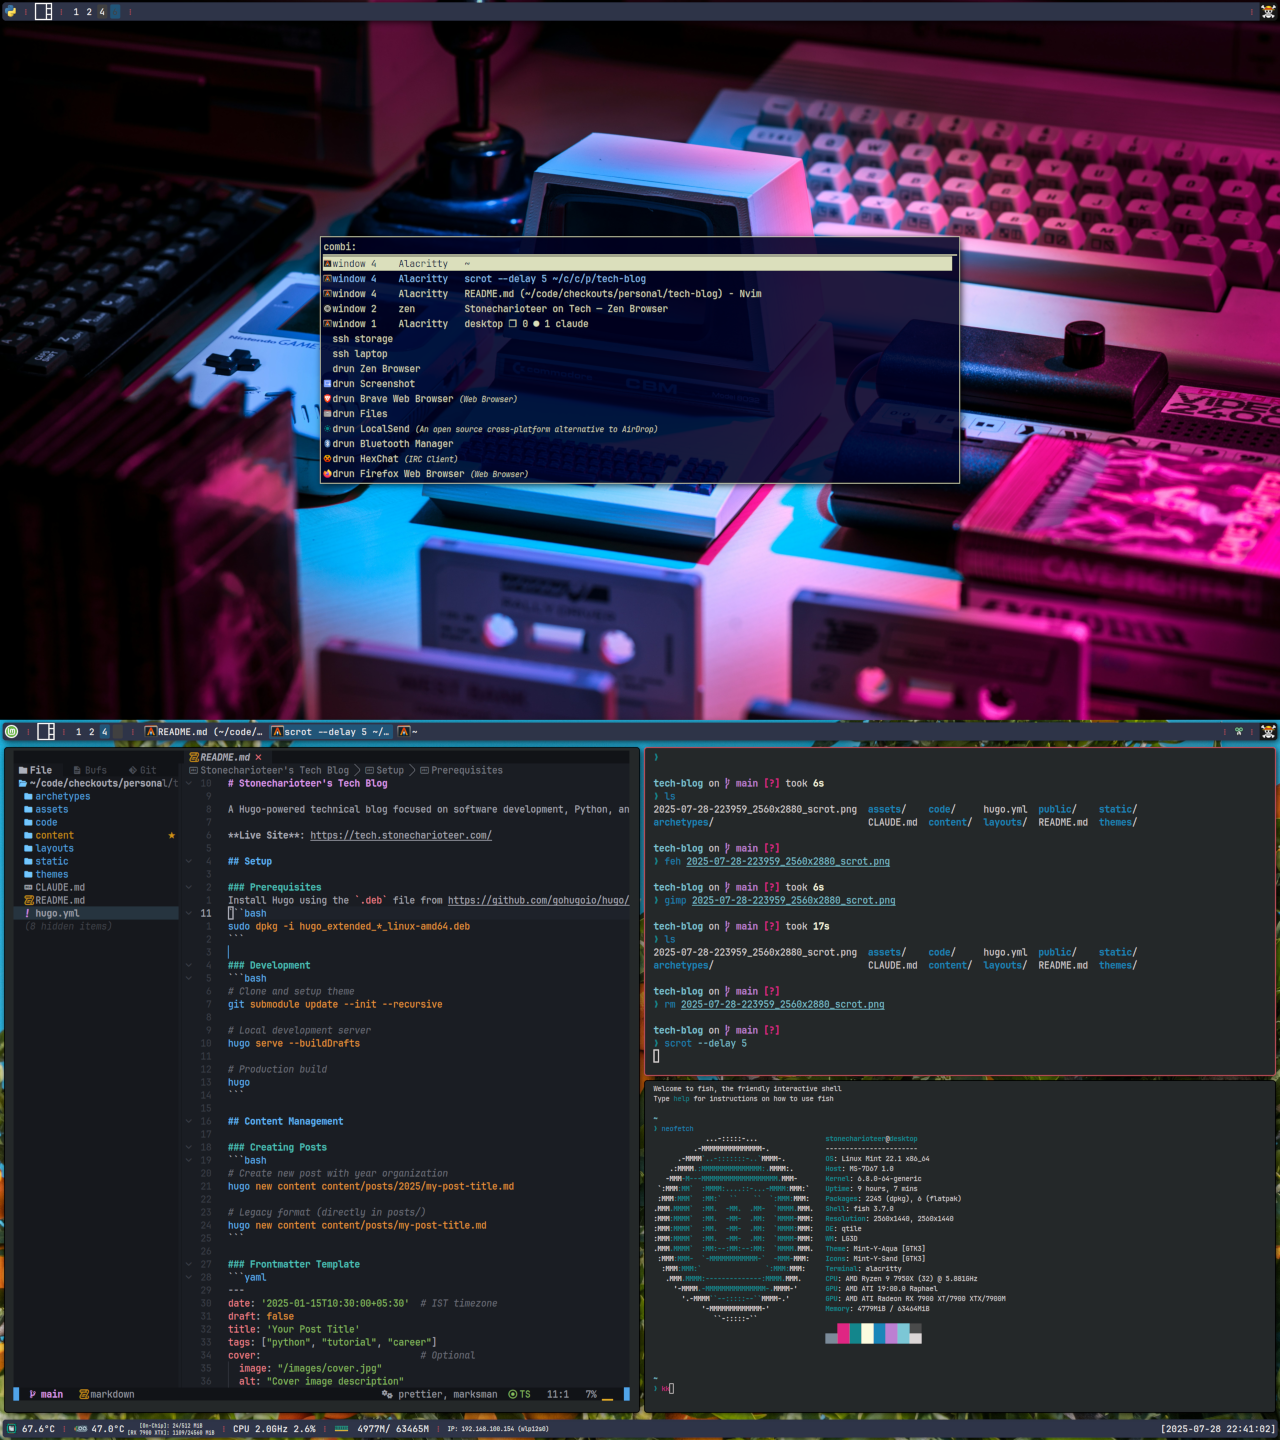
Qtile has transformed my Linux desktop experience. The ability to configure everything in Python, combined with the logical tiling approach, has made me significantly more productive. The learning curve is gentler than pure configuration-file-based window managers, and the extensibility is unmatched.
If you’re comfortable with Python and want a window manager that grows with your needs, Qtile is an excellent choice. The community is helpful, the documentation is comprehensive, and the possibilities are endless.
The configuration I’ve shared represents months of daily use and refinement. It’s not just about aesthetics (though it does look good!) - it’s about creating a workspace that adapts to your hardware, workflow, and preferences seamlessly.
此内容由惯性聚合(RSS阅读器)自动聚合整理,仅供阅读参考。 原文来自 — 版权归原作者所有。