










TL;DR my motivation and experience for moving my blog from Cloudflare to bunny.net
I’ve been a long time Cloudflare user. They offer a solid service that is free for the vast majority of their users, that’s very generous. Their infrastructure is massive and their feature set is undeniably incredible.
One of my biggest concerns though is around how easily I could become heavily dependent on this one single company that then can decide to cut me off and disable all of my websites, for any arbitrary reason. It’s a single point of failure for the internet. Every Cloudflare outage ends up in the news. And I can’t help but feel that the idea of centralizing the internet into a single US corporation feels off. Not to mention the various scandals that have surrounded them. So I was open to alternatives.
Bunny.net (affiliate link because why not, raw link here) is a Slovenian (EU) company that is building up a lot of momentum. Their CDN-related services rival Cloudflare already, and although their PoP network is smaller than Cloudflare’s, they score highly on performance and speed across the globe. It’s a genuinely competitive alternative to Cloudflare.
It has the additional benefit of being a European company, and I like the idea of growing and supporting the European tech scene.
I’ve been using various different services, but focusing on this blog, the first thing was Cloudflare as the registrar for the domain name. I did some research on alternative registrars, but I just didn’t find any good European options. The closest I found was INWX, but their lack of free WHOIS Privacy made them a non-option. I ended up with Porkbun. They run on Cloudflare infrastructure, but they have better support. So the remaining thing Cloudflare was doing for me was the “Orange Cloud”: automatic caching, origin hiding, and optional protection features.
So that’s what we’re moving over! I’m gonna walk you through how to set up the bunny.net CDN for your website, with some sensible defaults.
Setting up your bunny.net account is quick and you get $20 worth of free credits to play around with, those are valid for 14 days. You don’t need to give them a credit card up front to try things out, but if you do, you get another $30 worth of credits. You do need to confirm your email though before you can start setting things up. Once you’re out of the trial, you pay per use, which for most cases is cents a month. However, note that bunny.net require a minimum payment of $1 per month.
I guess a cheap price to pay to stop being the product and start becoming the customer.
The pull zone is the main mechanism for enabling the CDN for your website. You’ll find them under CDN in the left navigation bar. Here’s how to set one up:
And you’re done with the first part!
Now that you’ve set up the pull zone, it’s time to hook it up to your website and domain. Go to the pull zone you created. You’ll see a “hostnames” screen. Time to connect things.
This is the part where bunny.net will really shine through!
If your website is set up to return the appropriate cache headers for each resource, things will just work. Bunny defaults to respecting the cache control headers when pointing a pull zone at an origin site. To verify, go to Caching → General and check that “Respect origin Cache-Control” is set under “Cache expiration time”. Note that if you set no-cache, bunny will use that and will not cache at the edge.
Alternatively, if you don’t have cache headers set up, and you don’t want to control that yourself, you can instead enable Smart Cache. This will default to caching typically cached resources like images, CSS, JS files etc, while avoiding caching things like HTML pages. This will work for most cases!
But I wanted to go faster. If you've read my post about building this website, here’s how I’ve set up my cache headers: I added a new pipeline in the router called public and added an extra middleware to it. I technically have everything using this pipeline, but leaving the standard browser pipeline that comes out of the box with Phoenix keeps my options open to add authenticated (uncached) pages in the future.
pipeline :public do
plug :accepts, ["html"]
plug :put_root_layout, html: {JolaDevWeb.Layouts, :root}
plug :put_secure_browser_headers, @secure_headers
plug :put_cdn_cache_header
end
defp put_cdn_cache_header(conn, _opts) do
put_resp_header(conn, "cache-control", "public, s-maxage=86400, max-age=0")
end
You can see the whole router here https://github.com/joladev/jola.dev/blob/main/lib/jola_dev_web/router.ex.
This setup means I even cache the HTML pages, which makes this ridiculously fast. Here’s the landing page response time from various locations, using the Larm response time checker tool:
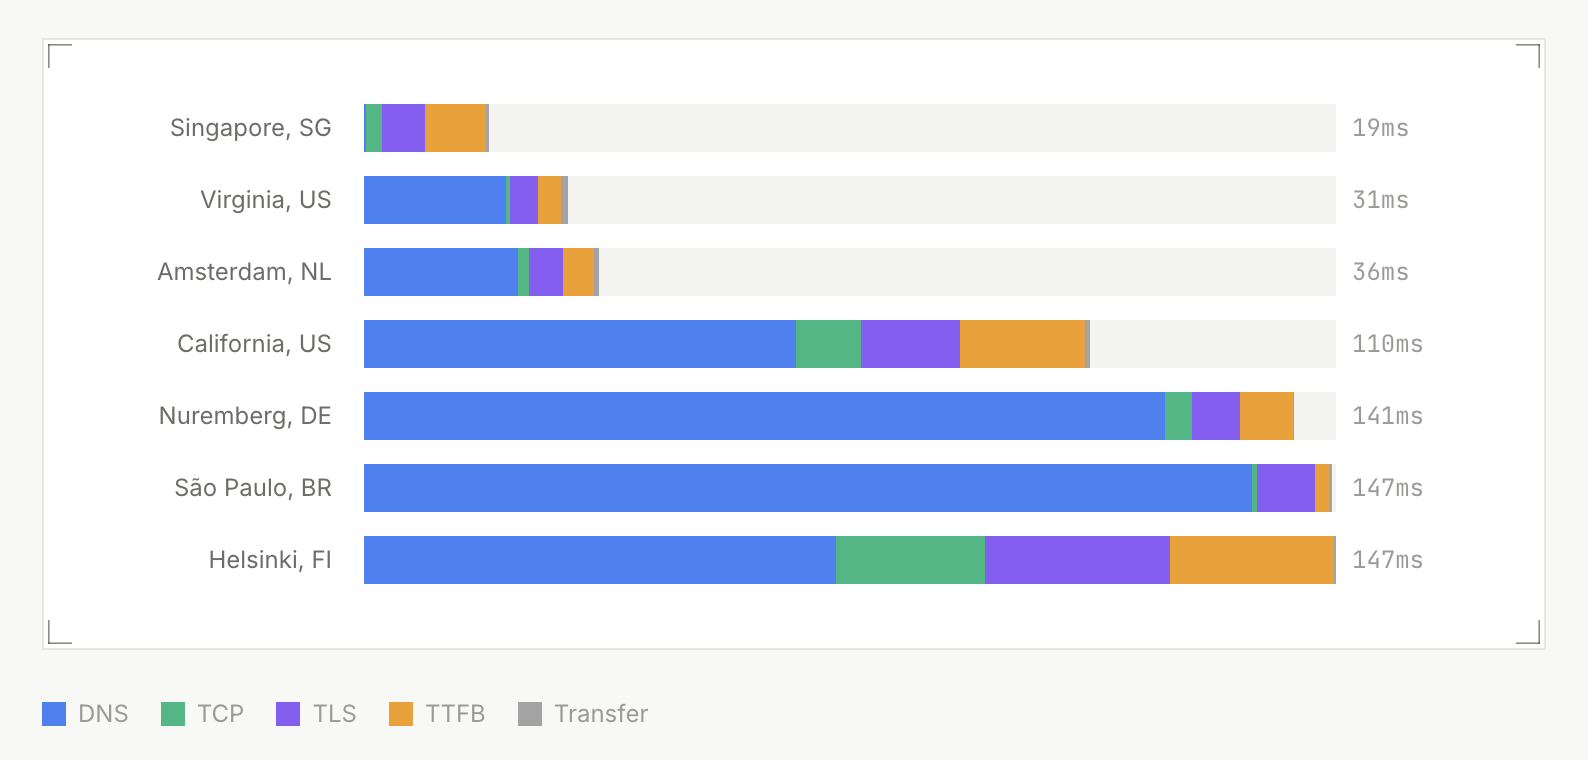
Because I’m caching the HTML pages, if I publish a new post I do need to purge the pull zone to reset the cached HTML files.
All of these are optional, but nice to have!
On your pull zone page, under General → Hostnames, go toggle “Force SSL” on for your domain to ensure that all requests use SSL. SSL/TLS is pretty standard these days, and many TLDs and websites use HSTS to enforce it, but no harm in enabling it here too.
DDoS protection comes out of the box, but we can set some other things up. First of all, go to Caching and then Origin Shield in the left menu on your pull zone, and activate Origin Shield. Select the location closest to your origin. This reduces load on your server, as bunny.net will cache everything in the Origin Shield location, and all edge locations will try that location first before hitting your server.
Next, go to Caching → General and scroll down. At the bottom of the page you can select Stale Cache: While Origin Offline and While Updating. This means bunny will keep serving cached content even if it is stale, if it can’t reach your origin, and that it will serve stale content while fetching the latest version. Both are nice to haves, nothing you have to enable, but provide a slightly better service to your users!
Next, let’s set up an Edge rule to redirect any requests to our automatically generated pull zone domain to our actual domain, to avoid confusing crawlers. On your pull zone, in the left menu, click Edge rules.
https://jola.dev{{path}} .*://<slug>.b-cdn.net/* replacing <slug> with the name given to your pull zone.Now you should be able to go to https://slug.b-cdn.net for your pull zone and get redirected to your proper domain!
This post just covers the very basics of getting set up on bunny.net. I haven’t even scratched the surface of edge rules, cache configuration, the Shield features for security and firewalls, video hosting and streaming, edge scripting and edge distributed containers, and much more.
I especially appreciate the great statistics, logs, and metrics you get out of the dashboard. You can even see every single request coming through to help you investigate issues, and clear feedback on what’s getting cached and not. I’m actively moving everything else over and I’m excited for the upcoming S3 compatible storage!
You should give bunny.net a try!
ps Since writing this I've open-sourced bunnyx, my Elixir client for the bunny.net API.
Written by Johanna Larsson. Thoughts on this post? Find me on Bluesky at @jola.dev or why not give it a vote on Bubbles.
此内容由惯性聚合(RSS阅读器)自动聚合整理,仅供阅读参考。 原文来自 — 版权归原作者所有。