







kube-apiserver is one of the most important core components of Kubernetes and mainly provides the following functions
apiserver main functions:
API Server is the intermediate hub for all component interactions.
Each request to the Kubernetes API will go through multi-stage access control before it is accepted, including authentication, authorization and admission control (Admission Control), etc.
The previous one is Mutating Webhook, which can change the value of an object, but Validating Webhook cannot modify the value of an object and will not take effect.

More detailed request processing process:

📜 Explanation of the above:
How to handle API requests: The API source code exists in the kubernetes/pkg/api path and will handle requests from clients within the cluster and outside the cluster.
So, what exactly will you find when an HTTP request reaches the Kubernetes API? Looking from the top, you will find the following interactions:
HTTP requests are processed by a series of filters (filters), which are registered in DefaultBuildHandlerChain() (see source code: config.go in https://github.com/kubernetes/apiserver) , and Perform appropriate processing. The filter will either pass and append information to ctx.RequestInfo (such as an authenticated user) or return an appropriate HTTP response code.
In the second step, the multiplexer (multiplexer, refer to the source code: container.go in https://github.com/kubernetes/apiserver ) will route the HTTP request to the corresponding handler according to the HTTP path ( handler).
In the third step, routes (defined in routes/*) will connect the handler to the HTTP path.
The fourth step is to register the handler according to the API Group (see source code: groupversion.go and installer.go in https://github.com/kubernetes/apiserver) , which will handle HTTP requests and context ( context, such as user, rights, etc.) and transfer the requested object from storage.
Note that for the sake of simplicity, we have omitted the
$NAMESPACEfield in the HTTP path in the above figure.Now we will further introduce the filters established in DefaultBuildHandlerChain() mentioned earlier:
**WithRequestInfo():**Defined in requestinfo.go, attaches RequestInfo to the context.
WithMaxInFlightLimit(): Defined in maxinflight.go, limits the current number of requests.
WithTimeoutForNonLongRunningRequests(): Defined in timeout.go, the timeout pauses non-long-running requests (such as most GET, PUT, POST, DELETE requests), which is different from long-running requests (such as watch and proxy) request) is exactly the opposite.
WithPanicRecovery(): Defined in wrap.go, wraps an http Handler to recover and record errors.
WithCORS(): Defined in cors.go, providing a CORS implementation; CORS stands for Cross-Origin Resource Sharing, which is a method that allows JavaScript embedded in HTML pages to generate XMLHttpRequests requests Mechanism to a domain that is different from JavaScript’s original origins.
WithAuthentication(): Defined in authentication.go, attempts to authenticate the given request as the user and stores the user information in the provided context. Upon success, the Authorization HTTP header will be removed from the request.
**WithAudit(): **Defined in audit.go, enriches the handler with audit log information from all incoming requests. Audit log entries contain a lot of information, such as the source IP of the request, the user information that called the operation, and the namespace of the request.
WithImpersonation(): defined in impersonation.go, handles fake users by checking requests that attempt to modify the user (similar to sudo);
**WithAuthorization():**Defined in authorization.go, passes all authorized requests to the multiplexer that has distributed the requests to the correct handler, otherwise a forbidden error is returned.
When TLS is turned on, all requests need to be authenticated first. Kubernetes supports multiple authentication mechanisms and supports opening multiple authentication plug-ins at the same time (as long as one authentication passes). If the authentication is successful, the user’s username will be passed to the authorization module for further authorization verification; for requests that fail authentication, HTTP 401 will be returned.
We learned ETCD in the last section and know how important ETCD is as the database of Kubernetes:
We know that whether you access the K8s cluster through the kubectl client or REST request, you ultimately need to go through the API Server to operate the resources. The effective results will be persisted to etcd, and the data security in etcd becomes very important. In order to ensure the security of etcd, K8s only allows the API Server to access and operate etcd. At this time, the API Server is responsible for the security of the entire etcd. So how does K8s control and ensure the security of the API Server access process?
The main authentication methods include: client certificate, password, ordinary token, bootstrap token and JWT authentication (mainly used for Service Account). The authentication module will check the content of the request header or client certificate. We can configure one or several methods to authenticate the request at the same time. Multiple authentication methods will be executed in sequence. As long as one method passes, the request will be legally authenticated. When all methods fail, a 401 status code will be returned and the request will be interrupted. The problem solved by authentication is to verify whether the visiting party is legitimate and to identify its identity.
apiserver supports multiple authentication methods:
X509 Certificate
Static Token file
Bootstrap Token
Static Password File
--basic-auth-file=SOMEFILE when starting the API Server. The file format is csv. Each line has at least three columns password, user, uid, followed by the optional group name password, user, uid, “group1,group2,group3”+ServiceAccount
+OpenID
OAuth 2.0 authentication mechanism
Webhook token authentication
Anonymous request
It is not recommended to enable anonymous requests and is generally used for testing.
If you don’t understand the basic principles of digital certificates and CAs, you can read this article first “Principles of Digital Certificates”
For communication between components in K8s, certificate verification is completed through TLS at the protocol layer. TLS verification is divided into two types:
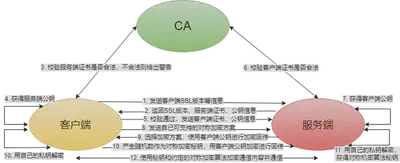
When two components perform mutual TLS authentication, the relevant files in the following table will be involved:
| 📜 Name | 🎯 Function | 🌟 Example |
|---|---|---|
| 🖧 Server certificate | Contains server public key and server identity information | API Server certificate file (apiserver.crt) either generated manually through root certificate or by kubeadm 🛠️ |
| 🔐 Server private key | Used for digital signature during TLS authentication to prove the server’s identity | API Server private key file (apiserver.key) either manually generated or by kubeadm through the root certificate |
| 🖥️ Client certificate | Contains client public key and client identity information | .crt file signed by the same CA root certificate 📝 |
| 🔑 Client private key | Used for digital signature during TLS authentication to prove the client’s identity | .key file signed by the same CA root certificate 📝 |
| 🏛️ Server CA root certificate | CA root certificate that issues the server certificate | ca.crt file generated through tools like openssl, specified during server startup 🚀 |
| 🌍 Client CA root certificate | CA root certificate that issues the client certificate | ca.crt file generated using tools like openssl, specified when the client starts (commonly shared with the server) 🔄 |
You can also know your identity without using a username and password, or using a Token. I can apply for a certificate.
Bring the certificate to the API Server (student ID), and the API Server will know your identity.
Kubernetes itself is a CA, API Server itself is a CA
Kubernetes API Server certificates are placed under /etc/kubernetes/pki
❯ ls /etc/kubernetes/pki
apiserver.crt apiserver.key ca.crt front-proxy-ca.crt front-proxy-client.key
apiserver-etcd-client.crt apiserver-kubelet-client.crt ca.key front-proxy-ca.key sa.key
apiserver-etcd-client.key apiserver-kubelet-client.key etcd front-proxy-client.crt sa.pub
Use ca in k8s to issue a certificate for the myuser user, add permissions to the user through rbac, and configure it in kubeconfig.
Create a private key and csr file:
openssl genrsa -out myuser.key 2048
openssl req -new -key myuser.key -out myuser.csr
openssl req -new -x509 -days 10000 -key .key -out <CA_public>.crt
base64 below
cat myuser.csr | base64 | tr -d "\n"
Then use the value after base64 to create a csr object in k8s, indicating that we need to issue a certificate
cat <<EOF | kubectl apply -f -
apiVersion: certificates.k8s.io/v1
kind: CertificateSigningRequest
metadata:
   name: myuser
spec:
   request: LS0tLS1CRUdJTiBDRVJUSUZJQ0FURSBSRVFVRVNULS0tLS0KTUlJREJ6Q0NBZThDQVFBd2dZNHhDekFKQmdOVkJBWVRBa05PTVJFd0R3WURWUVFJREFoVGFHRnVaMGhoYVRFUgpNQThHQTFVRUJ3d0lVMmhoYm1k SVlXa3hEekFOQmdOVkJBb01CbU51WTJGdGNERVBNQTBHQTFVRUN3d0dZMjVqCllXMXdNUTh3RFFZRFZRUUREQVpqYm1OaGJYQXhKakFrQmdrcWhraUc5dzBCQ1FFV0Z6TXlPVE14TnpJM05URnUKYzNNaloyMWhh V3d1WTI5dE1JSUJJakFOQmdrcWhraUc5dzBCQVFFRkFBT0NBUThBTUlJQkNnS0NBUUVBd1o0cgpRWE9rL3NSWW9OMUJKckRnTE01cHB0aGdlczJLOVE1VFJyTGFtUkZwMThpclN5b0tjQi8rdzlGdWlPYWQ 5VmdBCmdveC9MSGFCdnNibnpiVmlHVHc4ODhSQXNXODVLengwc2tlYTRiVWtrWjhpVjRLb2xRNzRIWXp0N3l5a1JMVHIKQjYrMUk3MmZQUDhHMFYxQ1JEQkN6ZE5RNUE3ZFBRcVJHbHg5Wm9lUThFYU1j QnU5dXE1Ti96aG9PRVNKL1BhRwprdFVQNHR0YWI0NSs4MkNLVEZiZWZKbENSUmpucXRoSVRuME0xRmxOVlIvYW9HR3N3NndYTjhmaXZVRzk4aXNSCmJjUWpKMVRnSEltYTZYc3lKSWFnWDVScCtqY0ZmM zdOcjljdG1GUTZBbkNUUUVmVlVLdGgybnFxK2lBUERBQWQKNUdvcEVlaUt4N0tpSjNsU253SURBUUFCb0RNd0ZRWUpLb1pJaHZjTkFRa0hNUWdNQmpFeU16UTFOakFhQmdrcQpoa2lHOXcwQkNRSXh Europe bHRUakQKK0J1TDU1NEN1Y1pTYjN2ellMR0MwdXVqTlBBY2lSVHkrMmNKNVdmMUtTdjFVZ0lpbzNWRjJ4K1FybVJ6Uk54MApsa0w5M1BmYlIxMVdwNktLWE5UOGRGejNsdmNXV3lmSlpMOC8vV3dRZl FJV2IyRG1wQXQ1a2Jnekw4NEFNYjg0CnVITkh2RGxBN1pYS0k5NzRMSGdZUlptWW9paHkzanBiSzgxcFYzdzFFSWx6UlhZbG5tWFVrWmExVElsbjllUlEKREtaV2xmOXJGb1dVM0dDQXN2MWxCYytGM mxjY1ZyYTNDaktuTnBUdmFIWG4vQkhUREZGT1JmSTNhNGMrYzl3SgpLb3hpS3VDVW5TYkdEOGs9Ci0tLS0tRU5EIENFUlRJRklDQVRFIFJFUVVFU1QtLS0tLQo=#
   signerName: kubernetes.io/kube-apiserver-client
   expirationSeconds: 86400 # one day
   usages:
   -client auth
EOF
Then use the default administrator account to execute the command and agree to the request.
kubectl certificate approve myuser
Then after checking, you can find that the certificate has been issued.
kubectl get csr/myuser -o yaml
Use jsonpath to extract our certificate and write it into the myuser.crt file
kubectl get csr myuser -o jsonpath='{.status.certificate}'| base64 -d > myuser.crt
Use certificate and key to configure user in kubeconfig
kubectl config set-credentials myuser --client-key=myuser.key --client-certificate=myuser.crt --embed-certs=true
Add permissions for this user using role and rolebinding
kubectl create role developer --verb=create --verb=get --verb=list --verb=update --verb=delete --resource=pods
kubectl create rolebinding developer-binding-myuser --role=developer --user=myuser
Specify this user in the kubectl command to query:
# Specify the user myuser to access apiserver
kubectl get po --user myuser
**static token authentication method is the simplest authentication method in apiserver. **
–token-auth-file=SOMEFILE when starting the API Server.csv format, each line includes at least three columns token, username, user idFirst prepare a static-token file, the complete content is as follows:
**The file is in csv format. Each row includes at least three columns of
token, username, user id, and the last column is an optional group field. **
Create a new directory to store the file:
❯ cat static-token
cncamp-token,cncamp,1000,"group1,group2,group3"

❯ mkdir -p /etc/kubernetes/auth
❯ cp static-token /etc/kubernetes/auth
Modify /etc/kubernetes/manifests/kube-apiserver.yaml file, add startup parameters.
Make a backup: configure –token-auth-file=SOMEFILE when starting the API Server
❯ cp /etc/kubernetes/manifests/kube-apiserver.yaml ~/kube-apiserver.yaml
--token-auth-file=/etc/kubernetes/auth/static-token parameter,
apiserver is run in a container, you need to add mount to hostpath and mount the directory where static token is stored into the container.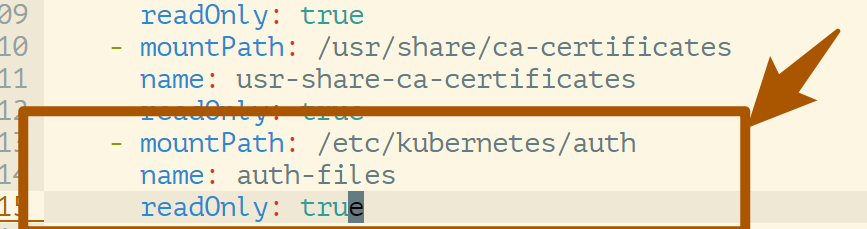
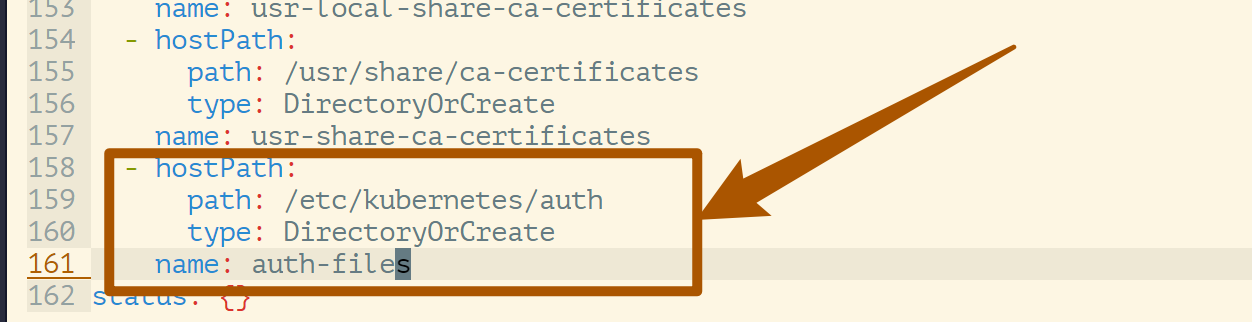
After the modification is completed, kubelet will automatically restart the apiserver pod.
Then we can use static token to access apiserver:
❯ curl https://192.168.137.133:6443/api/v1/namespaces/default -H "Authorization: Bearer cncamp-token" -k
{
   "kind": "Status",
   "apiVersion": "v1",
   "metadata": {

   },
   "status": "Failure",
   "message": "namespaces \"default\" is forbidden: User \"cncamp\" cannot get resource \"namespaces\" in API group \"\" in the namespace \"default\"",
   "reason": "Forbidden",
   "details": {
     "name": "default",
     "kind": "namespaces"
   },
   "code": 403
}#
At this point, the API Server knows that the current user is:
cncamp
Of course, now the access will raise 403, because the permissions (Authorization) have not been configured for the user, but it can be explained that the apiserver can already recognize us at this time.
**Now it is a multi-user cluster. We are creating multi-users through static tokens, and isolation will occur at this time. **
For example, five people, each uses his own Token.
When a Request from User is authenticated, the Request must be authorized. A Request must contain the following content:
As shown in the following example, user bob is only allowed to read pod resources in the namespace projectCaribou:
{
     "apiVersion": "abac.authorization.kubernetes.io/v1beta1",
     "kind": "Policy",
     "spec": {
         "user": "bob",
         "namespace": "projectCaribou",
         "resource": "pods",
         "readonly": true
     }
}
At this time, user bob initiates the following request, which can be authorized:
{
   "apiVersion": "authorization.k8s.io/v1beta1",
   "kind": "SubjectAccessReview",
   "spec": {
     "resourceAttributes": {
       "namespace": "projectCaribou",
       "verb": "get",
       "group": "unicorn.example.org",
       "resource": "pods"
     }
   }
}
The following operations will be rejected by the authorization mechanism:
create or update) to a resource in namespace projectCaribou;get) resources in other namespacesThe Authorization mechanism of k8s requires users to use common REST attributes to interact with the control system, because the control system may need to interact with other APIs. The Authorization mechanism of k8s currently supports multiple authorization models, such as:
* Node Mode, v1.7+ support, cooperates with NodeRestriction access control to restrict kubelet to only access node, endpoint, pod, service, secret, configmap, PV and PVC and other related resources.
* ABAC Mode,
*RBAC Mode,
* Webhook Mode,
*AlwaysDeny is only for testing,
* AlwaysAllow allows all requests (will override other modes)
Users can specify multiple models when starting kube-apiserver. If multiple models are set up, k8s will check them in order.
Authenticator mechanism, as long as one of the models allows the Request, it will be PASS.This also shows that a Request’s permissions are denied by default.
Instructions
--authorization-mode=RBAC
K8s authorization mechanism only handles the following request attributes:
We add a user: (~/.kube/config)

Log in:
❯ k get ns --user cncamp
Error from server (Forbidden): namespaces is forbidden: User "cncamp" cannot list resource "namespaces" in API group "" at the cluster scope
ServiceAccount is a system account that comes with Kubernetes.
❯ k get sa
NAME SECRETS AGE
default 1 136m
When Kubernetes creates a namespace, there is a namespace controller after the namespace is created. It will automatically create a
default serviceaccountobject under the namespace.
Look at the details:
❯ k get sa default -oyaml
apiVersion: v1
kind: ServiceAccount
metadata:
   creationTimestamp: "2023-03-05T07:02:48Z"
   name:default
   namespace:default
   resourceVersion: "394"
   uid: e0d24106-9bf0-49af-9f06-ac0020307950
secrets:
- name: default-token-vkbzr
**See that there is a secrets field in this ServiceAccount yaml file, OMG, this corresponds to it, let’s continue to look at the details. **
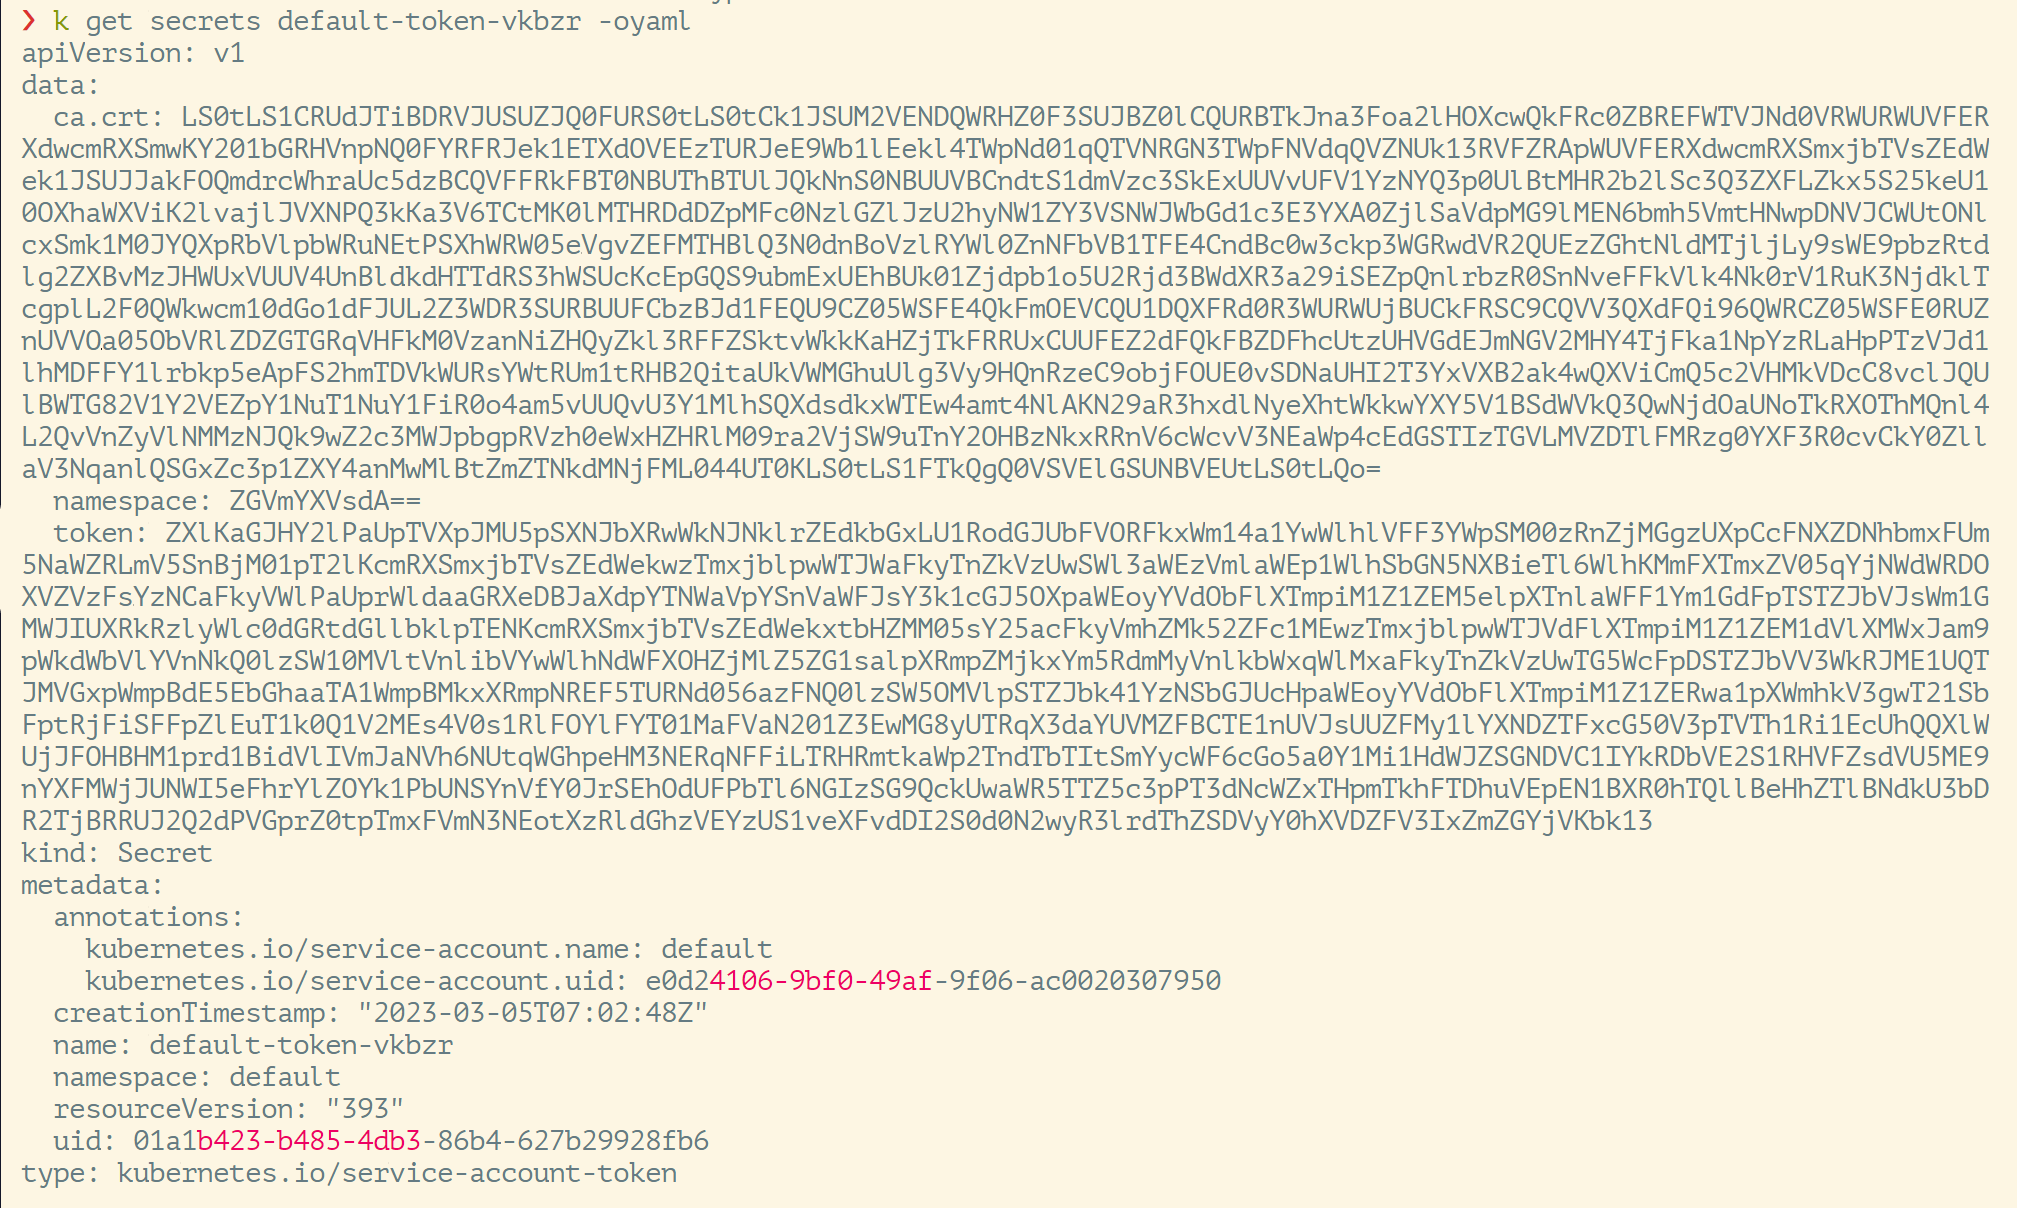
There is ca.crt and namespace, so ServiceAccount is automatically generated by Kubernetes and will be automatically mounted to /run/secrets/kubernetes.io/serviceaccount of any container
View details of a container:
❯ k get pod coredns-697ddfb55c-87qws -oyaml -n kube-system
...
- mountPath: /var/run/secrets/kubernetes.io/serviceaccount
...
  serviceAccountName: coredns
...
Kubernetes will mount the service corresponding to coredns to the directory /var/run/secrets/kubernetes.io/serviceaccount.
What’s the meaning:
Once we enter the Pod, you can simply get the Token from any program in the Pod, and then access the API Server. This is used to control permissions in Kubernetes components.
When we develop Kubernetes components, we need to monitor the API Server and modify the API Server data, so permissions are required.
**There is also the management of user permissions, establishing your own service account, and taking away your own Token to uniquely identify yourself. **
The difference between user account and service account:
When you implement Kubernetes, you need users within the enterprise to log in to the Kubernetes cluster. This information is not in Kubernetes, but on the external platform. In this way, a permission system can be developed, but it is an external system, so Kubernetes needs to ask externally. .
The service account actively or passively creates a system account and only exists inside Kubernetes, not outside.
If it is in Kubernetes, except
service account, everything else isuser account
Webhook’s authentication service integration has a wide range. Basically, when implementing a Kubernetes project, you must consider whether to integrate Kubernetes with the company’s authentication platform.
Kubernetes itself is a framework. Kubernetes provides webhook-based authentication service integration functions that can be integrated with various authentication services, such as OAuth, LDAP, Active Directory, etc.
An authentication service needs to be built in accordance with the Kubernetes specification to authenticate tokenreview request. The authentication service needs to meet the following Kubernetes specifications.
The built-in logic provided by API Server may not be enough. We need an external http service written by ourselves, so this is webhook.
URL: https://authn.example.com/authenticate
Must end with
authenticate
Method: POST
Must be POST method
Input:
Bring the token
{ "apiVersion": "authentication.k8s.io/v1beta1", "kind": "TokenReview",
"spec": { "token": "(BEARERTOKEN)" } }
Output:
Parse the token and return the verification result and the data of the corresponding user
{
"apiVersion": "authentication.k8s.io/v1beta1",
     "kind": "TokenReview",
     "status": {
     "authenticated": true,
     "user": {
         "username": "janedoe@example.com",
         "uid": "42",
         "groups": [
             "developers",
             "qa"
             ]
         }
     }
}
Forward the authentication request to the authentication server:
// check user
ts := oauth2.StaticTokenSource(
&oauth2.Token{AccessToken: tr.Spec.Token},
)
// Incoming request to GitHub
tc := oauth2.NewClient(context.Background(), ts)
client := github.NewClient(tc)
user, _, err := client.Users.Get(context.Background(), "")
if err != nil {
log.Println("[Error]", err.Error())
w.WriteHeader(http.StatusUnauthorized)
json.NewEncoder(w).Encode(map[string]interface{}{
"apiVersion": "authentication.k8s.io/v1beta1",
"kind": "TokenReview",
"status": authentication.TokenReviewStatus{
Authenticated: false,
},
})
return
}
How does apiserver know which webhook to request for verification?
Question: Will apiserver send webhook when encountering unrecognized users?
This requires us to configure
Can be any authentication system:
Modify the apiserver settings and enable the authentication service. The apiserver ensures that the token information in all received requests is sent to the authentication service for verification.
--authentication-token-webhook-config-file, which describes how to access the authentication service--authentication-token-webhook-cache-ttl, default 2 minutesThe configuration file needs to be mounted into Pod
The server address in the configuration file needs to point to authService
The configuration file format is as follows:
{
   "kind": "Config",
   "apiVersion": "v1",
   "preferences": {},
   "clusters": [
     {
       "name": "github-authn",
       "cluster": {
         "server": "http://192.168.34.2:3000/authenticate"
       }
     }
   ],
   "users": [
     {
       "name": "authn-apiserver",
       "user": {
         "token": "secret"
       }
     }
   ],
   "contexts": [
     {
       "name": "webhook",
       "context": {
         "cluster": "github-authn",
         "user": "authn-apiserver"
       }
     }
   ],
   "current-context": "webhook"
}
Keystone-based authentication plugin causes Keystone failure and cannot be recovered
Most controllers have exponential back off, and the retry interval is getting slower and slower, but gophercloud will always retry for expired tokens.
A large number of requests are backlogged in Keystone, causing the service to be unable to be restored.
As time goes by, more and more tokens in the apiserver expire and need to access Keystone for authentication. Therefore, the pressure on Keystone is increasing. Then Keystone cannot start normally under a lot of pressure. When it gets up, it is killed by a large number of requests, thus forming Vicious cycle.
Kubernetes becomes the last straw for enterprise authentication services
solution?
Authorization is mainly used to control access to cluster resources. By checking the relevant attribute values contained in the request and comparing it with the corresponding access policy, the API request must meet certain policies before it can be processed. Similar to authentication, Kubernetes also supports multiple authorization mechanisms and supports opening multiple authorization plug-ins at the same time (as long as one of them passes the verification). If the authorization is successful, the user’s request will be sent to the admission control module for further request verification; for requests that fail to authorize, HTTP 403 will be returned.
Kubernetes authorization only handles the following request attributes:
**Currently, Kubernetes supports the following authorization plugins: **
####RBAC vs ABAC
ABAC (Attribute Based Access Control) is originally a good concept, but its implementation in Kubernetes is difficult to manage and understand, and it requires SSH and file system permissions on the node where the Master is located. To make the authorization changes successfully take effect, it needs to be re-authorized. Start API Server.
ABAC is similar to the static-token in my authentication. It configures the data into a static file, and then specifies the file through the apiserver parameters. If there are updates, it is troublesome to restart the apiserver.
The RBAC authorization policy can be configured directly using kubectl or the Kubernetes API. RBAC can be authorized to users, giving them the right to perform authorization management, so that they can directly perform authorization management without touching the node. RBAC is mapped to API resources and operations in Kubernetes.
The general design idea of the authorization system is the same
Role: role, including resources and verbs (actions)
Subject is a function word, subject: including User (external user) and ServiceAccount (system user)
Role and Subject are related through RoleBindings. Finally, what RBAC needs to define is who (who) can do which operations (how) on which objects (what)
ClusterRole means that this role is defined in the global scope, and Role means that this role is related to the namespace.
The same is true for ClusterRoleBindings and RoleBindings. That is to say, if a user is bound through ClusterRoleBindings, then this user will have permissions on all Namespaces by default. RoleBindings will be restricted to namespace
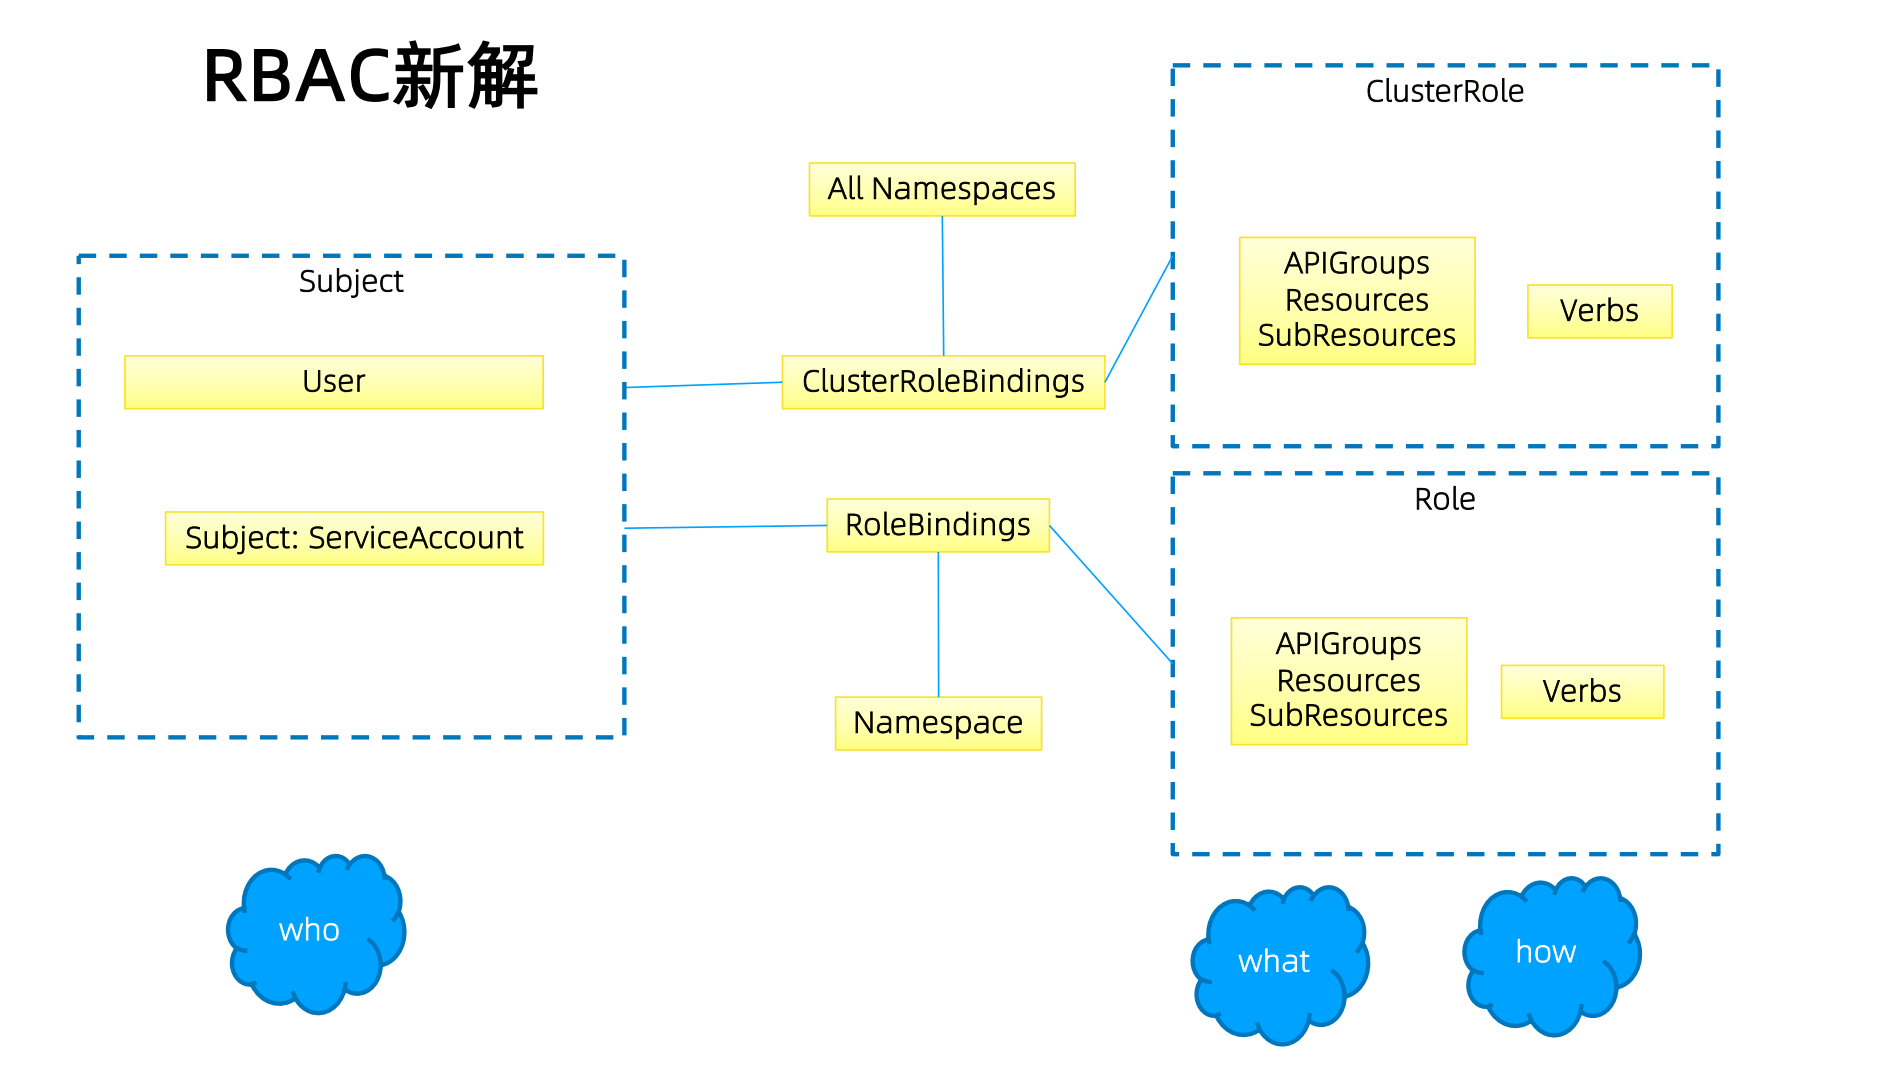
The final effect is: who (who) can do which operations (how) on which objects (what)
A role is a collection of permissions. For example, a role can include permissions to read Pods and permissions to list Pods.
Role can only be used to authenticate resources in a specific namespace. It cannot be used to authenticate resources in multiple namespaces and cluster-level resources or non-
# Role example
kind: Role
apiVersion: rbac.authorization.k8s.io/v1
metadata:
   namespace:default
   name: pod-reader
rules:
- apiGroups: [""] # "" indicates the core API group
   resources: ["pods"]
   verbs: ["get", "watch", "list"]
📜 Explanation of the above:
If your Groups is empty, it means it is a core API group object, and this permission is limited to the default namespace.
After binding, there is only default namespace read and write permissions
After creating the Role, you can bind it
RoleBinding maps the permissions of a role (Role or ClusterRole) to users or user groups, allowing these users to inherit the permissions of the role in the namespace.
# RoleBinding example (referring to Role)
# This role binding allows "jane" to read pods in the "default" namespace.
kind: RoleBinding
apiVersion: rbac.authorization.k8s.io/v1
metadata:
   name: read-pods
   namespace:default
subjects:
- kind: User
   name: jane
   apiGroup: rbac.authorization.k8s.io
roleRef:
   kind: Role
   name: pod-reader
   apiGroup: rbac.authorization.k8s.io
📜 Explanation of the above:
This is also the permission of knowledge under the default namespace.
If it is ClusterRoleBindings, then
namespace: defaultis not needed
Authorization is transferable~
Resource class APIs (such as /healthz) use ClusterRole.
Role has a namespace and can only be binded under this namespace.
ClusterRole has no namespace and can be binded in any namespace.
roleBinding can reference Role and ClusterRole, but the final permissions will be limited to the namespace.
clusterRoleBinding can only reference ClusterRole, but the final permission is in the entire cluster.
Corresponds to multi-tenant applications~
Role Binding is to assign the permissions defined in the role to one or a group of users.
It contains a list of several principals (users, groups, or service accounts) and references to the roles obtained by these principals.
The concept of group:
apiVersion: rbac.authorization.k8s.io/v1
kind: ClusterRoleBinding
metadata:
   name: read-secrets-global
subjects:
   - kind: Group
     name: manager # 'name' is case sensitive
     apiGroup: rbac.authorization.k8s.io
roleRef:
kind: ClusterRole
name: secret-reader
apiGroup: rbac.authorization.k8s.io
User
SystemAccount
When the cluster is created, create a custom role, such as namespace-creator
Namespace-creator role defines user-operable objects and corresponding read and write operations.
Create a custom namespace admission webhook
Create RBAC controller
ClusterRole is non-namespace bound and takes effect for the entire cluster.
Usually you need to create an administrator role and bind it to the development operations team members
CustomResourceDefinition is a global resource. After ordinary users create a CustomResourceDefinition, the administrator needs to grant corresponding permissions before they can actually operate the object.
For all role management, it is recommended to create a spec and drive it with source code
Permissions are transferable. User A can extract a certain operation on an object into a permission and assign it to user B.
Prevent a large number of roles and role-binding objects, because a large number of objects will lead to low authentication efficiency and increase the burden on the apiserver.
ServiceAccount also needs authorization, otherwise your component may not be able to operate a certain object.
Tips: SSH to the master node and access the apiserver through the insecure port to bypass authentication. When management operations need to be performed but there is no
Can be used if you have permission (not recommended)
Case 1:
Case 2:
此内容由惯性聚合(RSS阅读器)自动聚合整理,仅供阅读参考。 原文来自 — 版权归原作者所有。