部署方式
采用 Docker Compose 部署,使用 Postgres 作为数据库,使用 Nginx 作为反向代理。
Docker Compose 配置文件
1
2
3
4
5
6
7
8
9
10
11
12
13
14
15
16
17
18
19
20
21
22
23
24
25
26
27
28
29
30
31
32
| version: '3'services:
keycloak:
image: quay.io/keycloak/keycloak:latest
environment:
KC_DB: postgres
KC_DB_URL: jdbc:postgresql://db:5432/keycloak
KC_DB_USERNAME: keycloak
KC_DB_PASSWORD: keycloak
KC_HTTP_ENABLED: true # 开启 HTTP
KC_HOSTNAME_STRICT: false
KC_HOSTNAME_STRICT_HTTPS: false
KC_HTTP_RELATIVE_PATH: '/' # Keycloak 应用的相对路径
KC_HTTP_PORT: 8080 # HTTP 端口
KEYCLOAK_ADMIN: MY_USERNAME # 管理员账号,仅初始化时使用
KEYCLOAK_ADMIN_PASSWORD: MY_PASSWORD # 管理员密码,仅初始化时使用
PROXY_ADDRESS_FORWARDING: true # 使用反向代理必须开启
KC_PROXY: edge # 反向代理模式,详见文档
entrypoint: /opt/keycloak/bin/kc.sh start # 第一次运行后可以加上 --optimized 参数,加快二次启动速度
ports:
- 127.0.0.1:18080:8080 # Keycloak 应用端口
restart: unless-stopped
db:
image: postgres:14
restart: unless-stopped
environment:
- POSTGRES_USER=keycloak
- POSTGRES_PASSWORD=keycloak
- POSTGRES_DB=keycloak
volumes:
- ./postgres-data:/var/lib/postgresql/data # 数据库数据保存位置
|
使用命令 docker compose up -d 启动服务。
Nginx 配置
我建议使用 DigitalOcean 的 Nginx 配置生产工具,示例配置如下:
示例配置
也可参考下述配置,此为 DigitalOcean 生成配置的简化版:
1
2
3
4
5
6
7
8
9
10
11
12
13
14
15
16
17
18
19
20
21
22
23
24
25
26
27
28
29
30
31
32
33
34
35
36
37
38
39
40
41
42
43
44
45
46
47
48
49
50
51
52
53
54
55
56
57
58
59
60
61
62
63
| server {
listen 443 ssl http2;
listen [::]:443 ssl http2;
server_name auth.example.com; # SSL
ssl_certificate /etc/letsencrypt/live/auth.example.com/fullchain.pem;
ssl_certificate_key /etc/letsencrypt/live/auth.example.com/privkey.pem;
ssl_trusted_certificate /etc/letsencrypt/live/auth.example.com/chain.pem; # logging
access_log /var/log/nginx/access.log combined buffer=512k flush=1m;
error_log /var/log/nginx/error.log warn; # reverse proxy
location / {
proxy_set_header Host $host;
proxy_set_header X-Real-IP $remote_addr;
proxy_set_header X-Forwarded-Proto $scheme;
proxy_set_header X-Auth-Request-Redirect $request_uri;
proxy_buffer_size 128k;
proxy_buffers 4 256k;
proxy_busy_buffers_size 256k;
proxy_pass http://127.0.0.1:18080;
} location /auth/realms {
proxy_set_header Host $host;
proxy_set_header X-Real-IP $remote_addr;
proxy_set_header X-Forwarded-Proto $scheme;
proxy_set_header X-Auth-Request-Redirect $request_uri;
proxy_pass http://127.0.0.1:18080;
} location /auth/resources {
proxy_set_header Host $host;
proxy_set_header X-Real-IP $remote_addr;
proxy_set_header X-Forwarded-Proto $scheme;
proxy_set_header X-Auth-Request-Redirect $request_uri;
proxy_pass http://127.0.0.1:18080;
} location /auth/js {
proxy_set_header Host $host;
proxy_set_header X-Real-IP $remote_addr;
proxy_set_header X-Forwarded-Proto $scheme;
proxy_set_header X-Auth-Request-Redirect $request_uri;
proxy_pass http://127.0.0.1:18080;
}
} # subdomains redirect
server {
listen 443 ssl http2;
listen [::]:443 ssl http2;
server_name *.auth.example.com; # SSL
ssl_certificate /etc/letsencrypt/live/auth.example.com/fullchain.pem;
ssl_certificate_key /etc/letsencrypt/live/auth.example.com/privkey.pem;
ssl_trusted_certificate /etc/letsencrypt/live/auth.example.com/chain.pem;
return 301 https://auth.example.com$request_uri;
}
|
配置 Keycloak
创建 Realm
打开 Keycloak 地址,界面如下。
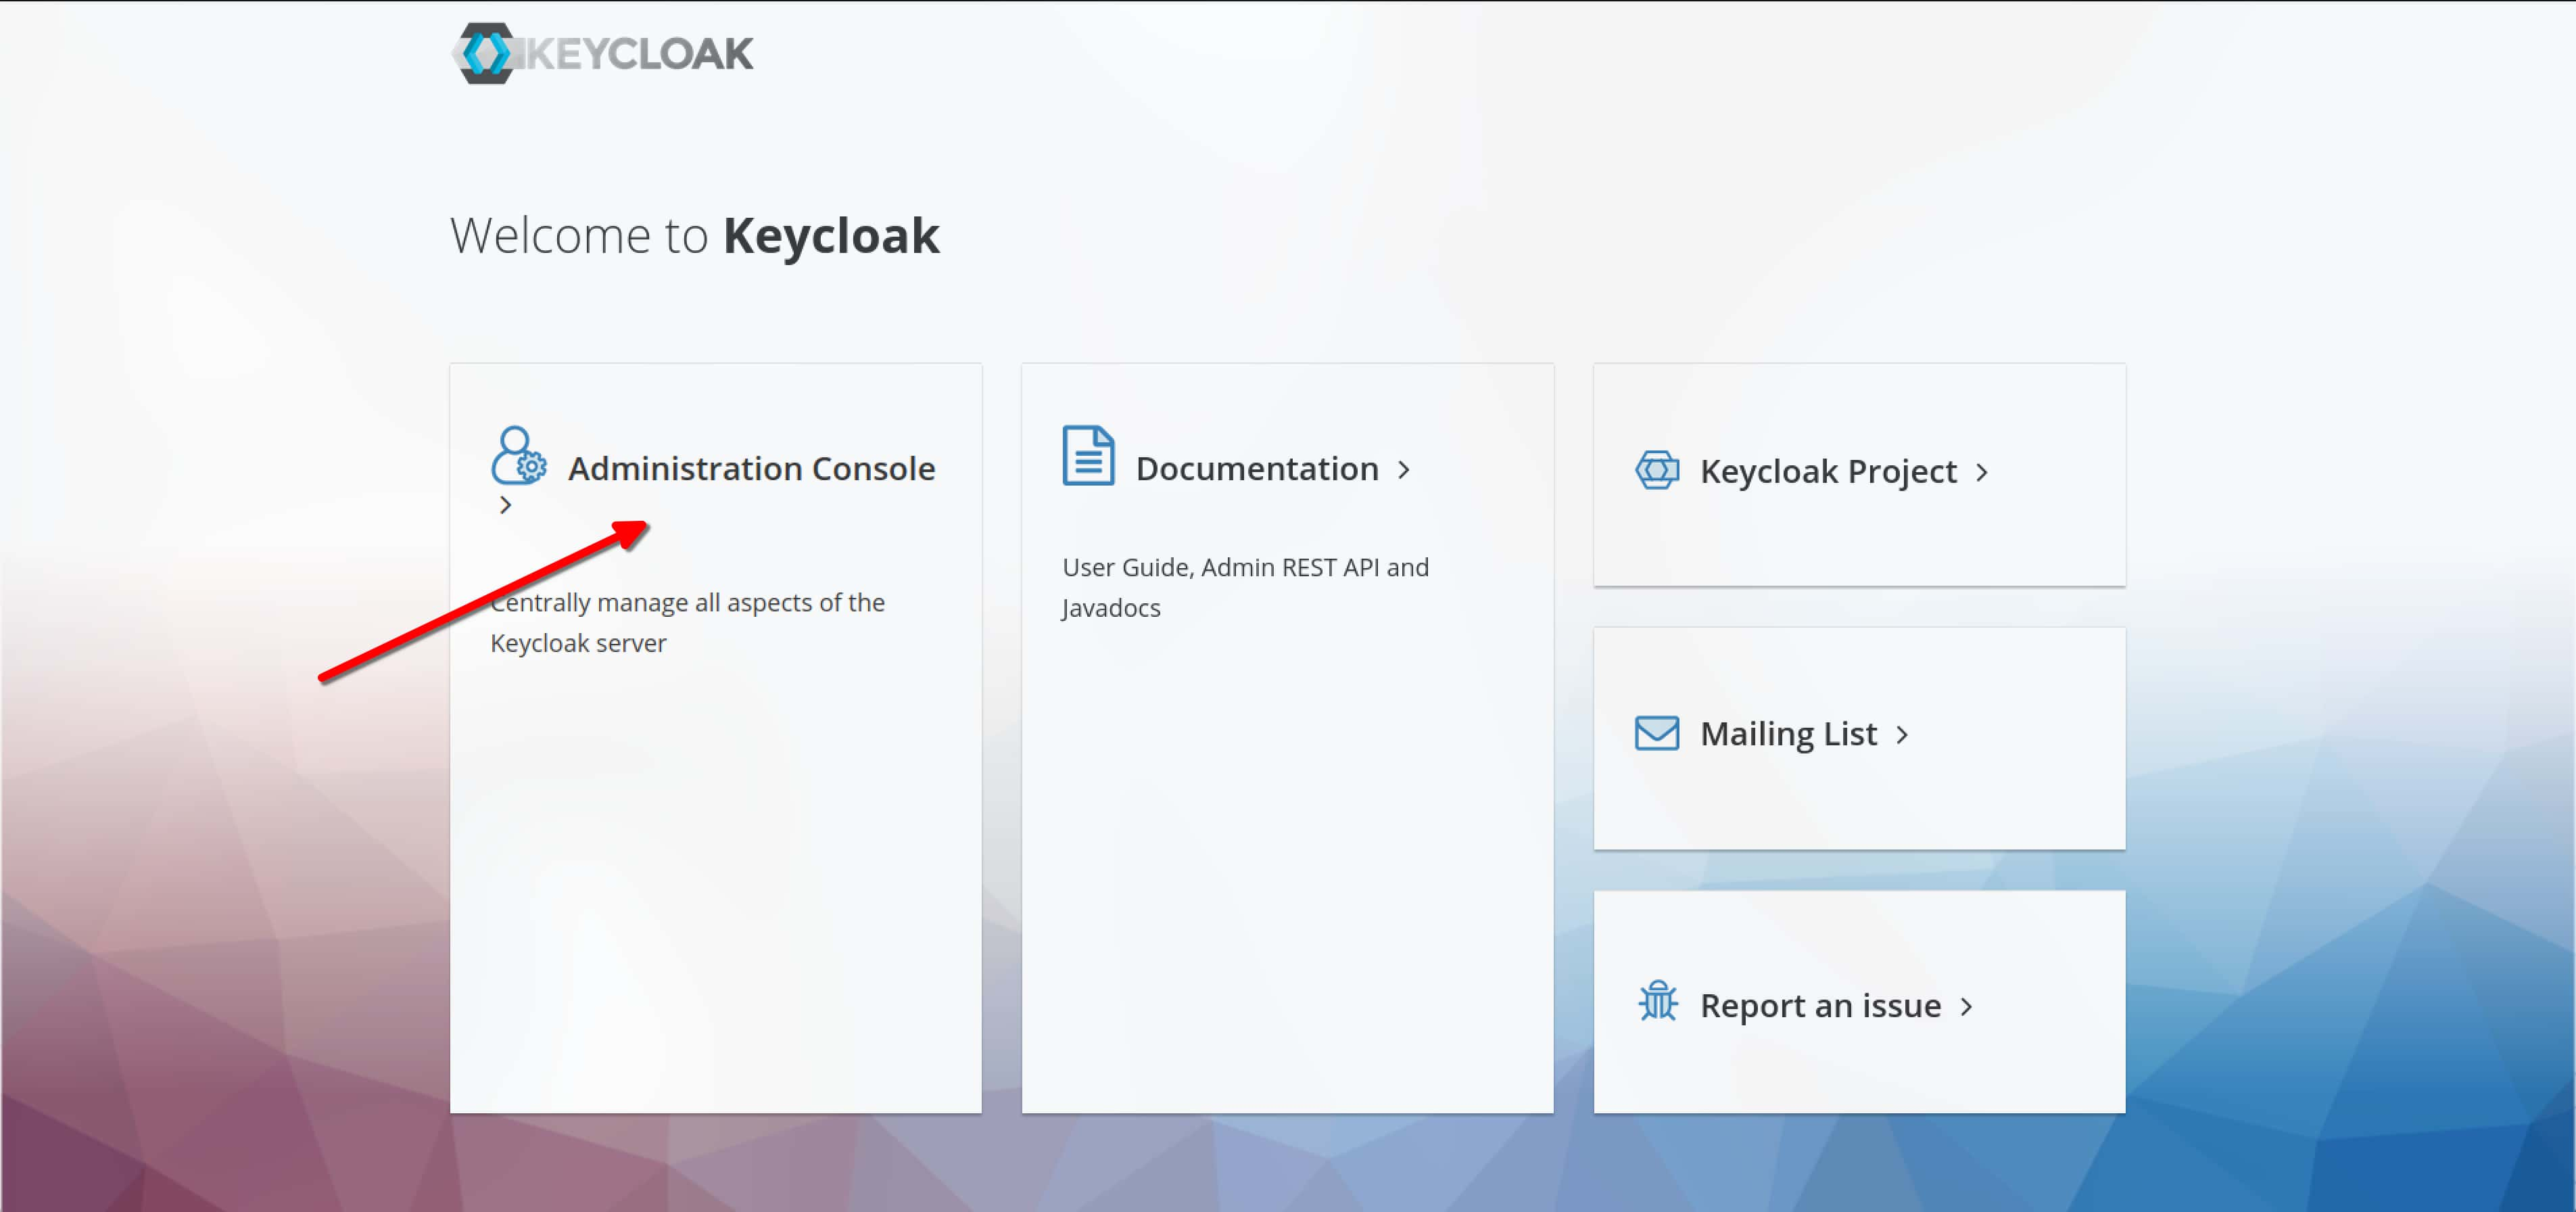
选择 Administration Console,进入管理界面。
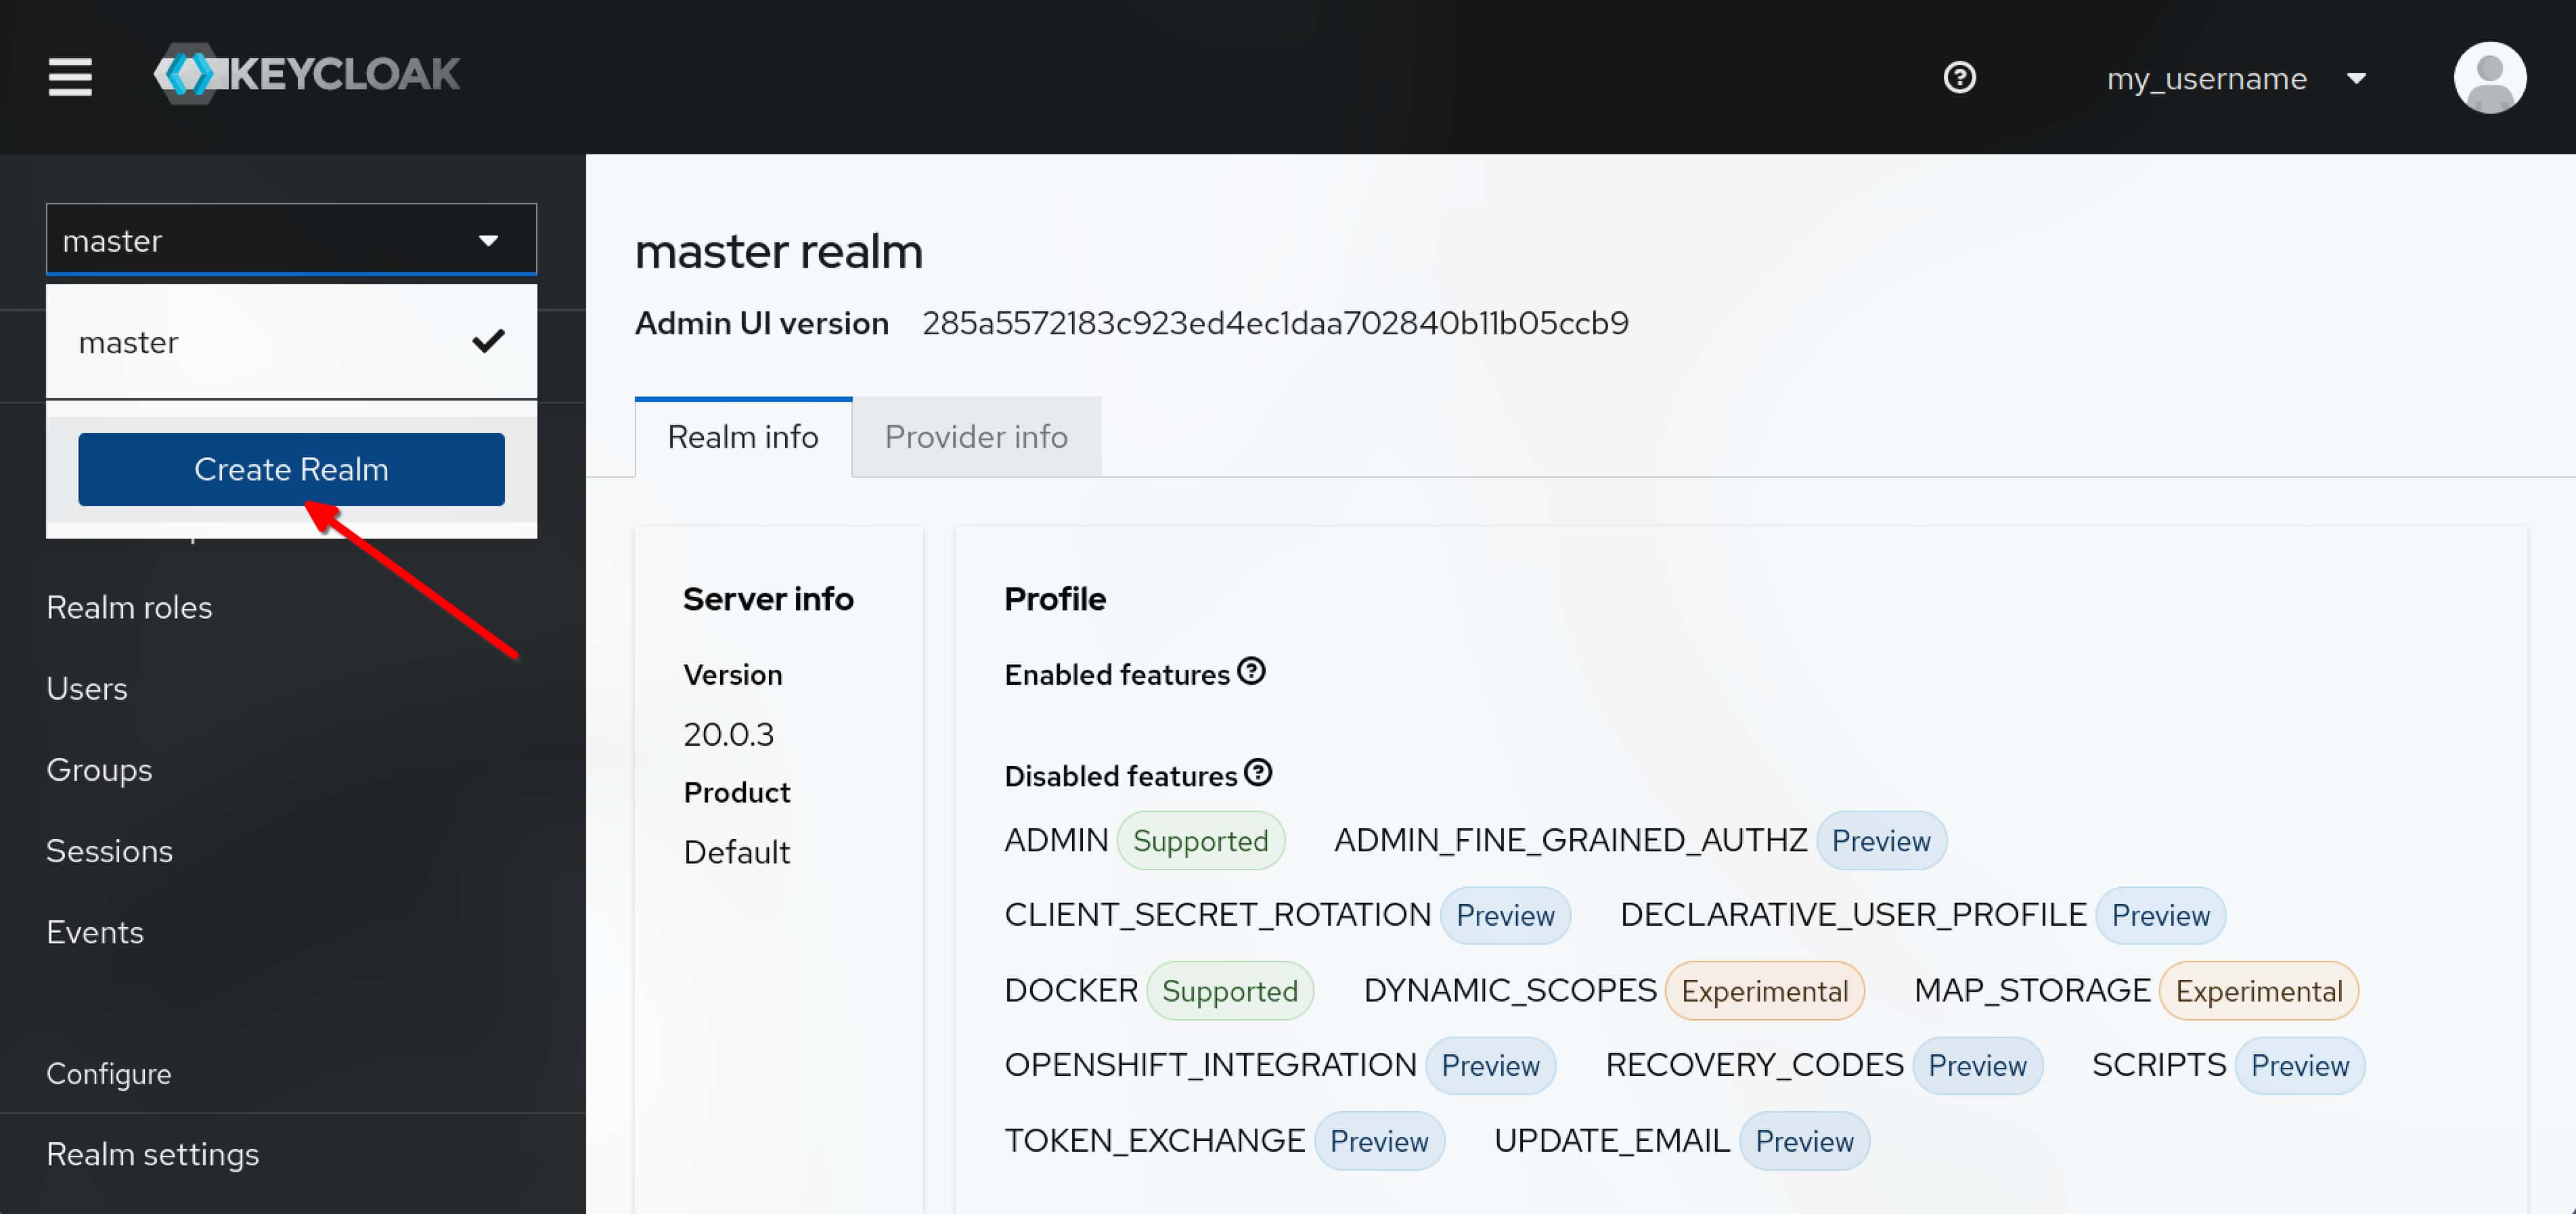
选择箭头指向的下拉菜单,选择 Add realm,创建一个新的 Realm。
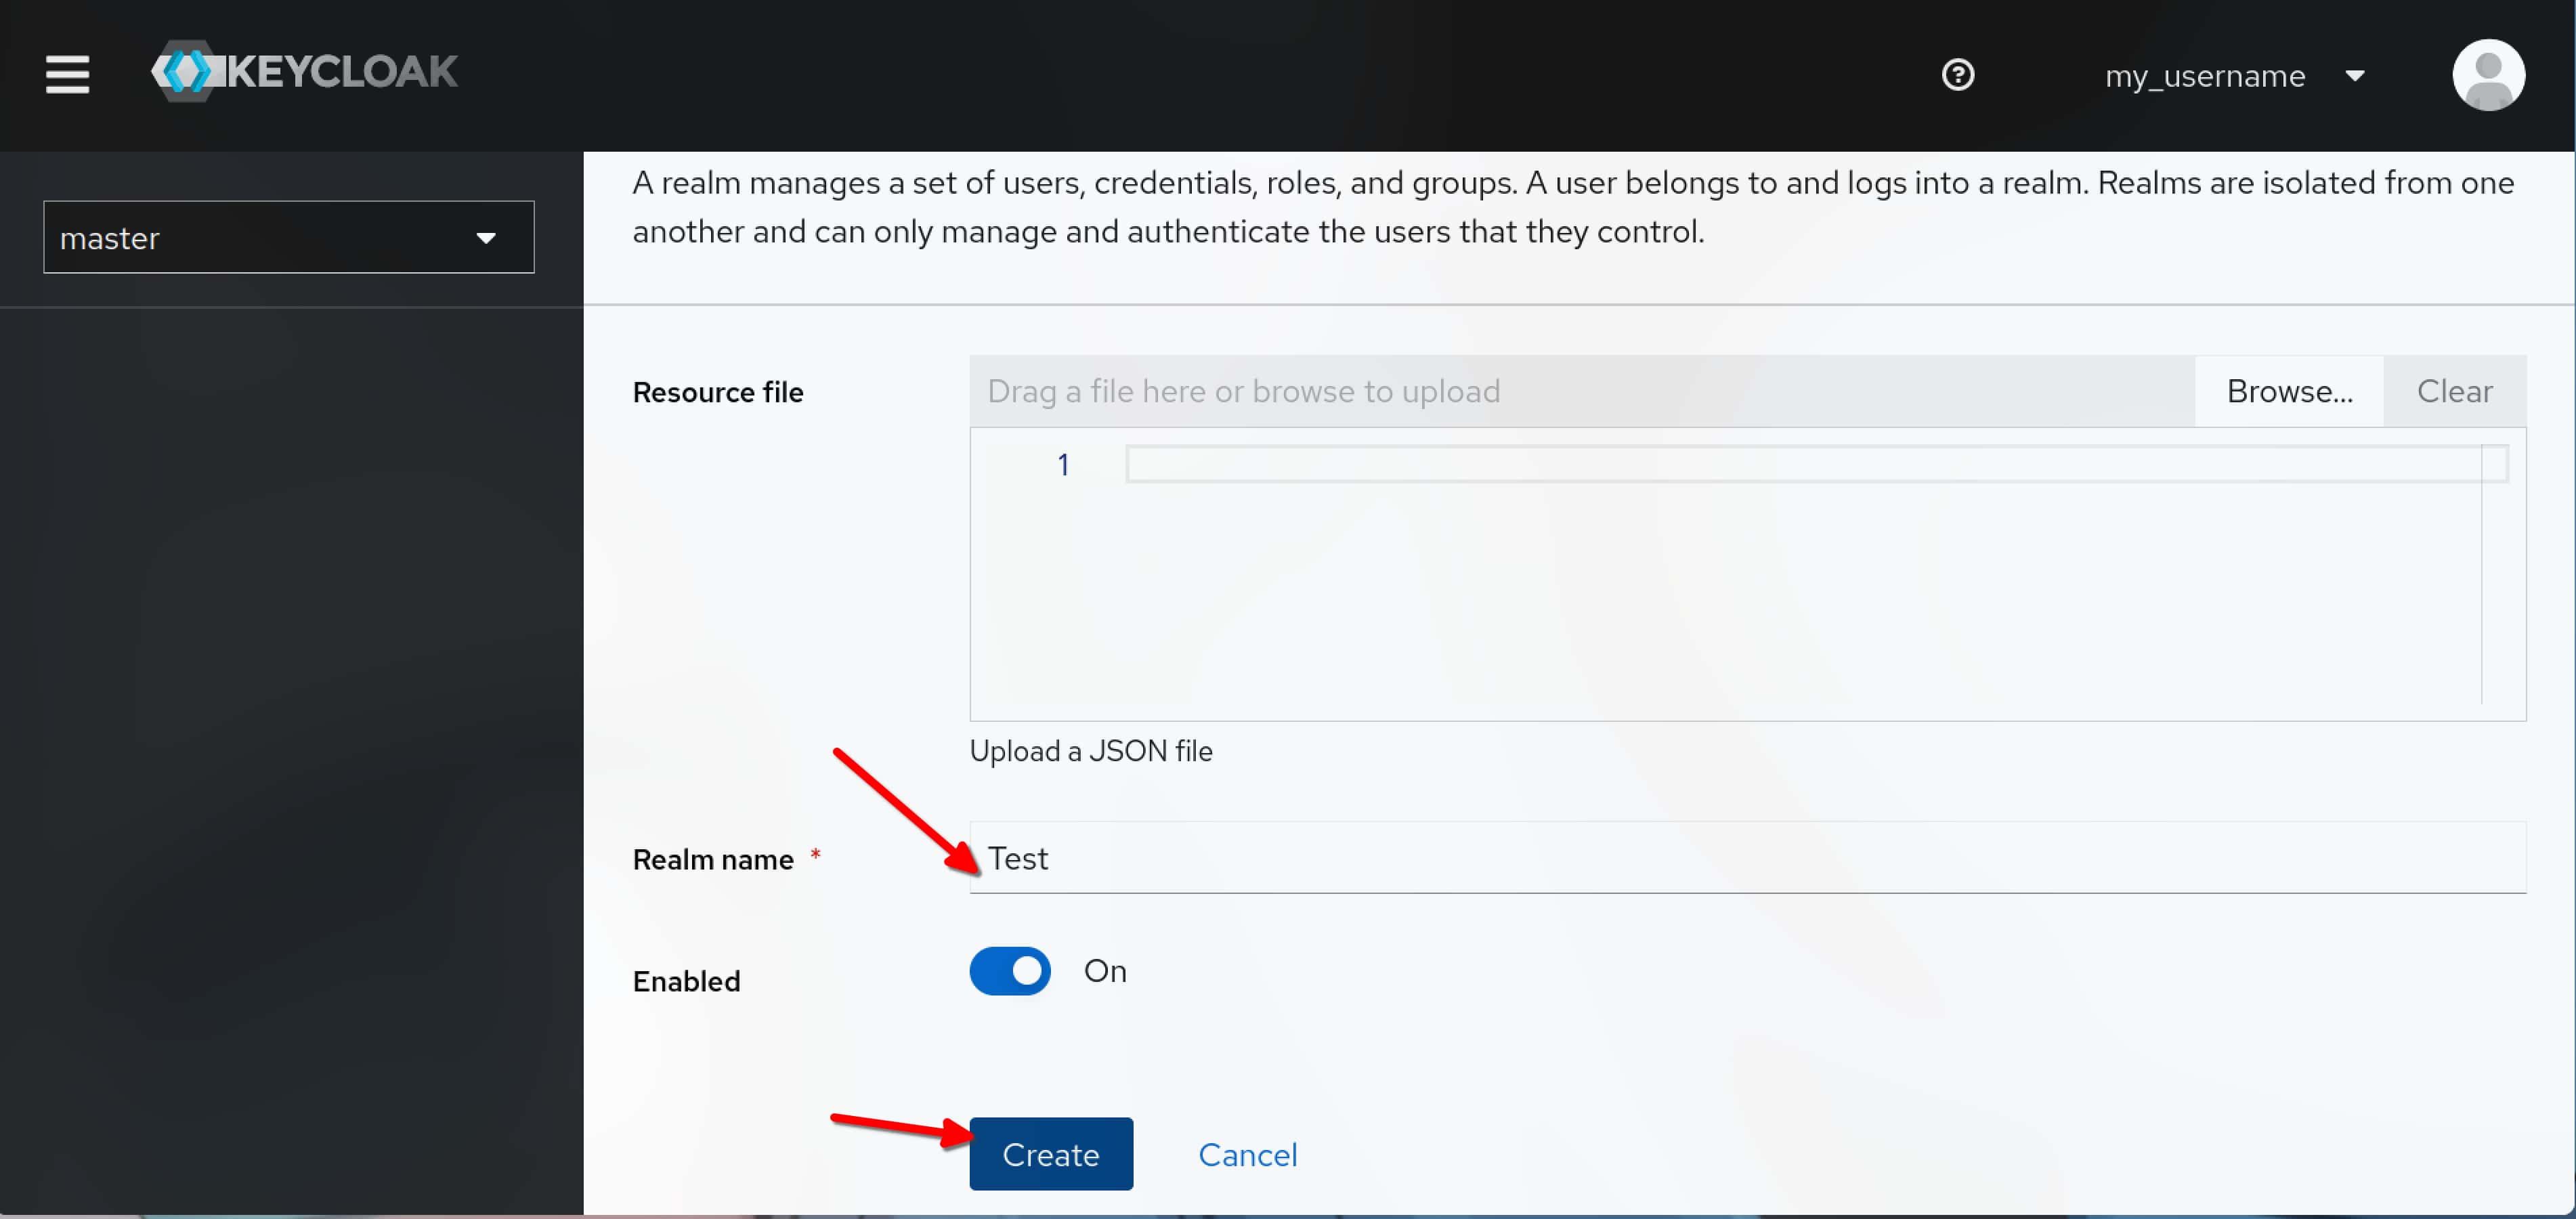
填写 Realm 名称,点击 Create。
创建 Client
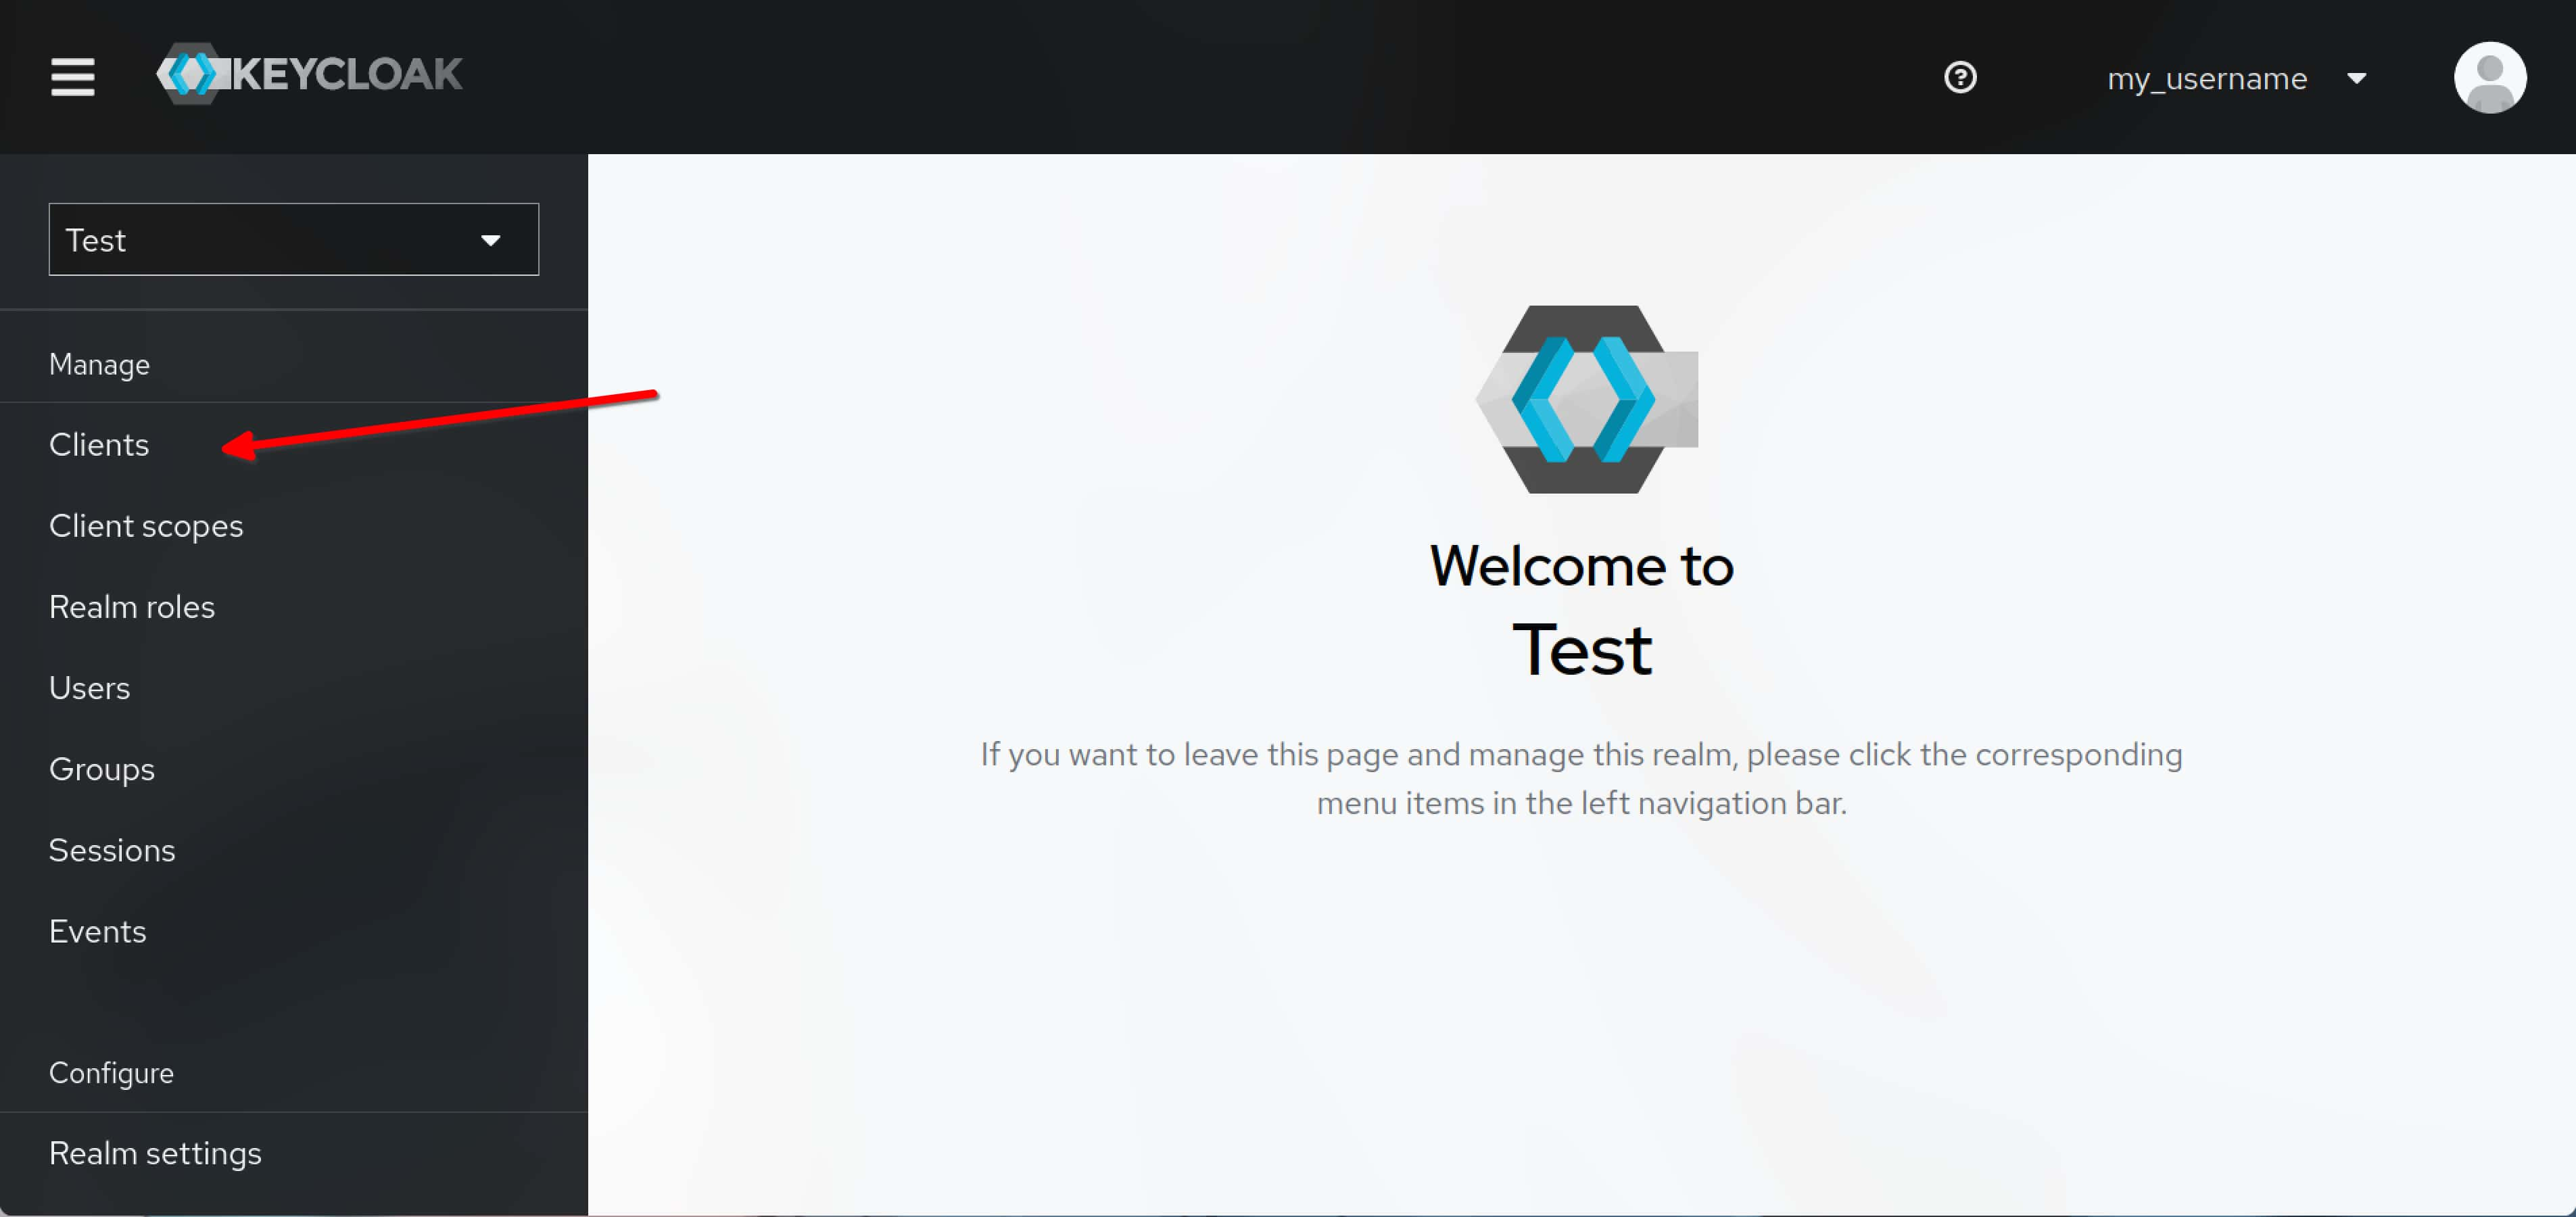
选择 Clients。
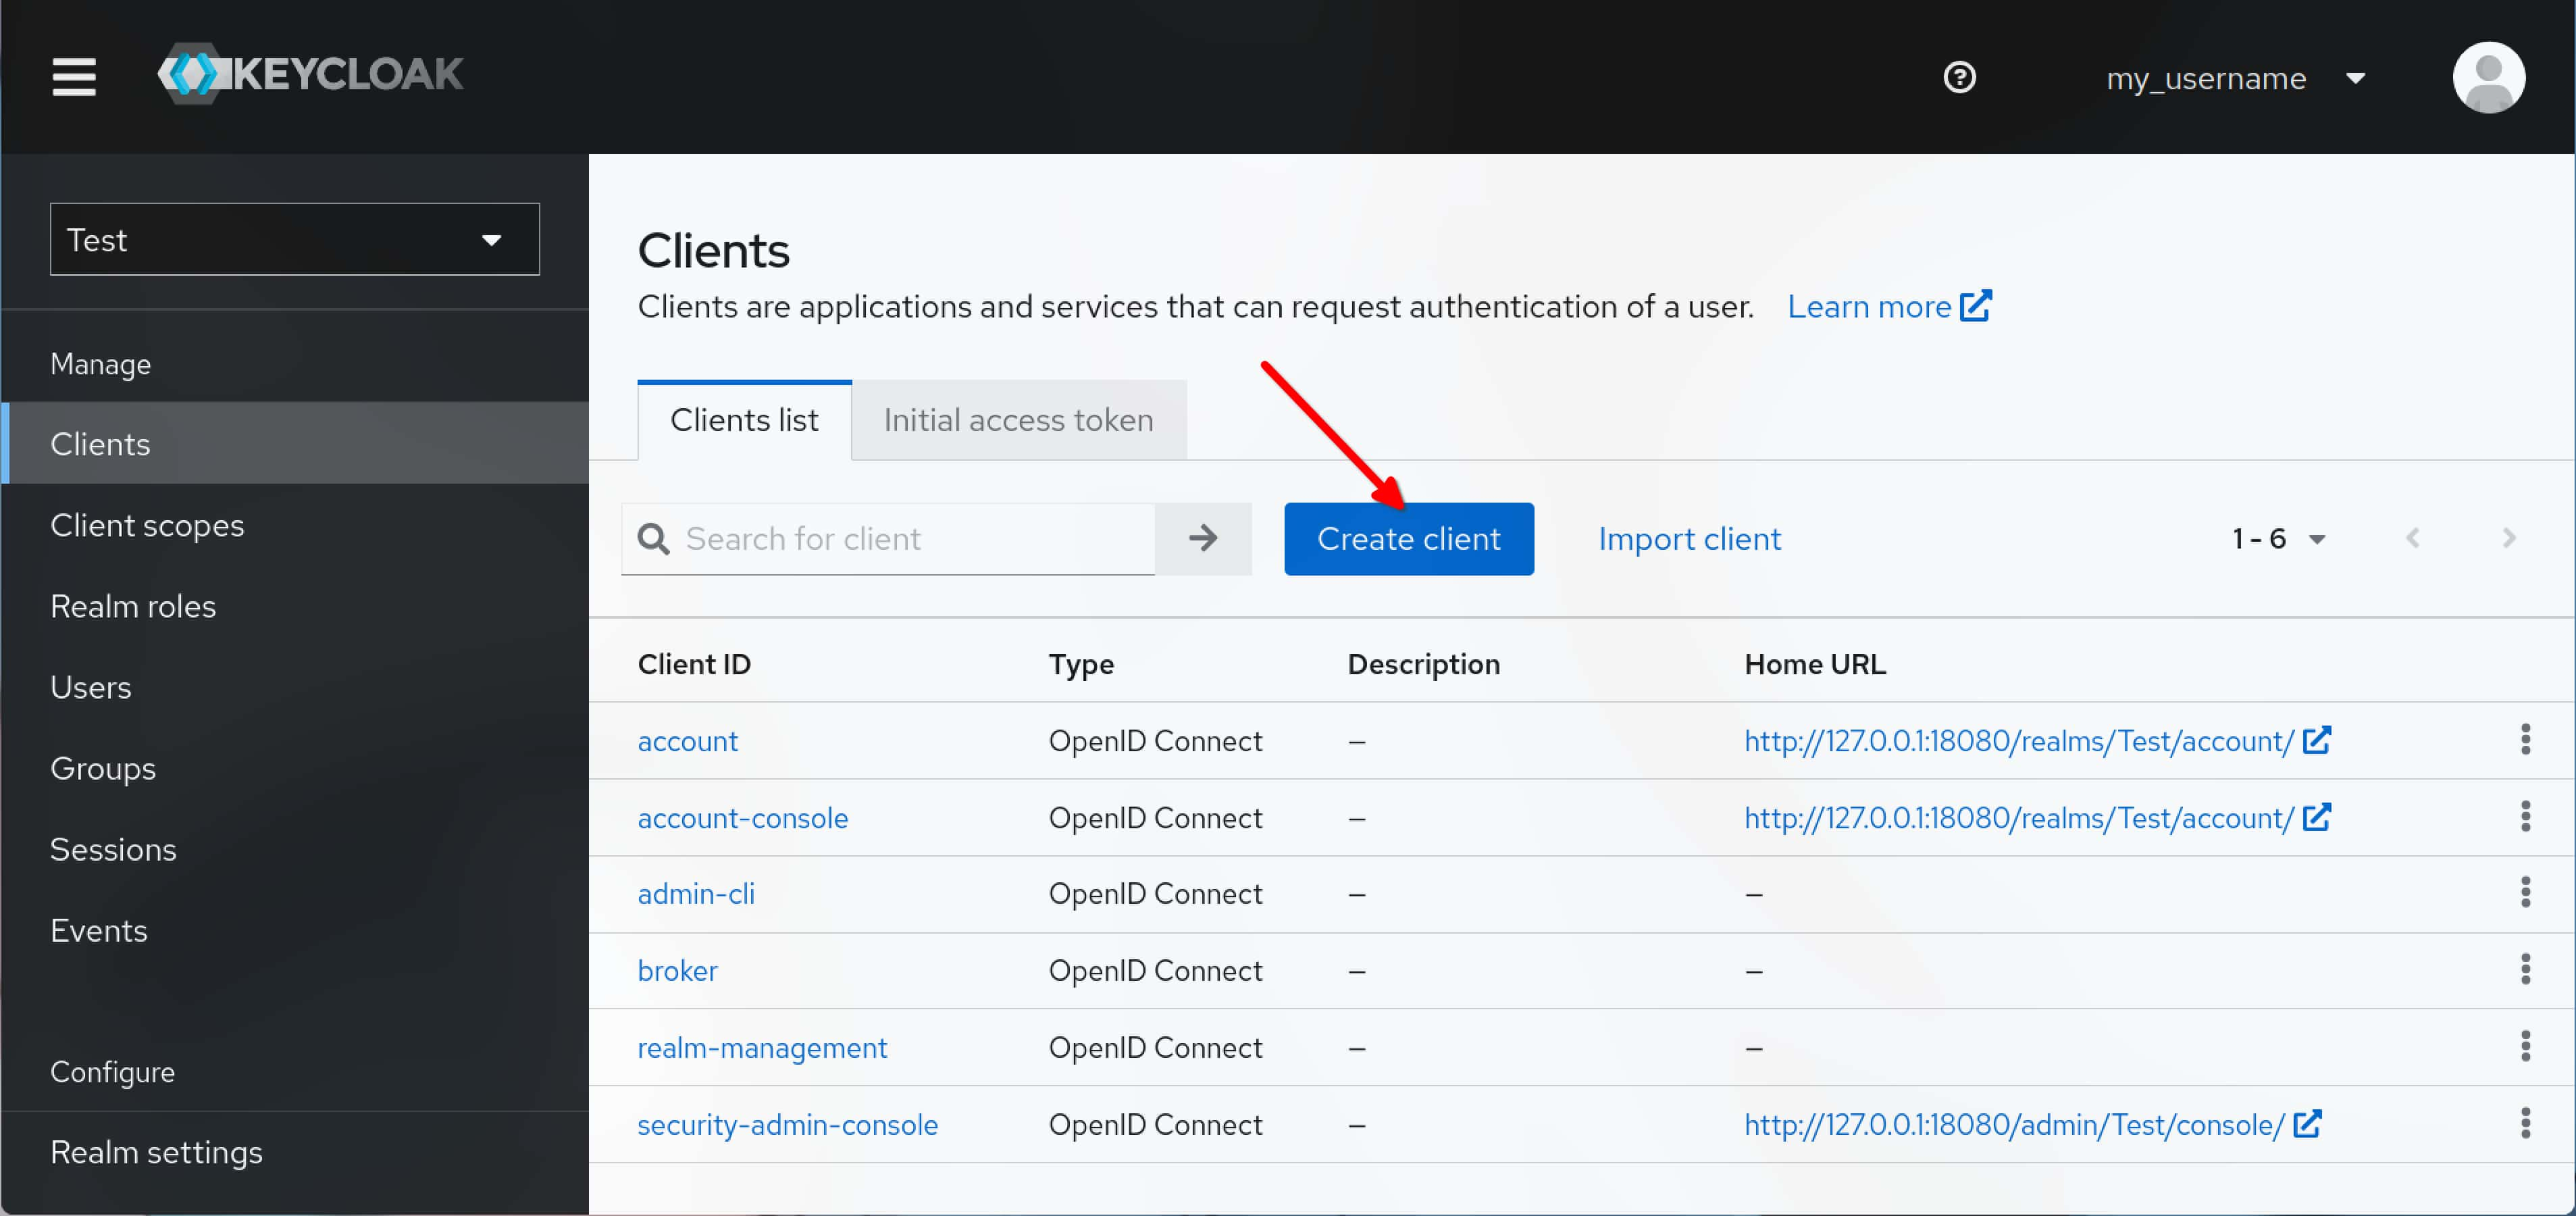
点击 Create client。
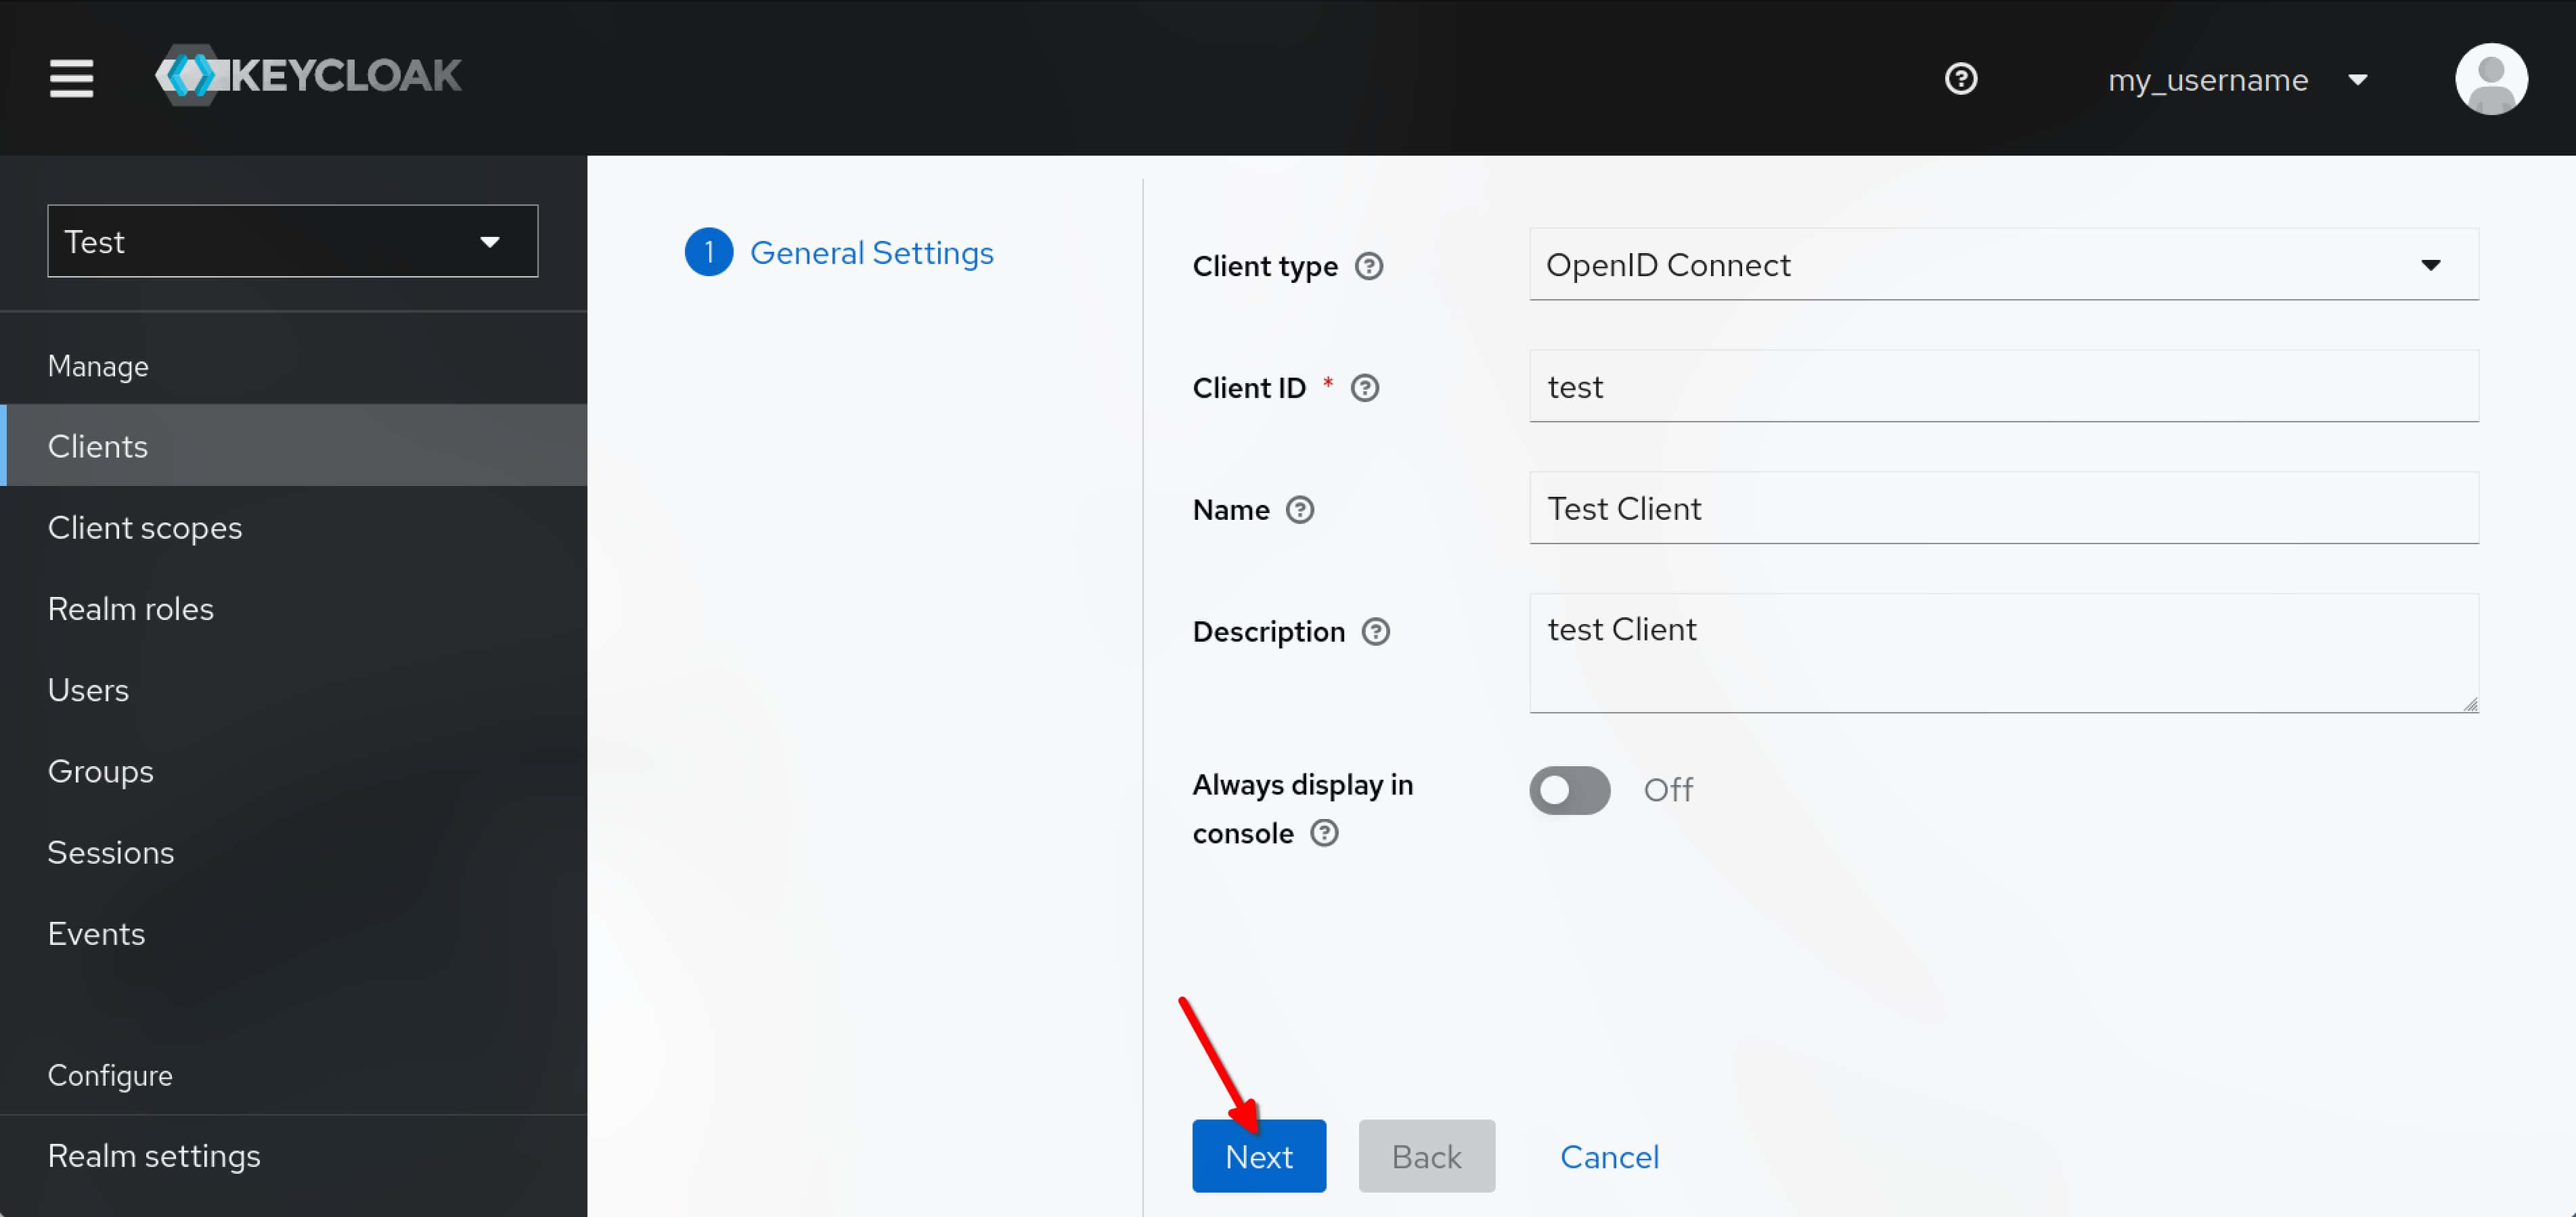
填写 Client 相关信息,点击 Next。
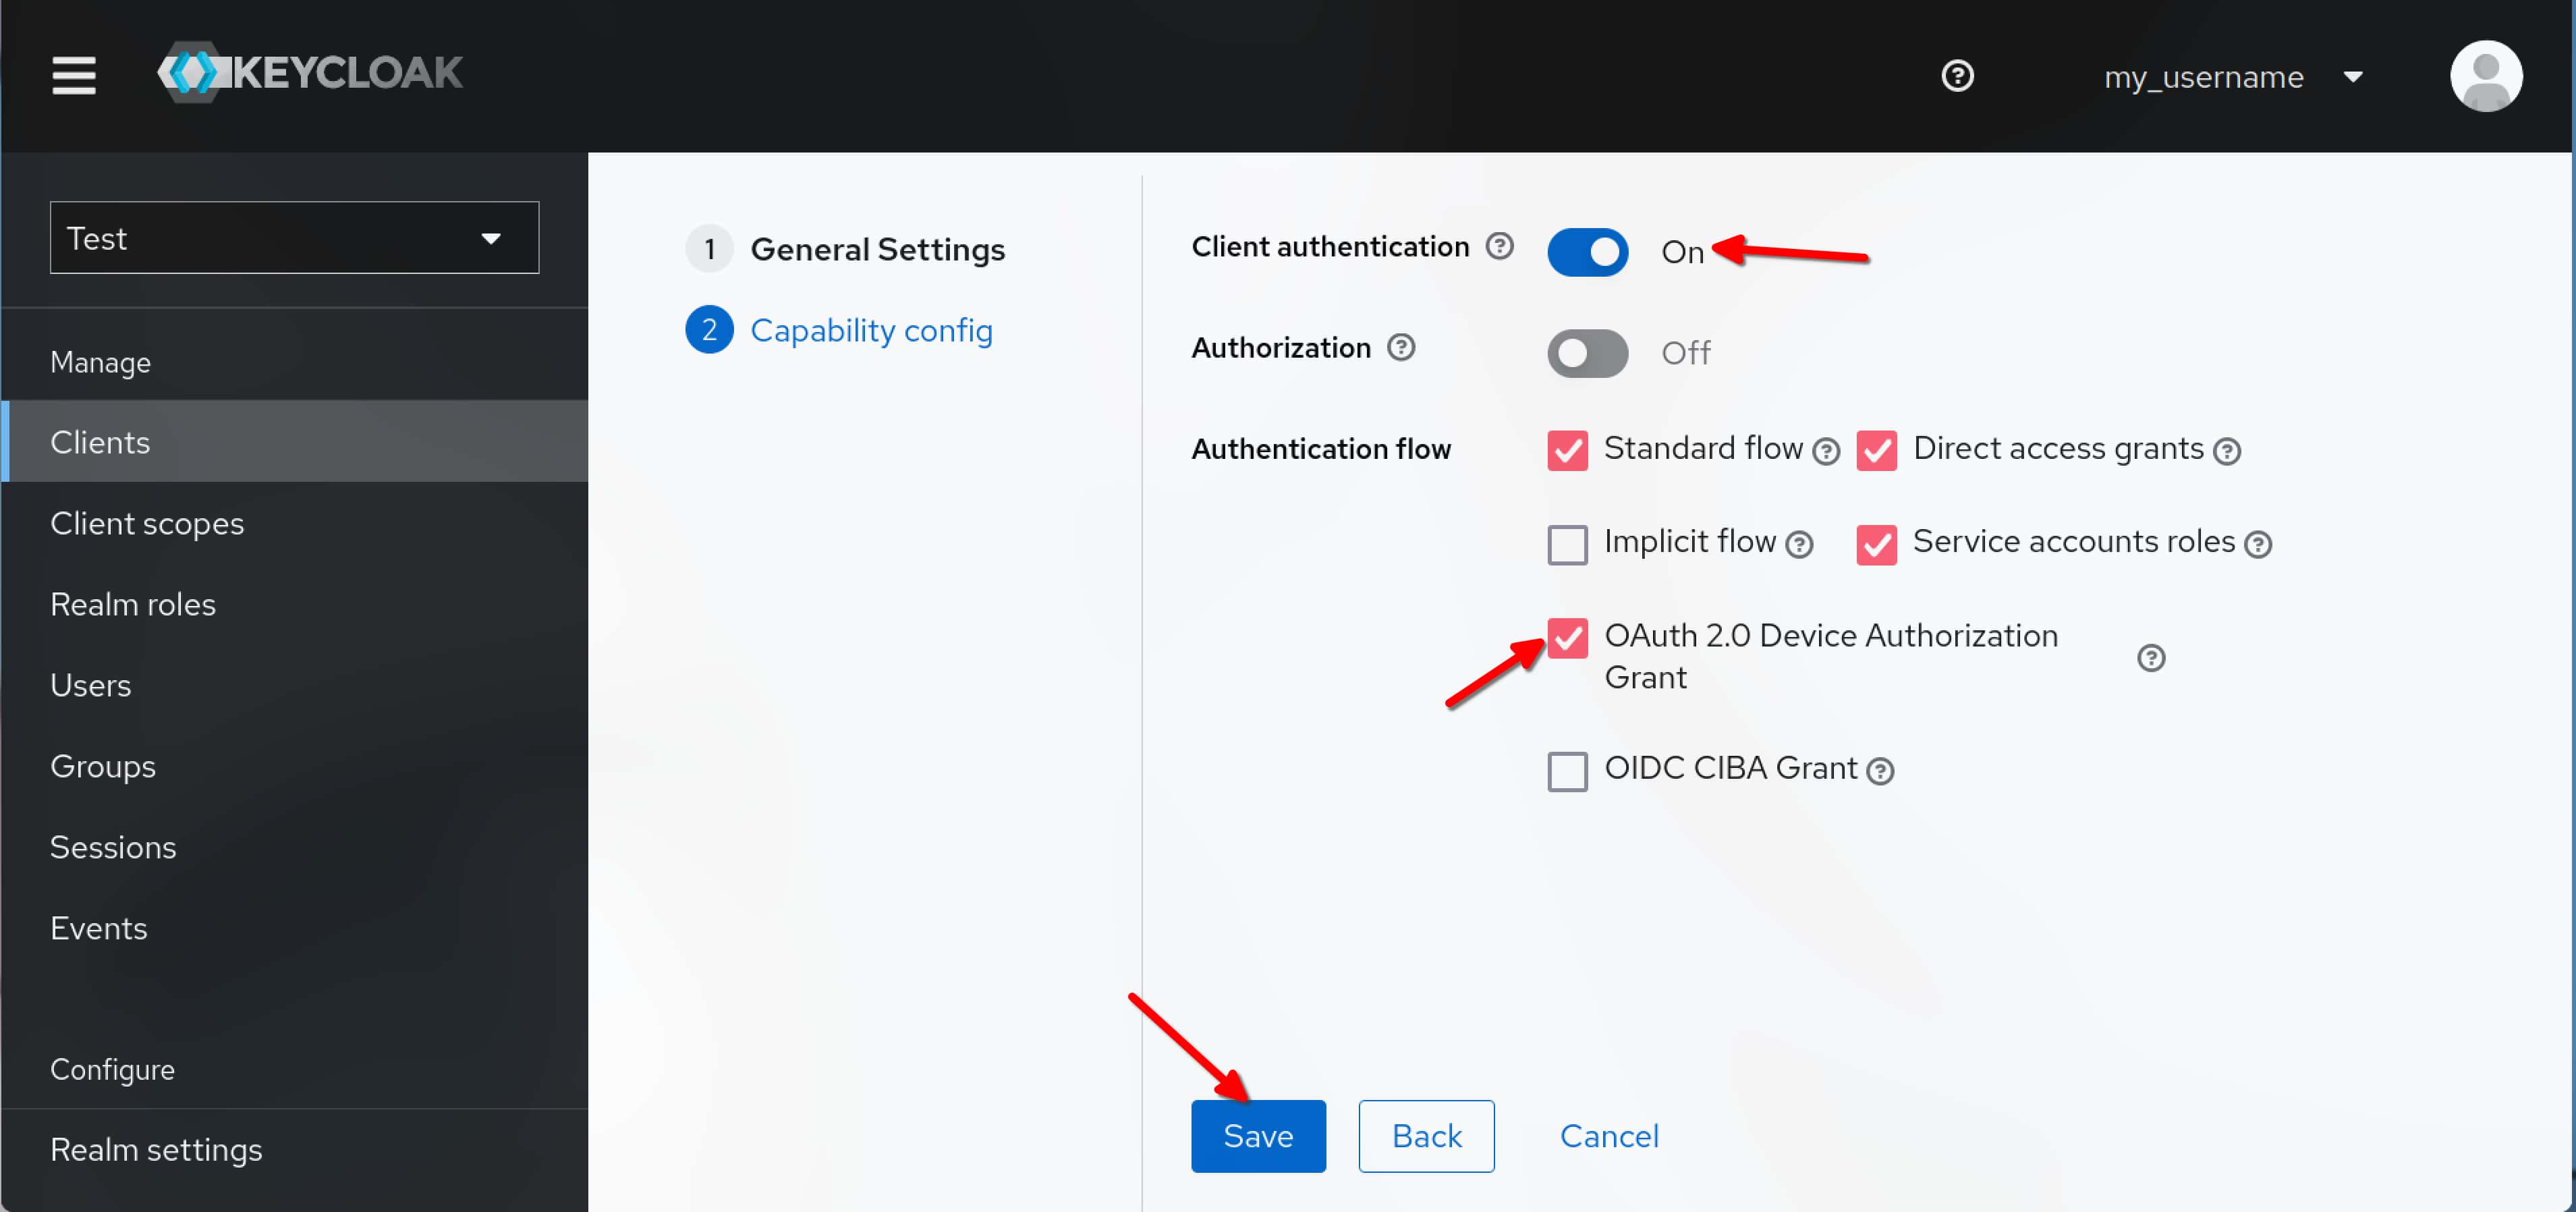
按需求选择 Client 的配置,点击 Save。
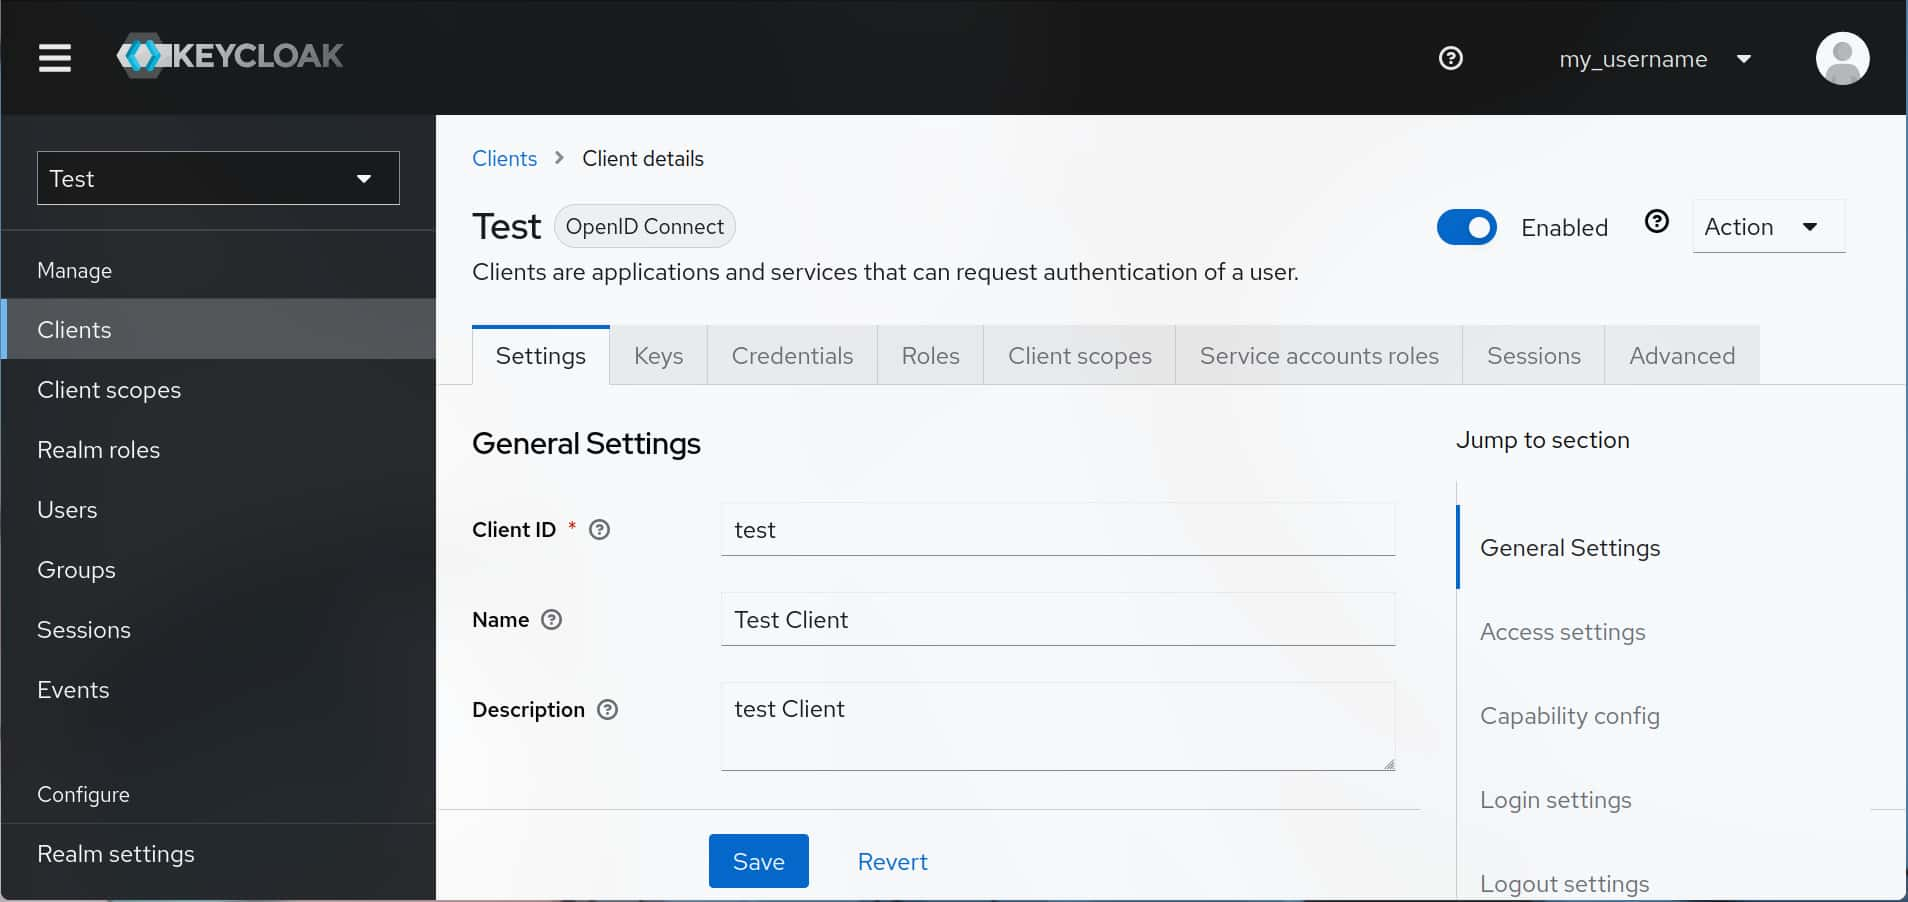
至此,Keycloak 配置完成,且创建了第一个测试用 Client。
测试 Client
可根据 官方教程 测试该 Client。
尾声
上述便是使用 Docker Compose 部署 Keycloak 20 的方法,我们顺利创建了第一个测试用 Client,接下来可以根据自己的需求进行配置。










