





进程,线程和协程
Process, Thread and Coroutine
实现篇
分类: 编程 / 字数: 8071 / 标签: 进程, Process, 线程, Thread, 协程, Coroutine, CPU 密集型, IO 密集型, 磁盘 IO 密集型, 网络 IO 密集型, 模拟 IO 密集型, 互斥锁, 可重入锁, 嵌套锁, 死锁, 全局解释器锁, Global Interpreter Lock, GIL, 事件, Event, 队列, Queue, 池, 进程池, 线程池, 容器, 可迭代对象, 生成器, 迭代器, yield, 双向通道, asyncio, 异步 IO, 事件循环, 回调, Callback
本文将介绍进程,线程和协程在 Python 中的实现,代码详见这里,部分参考自「Python 并发编程」 1:。
在 Python 中可以使用 multiprocessing.Process 和 threading.Thread 来实现进程和线程。我们采用CPU 密集型、磁盘 IO 密集型、网络 IO 密集型和模拟 IO 密集型任务类型来测试单线程,多线程和多进程之间的性能差异。
import requests

# CPU 密集型
def cpu_bound_task(x=1, y=1):
    c = 0

    while c < 1500000:
        c += 1
        x += x
        y += y

# 磁盘 IO 密集型
def disk_io_bound_task():
    with open('tmp.log', 'w') as f:
        for idx in range(5000000):
            f.write('{}\n'.format(idx))

# 网络 IO 密集型
def web_io_bound_task():
    try:
        requests.get('https://www.baidu.com')
    except Exception as e:
        pass

# 模拟 IO 密集型
def simulation_io_bound_task():
    time.sleep(2)
为了方便统计运行时间,定义如下一个运行时间装饰器:
import time

def timer(task_mode):
    def wrapper(func):
        def decorator(*args, **kwargs):
            task_type = kwargs.setdefault('task_type', None)
            start_time = time.time()
            func(*args, **kwargs)
            end_time = time.time()
            print('耗时({} - {}): {}'.format(
                task_mode, task_type, end_time - start_time))
        return decorator
    return wrapper
单线程,多线程和多进程的测试代码如下:
from threading import Thread
from multiprocessing import Process

@timer('单线程')
def single_thread(func, task_type='', n=10):
    for idx in range(n):
        func()


@timer('多线程')
def multi_threads(func, task_type='', n=10):
    threads = {}

    for idx in range(n):
        t = Thread(target=func)
        threads[idx] = t
        t.start()

    for thread in threads.values():
        thread.join()


@timer('多进程')
def multi_processes(func, task_type='', n=10):
    processes = {}

    for idx in range(n):
        p = Process(target=func)
        processes[idx] = p
        p.start()

    for process in processes.values():
        process.join()
运行测试
# 单线程
single_thread(cpu_bound_task, task_type='CPU 密集型任务')
single_thread(disk_io_bound_task, task_type='磁盘 IO 密集型任务')
single_thread(web_io_bound_task, task_type='网络 IO 密集型任务')
single_thread(simulation_io_bound_task, task_type='模拟 IO 密集型任务')

# 多线程
multi_threads(cpu_bound_task, task_type='CPU 密集型任务')
multi_threads(disk_io_bound_task, task_type='磁盘 IO 密集型任务')
multi_threads(web_io_bound_task, task_type='网络 IO 密集型任务')
multi_threads(simulation_io_bound_task, task_type='模拟 IO 密集型任务'

# 多进程
multi_processes(cpu_bound_task, task_type='CPU 密集型任务')
multi_processes(disk_io_bound_task, task_type='磁盘 IO 密集型任务')
multi_processes(web_io_bound_task, task_type='网络 IO 密集型任务')
multi_processes(simulation_io_bound_task, task_type='模拟 IO 密集型任务')
可以得到类似如下的结果:
| 单线程 | 多线程 | 多进程 | |
|---|---|---|---|
| CPU 密集型 | 83.42 | 93.82 | 9.08 |
| 磁盘 IO 密集型 | 15.64 | 13.27 | 1.28 |
| 网络 IO 密集型 | 1.13 | 0.18 | 0.13 |
| 模拟 IO 密集型 | 20.02 | 2.02 | 2.01 |
从测试结果来看,不难得出如下结论:
创建线程有两种方式:
Python 中的 threading.Thread() 接受两个参数:线程函数,用于指定线程执行的函数;线程函数参数,以元组的形式传入执行函数所需的参数。
import time
from threading import Thread

# 自定义函数
def func(name='Python'):
    for idx in range(2):
        print('Hello, {}'.format(name))
        time.sleep(1)

# 创建线程
thread_1 = Thread(target=func)
thread_2 = Thread(target=func, args=('Leo', ))

# 启动线程
thread_1.start()
thread_2.start()
可以得到如下输出:
Hello, Python
Hello, Leo
Hello, Python
Hello, Leo
利用类创建线程需要自定义一个类并继承 threading.Thread 这个父类,同时重写 run 方法。最后通过实例化该类,并运行 start() 方法执行该线程。
# 自定义类
class MyThread(Thread):
    def __init__(self, name='Python'):
        super(MyThread, self).__init__()
        self.name = name

    def run(self):
        for idx in range(2):
            print('Hello, {}'.format(self.name))
            time.sleep(1)

# 创建线程
thread_1 = MyThread()
thread_2 = MyThread('Leo')

# 启动线程
thread_1.start()
thread_2.start()
可以得到同上面一样的输出:
Hello, Python
Hello, Leo
Hello, Python
Hello, Leo
线程的一些常用方法和属性如下所示:
# 创建线程
t = Thread(target=func)

# 启动线程
t.start()

# 阻塞线程
t.join()

# 判断线程是否处于执行状态
# True: 执行中,False: 其他
t.is_alive()

# 这是线程是否随主线程退出而退出
# 默认为 False
t.daemon = True

# 设置线程名称
t.name = 'My Thread'
在一段代码中加锁表示同一时间有且仅有一个线程可以执行这段代码。在 Python 中锁分为两种:互斥锁和可重入锁。利用 threading.Lock() 可以获取全局唯一的锁对象,使用 acquire() 和 release() 方法可以获取和释放锁,注意两个需成对出现,否则可能造成死锁。
例如定义两个函数,并在两个线程中执行,这两个函数共用一个变量 C:
import time
import random

from threading import Thread

# 共用变量
C = 0

def job1(n=10):
    global C

    for idx in range(n):
        C += 1
        print('Job1: {}'.format(C))

def job2(n=10):
    global C

    for idx in range(n):
        C += 10
        print('Job2: {}'.format(C))

t1 = Thread(target=job1)
t2 = Thread(target=job2)

t1.start()
t2.start()
运行结果如下:
Job1: 1
Job2: 11
Job2: 21
Job1: 22
Job1: 23
Job2: 33
Job2: 43
Job1: 44
Job2: 54
Job1: 55
Job2: 65
Job1: 66
Job2: 76
Job2: 86
Job1: 87
Job1: 88
Job2: 98
Job1: 99
Job2: 109
Job1: 110
两个线程共用一个全局变量,两个线程根据自己执行的快慢对变量 C 进行修改。在增加锁后:
import time
import random

from threading import Lock

# 全局唯一锁
LOCK = Lock()

# 共用变量
C = 0

def job1_with_lock(n=10):
    global C, LOCK

    LOCK.acquire()

    for idx in range(n):
        C += 1
        print('Job1: {}'.format(C))
        time.sleep(random.random())

    LOCK.release()


def job2_with_lock(n=10):
    global C, LOCK

    LOCK.acquire()

    for idx in range(n):
        C += 10
        print('Job2: {}'.format(C))
        time.sleep(random.random())

    LOCK.release()

t1 = Thread(target=job1_with_lock)
t2 = Thread(target=job2_with_lock)

t1.start()
t2.start()
运行结果如下:
Job1: 1
Job1: 2
Job1: 3
Job1: 4
Job1: 5
Job1: 6
Job1: 7
Job1: 8
Job1: 9
Job1: 10
Job2: 20
Job2: 30
Job2: 40
Job2: 50
Job2: 60
Job2: 70
Job2: 80
Job2: 90
Job2: 100
Job2: 110
此时,由于 job1_with_lock 先拿到了锁,所以当执行时 job2_with_lock 无法获取到锁,就无法对 C 进行修改。只有当 job1_with_lock 执行完毕释放锁后,job2_with_lock 才能执行对 C 的修改操作。为了避免忘记释放锁,可以使用 with 上下文管理器来加锁。
在同一个线程中,我们可能会多次请求同一个资源,这称为嵌套锁。如果使用常规的方式:
from threading import Lock

def lock_with_lock(n=10):
    c = 0
    lock = Lock()

    with lock:
        for idx in range(n):
            c += 1
            with lock:
                print(c)

t = Thread(target=lock_with_lock)
t.start()
则无法正常运行,因为第二次获取锁时,锁已经被同一线程获取,从而无法运行后续代码。由于后续代码无法运行则无法释放锁,从而上述的嵌套锁会造成死锁。
为了解决这个问题,threading 模块提供了可重入锁 RLock:
from threading import RLock

def rlock_with_lock(n=10):
    c = 0
    lock = RLock()

    with lock:
        for idx in range(n):
            c += 1
            with lock:
                print(c)

t = Thread(target=rlock_with_lock)
t.start()
运行结果如下:
1
2
3
4
5
6
7
8
9
10
全局解释器锁(Global Interpreter Lock,GIL),是计算机程序设计语言解释器用于同步线程的一种机制,它使得任何时刻仅有一个线程在执行。
任何 Python 线程执行前,必须先获得 GIL 锁,然后,每执行 100 条字节码,解释器就自动释放 GIL 锁,让别的线程有机会执行。这个 GIL 全局锁实际上把所有线程的执行代码都给上了锁,所以,多线程在 Python 中只能交替执行,即使 100 个线程跑在 100 核 CPU 上,也只能用到 1 个核。
Python 中实现线程中通信有如下 3 中方法:
threading.Event 可以创建一个事件变量,多个线程等待这个事件的发生,在事件发生后,所有线程继续运行。threading.Event 包含如下三个函数:
event = threading.Event()

# 重置 event,使得所有该 event 事件都处于待命状态
event.clear()

# 等待接收 event 的指令,决定是否阻塞程序执行
event.wait()

# 发送 event 指令,使所有设置该 event 事件的线程执行
event.set()
例如:
import time

from threading import Thread, Event

class EventThread(Thread):
    def __init__(self, name, event):
        super(EventThread, self).__init__()

        self.name = name
        self.event = event

    def run(self):
        print('线程 {} 启动于 {}'.format(self.name, time.ctime(time.time())))
        self.event.wait()
        print('线程 {} 结束于 {}'.format(self.name, time.ctime(time.time())))

threads = {}
event = Event()

for tid in range(3):
    threads[tid] = EventThread(str(tid), event)

event.clear()

for thread in threads.values():
    thread.start()

print('等待 3 秒钟 ...')
time.sleep(3)

print('唤醒所有线程 ...')
event.set()
运行结果如下:
线程 0 启动于 Thu Apr  1 23:12:32 2021
线程 1 启动于 Thu Apr  1 23:12:32 2021
线程 2 启动于 Thu Apr  1 23:12:32 2021
等待 3 秒钟 ...
唤醒所有线程 ...
线程 0 结束于 Thu Apr  1 23:12:35 2021
线程 1 结束于 Thu Apr  1 23:12:35 2021
线程 2 结束于 Thu Apr  1 23:12:35 2021
可见线程启动后并未执行完成,而是卡在了 event.wait() 处,直到通过 event.set() 发送指令后,所有线程才继续向下执行。
threading.Condition 与 threading.Event 类似,包含如下 4 个函数:
cond = threading.Condition()

# 类似 lock.acquire()
cond.acquire()

# 类似 lock.release()
cond.release()

# 等待指定触发,同时会释放对锁的获取,直到被 notify 才重新占有琐。
cond.wait()

# 发送指定,触发执行
cond.notify()
以一个捉迷藏的游戏为例:
import time

from threading import Thread, Condition

class Seeker(Thread):
    def __init__(self, condition, name):
        super(Seeker, self).__init__()

        self.condition = condition
        self.name = name

    def run(self):
        time.sleep(1) # 确保先运行 Hider 中的方法

        self.condition.acquire()

        print('{}: 我把眼睛蒙好了'.format(self.name))
        self.condition.notify()
        self.condition.wait()
        print('{}: 我找到你了'.format(self.name))
        self.condition.notify()

        self.condition.release()
        print('{}: 我赢了'.format(self.name))


class Hider(Thread):
    def __init__(self, condition, name):
        super(Hider, self).__init__()

        self.condition = condition
        self.name = name

    def run(self):
        self.condition.acquire()

        self.condition.wait()
        print('{}: 我藏好了'.format(self.name))
        self.condition.notify()
        self.condition.wait()
        self.condition.release()
        print('{}: 被你找到了'.format(self.name))

condition = Condition()

seeker = Seeker(condition, 'Seeker')
hider = Hider(condition, 'Hider')

seeker.start()
hider.start()
运行结果如下:
Seeker: 我把眼睛蒙好了
Hider: 我藏好了
Seeker: 我找到你了
Seeker: 我赢了
Hider: 被你找到了
可见通过 cond.wait() 和 cond.notify() 进行阻塞和通知可以实现双方动作交替进行。
从一个线程向另一个线程发送数据最安全的方式是使用 queue 库中的队列。创建一个被多个线程共享的队列对象,通过 put() 和 get() 方法向队列发送和获取元素。队列的常用方法如下:
from queue import Queue

# maxsize=0 表示不限大小
# maxsize>0 且消息数达到限制时,put() 方法会阻塞
q = Queue(maxsize=0)

# 默认阻塞程序,等待队列消息,可设置超时时间
q.get(block=True, timeout=None)

# 发送消息,默认会阻塞程序至队列中有空闲位置放入数据
q.put(item, block=True, timeout=None)

# 等待所有的消息都被消费完
q.join()

# 通知队列任务处理已经完成,当所有任务都处理完成时,join() 阻塞将会解除
q.task_done()

# 查询当前队列的消息个数
q.qsize()

# 队列消息是否都被消费完,返回 True/False
q.empty()

# 检测队列里消息是否已满
q.full()
以老师点名为例:
import time

from queue import Queue
from threading import Thread

class Student(object):
    def __init__(self, name):
        super(Student, self).__init__()

        self.name = name

    def speak(self):
        print('{}: 到'.format(self.name))


class Teacher(object):
    def __init__(self, queue):
        super(Teacher, self).__init__()

        self.queue = queue

    def call(self, student_name):
        if student_name == 'exit':
            print('老师: 点名结束,开始上课')
        else:
            print('老师: {}'.format(student_name))

        self.queue.put(student_name)


class CallManager(Thread):
    def __init__(self, queue):
        super(CallManager, self).__init__()

        self.students = {}
        self.queue = queue

    def put(self, student):
        self.students.setdefault(student.name, student)

    def run(self):
        while True:
            student_name = self.queue.get()

            if student_name == 'exit':
                break
            elif student_name in self.students:
                self.students[student_name].speak()
            else:
                print('学生: 老师,没有 {} 这个人'.format(student_name))

queue = Queue()

teacher = Teacher(queue=queue)
s1 = Student(name='张三')
s2 = Student(name='李四')

cm = CallManager(queue)
cm.put(s1)
cm.put(s2)

cm.start()

print('开始点名')
teacher.call('张三')
time.sleep(1)
teacher.call('李四')
time.sleep(1)
teacher.call('王五')
time.sleep(1)
teacher.call('exit')
运行结果如下:
开始点名
老师: 张三
张三: 到
老师: 李四
李四: 到
老师: 王五
学生: 老师,没有 王五 这个人
老师: 点名结束,开始上课
除了先进先出队列 queue.Queue 外,还有后进先出队列 queue.LifoQueue 和优先级队列 queue.PriorityQueue。
池是一组资源的集合,这组资源在服务器启动之初就被完全创建好并初始化,这称为静态资源分配。当服务器进入正式运行阶段,即开始处理客户请求的时候,如果它需要相关的资源,就可以直接从池中获取,无需动态分配。很显然,直接从池中取得所需资源比动态分配资源的速度要快得多,因为分配系统资源的系统调用都是很耗时的。
池的概念主要目的是为了重用:让线程或进程在生命周期内可以多次使用。它减少了创建创建线程和进程的开销,以空间换时间来提高了程序性能。重用不是必须的规则,但它是程序员在应用中使用池的主要原因。
Python 中利用 concurrent.futures 库中的 ThreadPoolExecutor 和 ProcessPoolExecutor 创建线程池和进程池。示例如下:
import time
import threading

from concurrent.futures import ThreadPoolExecutor, ProcessPoolExecutor, as_completed


def print_func(n=3):
    for idx in range(n):
        print('运行 {}-{}'.format(threading.get_ident(), idx))
        time.sleep(1)


def return_func(n=3):
    res = []

    for idx in range(n):
        res.append('{}-{}'.format(threading.get_ident(), idx))
        time.sleep(1)

    return res


def test_thread_pool_print(n=3, m=12):
    with ThreadPoolExecutor(max_workers=n) as executor:
        for _ in range(m):
            executor.submit(print_func)


def test_process_pool_print(n=3, m=12):
    with ProcessPoolExecutor(max_workers=n) as executor:
        for _ in range(m):
            executor.submit(print_func)


def test_thread_pool_return(n=3, m=12):
    with ThreadPoolExecutor(max_workers=n) as executor:
        futures = [executor.submit(return_func) for _ in range(m)]

        for future in as_completed(futures):
            print(future.result())


def test_process_pool_return(n=3, m=12):
    with ProcessPoolExecutor(max_workers=n) as executor:
        futures = [executor.submit(return_func) for _ in range(m)]

        for future in as_completed(futures):
            print(future.result())


line_sep = '-' * 60

print(line_sep)
print('测试线程池')
print(line_sep)
test_thread_pool_print()
print(line_sep)

print(line_sep)
print('测试进程池')
print(line_sep)
test_process_pool_print()
print(line_sep)

print(line_sep)
print('测试线程池')
print(line_sep)
test_thread_pool_return()
print(line_sep)

print(line_sep)
print('测试进程池')
print(line_sep)
test_process_pool_return()
print(line_sep)
运行结果如下:
------------------------------------------------------------
测试线程池
------------------------------------------------------------
运行 123145462505472-0
运行 123145479294976-0
运行 123145496084480-0
运行 123145496084480-1
运行 123145462505472-1
运行 123145479294976-1
运行 123145496084480-2
运行 123145462505472-2
运行 123145479294976-2
运行 123145462505472-0
运行 123145479294976-0
运行 123145496084480-0
运行 123145479294976-1
运行 123145462505472-1
运行 123145496084480-1
运行 123145479294976-2
运行 123145462505472-2
运行 123145496084480-2
------------------------------------------------------------
------------------------------------------------------------
测试进程池
------------------------------------------------------------
运行 4545199616-0
运行 4545199616-1
运行 4545199616-2
运行 4545199616-0
运行 4545199616-1
运行 4545199616-2
运行 4663131648-0
运行 4663131648-1
运行 4663131648-2
运行 4663131648-0
运行 4663131648-1
运行 4663131648-2
运行 4633173504-0
运行 4633173504-1
运行 4633173504-2
运行 4633173504-0
运行 4633173504-1
运行 4633173504-2
------------------------------------------------------------
------------------------------------------------------------
测试线程池
------------------------------------------------------------
['123145496084480-0', '123145496084480-1', '123145496084480-2']
['123145479294976-0', '123145479294976-1', '123145479294976-2']
['123145462505472-0', '123145462505472-1', '123145462505472-2']
['123145479294976-0', '123145479294976-1', '123145479294976-2']
['123145496084480-0', '123145496084480-1', '123145496084480-2']
['123145462505472-0', '123145462505472-1', '123145462505472-2']
------------------------------------------------------------
------------------------------------------------------------
测试进程池
------------------------------------------------------------
['4791307776-0', '4791307776-1', '4791307776-2']
['4588228096-0', '4588228096-1', '4588228096-2']
['4654599680-0', '4654599680-1', '4654599680-2']
['4791307776-0', '4791307776-1', '4791307776-2']
['4588228096-0', '4588228096-1', '4588228096-2']
['4654599680-0', '4654599680-1', '4654599680-2']
------------------------------------------------------------
其中,submit() 方法用于提交要执行的任务到线程池或进程池中,并返回该任务的 Future 对象。Future 对象的 done() 方法用于判断任务是否执行完毕,通过 result(timeout=None) 方法获取返回结果。利用 concurrent.futures.as_completed() 方法可以返回一个包含指定 Future 实例的迭代器,这些实例在完成时生成 Future 对象。
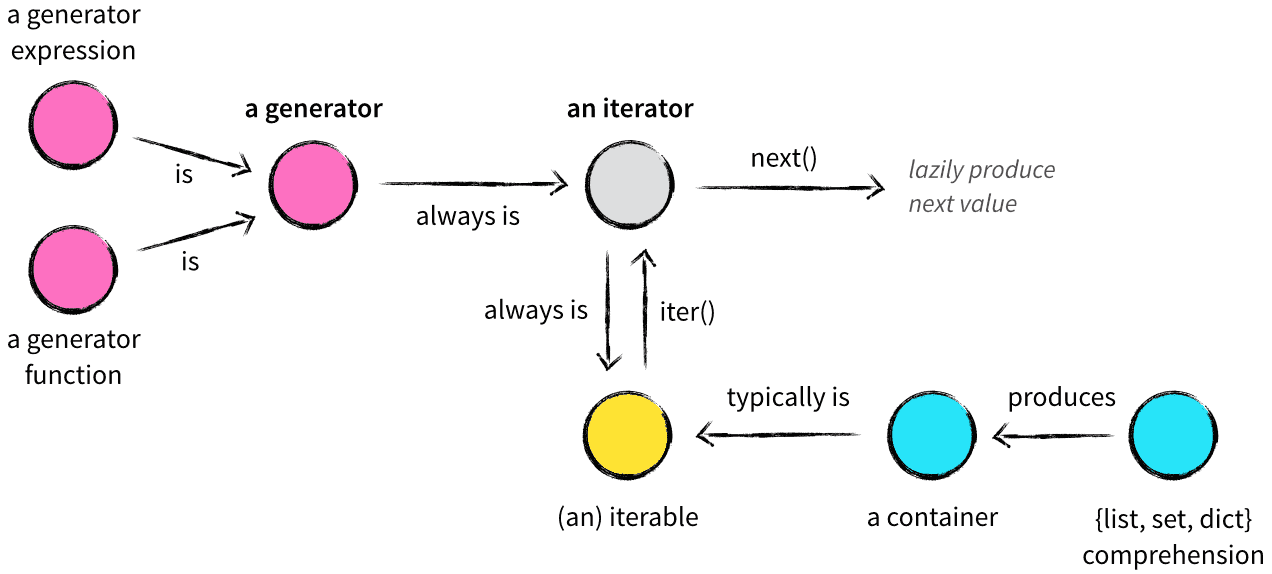
容器是一种把多个元素组织在一起的数据结构,容器中的元素可以逐个迭代获取,可以用 in 或 not in 判断元素是否包含在容器中。常见的容器对象有:
list, deque, ...
set, frozensets, ...
dict, defaultdict, OrderedDict, Counter, ...
tuple, namedtuple, ...
str
很多容器都是可迭代对象,此外还有更多的对象同样也可以是可迭代对象,比如处于打开状态的 file 和 socket 等。凡是可以返回一个迭代器的对象都可称之为可迭代对象,例如:
from collections import deque
from collections.abc import Iterable

print(isinstance('Leo Van', Iterable))
print(isinstance([1, 2, 3], Iterable))
print(isinstance({'k1': 'v1', 'k2': 'v2'}, Iterable))
print(isinstance(deque('abc'), Iterable))
运行结果如下:
True
True
True
True
迭代器是一个带有状态的对象,通过 next() 方法可以返回容器中的下一个值。任何实现 __iter__() 和 __next__() 方法的对象都是迭代器。其中,__iter__() 方法返回迭代器本身,__next__() 方法返回容器中的下一个值,如果容器中没有更多元素了,则抛出 StopIteration 异常。例如:
class MyList(object):
    def __init__(self, end):
        super(MyList, self).__init__()

        self.end = end

    def __iter__(self):
        return MyListIterator(self.end)

    def __repr__(self):
        return '[{}]'.format(', '.join([str(ele) for ele in self]))


class MyListIterator(object):
    def __init__(self, end):
        super(MyListIterator, self).__init__()

        self.data = end
        self.start = 0

    def __iter__(self):
        return self

    def __next__(self):
        while self.start < self.data:
            self.start += 1
            return self.start - 1

        raise StopIteration

my_list = MyList(3)

print('MyList: {}'.format(my_list))
print(isinstance(my_list, Iterable))
print(isinstance(my_list, Iterator))

for ele in my_list:
    print(ele)

my_list_iterator = MyListIterator(3)

print('MyListIterator: {}'.format(my_list_iterator))
print(isinstance(my_list_iterator, Iterable))
print(isinstance(my_list_iterator, Iterator))

my_iterator = iter(my_list)

print('MyIterator: {}'.format(my_iterator))
print(isinstance(my_iterator, Iterable))
print(isinstance(my_iterator, Iterator))

while True:
    try:
        print(next(my_iterator))
    except StopIteration as e:
        return
运行结果如下:
MyList: [0, 1, 2]
True
False
0
1
2
MyListIterator: <__main__.MyListIterator object at 0x7fc9602b2100>
True
True
0
1
2
MyIterator: <__main__.MyListIterator object at 0x7fc9602b2fa0>
True
True
0
1
2
Stop
生成器非常类似于返回数组的函数,都是具有参数、可被调用、产生一系列的值。但是生成器并不是构造出数组包含所有的值并一次性返回,而是每次产生一个值,因此生成器看起来像函数,但行为像迭代器。
Python 中创建生成器有两种方法:使用类似列表方式或 yield 关键字:
from collections.abc import Generator
from inspect import getgeneratorstate

a_list = [x for x in range(10)]
print(a_list)
print(isinstance(a_list, Generator))

a_generator = (x for x in range(10))
print(a_generator)
print(isinstance(a_generator, Generator))

def my_yield(n):
    now = 0

    while now < n:
        yield now
        now += 1

    raise StopIteration

gen = my_yield(4)
print(gen)
print(isinstance(gen, Generator))
运行结果如下:
[0, 1, 2, 3, 4, 5, 6, 7, 8, 9]
False
<generator object <genexpr> at 0x7fdf84a8a430>
True
<generator object my_yield at 0x7fdf86a03f20>
True
由于生成器并不是一次生成所有元素,而是每次执行后返回一个值,通过 next() 和 generator.send(None) 两个方法可以激活生成器,例如:
def my_yield(n):
    now = 0

    while now < n:
        yield now
        now += 1

    raise StopIteration

gen = my_yield(4)
print(gen.send(None))
print(next(gen))
print(gen.send(None))
print(next(gen))
运行结果如下:
0
1
2
3
生成器在其生命周期中共有 4 种状态:
GEN_CREATED:已创建GEN_RUNNING:正在执行(只在多线程应用中能看到该状态)GEN_SUSPENDED:暂停中GEN_CLOSED:已关闭例如:
from collections.abc import Generator
from inspect import getgeneratorstate

def my_yield(n):
    now = 0

    while now < n:
        yield now
        now += 1

    raise StopIteration

gen = my_yield(4)
print(gen)
print(getgeneratorstate(gen))

print(gen.send(None))
print(next(gen))
print(getgeneratorstate(gen))

print(gen.send(None))
print(next(gen))
print(getgeneratorstate(gen))

gen.close()
print(getgeneratorstate(gen))
运行结果如下:
GEN_CREATED
0
1
GEN_SUSPENDED
2
3
GEN_SUSPENDED
GEN_CLOSED
生成器在不满足生成元素的条件时,会抛出 StopIteration 异常,通过类似列表形式构建的生成器会自动实现该异常,自定的生成器则需要手动实现该异常。
协程通过 yield 暂停生成器,可以将程序的执行流程交给其他子程序,从而实现不同子程序之间的交替执行。例如:
def jump_range(n):
    idx = 0

    while idx < n:
        jump = yield idx
        print('[idx: {}, jump: {}]'.format(idx, jump))

        if jump is None:
            jump = 1

        idx += jump

itr = jump_range(6)
print(next(itr))
print(itr.send(2))
print(next(itr))
print(itr.send(-1))
print(next(itr))
print(next(itr))
运行结果如下:
0
[idx: 0, jump: 2]
2
[idx: 2, jump: None]
3
[idx: 3, jump: -1]
2
[idx: 2, jump: None]
3
[idx: 3, jump: None]
4
yield idx 将 idx 返回给外部调用程序,jump = yield 可以接受外部程序通过 send() 发送的信息,并将其赋值给 jump。
yield from 是 Python 3.3 之后出现的新语法,后面是可迭代对象,可以是普通的可迭代对象,也可以是迭代器,甚至是生成器。yield 和 yield from 的对比如下:
a_str = 'Leo'
a_list = [1, 2, 3]
a_dict = {'name': 'Leo', 'gender': 'Male'}
a_gen = (idx for idx in range(4, 8))

def gen(*args, **kwargs):
    for item in args:
        for ele in item:
            yield ele

new_gen = gen(a_str, a_list, a_dict, a_gen)
print(list(new_gen))

a_gen = (idx for idx in range(4, 8))

def gen_from(*args, **kwargs):
    for item in args:
        yield from item

new_gen = gen_from(a_str, a_list, a_dict, a_gen)
print(list(new_gen))
运行结果如下:
['L', 'e', 'o', 1, 2, 3, 'name', 'gender', 4, 5, 6, 7]
['L', 'e', 'o', 1, 2, 3, 'name', 'gender', 4, 5, 6, 7]
在实现生成器的嵌套时,使用 yield from 可以比使用 yield 避免各种意想不到的异常。使用 yield from 时,需要关注如下几个概念:
yield from 表达式的生成器函数yield from 后面的生成器函数如下是一个计算平均数的例子:
# 子生成器
def average_gen():
    total = 0
    count = 0
    average = 0

    while True:
        num = yield average

        if num is None:
            break

        count += 1
        total += num
        average = total / count

    return total, count, average

# 委托生成器
def proxy_gen():
    while True:
        total, count, average = yield from average_gen()
        print('计算完毕,共输入 {} 个数值,总和 {},平均值 {}'.format(
            count, total, average))

# 调用方
calc_average = proxy_gen()
next(calc_average)
print(calc_average.send(10))
print(calc_average.send(20))
print(calc_average.send(30))
calc_average.send(None)
运行结果如下:
10.0
15.0
20.0
计算完毕,共输入 3 个数值,总和 60,平均值 20.0
委托生成器的作用是在调用方和子生成器之间建立一个双向通道,调用方通过 send() 将消息发送给子生成器,子生成器 yield 的值则返回给调用方。yield from 背后为整个过程做了很多操作,例如:捕获 StopIteration 异常等。
asyncio 是 Python 3.4 引入的标准库,直接内置了对异步 IO 的支持。只要在一个函数前面加上 async 关键字就可以将一个函数变为一个协程。例如:
from collections.abc import Coroutine

async def async_func(name):
    print('Hello, ', name)

coroutine = async_func('World')
print(isinstance(coroutine, Coroutine))
运行结果如下:
True
利用 asyncio.coroutine 装饰器可以将一个生成器当作协程使用,但其本质仍旧是一个生成器。例如:
import asyncio

from collections.abc import Generator, Coroutine

@asyncio.coroutine
def coroutine_func(name):
    print('Hello,', name)
    yield from asyncio.sleep(1)
    print('Bye,', name)


coroutine = coroutine_func('World')
print(isinstance(coroutine, Generator))
print(isinstance(coroutine, Coroutine))
运行结果如下:
True
False
asyncio 中包含如下几个重要概念:
event_loop 事件循环:程序开启一个无限的循环,协程将注册到事件循环上,当满足事件发生时,调用相应的协程函数。coroutine 协程:一个使用 async 定义的协程函数,它的调用不会立即执行,而是会返回一个协程对象。协程对象需要注册到事件循环上,由事件循环控制调用。future 对象:代表将来执行或没有执行的对象。它和 task 对象没有本质上的区别。task 对象:一个协程对象是一个原生可以挂起的函数,任务是对协程的进一步封装,其中包含任务的各种状态。Task 对象是 Future 的子类,它将 coroutine 和 Future 联系在一起,将 coroutine 封装成为一个 Future 对象。async / await 关键字:async 定义一个协程,await 用于挂起阻塞的异步调用接口。协程完整的工作流程如下:
import asyncio

async def hello(name):
    print('Hello,', name)

# 定义协程
coroutine = hello('World')

# 定义事件循环
loop = asyncio.get_event_loop()

# 创建任务
task = loop.create_task(coroutine)

# 将任务交由时间循环并执行
loop.run_until_complete(task)
运行结果如下:
Hello, World
await 用于挂起阻塞的异步调用接口,其作用在一定程度上类似于 yield。yield from 后面可接可迭代对象,也可接 future 对象或协程对象;await 后面必须接 future 对象或协程对象。
import asyncio
from asyncio.futures import Future

async def hello(name):
    await asyncio.sleep(2)
    print('Hello, ', name)

coroutine = hello("World")

# 将协程转为 task 对象
task = asyncio.ensure_future(coroutine)

print(isinstance(task, Future))
运行结果如下:
True
异步 IO 的实现原理就是在 IO 高的地方挂起,等 IO 结束后再继续执行。绝大部分情况下,后续代码的执行是需要依赖 IO 的返回值的,这就需要使用回调。
回调的实现有两种,一种是在同步编程中直接获取返回结果:
import asyncio
import time

async def _sleep(x):
    time.sleep(x)
    return '暂停了 {} 秒'.format(x)

coroutine = _sleep(2)
loop = asyncio.get_event_loop()
task = asyncio.ensure_future(coroutine)

loop.run_until_complete(task)
print('返回结果:{}'.format(task.result()))
运行结果如下:
返回结果:暂停了 2 秒
另一种是通过添加回调函数来实现:
import asyncio
import time

async def _sleep(x):
    time.sleep(x)
    return '暂停了 {} 秒'.format(x)

def callback(future):
    print('回调返回结果:{}'.format(future.result()))

coroutine = _sleep(2)
loop = asyncio.get_event_loop()
task = asyncio.ensure_future(coroutine)

task.add_done_callback(callback)
loop.run_until_complete(task)
运行结果如下:
回调返回结果:暂停了 2 秒
asyncio 实现并发需要多个协程来完成,每当有任务阻塞时需要 await,然后让其他协程继续工作。
import asyncio

async def do_some_work(x):
    print('等待中 ...')
    await asyncio.sleep(x)
    print('{} 秒后结束'.format(x))
    return x

# 协程对象
coroutine1 = do_some_work(1)
coroutine2 = do_some_work(2)
coroutine3 = do_some_work(4)

# 任务列表
tasks = [
    asyncio.ensure_future(coroutine1),
    asyncio.ensure_future(coroutine2),
    asyncio.ensure_future(coroutine3)
]

loop = asyncio.get_event_loop()
loop.run_until_complete(asyncio.wait(tasks))

for task in tasks:
    print('任务结果:{}'.format(task.result()))
运行结果如下:
等待中 ...
等待中 ...
等待中 ...
1 秒后结束
2 秒后结束
4 秒后结束
任务结果:1
任务结果:2
任务结果:4
协程之间可以进行嵌套,即在一个协程中 await 另一个协程:
import asyncio

async def do_some_work(x):
    print('等待中 ...')
    await asyncio.sleep(x)
    print('{} 秒后结束'.format(x))
    return x

async def out_do_some_work():
    coroutine1 = do_some_work(1)
    coroutine2 = do_some_work(2)
    coroutine3 = do_some_work(4)

    tasks = [
        asyncio.ensure_future(coroutine1),
        asyncio.ensure_future(coroutine2),
        asyncio.ensure_future(coroutine3)
    ]

    dones, pendings = await asyncio.wait(tasks)

    for task in dones:
        print('任务结果:{}'.format(task.result()))

loop = asyncio.get_event_loop()
loop.run_until_complete(out_do_some_work())
如果使用 asyncio.gather() 来获取结果,则需要对获取结果部分做如下修改:
results = await asyncio.gather(*tasks)
for result in results:
    print('任务结果:{}'.format(result))
asyncio.wait() 返回 dones 和 pendings,分别表示已完成和未完成的任务;asyncio.gather() 则会把结果直接返回。
运行结果如下:
等待中 ...
等待中 ...
等待中 ...
1 秒后结束
2 秒后结束
4 秒后结束
任务结果:1
任务结果:4
任务结果:2
协程(准确的说是 Future 或 Task 对象)包含如下状态:
Pending:已创建,未执行Running:执行中Done:执行完毕Cancelled:被取消测试代码如下:
coroutine = _sleep(10)
loop = asyncio.get_event_loop()
task = loop.create_task(coroutine)

print('Pending')

try:
    t = Thread(target=loop.run_until_complete, args=(task, ))
    t.start()
    print('Running')
    t.join()
except KeyboardInterrupt as e:
    task.cancel()
    print('Cancel')
finally:
    print('Done')
执行顺利的话,运行结果如下:
Pending
Running
Done
如果在启动后按下 Ctrl + C 则会触发 task.cancel(),运行结果如下:
Pending
Running
Cancelled
Done
asyncio.wait() 可以通过参数控制何时返回:
import random
import asyncio

async def random_sleep():
    await asyncio.sleep(random.uniform(0.5, 6))

loop = asyncio.get_event_loop()
tasks = [random_sleep() for _ in range(1, 10)]

dones, pendings = loop.run_until_complete(asyncio.wait(
    tasks, return_when=asyncio.FIRST_COMPLETED))
print('第一次完成的任务数:{}'.format(len(dones)))

dones, pendings = loop.run_until_complete(asyncio.wait(
    pendings, timeout=2))
print('第二次完成的任务数: {}'.format(len(dones)))

dones, pendings = loop.run_until_complete(asyncio.wait(pendings))
print('第三次完成的任务数:{}'.format(len(dones)))
运行结果如下:
第一次完成的任务数:1
第二次完成的任务数: 4
第三次完成的任务数:4
此内容由惯性聚合(RSS阅读器)自动聚合整理,仅供阅读参考。 原文来自 — 版权归原作者所有。