





文本使用的软件版本分别为:
按照虚拟环境准备 (Virtual Environment Preparation) 准备虚拟机。
按照 Hadoop 集群搭建 (Hadoop Cluster Setup) 搭建 Hadoop 集群。
本文以 Spark on YARN 模式介绍 Spark 集群的搭建。
将 Scala 安装包解压缩到 /opt 目录并创建软链接:
cd /opt
tar -zxvf scala-2.12.14.tgz
ln -s /opt/scala-2.12.14 /opt/scala
将如下信息添加到 /etc/profile 中:
# Scala
export SCALA_HOME=/opt/scala
export PATH=$PATH:$SCALA_HOME/bin
方便起见可以使用 rsync 命令同步 Scala:
rsync -auvp /opt/scala-2.12.14 leo@vm-02:/opt
rsync -auvp /opt/scala-2.12.14 leo@vm-03:/opt
将 Spark 安装包解压缩到 /opt 目录并创建软链接:
cd /opt
tar -zxvf spark-3.1.2-bin-hadoop3.2.tgz
ln -s /opt/spark-3.1.2-bin-hadoop3.2 /opt/spark
将如下信息添加到 /etc/profile 中:
# Spark
export SPARK_HOME=/opt/spark
export PATH=$PATH:$SPARK_HOME/bin
复制环境变量文件:
cp /opt/spark/conf/spark-env.sh.template /opt/spark/conf/spark-env.sh
在 spark-env.sh 结尾添加如下内容:
export JAVA_HOME=/opt/jdk
export SCALA_HOME=/opt/scala
export HADOOP_HOME=/opt/hadoop
export HADOOP_CONF_DIR=$HADOOP_HOME/conf
export YARN_CONF_DIR=$HADOOP_HOME/conf
export SPAKR_HOME=/opt/spark
export SPARK_CONF_DIR=$SPAKR_HOME/conf

export SPARK_EXECUTOR_CORES=1
export SPARK_EXECUTOR_MEMORY=1G
export SPARK_DRIVER_MEMORY=1G
export SPARK_HISTORY_OPTS="-Dspark.history.retainedApplications=10"
复制配置文件:
cp /opt/spark/conf/spark-defaults.conf.template /opt/spark/conf/spark-defaults.conf
修改 spark-defaults.conf 文件内容如下:
spark.eventLog.enabled              true
spark.eventLog.compress             true
spark.eventLog.dir                  hdfs://vm-01:9000/logs/spark
spark.history.fs.logDirectory       hdfs://vm-01:9000/logs/spark
spark.yarn.historyServer.address    vm-01:18080
spark.yarn.jars                     hdfs://vm-01:9000/spark/jars/*
复制 Worker 节点列表文件:
cp /opt/spark/conf/workers.template /opt/spark/conf/workers
修改 workers 文件内容如下:
在 HDFS 上创建目录,并上传 Spark 相关 JAR 包:
hdfs dfs -mkdir -p /spark/jars
hdfs dfs -put /opt/spark/jars/* /spark/jars/
方便起见可以使用 rsync 命令同步 Spark:
rsync -auvp /opt/spark-3.1.2-bin-hadoop3.2 leo@vm-02:/opt
rsync -auvp /opt/spark-3.1.2-bin-hadoop3.2 leo@vm-03:/opt
在 vm-01,vm-02 和 vm-03 上启动 Zookeeper:
启动 Hadoop:
/opt/hadoop/sbin/start-dfs.sh
/opt/hadoop/sbin/start-yarn.sh
获取并切换 YARN Resource Manager 的状态:
yarn rmadmin -getServiceState rm1
yarn rmadmin -getServiceState rm2

yarn rmadmin -transitionToActive rm1 --forcemanual
在 HDFS 上创建相关目录:
hdfs dfs -mkdir /logs
hdfs dfs -mkdir /logs/spark
启动 Spark:
/opt/spark/sbin/start-all.sh
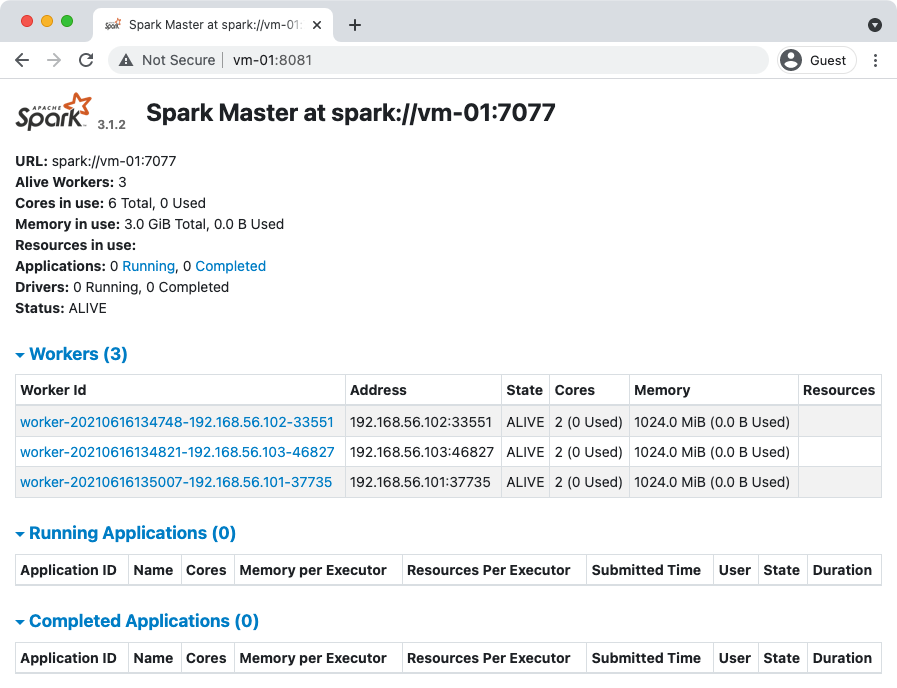
通过 http://vm-01:8081 可以进入 Spark Web 页面:
启动 Spark History Server:
/opt/spark/sbin/start-history-server.sh
执行 PI 示例程序:
spark-submit \
  --class org.apache.spark.examples.SparkPi \
  --master yarn \
  --deploy-mode cluster \
  --executor-memory 1G \
  --num-executors 3 \
  /opt/spark/examples/jars/spark-examples*.jar \
  10
在 YARN 中,通过 Application ID 查看对应的 Container 的 stdout 日志,可以得到示例程序的运行结果:
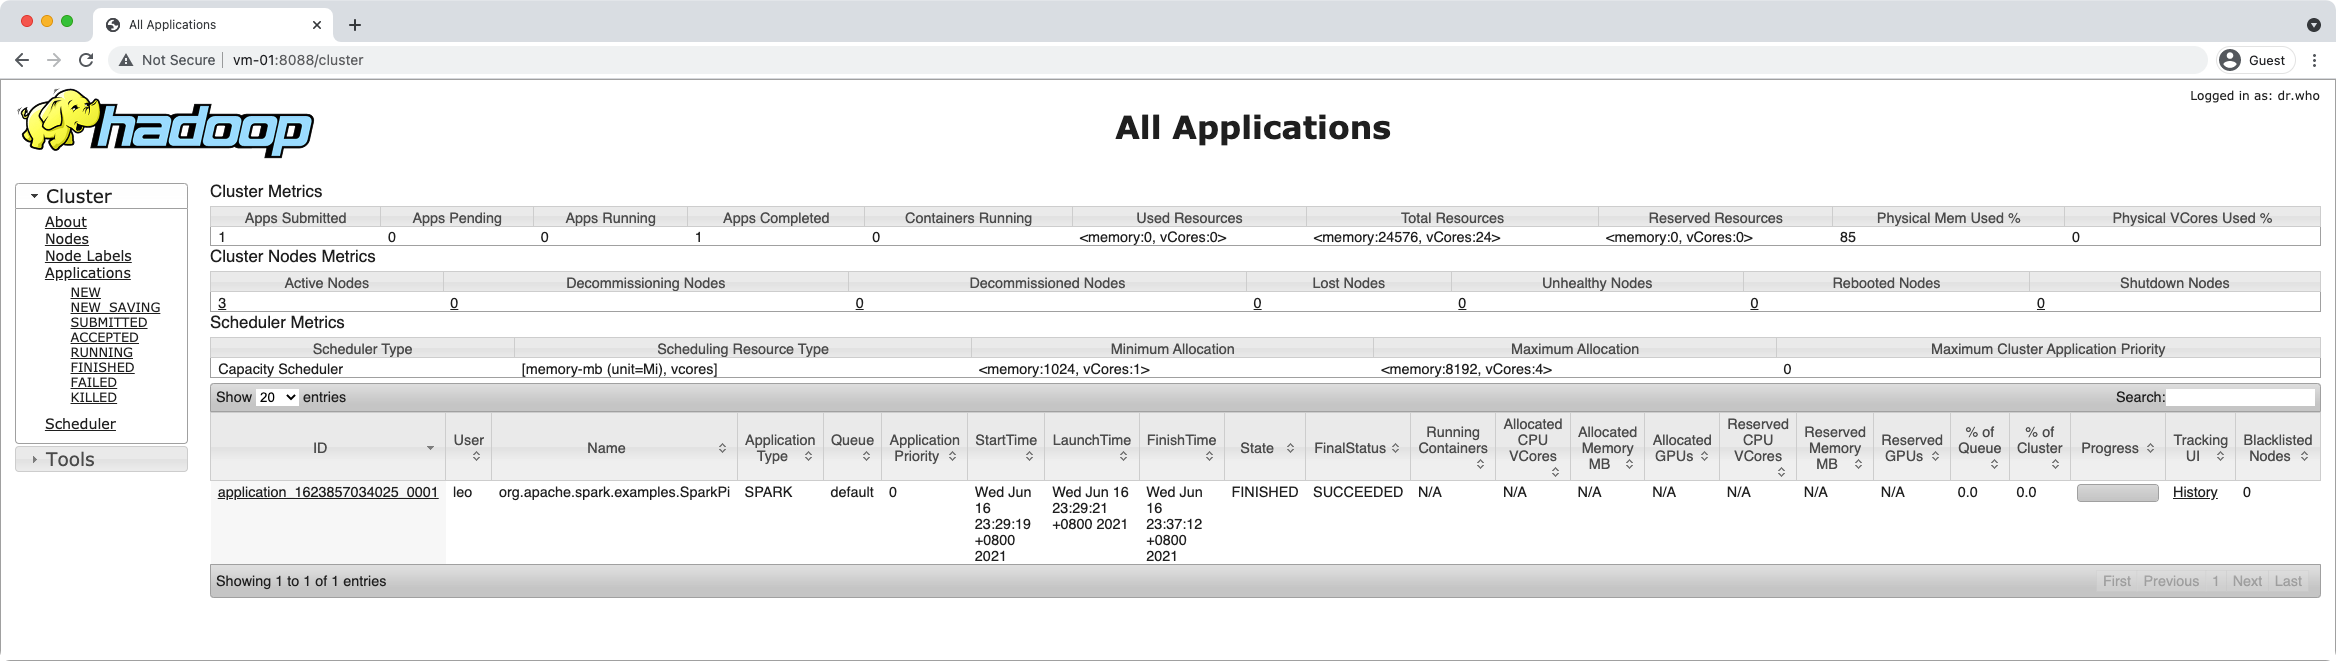
Pi is roughly 3.1424791424791425
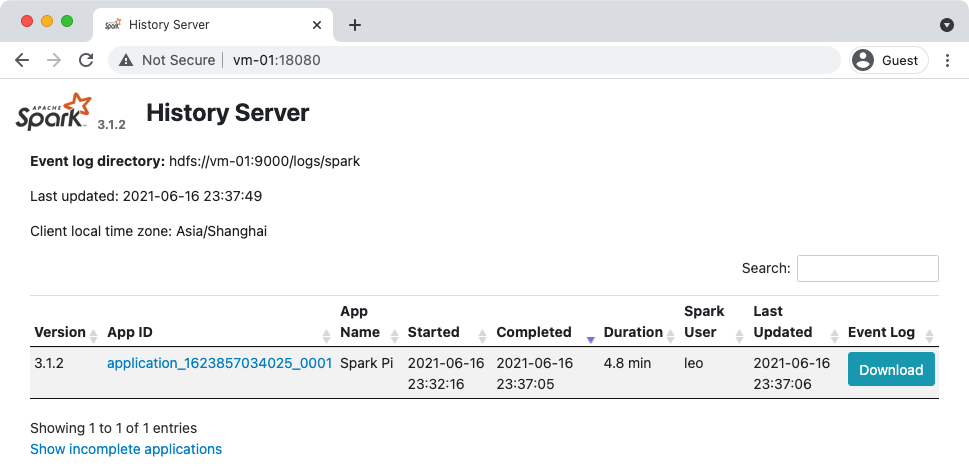
通过 http://vm-01:18081 可以进入 Spark History Server 页面:
安装 NFS 相关软件:
sudo apt install nfs-kernel-server nfs-common
在 vm-01,vm-02 和 vm-03 上创建 MFS 文件夹并设置权限:
sudo mkdir /nfs
sudo chown -R leo:leo /nfs
在 vm-01 上修改 /etc/exports 文件,配置 NFS 共享目录:
/nfs 192.168.56.1/24(rw,sync,no_root_squash,no_subtree_check)
相关参数定义可以通过 man nfs 获取。
导出共享目录并重启 NFS 服务:
sudo exportfs -a
sudo service nfs-kernel-server restart
在 vm-02 和 vm-03 上挂在 NFS:
sudo mount vm-01:/nfs /nfs
在 /etc/fstab 中添加如下内容实现开机自动挂载:
安装 Miniconda3 到 /nfs/miniconda3 目录:
sh Miniconda3-py39_4.9.2-Linux-x86_64.sh
在安装过程中安装选项如下:
Miniconda3 will now be installed into this location:
/home/leo/miniconda3

  - Press ENTER to confirm the location
  - Press CTRL-C to abort the installation
  - Or specify a different location below

[/home/leo/miniconda3] >>> /nfs/miniconda3
Do you wish the installer to initialize Miniconda3
by running conda init? [yes|no]
[no] >>> yes
修改 ~/.condarc 更改 Anaconda 镜像:
channels:
  - defaults
show_channel_urls: true
default_channels:
  - https://mirrors.tuna.tsinghua.edu.cn/anaconda/pkgs/main
  - https://mirrors.tuna.tsinghua.edu.cn/anaconda/pkgs/r
  - https://mirrors.tuna.tsinghua.edu.cn/anaconda/pkgs/msys2
custom_channels:
  conda-forge: https://mirrors.tuna.tsinghua.edu.cn/anaconda/cloud
  msys2: https://mirrors.tuna.tsinghua.edu.cn/anaconda/cloud
  bioconda: https://mirrors.tuna.tsinghua.edu.cn/anaconda/cloud
  menpo: https://mirrors.tuna.tsinghua.edu.cn/anaconda/cloud
  pytorch: https://mirrors.tuna.tsinghua.edu.cn/anaconda/cloud
  simpleitk: https://mirrors.tuna.tsinghua.edu.cn/anaconda/cloud
创建用于 Spark 的 Python 环境:
conda create -n spark python=3.9
分别在 vm-02 和 vm-03 中将如下信息添加到 /etc/profile 中:
# >>> conda initialize >>>
# !! Contents within this block are managed by 'conda init' !!
__conda_setup="$('/nfs/miniconda3/bin/conda' 'shell.bash' 'hook' 2> /dev/null)"
if [ $? -eq 0 ]; then
    eval "$__conda_setup"
else
    if [ -f "/nfs/miniconda3/etc/profile.d/conda.sh" ]; then
        . "/nfs/miniconda3/etc/profile.d/conda.sh"
    else
        export PATH="/nfs/miniconda3/bin:$PATH"
    fi
fi
unset __conda_setup
# <<< conda initialize <<<
分别在 vm-01,vm-02 和 vm-03 中将如下信息添加到 /etc/profile 中:
# Python 3.9 for Spark
conda activate spark
输入 pyspark 进入 PySaprk Shell:
Welcome to
      ____              __
     / __/__  ___ _____/ /__
    _\ \/ _ \/ _ `/ __/  '_/
   /__ / .__/\_,_/_/ /_/\_\   version 3.1.2
      /_/

Using Python version 3.9.5 (default, Jun  4 2021 12:28:51)
Spark context Web UI available at http://vm-01:4040
Spark context available as 'sc' (master = local[*], app id = local-1623876641615).
SparkSession available as 'spark'.
>>>
执行 PI 示例程序:
from random import random
from operator import add

partitions = 3
n = 100000 * partitions

def f(_):
    x = random() * 2 - 1
    y = random() * 2 - 1
    return 1 if x ** 2 + y ** 2 <= 1 else 0

count = spark.sparkContext.parallelize(range(1, n + 1), partitions).map(f).reduce(add)
print("Pi is roughly %f" % (4.0 * count / n))
运行结果如下:
Pi is roughly 3.147160
此内容由惯性聚合(RSS阅读器)自动聚合整理,仅供阅读参考。 原文来自 — 版权归原作者所有。