


惯性聚合 高效追踪和阅读你感兴趣的博客、新闻、科技资讯
阅读原文 在惯性聚合中打开

推荐订阅源

B
Blog
C
Check Point Blog
The GitHub Blog
The GitHub Blog
Y
Y Combinator Blog
SecWiki News
SecWiki News
有赞技术团队
有赞技术团队
Latest news
Latest news
D
DataBreaches.Net
Blog — PlanetScale
Blog — PlanetScale
Project Zero
Project Zero
H
Help Net Security
Cyber Security Advisories - MS-ISAC
G
GRAHAM CLULEY
Engineering at Meta
Engineering at Meta
T
Threat Research - Cisco Blogs
腾讯CDC
P
Proofpoint News Feed
L
LINUX DO - 热门话题
C
Cisco Blogs
P
Palo Alto Networks Blog
Vercel News
Vercel News
P
Privacy International News Feed
爱范儿
爱范儿
Scott Helme
Scott Helme
L
Lohrmann on Cybersecurity
MyScale Blog
MyScale Blog
K
Kaspersky official blog
B
Blog RSS Feed
美团技术团队
Microsoft Security Blog
O
OpenAI News
博客园 - 叶小钗
量子位
T
Tenable Blog
C
Cybersecurity and Infrastructure Security Agency CISA
J
Java Code Geeks
Application and Cybersecurity Blog
Hacker News: Ask HN
Hacker News: Ask HN
OSCHINA 社区最新新闻
OSCHINA 社区最新新闻
L
LINUX DO - 最新话题
F
Fortinet All Blogs
N
News | PayPal Newsroom
The Hacker News
The Hacker News
C
CXSECURITY Database RSS Feed - CXSecurity.com
cs.CV updates on arXiv.org
博客园 - 【当耐特】
N
News and Events Feed by Topic
V
Visual Studio Blog
Google DeepMind News
Last Week in AI
Last Week in AI

中文博客 on 范叶亮 | Leo Van

多智能体系统 (Multi-Agent System) 确定性和掌控欲 - 你的 AI 不是你的 AI LLM Token 消耗节省计划 (How to Save Token for LLM) 智能体的角色定位和身份演化 (Agent Role Orientation and Identity Evolution) 本地部署 OpenClaw,QwenPaw 和 Hermes Agent (Local Deployment of OpenClaw, QwenPaw and Hermes Agent) 本地部署智能体 - OpenClaw,QwenPaw,Hermes Agent ... 部署 Matrix 服务器 Synapse (Deployment of Matrix Server Synapse) 部署 frp 内网穿透服务 (Deployment of frp NAT Traversal Service) 本地部署大模型服务 (Local Deployment of LLM Services) AI 时代的生产力和生产关系 (Forces and Relations of Production in AI Era) 业余无线电入门 - CQ, CQ, CQ, this is BD1CZP. Calling CQ and standing by. 重构 - 之于代码、之于工作、之于生活 大语言模型微调 (Fine-tuning Large Language Models) 提升图片分辨率和质量 - Invoke AI 101 教程 使用画布创建和组合生成新的图片 - Invoke AI 101 教程 探索 AI 模型和概念适配器 - Invoke AI 101 教程 理解图像到图像和降噪过程 - Invoke AI 101 教程 使用控制层和指示控制图片的生成 - Invoke AI 101 教程 使用 Invoke 创作你的第一张图片 - Invoke AI 101 教程 在 OpenWrt 和群晖中自动申请和部署证书 凡人歌 - 凡人,但不要烦心 Shell 调用方式 fork,exec 和 source (Run Shell with fork, exec and source) 重定向和管道 (Redirect and Pipe) 模型压缩和推理加速 (Model Compression and Inference Acceleration) 我们需要多少种编程语言 (How Many Programming Languages do We Need) 数据可视化小贴士 - 面向动态文档生成,秉承规范、统一和实用的理念 从 rm -rf * 说起 - 喜新、怀旧、再出发 当我谈摄影时,我谈些什么 - 色彩篇 Part 1 CSS 布局和定位 (CSS Layout and Position) 当我谈修图时,我谈些什么 - 色彩篇 Part 1 文学编程和可重复性研究 (Literate Programming and Reproducible Research) 在 OpenWrt 中安装 Jellyfin 搭建家庭影音中心 自私和贪婪 (Selfish and Greedy) 评分和排名算法 (Rating & Ranking Algorithms) 小记这一波裁员浪潮 基于内容的图像检索 (Content-based Image Retrieval, CBIR) 你所应该知道的 A/B 测试 (A/B Test You Should Know) 一个人的摩旅 (Travel with My Motorcycle Alone) 设计语言初探 (A Glimpse of Design Language) Spark 集群搭建 (Spark Cluster Setup) Hive 安装和配置 (Hive Setup) Hadoop 集群搭建 (Hadoop Cluster Setup) 虚拟环境准备 (Virtual Environment Preparation) 大数据 SQL 性能调优 (Big Data SQL Performance Tuning) SQL 样式指南 (SQL Style Guide) 进程,线程和协程 (Process, Thread and Coroutine) - 实现篇 进程,线程和协程 (Process, Thread and Coroutine) - 理论篇 胶囊网络 (Capsule Network) 投票公平合理吗? 图存储与计算 (Network Storage and Computing) - 复杂网络系列 网络算法 (Network Algorithms) - 复杂网络系列 真实世界网络结构 (Structure of Real-World Network) - 复杂网络系列 网络表示,测度和度量 (Network Representation, Measures and Metrics) - 复杂网络系列 文本相似度 (Text Similarity) 而立之前 (Life before 30) 最近邻搜索 (Nearest Neighbor Search) 无模型策略预测和控制 - 时序差分学习 (Model-Free Policy Prediction and Control - Temporal Difference Learning) - 强化学习系列 无模型策略预测和控制 - 蒙特卡洛方法 (Model-Free Policy Prediction and Control - Monte-Carlo Learning) - 强化学习系列 利用动态规划求解马尔可夫决策过程 (Planning by Dynamic Programming) - 强化学习系列 贝叶斯优化 (Bayesian Optimization) 马尔可夫决策过程 (Markov Decision Process) - 强化学习系列 多臂赌博机 (Multi-armed Bandit) - 强化学习系列 强化学习简介 (Introduction of Reinforcement Learning) - 强化学习系列 在群晖 NAS 上编译安装 tmux 隐马尔可夫,条件随机场和序列标注 (Hidden Markov Model, Conditional Random Fields and Sequence Labeling) 图嵌入和图神经网络 (Graph Embedding and Graph Neural Network) 预训练自然语言模型 (Pre-trained Models for NLP) toB 产品用户权限 (User Privileges of toB Products) 京东数科 HIPO 学习之旅 (JDD HIPO Learning Journey) 杭州和东京之旅 (Tour of Hangzhou and Tokyo) 国际智慧温室种植挑战赛 (International Autonomous Greenhouse Challenge) 记忆中的儿时 (My Childhood in Memory) 启发式算法 (Heuristic Algorithms) 关不掉的浏览器标签页 (Browser Tabs You do not Close) 贝塞尔曲线 (Bézier Curve) 如何阅读一本书 (How to Read a Book) 相似性和距离度量 (Similarity and Distance Measurement) 集成学习算法 (Ensemble Learning) 计算复杂性与动态规划 (Computational Complexity and Dynamic Programming) 利用 Flask 和 Google App Engine 部署模型服务 序列到序列和注意力机制 (Seq2Seq and Attention Machanism) 词向量 (Word Embeddings) 循环神经网络 (Recurrent Neural Network, RNN) 泰国之行 (Tour of Thailand) 媒介之战 (War of Medias) 卷积神经网络 (Convolutional Neural Network, CNN) 买书,囤书,看书 (Buy Books, Hoard Books and Read Books) Play Safe, Smart Choice & Yuppie 基于 PyQt5/PySide2 和 QML 的跨平台 GUI 程序开发 流形学习 (Manifold Learning) 深度学习优化算法 (Optimization Methods for Deep Learning) 深度学习优化算法 (Optimization Methods for Deeplearning) 生成对抗网络简介 (GAN Introduction) Ising 模型,Hopfield 网络和受限的玻尔兹曼机 (Ising, Hopfield and RBM) 马尔科夫链蒙特卡洛方法和吉布斯采样 (MCMC and Gibbs Sampling) 特征值分解,奇异值分解和主成分分析 (EVD, SVD and PCA) 墨尔本之行 (Trip to Melbourne)
在 Windows 下利用 WSL2 和 Ubuntu 配置 GPU 机器学习环境
范叶亮 · 2023-03-19 · via 中文博客 on 范叶亮 | Leo Van

在 Windows 下利用 WSL2 和 Ubuntu 配置 GPU 机器学习环境

分类: 教程 / 字数: 1693 / 标签: GPU, WSL, WSL2, Ubuntu, 机器学习, 深度学习, CUDA, cuDNN, PyTorch, Tensorflow


本文主要面向希望在游戏空闲时段将显卡用于科学事业的朋友们 😎。

更新于 2024-05-19

终端

工欲善其事必先利其器,开发离不开那个黑框框,所以我们需要把这个黑框框变得更好看更好用些。Windows 终端是一个新的支持 PowerShell 和 WSL bash 的应用,通过应用商店 直接进行安装。

建议安装最新版的 PowerShell 作为命令行环境,相关下载和配置详见官网

为了更好的在终端中显示中英文和图标,推荐使用 Sarasa Term SC Nerd 作为终端显示字体。

网络

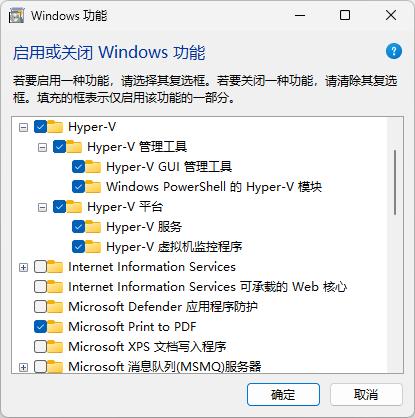
为了方便使用,网络设置采用桥接模式。桥接模式需要在 Windows 中启用 Hyper-V(仅 Windows 专业版支持)。通过启用或关闭 Windows 功能开启 Hyper-V,然后重启电脑生效。
在 Hyper-V 中创建一个新的交换机,在连接类型中选择外部网络,并根据电脑的网络连接情况选择对应的桥接网卡。
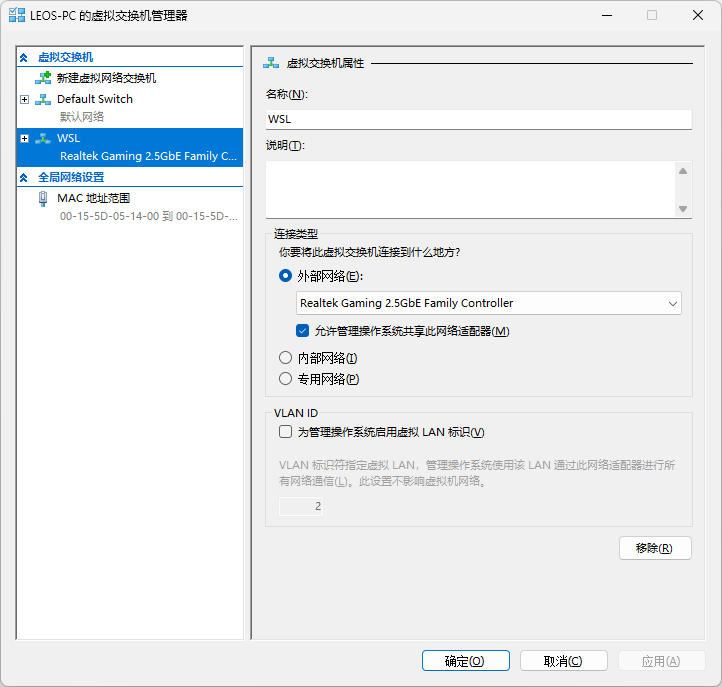
通过 Get-VMSwitch -SwitchType External 可以查看创建的交换机:

Name SwitchType NetAdapterInterfaceDescription
---- ---------- ------------------------------
WSL  External   Realtek Gaming 2.5GbE Family Controller

在 Home 目录创建 .wslconfig 文件,并添加如下内容:

[wsl2]
networkingMode=bridged
vmSwitch=WSL
ipv6=true

其中,vmSwitch 填写创建的交换机的名称。

WSL

以管理员模式打开 PowerShell 或 Windows 命令提示符,输入如下命令,并重启计算机:

此命令会启用 WSL 并安装 Ubuntu 发行版 Linux。通过 wsl -l -o 可以查看所有 Linux 的发行版:

以下是可安装的有效分发的列表。
请使用“wsl --install -d <分发>”安装。

NAME                                   FRIENDLY NAME
Ubuntu                                 Ubuntu
Debian                                 Debian GNU/Linux
kali-linux                             Kali Linux Rolling
Ubuntu-18.04                           Ubuntu 18.04 LTS
Ubuntu-20.04                           Ubuntu 20.04 LTS
Ubuntu-22.04                           Ubuntu 22.04 LTS
Ubuntu-24.04                           Ubuntu 24.04 LTS
OracleLinux_7_9                        Oracle Linux 7.9
OracleLinux_8_7                        Oracle Linux 8.7
OracleLinux_9_1                        Oracle Linux 9.1
openSUSE-Leap-15.5                     openSUSE Leap 15.5
SUSE-Linux-Enterprise-Server-15-SP4    SUSE Linux Enterprise Server 15 SP4
SUSE-Linux-Enterprise-15-SP5           SUSE Linux Enterprise 15 SP5
openSUSE-Tumbleweed                    openSUSE Tumbleweed

通过 wsl --install -d <发行版名称> 可以安装其他发行版 Linux,本文以 Ubuntu 22.04 为例。通过 wsl -l -v 可以查看当前运行的 WSL 版本:

  NAME                   STATE           VERSION
* Ubuntu-22.04           Running         2

通过 wsl 新安装的 Linux 默认已经设置为 WSL 2。

进入 Ubuntu 命令行,输入如下命令安装必要的系统依赖:

安装 zsh 作为 Ubuntu 默认的 Shell:

安装 Oh My Zsh 来提升 zsh 的易用性。

显卡

驱动

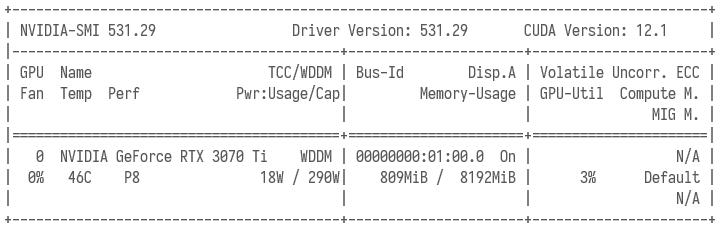
从 Nvidia 官网(https://www.nvidia.cn/geforce/drivers)下载适用于 Windows 的最新驱动并安装。进入 Windows 命令行,输入 nvidia-smi 命令查看显卡状态:
Ubuntu 中不再需要额外安装显卡驱动,进入 Ubuntu 命令行,输入 nvidia-smi 命令查看显卡状态:
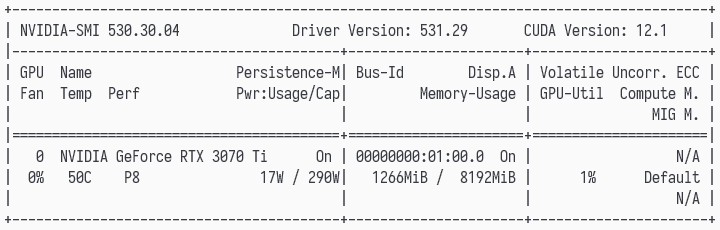
不难看出,出了 nvidia-smi 工具版本不同外,显卡驱动和 CUDA 版本均是相同的。

CUDA

从 Nvidia 官网(https://developer.nvidia.com/cuda-toolkit-archive)下载适用于 WSL Ubuntu 的 CUDA,在此选择的版本为 11.8.0(具体请参考例如 Tensorflow 等所需工具的依赖版本),相关平台选项如下:

  • Operating System:Linux
  • Architecture:x86_64
  • Distribution:WSL-Ubuntu
  • Version:2.0
  • Installer Type:runfile (local)

下载完毕后运行如下命令进行安装:

chmod +x cuda_11.8.0_520.61.05_linux.run
sudo ./cuda_11.8.0_520.61.05_linux.run --toolkit

其中 --toolkit 表示仅安装 CUDA 工具箱。
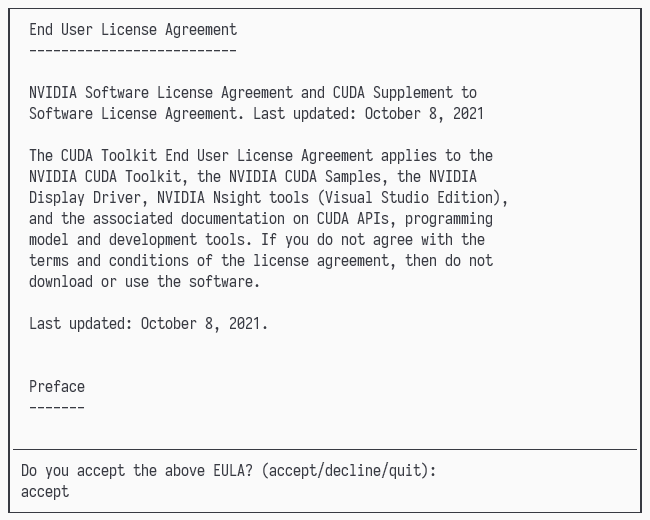
在弹出的 EULA 界面输入 accept 进入安装选项界面:
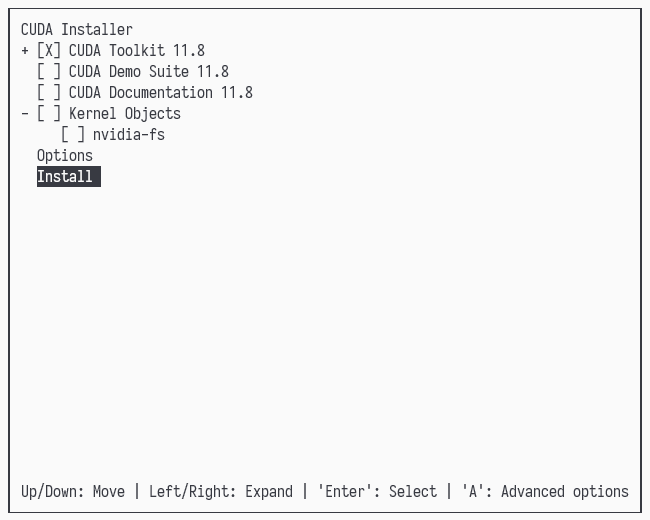
仅保留 CUDA Toolkit 11.8 即可,切换到 Install 并按回车键进行安装。

将如下内容添加到 ~/.bashrc 文件尾部:

export PATH=/usr/local/cuda/bin:$PATH
export LD_LIBRARY_PATH=$LD_LIBRARY_PATH:/usr/local/cuda/lib64:/usr/local/cuda/extras/CUPTI/lib64

通过 source ~/.bashrcsource ~/.zshrc 使路径立即生效。输入 nvcc -V 查看 CUDA 编译器驱动版本:
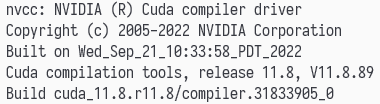
cuDNN

从 Nvidia 官网(https://developer.nvidia.com/rdp/cudnn-archive)下载适用于 Linux 和上述安装 CUDA 版本的 cuDNN,在此选择的版本为 v8.8.0 for CUDA 11.x,安装包格式为 Local Installer for Linux x86_64 (Tar)

注意:cuDNN 需要注册账户后方可进行下载。

下载完毕后运行如下命令进行解压:

tar -xvf cudnn-linux-x86_64-8.9.7.29_cuda11-archive.tar.xz

运行如下命令将其移动到 CUDA 目录:

sudo mv cudnn-*-archive/include/cudnn*.h /usr/local/cuda/include
sudo mv cudnn-*-archive/lib/libcudnn* /usr/local/cuda/lib64
sudo chmod a+r /usr/local/cuda/include/cudnn*.h /usr/local/cuda/lib64/libcudnn*

机器学习环境

Python

Ubuntu 22.04 系统已经安装了 Python 3.10 版本,Python 3.10 在常用机器学习库上具有较好的兼容性。因此,以 Python 3.10 版本为例,使用 venv 创建机器学习虚拟环境。在系统层面安装 venv 并创建虚拟环境:

sudo apt install python3-venv
mkdir ~/SDK
python3.10 -m venv ~/SDK/python310
source ~/SDK/python310/bin/activate

PyTorch

输入如下命令安装 PyTorch:

pip install torch torchvision torchaudio --index-url https://download.pytorch.org/whl/cu118

安装完毕后发现 PyTorch 内嵌了 CUDA 和 cuDNN。内嵌的好处是可以做到安装即用,但如果和其他包依赖的系统 CUDA 和 cuDNN 版本不一致,容易出现各种意想不到的问题。在 Python 中运行如下命令验证 PyTorch 是否可以正常调用显卡:

import torch

# PyTorch 版本
torch.__version__
# 2.3.0+cu118

# CUDA 是否可用
torch.cuda.is_available()
# True

# GPU 数量
torch.cuda.device_count()
# 1

# GPU 名称
torch.cuda.get_device_name(0)
# NVIDIA GeForce RTX 3070 Ti

Tensorflow

输入如下命令安装 Tensorflow(2.14.1 版本支持 CUDA 11.8):

pip install tensorflow==2.14.1

在 Python 中运行如下命令验证 Tensorflow 是否可以正常调用显卡:

import tensorflow as tf

# Tensorflow 版本
tf.__version__
# 2.15.1

# GPU 设备
tf.config.list_physical_devices('GPU')
# [PhysicalDevice(name='/physical_device:GPU:0', device_type='GPU')]

# GPU 名称
tf.test.gpu_device_name()
# /device:GPU:0

PyCharm

配置 PyCharm 使用 WSL 中的 Python 请参见 Configure an interpreter using WSL