本文最后更新于 233 天前,其中的信息可能已经有所发展或是发生改变。
在HuggingFace中,对应Bert模型的主要就是BertMoedel这个类:
from transformers import BertModel
HF源码对BertMoedel的封装也是一层接一层,在学习之前,我们先了解整体架构,然后再由内到外,逐层学习。
源码地址:
https://github.com/huggingface/transformers/blob/v4.57.1/src/transformers/models/bert/modeling_bert.py
BertModel
├── BertEmbeddings
│   ├── word_embeddings(TokenEmbeddings)
│   ├── position_embeddings
│   ├── token_type_embeddings(Segment Embeddings)
│   ├── LayerNorm
│   └── dropout
│
├── BertEncoder
│   ├── BertLayer[0..N-1]
│   │   ├── BertAttention
│   │   │   ├── BertSelfAttention(Multi-Head,分头)
│   │   │   ├── BertSelfOutput(将多头重新concat并且映射回来+LayerNorm+残差连接)
│   │   │   └──
│   │   └── BertIntermediate: (FeedForward前半部分,低维映射到高维+激活函数)
│   │   └── BertOutput (FeedForward前后半部分,高维映射回低维+LayerNorm+残差连接)
│
│
│
├── BertPooler(对cls向量在进行一个线性映射加激活,增强其在下游任务的拟合能力)
│   ├── dense (linear)
│   └── activation (tanh)
│
文章后边会对每一个类,由内到外,逐层学习,具体每个类的位置参见目录。
首先是初始化函数:
def __init__(self, config):
        super().__init__()
        self.word_embeddings = nn.Embedding(config.vocab_size, config.hidden_size, padding_idx=config.pad_token_id)
        self.position_embeddings = nn.Embedding(config.max_position_embeddings, config.hidden_size)
        self.token_type_embeddings = nn.Embedding(config.type_vocab_size, config.hidden_size)        # self.LayerNorm is not snake-cased to stick with TensorFlow model variable name and be able to load
        # any TensorFlow checkpoint file
        self.LayerNorm = nn.LayerNorm(config.hidden_size, eps=config.layer_norm_eps)
        self.dropout = nn.Dropout(config.hidden_dropout_prob)
        # position_ids (1, len position emb) is contiguous in memory and exported when serialized
        self.position_embedding_type = getattr(config, "position_embedding_type", "absolute")#getattr指的是获取config这个对象中的position_embedding_type属性,如果没有,则取"absolute"
        self.register_buffer(
            "position_ids", torch.arange(config.max_position_embeddings).expand((1, -1)), persistent=False   #(1,512)
        )
        self.register_buffer(
            "token_type_ids", torch.zeros(self.position_ids.size(), dtype=torch.long), persistent=False  #(1,512)
        )
config来自另一个文件中的一个类:具体参数如下:
        vocab_size=30522,
        hidden_size=768,
        num_hidden_layers=12,
        num_attention_heads=12,
        intermediate_size=3072,
        hidden_act="gelu",
        hidden_dropout_prob=0.1,
        attention_probs_dropout_prob=0.1,
        max_position_embeddings=512,
        type_vocab_size=2,
        initializer_range=0.02,
        layer_norm_eps=1e-12,
        pad_token_id=0,
        position_embedding_type="absolute",
        use_cache=True,
        classifier_dropout=None,
        **kwargs,
word_embeddings、position_embeddings、token_type_embeddings分别代表论文中的三种编码
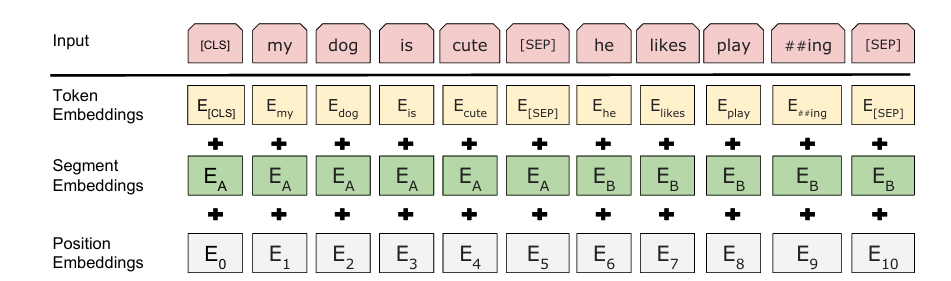
input_ids的范围也不一样,word_embedding是词向量,所以是由vocab_size大小转为(vocab_size,hidden_size),即将每个词都映射成hidden_size维度的向量,而position_embeddings只管当前输入序列的各个token位置关系,所以不需要由词表大小映射到hidden_size,这里设置成512,所以他也代表了模型最多支持输入最多包含512个token的seq。因为在计算自注意力的时候每个token之间都要计算点积,是的时间复杂度,设置为512,就要次计算。当这个数增大时,这个计算次数会平方级暴涨,但是太小又不能满足实际情况,所以bert选择了一个折中方案:512。token_type_embeddings就是代表当前token属于句子对中的哪一个,所以他的索引大小为2,只包含0和1。0代表第一句,1代表第二句。当输入单个句子的时候,全部为0.紧接着:self.register_buffer指的是pytorch中的机制,可以为该类注册一个静态张量,他会跟随模型一起移动到 .to(device),但是不参与反向传播,这里position_ids和token_type_ids是对应这两个id的初始化,主要在下边的forwar函数里使用:
def forward(
        self,
        input_ids: Optional[torch.LongTensor] = None,
        token_type_ids: Optional[torch.LongTensor] = None,
        position_ids: Optional[torch.LongTensor] = None,
        inputs_embeds: Optional[torch.FloatTensor] = None,
        past_key_values_length: int = 0,
    ) -> torch.Tensor:
        if input_ids is not None:
            input_shape = input_ids.size()#(batch_size,seq_len)
        else:
            input_shape = inputs_embeds.size()[:-1]#(batch_size,seq_len,hidden_size)
        #这里提供了直接输入inputs_embeds的选择,那代表可以不用输入序列,直接输入预训练好的静态词向量
        seq_length = input_shape[1]        if position_ids is None:  #self.position_ids指的是前面register_buffer注册的position_ids大小为(1,512)
            position_ids = self.position_ids[:, past_key_values_length : seq_length + past_key_values_length]
            #past_key_values_length是在使用了decoder模型中使用的(GPT,T5等),用来告诉模型前面缓存了多少个token的注意力,Bert是encoder only,所以在bert中,past_key_values_length为0。  下边还会展开大概讲讲注意力缓存机制        # Setting the token_type_ids to the registered buffer in constructor where it is all zeros, which usually occurs
        # when its auto-generated, registered buffer helps users when tracing the model without passing token_type_ids, solves
        # issue #5664
        if token_type_ids is None: #如果token_type_ids是none,则代表输入的是单句
            if hasattr(self, "token_type_ids"):#hasattr指的是检查类中是否含有token_type_ids属性,这里检查的是self,也就是自己这个类
                buffered_token_type_ids = self.token_type_ids[:, :seq_length]#(1,seq) #只需要取到和当前seq_length一样的长度即可,最大提供512长度
                buffered_token_type_ids_expanded = buffered_token_type_ids.expand(input_shape[0], seq_length)#扩展到(batch_size,seq)
                token_type_ids = buffered_token_type_ids_expanded
            else:#更加保险
                token_type_ids = torch.zeros(input_shape, dtype=torch.long, device=self.position_ids.device)        if inputs_embeds is None:
            inputs_embeds = self.word_embeddings(input_ids)
        token_type_embeddings = self.token_type_embeddings(token_type_ids)        embeddings = inputs_embeds + token_type_embeddings
        if self.position_embedding_type == "absolute":#绝对位置编码,可以直接相加
            position_embeddings = self.position_embeddings(position_ids)
            embeddings += position_embeddings
        #若不采用绝对位置,那会在计算注意力分数的时候去添加位置编码
        embeddings = self.LayerNorm(embeddings)
        embeddings = self.dropout(embeddings)
        return embeddings
class BertAttention(nn.Module):
    def __init__(self, config, position_embedding_type=None):
        super().__init__()
        self.self = BertSelfAttention(config, position_embedding_type=position_embedding_type)
        self.output = BertSelfOutput(config)
        self.pruned_heads = set()
可以看到BertSelfAttention是在BertAttention类中调用的,但由于BertSelfAttention比较重要,涉及到多头自注意力以及交叉注意力的计算,所以将它单独摘出来放在前面先学习。
首先是初始化函数:比较容易理解,我就只在代码里加注释了
class BertSelfAttention(nn.Module):
    def __init__(self, config, position_embedding_type=None):
        super().__init__()
        if config.hidden_size % config.num_attention_heads != 0 and not hasattr(config, "embedding_size"):
            #在一些模型中,会引入embedding_size,
            #hidden vectors 会先投影到 embedding_size,这个 embedding_size 可以整除 head 数
            # 所以即使hidden_size整除不了head_num也没问题
            raise ValueError(
                f"The hidden size ({config.hidden_size}) is not a multiple of the number of attention "
                f"heads ({config.num_attention_heads})"
            )        self.num_attention_heads = config.num_attention_heads
        self.attention_head_size = int(config.hidden_size / config.num_attention_heads)#每个head的hidden_size
        self.all_head_size = self.num_attention_heads * self.attention_head_size
        #bert中all_head_size ==config.hidden_size 这里这么写可能是为了可读性。
        self.query = nn.Linear(config.hidden_size, self.all_head_size)
        self.key = nn.Linear(config.hidden_size, self.all_head_size)
        self.value = nn.Linear(config.hidden_size, self.all_head_size)
        #如果是nn.Linear(config.hidden_size, config.hidden_size)代码可读性不好
        #这里就是意思是all_head_size,之后再 view给他切分给每个头        self.dropout = nn.Dropout(config.attention_probs_dropout_prob)
        self.position_embedding_type = position_embedding_type or getattr(
            config, "position_embedding_type", "absolute"
        )
        if self.position_embedding_type == "relative_key" or self.position_embedding_type == "relative_key_query":
            #relative_key和relative_key_query指的是相对位置编码,分别指不同的操作,在后续的forwar函数里可以看到。
            self.max_position_embeddings = config.max_position_embeddings
            self.distance_embedding = nn.Embedding(2 * config.max_position_embeddings - 1, self.attention_head_size)        self.is_decoder = config.is_decoder #这个在后边的
    def transpose_for_scores(self, x: torch.Tensor) -> torch.Tensor:
        #x:(batch_size,seq_len,hidden_size)
        new_x_shape = x.size()[:-1] + (self.num_attention_heads, self.attention_head_size)
        #new_x_shape=(batch_size,seq_len,num_attention_head,attention_head_size)
        #即:(batch_size,seq_len,head_num,d_k)==(batch_size,seq_len,12,64)
        x = x.view(new_x_shape)
        return x.permute(0, 2, 1, 3)#交换第一维和第二维
        #(batch_size,seq_len,head_num,d_k)->(batch_size,head_num,seq_len,d_k)
然后是forward函数
    def forward(
        self,
        hidden_states: torch.Tensor,
        attention_mask: Optional[torch.FloatTensor] = None,
        head_mask: Optional[torch.FloatTensor] = None,
        encoder_hidden_states: Optional[torch.FloatTensor] = None,
        encoder_attention_mask: Optional[torch.FloatTensor] = None,
        past_key_value: Optional[Tuple[Tuple[torch.FloatTensor]]] = None,
        output_attentions: Optional[bool] = False,
    ) -> Tuple[torch.Tensor]:
        mixed_query_layer = self.query(hidden_states)#这里这个q可能还要复用        # If this is instantiated as a cross-attention module, the keys
        # and values come from an encoder; the attention mask needs to be
        # such that the encoder's padding tokens are not attended to.
        is_cross_attention = encoder_hidden_states is not None        if is_cross_attention and past_key_value is not None:
            #交叉注意力 + 缓存 K/V
            # reuse k,v, cross_attentions
            key_layer = past_key_value[0]
            value_layer = past_key_value[1]
            attention_mask = encoder_attention_mask
        elif is_cross_attention:#只是计算交叉注意力,没有注意力缓存机制
            key_layer = self.transpose_for_scores(self.key(encoder_hidden_states))
            value_layer = self.transpose_for_scores(self.value(encoder_hidden_states))
            attention_mask = encoder_attention_mask
        #即K、V来自encoder,Q来自decoder 说明当计算cross注意力时,是在decoder中调用该函数,并且传入encoder_hidden_states、encoder_attention_mask

        elif past_key_value is not None: #decoder中的自注意力+有注意力缓存机制
            key_layer = self.transpose_for_scores(self.key(hidden_states))
            value_layer = self.transpose_for_scores(self.value(hidden_states))
            key_layer = torch.cat([past_key_value[0], key_layer], dim=2)
            value_layer = torch.cat([past_key_value[1], value_layer], dim=2)
        else:#仅计算自注意力
            key_layer = self.transpose_for_scores(self.key(hidden_states))
            value_layer = self.transpose_for_scores(self.value(hidden_states))        query_layer = self.transpose_for_scores(mixed_query_layer)        use_cache = past_key_value is not None
        if self.is_decoder:
            # if cross_attention save Tuple(torch.Tensor, torch.Tensor) of all cross attention key/value_states.
            # Further calls to cross_attention layer can then reuse all cross-attention
            # key/value_states (first "if" case)
            # if uni-directional self-attention (decoder) save Tuple(torch.Tensor, torch.Tensor) of
            # all previous decoder key/value_states. Further calls to uni-directional self-attention
            # can concat previous decoder key/value_states to current projected key/value_states (third "elif" case)
            # if encoder bi-directional self-attention past_key_value is always None
            past_key_value = (key_layer, value_layer)        # Take the dot product between "query" and "key" to get the raw attention scores.
        attention_scores = torch.matmul(query_layer, key_layer.transpose(-1, -2))
        #(batch_size,head_num,seq_len,d_k)*(batch_size,head_num,d_k,seq_len)
        #key_layer.transpose(-1, -2)等价于key_layer.permute(0,1,3,2)
            #(batch_size,head_num,seq_len,d_k)
上边代码的注意力计算分为四种模式:
交叉注意力好理解,就是K、V来自encoder,Q来自decoder。
这里出现一个之前没学过的:缓存机制。缓存主要是针对decoder的。
在预测的时候,decoder是自回归的。
例如当生成一段序列时:
对于自注意力模块中:
["BOS",I","love","you","EOS"]
decoder会先输入<BOS>,然后经过decoder输出"I",然后再将<BOS>和"I"喂给decoder,再输出第三个,以此类推,对于一个5个token的序列,需要输入decoder4次,那每次输入前都需要将x经过一个线性层:self.key = nn.Linear(config.hidden_size, self.all_head_size)生成对应的key和value向量。但实际上每次生成的和前一步生成的K、V向量并没什么区别,所以我们就可以将K、V向量缓存下来。所以代码是这么写的:
 elif past_key_value is not None: #decoder中的自注意力+有注意力缓存机制
            key_layer = self.transpose_for_scores(self.key(hidden_states))
            value_layer = self.transpose_for_scores(self.value(hidden_states))
            key_layer = torch.cat([past_key_value[0], key_layer], dim=2)
            value_layer = torch.cat([past_key_value[1], value_layer], dim=2)
第一次输入 "I"
没有缓存,所以触发的条件是:
else:#仅计算自注意力
            key_layer = self.transpose_for_scores(self.key(hidden_states))
            value_layer = self.transpose_for_scores(self.value(hidden_states))
计算 K₁, V₁
缓存:past_key_value = (K₁, V₁)
第二次输入 "I love"
只需计算新的 K₂, V₂
触发的是
elif past_key_value is not None: #decoder中的自注意力+有注意力缓存机制
然后拼接:
K = torch.cat([past_key_value[0], K₂], dim=2)
V = torch.cat([past_key_value[1], V₂], dim=2)
之后以此类推,就只需要计算当前时刻的K、V而不用计算之前的K、V了。
而在交叉注意力模块中,
第一次调用,K、V肯定是没有缓存的,所以触发的代码是这个:
elif is_cross_attention:#只是计算交叉注意力,没有注意力缓存机制
            key_layer = self.transpose_for_scores(self.key(encoder_hidden_states))
            value_layer = self.transpose_for_scores(self.value(encoder_hidden_states))
            attention_mask = encoder_attention_mask
而经过了一次交叉注意力计算,来自encoder的K和V也缓存下来了:past_key_value = (key_layer, value_layer)
之后再经过交叉注意力模块的时候,就可以直接调用
 if is_cross_attention and past_key_value is not None:
            #交叉注意力 + 缓存 K/V
            # reuse k,v, cross_attentions
            key_layer = past_key_value[0]
            value_layer = past_key_value[1]
            attention_mask = encoder_attention_mask
这里你可能会有疑问,交叉注意力和自注意力的缓存不会冲突吗?答案是不会的,因为在调用该类的时候,是独立的两个模块:
class BertLayer(nn.Module):
    def __init__(self, config):
        super().__init__()
        self.chunk_size_feed_forward = config.chunk_size_feed_forward
        self.seq_len_dim = 1
        self.attention = BertAttention(config)
        self.is_decoder = config.is_decoder
        self.add_cross_attention = config.add_cross_attention
        if self.add_cross_attention:
            if not self.is_decoder:
                raise ValueError(f"{self} should be used as a decoder model if cross attention is added")
            self.crossattention = BertAttention(config, position_embedding_type="absolute")
        self.intermediate = BertIntermediate(config)
        self.output = BertOutput(config)
可以看到self.attention和self.crossattention是分别定义的,不会混在一起
可以说,if is_cross_attention and past_key_value is not None:和elif is_cross_attention:是一套,他俩绑定,
然后elif past_key_value is not None:和else:绑定
注释里也写的很清楚:
            # if cross_attention save Tuple(torch.Tensor, torch.Tensor) of all cross attention key/value_states.
            # Further calls to cross_attention layer can then reuse all cross-attention
            # key/value_states (first "if" case)
            # if uni-directional self-attention (decoder) save Tuple(torch.Tensor, torch.Tensor) of
            # all previous decoder key/value_states. Further calls to uni-directional self-attention
            # can concat previous decoder key/value_states to current projected key/value_states (third "elif" case)
            # if encoder bi-directional self-attention past_key_value is always None
| 注释内容 | 中文解释 |
|---|---|
| cross_attention 情况 | 如果是解码器在做“交叉注意力”,那就缓存编码器的 key/value,供后续使用。 |
| uni-directional self-attention 情况 | 如果是解码器的“单向自注意力”,那就缓存上一步生成的 key/value,用于下一次拼接。 |
| encoder 情况 | 如果是普通的编码器双向注意力(如 BERT),那根本不需要缓存。 |
然后是点积计算:attention_scores = torch.matmul(query_layer, key_layer.transpose(-1, -2))
按正常的理解,接下来应该是除以之后接一个softmax,然后对value加权求和了。但是代码里紧接着来了这么一坨:
        #relative_key和relative_key_query都是相对位置编码
        if self.position_embedding_type == "relative_key" or self.position_embedding_type == "relative_key_query":
            #query_layer:(batch_size,head_num,seq_len_q,d_k)
            #key_layer:(batch_size,head_num,seq_len_k,d_k)
            query_length, key_length = query_layer.shape[2], key_layer.shape[2]
            if use_cache: #有缓存,代表当前是decoder模式
                position_ids_l = torch.tensor(key_length - 1, dtype=torch.long, device=hidden_states.device).view(
                    -1, 1
                )#(l_k-1,)->(l_k-1,1)
            else:
                #这里
                position_ids_l = torch.arange(query_length, dtype=torch.long, device=hidden_states.device).view(-1, 1)
                ##(l_q,)->(l_q,1)
            position_ids_r = torch.arange(key_length, dtype=torch.long, device=hidden_states.device).view(1, -1)
            #(1,l_k)

            distance = position_ids_l - position_ids_r
            """
            position_ids_l代表的是q向量对应序列的token位置列表,
            position_ids_r代表的是k向量对应序列的token位置列表
            当没有缓存
            例如当 q的长度为4时, k的长度也为4
            position_ids_l = torch.arange(query_length).view(-1, 1)
            position_ids_l:
            [[0],
            [1],
            [2],
            [3],]
             #(4,1) 这代表q向量对应这个序列中有4个token。
            position_ids_r:
            position_ids_r = torch.arange(key_length).view(1, -1)
            [[0,1,2,3],] #(1,4)            distance=[[0,-1,-2,-3],
                      [1,-0,-1,-2],
                      [2,1,0,-1],
                      [3,2,1,0],
                     ]
            distance[i][j]就代表了q向量对应的序列中第i个token和k向量对应的序列中第j个token的相对位置            当有缓存的时候(if use_cache: ),就默认是decoder模式,因为缓存只在decoder中才有意义
            此时就无法并行的一次性处理所有token之间的位置关系,而是每次处理当前要生成的token与前面所有token的位置关系,只能串行处理,而k向量可以缓存,当要生成第i个token的时候,该token会处理成q向量,然后和前面所有已经生成的token的k向量进行计算
            例如:当前已生成:"我","爱","学"
            要生成第四个token:"习"
            此时前面已经将"我爱学"这三个token的k、v向量缓存下来了
            在输入该类之前,key_length=3,但是同时也会生成第四个token的k、v向量,并且在此代码之前就已经缓存,所以代码走到这一步的时候key_length==4
            其中第四个就是第四个token自己,所以"我"的位置是0,"爱"是1,"你"是2,
            所以对应"习"的位置应该就是3,即4-1=3。
            position_ids_l = torch.tensor(key_length - 1).view(-1, 1)
            所以此时:position_ids_l为
            [[3],](1,1)
            而position_ids_r为 [[0,1,2,3],]  #(1,4)
            所以
            distance=[[3,2,1,0],]
            和上边一样:
            这里distance只存在最新的token与前面已经生成token的位置关系了            """            positional_embedding = self.distance_embedding(distance + self.max_position_embeddings - 1)
            #这里是将distance做一个偏移,将相对距离都偏移到正的
            # 因为要保证输入序列最大不超过max_position_embeddings-1,
            # 所以偏移之后最大的值为2*max_position_embeddings。
#这也是self.distance_embedding =nn.Embedding(2 * config.max_position_embeddings - 1, self.attention_head_size)
            #的原因
            #这样就可以保证每个相对距离值都可以通过distance_embedding
            #映射到attention_head_size,即d_k
            positional_embedding = positional_embedding.to(dtype=query_layer.dtype)  # fp16 compatibility            #这里就是对应到两种类型了,详细请向下看
            if self.position_embedding_type == "relative_key":
                relative_position_scores = torch.einsum("bhld,lrd->bhlr", query_layer, positional_embedding)
                attention_scores = attention_scores + relative_position_scores
            elif self.position_embedding_type == "relative_key_query":
                relative_position_scores_query = torch.einsum("bhld,lrd->bhlr", query_layer, positional_embedding)
                relative_position_scores_key = torch.einsum("bhrd,lrd->bhlr", key_layer, positional_embedding)
                attention_scores = attention_scores + relative_position_scores_query + relative_position_scores_key
这里就是对相对位置编码的处理了。
在transformer和Bert中,都是采用的绝对位置编码,每个token的embedding都会加上一个固定的位置向量,他是直接和word_embedding相加的,这么做只能表示绝对位置,无法表示token的相对位置,当序列长度很长的时候,这样的绝对位置效果会差一些,所以就引出了相对位置编码,模型不再直接编码每个 token的位置,而是关注 和 之间的相对距离。而当采用这种方式的时候在embedding的时候就不做位置编码处理了,而是在计算注意力分数的时候进行相对位置编码处理。上边这一坨代码就是进行相对位置编码处理的。
至于代码中怎么关注每两个token之间的相对距离:可以详细看代码注释
而关注 和 之间的相对距离之后,主要是将这个距离信息融入到了注意力分数之中。
在标准注意力分数计算方式中:
表示第i个token 对第j个token的关注强度,但这个分数只反映语义相似度(Q、K 向量空间中的相似性),并不知道两者的相对位置关系(例如j在i前面3个还是后面2个)
具体方式为:
其中表示第个token的和第个token的相对位置向量
而这个公式的意思就是:每一对 (query_i, key_j),计算 query 与相对位置向量的点积,再把这个值加到 attention score 上
这个位置向量本身就蕴含了 和 之间距离的信息,之后与他做点积,就是在计算对距离 (i−j) 的关注程度
如果结果分数高,那么代表当前的查询很倾向于从距离为 的位置去取信息。
除此之外,语义还能加强:
让这个相对位置也影响到K向量,和K向量做点积,之后加起来,这里如果强行解释一下的话:
分数很代表更容易被哪些距离的query注意到。
但我感觉就只是把 和 的相对位置信息融入到注意力分数,使得 关注时会考虑位置信息。 至于和Q点积还是K点积,无非多一个K点积将这个距离信息更丰富了一下。
这样得到的 和 的注意力分数就不仅仅有这两个token的相似度,还包含了他俩的距离信息。
而代码实现是这样的
            if self.position_embedding_type == "relative_key":
                relative_position_scores = torch.einsum("bhld,lrd->bhlr", query_layer, positional_embedding)
                attention_scores = attention_scores + relative_position_scores
            elif self.position_embedding_type == "relative_key_query":
                relative_position_scores_query = torch.einsum("bhld,lrd->bhlr", query_layer, positional_embedding)
                relative_position_scores_key = torch.einsum("bhrd,lrd->bhlr", key_layer, positional_embedding)
                attention_scores = attention_scores + relative_position_scores_query + relative_position_scores_key
实际上"relative_key"应该改成"relative_query"比较合适
这里有个新用法torch.einsum叫爱因斯坦求和,可以让我们可以不那么关注维度对齐的计算矩阵乘法
torch.einsum("bhld,lrd->bhlr", query_layer, positional_embedding)代表,
query_layer的维度为(b,h,l,d),positional_embedding的维度为(l,r,d),
他俩计算要得到的维度为:(b,h,l,r),那说明,等价于torch.mamul(query_layer,positional_embedding.transpose(-1,-2))但因为positional_embedding的维度并不是(b,h,r,d),不能直接广播相乘,所以这里肯定得再处理,但是如果使用torch.einsum方法,就可以自动帮我们对齐每一个batch和head。得到最终的维度:(b,h,l,r)。 这里的r应该是seq_len_k,因为distance中每行的长度就是由seq_len_k决定的。(b,h,l,r)==(batch_size,head_num,seq_len_q,seq_len_k)
这里的操作就是对应公式:
同理下边就是多加了一个k向量对相对位置的计算。
relative_position_scores_key = torch.einsum("bhrd,lrd->bhlr", key_layer, positional_embedding)
(batch_size,head_num,seq_len_k,d)、(seq_len_q,seq_len_k,d)->(batch_size,head_num,seq_len_q,seq_len_k)
这两个维度都与注意力分数的维度相同,所以可以相加,对应于公式:
经过了上边繁杂没见过的KV cache,相对位置编码
终于来到了我们熟悉的流程,除以,过softmax函数,得到权重,然后
        attention_scores = attention_scores / math.sqrt(self.attention_head_size)
        if attention_mask is not None: #例如decoder中的mask
            # Apply the attention mask is (precomputed for all layers in BertModel forward() function)
            attention_scores = attention_scores + attention_mask
        # Normalize the attention scores to probabilities.
        attention_probs = nn.functional.softmax(attention_scores, dim=-1)
        # This is actually dropping out entire tokens to attend to, which might
        # seem a bit unusual, but is taken from the original Transformer paper.
        attention_probs = self.dropout(attention_probs)        # Mask heads if we want to
        #可以屏蔽特定的head,
        if head_mask is not None:
            attention_probs = attention_probs * head_mask        context_layer = torch.matmul(attention_probs, value_layer)


        context_layer = context_layer.permute(0, 2, 1, 3).contiguous()
    #(batche_size,head_num,seq_len_q,d_k)->(batche_size,seq_len,head_num,d_k)        new_context_layer_shape = context_layer.size()[:-2] + (self.all_head_size,)
    #(batche_size,seq_len_q)+(hidden_size)->#(batche_size,seq_len_q,hidden_size)

        context_layer = context_layer.view(new_context_layer_shape)
        #(batche_size,seq_len_q,hidden_size)
        outputs = (context_layer, attention_probs) if output_attentions else (context_layer,)

        #decoder模式,需要将缓存传给下一层
        if self.is_decoder:
            outputs = outputs + (past_key_value,)
        return outputs
需要注意的是:
attention_scores = attention_scores + attention_mask
在《The Annotated Transformer》中,作者是用tensor.masked_fill()方式来进行mask操作的。但这里直接进行了相加,那我们可以推断出,attention_mask一定是一个类似:[[0, 0, -∞, -∞, -∞]]的值,这样相加之后,得到的值,再经过softmax会将想屏蔽的地方变为0。
但是,在我们tokenizer得到的attention_mask应该是类似[1, 1, 0, 0, 0]]这样的形式。那他是什么时候转换的呢? 注释里也写到了:precomputed for all layers in BertModel forward() function。这些mask会再BertModel的forwar函数中进行预处理,而在源码中是这一行:
extended_attention_mask: torch.Tensor = self.get_extended_attention_mask(attention_mask, input_shape)
这个get_extended_attention_mask就是将原始的attention_mask进行了转化。
回到BertAttention
class BertAttention(nn.Module):
    def __init__(self, config, position_embedding_type=None):
        super().__init__()
        self.self = BertSelfAttention(config, position_embedding_type=position_embedding_type)
        self.output = BertSelfOutput(config)
        self.pruned_heads = set()
BertSelfAttention就是计算多头注意力的地方,那我们也能推断出来下边这个BertSelfOutput就是跟在多头注意力后边的残差连接和LayerNorm的操作了。
BertSelfOutput比较简单:
class BertSelfOutput(nn.Module):
    def __init__(self, config):
        super().__init__()
        self.dense = nn.Linear(config.hidden_size, config.hidden_size)
        self.LayerNorm = nn.LayerNorm(config.hidden_size, eps=config.layer_norm_eps)
        self.dropout = nn.Dropout(config.hidden_dropout_prob)    def forward(self, hidden_states: torch.Tensor, input_tensor: torch.Tensor) -> torch.Tensor:
        hidden_states = self.dense(hidden_states)
        hidden_states = self.dropout(hidden_states)
        hidden_states = self.LayerNorm(hidden_states + input_tensor)
        return hidden_states
一开始忘了这个Linear是怎么个事儿了,后边才想起来,在多头注意力中,每个头concat之后,我们还需要过一个线性层,按照常理来说这个不应该是在BertSelfAttention做吗,但作者放在这里了。
其他的没什么好说的,代码写的都很简洁
class BertAttention(nn.Module):
    def __init__(self, config, position_embedding_type=None):
        super().__init__()
        self.self = BertSelfAttention(config, position_embedding_type=position_embedding_type)
        self.output = BertSelfOutput(config)
        self.pruned_heads = set()    def prune_heads(self, heads):
        if len(heads) == 0:
            return
        heads, index = find_pruneable_heads_and_indices(
            heads, self.self.num_attention_heads, self.self.attention_head_size, self.pruned_heads
        )        # Prune linear layers
        self.self.query = prune_linear_layer(self.self.query, index)
        self.self.key = prune_linear_layer(self.self.key, index)
        self.self.value = prune_linear_layer(self.self.value, index)
        self.output.dense = prune_linear_layer(self.output.dense, index, dim=1)        # Update hyper params and store pruned heads
        self.self.num_attention_heads = self.self.num_attention_heads - len(heads)
        self.self.all_head_size = self.self.attention_head_size * self.self.num_attention_heads
        self.pruned_heads = self.pruned_heads.union(heads)
再次回到BertAttention,__init__函数没什么好说的了,他这里还写了一个prune_heads函数,字面意思上理解就是,剪头(bushi)。 实际上就是对多头注意力进行剪枝操作,
该函数的作用就是接受一个要删除的头编号集合 heads,把对应注意力头从模型中移除(同时调整对应的线性层权重和超参),以减小模型计算量和参数量。
我谷歌了一下这个"剪枝操作",在论文Analyzing Multi-Head Self-Attention:
Specialized Heads Do the Heavy Lifting, the Rest Can Be Pruned(https://arxiv.org/pdf/1905.09418)对多个Head进行了分析,发现有一些head在过程中给的作用是多余的,是可以被剪掉的。具体实现细节这里就不深挖了。
紧接着是foward函数,
也很常规,具体要注意的我都写在了注释里。
    def forward(
        self,
        hidden_states: torch.Tensor,
        attention_mask: Optional[torch.FloatTensor] = None,
        head_mask: Optional[torch.FloatTensor] = None,
        encoder_hidden_states: Optional[torch.FloatTensor] = None,
        encoder_attention_mask: Optional[torch.FloatTensor] = None,
        past_key_value: Optional[Tuple[Tuple[torch.FloatTensor]]] = None,
        output_attentions: Optional[bool] = False,
    ) -> Tuple[torch.Tensor]:
        self_outputs = self.self(
            hidden_states,
            attention_mask,
            head_mask,
            encoder_hidden_states,
            encoder_attention_mask,
            past_key_value,
            output_attentions,
        )
        """

        outputs = (context_layer, attention_probs) if output_attentions else (context_layer,)
        if self.is_decoder:
            outputs = outputs + (past_key_value,)
        return outputs        因为outputs是一个元组,所以后边取self_outputs[0]得到计算了自注意力分数的隐藏层。
        self_outputs[0]大小为:(batch_size,seq_len_q,hidden_size)
        """
        attention_output = self.output(self_outputs[0], hidden_states)
        outputs = (attention_output,) + self_outputs[1:]  # add attentions if we
        #这里再将 attention_probs、(past_key_value,)加上(如果有的话)
        return outputs
这个类也非常简单,主要功能就是实现多头注意力之后的Feedfoward层,但这个函数中只有低维到高维的映射,高维再回来的操作放在了后边的BertOutput类
class BertIntermediate(nn.Module):
    def __init__(self, config):
        super().__init__()
        #hidden_state低维映射到高维:Bert中是: 768->3072
        self.dense = nn.Linear(config.hidden_size, config.intermediate_size)
        if isinstance(config.hidden_act, str):#这里是检查config.hidden_act是否为字符串
            self.intermediate_act_fn = ACT2FN[config.hidden_act]        else:
            self.intermediate_act_fn = config.hidden_act    def forward(self, hidden_states: torch.Tensor) -> torch.Tensor:
        hidden_states = self.dense(hidden_states)
        hidden_states = self.intermediate_act_fn(hidden_states)
        return hidden_states
这里唯一会陌生的东西是:ACT2FN,他是一个类:ACT2FN = ClassInstantier(ACT2CLS),ACT2FN中主要存着一些json数据:
ACT2CLS = {
    "gelu": GELUActivation,
    "gelu_10": (ClippedGELUActivation, {"min": -10, "max": 10}),
    "gelu_fast": FastGELUActivation,
    "gelu_new": NewGELUActivation,
    "gelu_python": (GELUActivation, {"use_gelu_python": True}),
    ...
    ...,
}
所以self.intermediate_act_fn是激活函数
class BertOutput(nn.Module):
    def __init__(self, config):
        super().__init__()
        self.dense = nn.Linear(config.intermediate_size, config.hidden_size)
        self.LayerNorm = nn.LayerNorm(config.hidden_size, eps=config.layer_norm_eps)
        self.dropout = nn.Dropout(config.hidden_dropout_prob)    def forward(self, hidden_states: torch.Tensor, input_tensor: torch.Tensor) -> torch.Tensor:
        hidden_states = self.dense(hidden_states)
        hidden_states = self.dropout(hidden_states)
        hidden_states = self.LayerNorm(hidden_states + input_tensor)
        return hidden_states
这个类和BertSelfOutput几乎是一摸一样,但因为处理的隐藏层不一样,所以HF选择写两个类,但实际上合成一个类也是可以的。
这两个类唯一不同的就是self.dense = nn.Linear(config.intermediate_size, config.hidden_size)这行不同,BertSelfOutput的线性层是对多头注意力之后合并在一起的head做线性映射,而BertOutput中的线性层是将Feedfoward层中的高维重新映射到低维。之后也是一个残差+LN的操作。
上边提到的及格类就组成了 BertLayer:
class BertLayer(nn.Module):
    def __init__(self, config):
        super().__init__()
        self.chunk_size_feed_forward = config.chunk_size_feed_forward
        self.seq_len_dim = 1 #(batche_size,seq_len,hidden_size)
        self.attention = BertAttention(config)
        self.is_decoder = config.is_decoder
        self.add_cross_attention = config.add_cross_attention
        if self.add_cross_attention:
            if not self.is_decoder:
                raise ValueError(f"{self} should be used as a decoder model if cross attention is added")
            self.crossattention = BertAttention(config, position_embedding_type="absolute")
        self.intermediate = BertIntermediate(config)
        self.output = BertOutput(config)
唯一陌生的是这个self.chunk_size_feed_forward = config.chunk_size_feed_forward,从名字上来看:叫做:分块前向传播的大小。feed_forward指的是feed_forward层。feed_forward只是一个简单的线性层,将隐藏层由768维升维到3072维。这里是对他进行分块计算。那分块的原因肯定是节省内存。
当seq_len很长的时候,例如:(8, 4096, 768),升维:(8, 4096, 3072),这需要:8 × 4096 × 3072 × 4 bytes ≈ 400 MB (float32),一次计算这么大显存,可能会导致OOM(Out of Memory)。所以需要分块。接下来我们继续看forward函数,来看怎么分的快。
    def forward(
        self,
        hidden_states: torch.Tensor,
        attention_mask: Optional[torch.FloatTensor] = None,
        head_mask: Optional[torch.FloatTensor] = None,
        encoder_hidden_states: Optional[torch.FloatTensor] = None,
        encoder_attention_mask: Optional[torch.FloatTensor] = None,
        past_key_value: Optional[Tuple[Tuple[torch.FloatTensor]]] = None,
        output_attentions: Optional[bool] = False,
    ) -> Tuple[torch.Tensor]:
        """
        past_key_value是类似如下的形式
        past_key_value = (
        self_attn_key,     # [0] - 自注意力
        self_attn_value,   # [1] - 自注意力
        cross_attn_key,    # [2] - 交叉注意力
        cross_attn_value,  # [3] - 交叉注意力
    )
        """
        # decoder uni-directional self-attention cached key/values tuple is at positions 1,2  ## 即对应下标0、1.
        self_attn_past_key_value = past_key_value[:2] if past_key_value is not None else None
        self_attention_outputs = self.attention(
            hidden_states,
            attention_mask,
            head_mask,
            output_attentions=output_attentions,
            past_key_value=self_attn_past_key_value,
        )
        attention_output = self_attention_outputs[0]
    # attention_output为 hidden_states、self_attention_probs、past_key_value、
    #后两项可选
        # if decoder, the last output is tuple of self-attn cache
        if self.is_decoder:
            outputs = self_attention_outputs[1:-1]
            present_key_value = self_attention_outputs[-1]
        else:
            outputs = self_attention_outputs[1:]  # add self attentions if we output attention weights
        #这里ouputs只包含self_attention_probs,或者为空        cross_attn_present_key_value = None
        if self.is_decoder and encoder_hidden_states is not None:
            if not hasattr(self, "crossattention"):
                raise ValueError(
                    f"If encoder_hidden_states are passed, {self} has to be instantiated with cross-attention layers"
                    " by setting config.add_cross_attention=True"
                )            # cross_attn cached key/values tuple is at positions 3,4 of past_key_value tuple 对应下标2、3
            cross_attn_past_key_value = past_key_value[-2:] if past_key_value is not None else None
            cross_attention_outputs = self.crossattention(
                attention_output,
                attention_mask,
                head_mask,
                encoder_hidden_states,
                encoder_attention_mask,
                cross_attn_past_key_value,
                output_attentions,
            )            #(hidden_states、cross_attention_probs、past_key_value)
            attention_output = cross_attention_outputs[0] #隐藏层
            outputs = outputs + cross_attention_outputs[1:-1]  # add cross attentions if we output attention weights
            #这里outputs成为(self_attention_probs,cross_attention_probs)或者为空
            # add cross-attn cache to positions 3,4 of present_key_value tuple
            cross_attn_present_key_value = cross_attention_outputs[-1]
            present_key_value = present_key_value + cross_attn_present_key_value
            #这行代码使得past_key_value形成了一个数量为4的元组
                """
            past_key_value是类似如下的形式
            past_key_value = (
            self_attn_key,     # [0] - 自注意力
            self_attn_value,   # [1] - 自注意力
            cross_attn_key,    # [2] - 交叉注意力
            cross_attn_value,  # [3] - 交叉注意力
        )
            """        layer_output = apply_chunking_to_forward(
            self.feed_forward_chunk, self.chunk_size_feed_forward, self.seq_len_dim, attention_output
        )
        outputs = (layer_output,) + outputs        # if decoder, return the attn key/values as the last output
        if self.is_decoder:
            outputs = outputs + (present_key_value,)
        #所以如果使用KV cache,且保存注意力分数,且是decoder模式使用交叉注意力:
        #outputs为:(hidde_states,self_attention_probs,cross_attention_probs,present_key_value)
        return outputs    def feed_forward_chunk(self, attention_output):
        intermediate_output = self.intermediate(attention_output)
        layer_output = self.output(intermediate_output, attention_output)
        return layer_output
前面都很常规,无非是一些KV cache的数据流动,只要明白了子层的数据是怎么传递的就很容易理解。
主要还是这个分块怎么分块的:
       layer_output = apply_chunking_to_forward(
            self.feed_forward_chunk, self.chunk_size_feed_forward, self.seq_len_dim, attention_output
        )
比较陌生的就是这个apply_chunking_to_forward函数
def apply_chunking_to_forward(
    forward_fn: Callable[..., torch.Tensor], chunk_size: int, chunk_dim: int, *input_tensors
) -> torch.Tensor:"""
 This function chunks the input_tensors into smaller input tensor parts of size chunk_size over the dimension chunk_dim. It then applies a layer forward_fn to each chunk independently to save memory.
    If the forward_fn is independent across the chunk_dim this function will yield the same result as directly
    applying forward_fn to input_tensors.
"""
第一句是说会将input_tensors切分成每块为chunk_size大小的块,然后对chunk_dim维度的每个块独立执行forward_fn函数,之后再将结果拼起来。以用来节省内存
第二句是说如果 forward_fn在 chunk_dim 维度上是相互独立的,即每个块不互相影响,那么最终结果和不分块计算得到的结果一样。这句话就限定了这个分块计算的函数必须是相互独立的。
**什么是相互独立?**也就是这个函数对这个tensor操作的时候,对于chunk_dim维度的每个数据只依赖于他自己,他不能和该维度中其他数据进行交互。对于(Batch_size,Seq_len,hidden_size),算自注意力的时候,seq_len维度上的每个数据,也就是每个token对应的隐藏层,是依赖于其他token的,这个就不叫相互独立,而对于线性层,token之间是没有相互交互的。
这个函数的作用就是防止显存爆了,所以他一定是时间换空间。
然后feed_forward_chunk函数实际上就是Feed_forward层
 def feed_forward_chunk(self, attention_output):
        intermediate_output = self.intermediate(attention_output)
        layer_output = self.output(intermediate_output, attention_output)
        return layer_output
这里就不详细看这个函数的实现原理了,举个例子来理解一下这个函数:
# 假设输入: (batch=2, seq_len=4096, hidden=768)
# chunk_size=1024, chunk_dim=1

输入张量: [2, 4096, 768]
           ↓
分块维度 dim=1 (seq_len)
           ↓
┌──────────────────────────────────────┐
│  Chunk 0: [:, 0:1024, :]             │ → forward_fn → output_0
├──────────────────────────────────────┤
│  Chunk 1: [:, 1024:2048, :]          │ → forward_fn → output_1
├──────────────────────────────────────┤
│  Chunk 2: [:, 2048:3072, :]          │ → forward_fn → output_2
├──────────────────────────────────────┤
│  Chunk 3: [:, 3072:4096, :]          │ → forward_fn → output_3
└──────────────────────────────────────┘
           ↓
    torch.cat([output_0, output_1, output_2, output_3], dim=1)
           ↓
输出张量: [2, 4096, 768]
首先来看BertEncoder的定义
class BertEncoder(nn.Module):
    def __init__(self, config):
        super().__init__()
        self.config = config
        self.layer = nn.ModuleList([BertLayer(config) for _ in range(config.num_hidden_layers)])
        self.gradient_checkpointing = False
因为bert就是一层层encoder叠起来的,self.layer就是12层BertLayer。
又出现了一个陌生的参数:self.gradient_checkpointing = False,他主要是用来梯度检查点(Gradient Checkpointing)机制,用来节省内存的,也是用时间换空间。正常前向传播中,每一层都会算出一个hidden_state。这些数值都会保存在显存中,当self.gradient_checkpointing = True时,这些中间被激活的张量就不会被保存,而是在反向传播中重新正向计算这些张量。
举个例子:
对于:
x → f1 → f2 → f3 → loss
h1 = f1(x)
h2 = f2(h1)
h3 = f3(h2)
loss = L(h3)
正常h1、h2、h3都会被保存到显存中,但是当使用了这个机制时,就不会被保存,再反向传播更新梯度用到的时候,再重新计算h1 = f1(x)、h2 = f2(h1)。具体怎么实现我们来看forward函数
    def forward(
        self,
        hidden_states: torch.Tensor,
        attention_mask: Optional[torch.FloatTensor] = None,
        head_mask: Optional[torch.FloatTensor] = None,
        encoder_hidden_states: Optional[torch.FloatTensor] = None,
        encoder_attention_mask: Optional[torch.FloatTensor] = None,
        past_key_values: Optional[Tuple[Tuple[torch.FloatTensor]]] = None,
        use_cache: Optional[bool] = None,
        output_attentions: Optional[bool] = False,
        output_hidden_states: Optional[bool] = False,
        return_dict: Optional[bool] = True,
    ) -> Union[Tuple[torch.Tensor], BaseModelOutputWithPastAndCrossAttentions]:
        all_hidden_states = () if output_hidden_states else None
        all_self_attentions = () if output_attentions else None
        all_cross_attentions = () if output_attentions and self.config.add_cross_attention else None
        #这三个都是保存中间值 如果保存的话,就会初始化一个元组,在后边会保存        if self.gradient_checkpointing and self.training:#训练模式
            if use_cache:
                logger.warning_once(
                    "use_cache=True is incompatible with gradient checkpointing. Setting use_cache=False..."
                )
                use_cache = False
        #如果使用Gradient Checkpointing机制,那use_cache就不能为True,因为需要再次计算激活值        next_decoder_cache = () if use_cache else None
        for i, layer_module in enumerate(self.layer):
            if output_hidden_states:
                all_hidden_states = all_hidden_states + (hidden_states,)#保存当前隐藏层            layer_head_mask = head_mask[i] if head_mask is not None else None
            past_key_value = past_key_values[i] if past_key_values is not None else None            if self.gradient_checkpointing and self.training:#model.train()模式
                #关于_gradient_checkpointing_func函数,我在下边详细写了他怎么来的,以及他的用法。
                layer_outputs = self._gradient_checkpointing_func(
                    layer_module.__call__,
                    hidden_states,
                    attention_mask,
                    layer_head_mask,
                    encoder_hidden_states,
                    encoder_attention_mask,
                    past_key_value,
                    output_attentions,
                )
            else:
                #正常不使用梯度检查点的调用
                layer_outputs = layer_module(
                    hidden_states,
                    attention_mask,
                    layer_head_mask,
                    encoder_hidden_states,
                    encoder_attention_mask,
                    past_key_value,
                    output_attentions,
                )
            #layer_outputs最长为(即use_cache、保存自注意力和交叉注意力的分数):
            #最短只有一个hidden_states
            # (hidden_states、self_attention_probs、cross_attention_probs,past_key_value)
            hidden_states = layer_outputs[0]
            if use_cache:
                next_decoder_cache += (layer_outputs[-1],)
            if output_attentions:
                all_self_attentions = all_self_attentions + (layer_outputs[1],)
                if self.config.add_cross_attention:
                    all_cross_attentions = all_cross_attentions + (layer_outputs[2],)        if output_hidden_states:
            all_hidden_states = all_hidden_states + (hidden_states,)

        #如果不使用return_dict,那么返回的就是一个简单的元组,只能通过下标来取各个数据
        if not return_dict:
            return tuple(
                v
                for v in [
                    hidden_states,
                    next_decoder_cache,
                    all_hidden_states,
                    all_self_attentions,
                    all_cross_attentions,
                ]
                if v is not None
            )
        #一般使用这个
        #默认返回的是一个类,该类支持用户同时使用字典访问属性,也可以用下标访问属性
        #outputs.last_hidden_state、outputs[0]都可以,是等价的
        return BaseModelOutputWithPastAndCrossAttentions(
            last_hidden_state=hidden_states,
            past_key_values=next_decoder_cache,
            hidden_states=all_hidden_states,
            attentions=all_self_attentions,
            cross_attentions=all_cross_attentions,
        )
我们不难猜到_gradient_checkpointing_func()就是实现Gradient Checkpointing机制的函数,但实际上在modeling_bert.py中是找不到这个函数定义的,实际上该函数是来自于PreTrainedModel类中:
gradient_checkpointing_func = functools.partial(checkpoint, **gradient_checkpointing_kwargs)
而关于functools.partial,它的作用就是固定一个函数的部分参数,生成一个新的函数,这里固定的就是checkpoint函数。但预先固定了**gradient_checkpointing_kwargs参数
接下来我们再看checkpoint函数,他是来自:from torch.utils.checkpoint import checkpoint关于这个函数我就我看源码了,只看他的用法:
定义:
def checkpoint(function, *args, use_reentrant: bool = True, **kwargs):
其中function是用来执行的前向传播的操作,需要传__call__,*args是用来接收可匹配function操作的参数的一个元组,checkpoint 内部会把这个元组拆开传给 function。而use_reentrant涉及到一个新旧checkpoint的方法区别,这里不再深入。
例:
from torch.utils.checkpoint import checkpoint
out1 = checkpoint(layer1, x)
out2 = checkpoint(layer2, out1)
out3 = checkpoint(layer3, out2)
loss = criterion(out3, y)
这样子的前向传播就会使用check_point机制,用时间换空间。
我们回到PreTrainedModel,gradient_checkpointing_func定义之后,那我们是如何将这个方法放到BertEncoder类中的?
实际上在训练的时候,如果要使用梯度检查点机制的话,我们需要使用gradient_checkpointing_enable()函数来激活:
model=BertModel.from_pretrained("bert-base-chinese")
model.gradient_checkpointing_enable()
然后看一下gradient_checkpointing_enable()的定义:
    def gradient_checkpointing_enable(self, gradient_checkpointing_kwargs=None):
        """
        Activates gradient checkpointing for the current model.        Note that in other frameworks this feature can be referred to as "activation checkpointing" or "checkpoint
        activations".        We pass the __call__ method of the modules instead of forward because __call__ attaches all the hooks of
        the module. https://discuss.pytorch.org/t/any-different-between-model-input-and-model-forward-input/3690/2        Args:
            gradient_checkpointing_kwargs (dict, *optional*):
                Additional keyword arguments passed along to the torch.utils.checkpoint.checkpoint function.
        """
它的作用就是:“Activates gradient checkpointing for the current model”,并且需要传__call__方法而不是forward方法,这个原因是因为:
module(input) 实际上会调用 module.__call__(input)
__call__内部会执行:
forwardhooksmodule(input)真正调用的是__call__方法gradient_checkpointing_func()函数。并且上边提到的:
gradient_checkpointing_func = functools.partial(checkpoint, **gradient_checkpointing_kwargs)
也是在这个函数定义的,之后经过一些if判断条件,就会执行下边这个函数:
self._set_gradient_checkpointing(enable=True, gradient_checkpointing_func=gradient_checkpointing_func)
进入到_set_gradient_checkpointing()函数,
里边有这么关键的一行:
        for module in self.modules():
            if hasattr(module, "gradient_checkpointing"):
                module._gradient_checkpointing_func = gradient_checkpointing_func
                module.gradient_checkpointing = enable
                is_gradient_checkpointing_set = True
终于破案了:self._gradient_checkpointing_func()这个函数是怎么来的了。而该函数就是:
gradient_checkpointing_func = functools.partial(checkpoint, **gradient_checkpointing_kwargs)
所以调用的时候:
layer_outputs = self._gradient_checkpointing_func(
                    layer_module.__call__,
                    hidden_states,
                    attention_mask,
                    layer_head_mask,
                    encoder_hidden_states,
                    encoder_attention_mask,
                    past_key_value,
                    output_attentions,
                )
我们需要传入layer_module.__call__,作为checkpoint的第一个前向传播的函数,然后后边的各种参数都被打包成元组传入*args`参数中。
其他的部分较简单,都在注释中标明了。
class BertPooler(nn.Module):
    def __init__(self, config):
        super().__init__()
        self.dense = nn.Linear(config.hidden_size, config.hidden_size)
        self.activation = nn.Tanh()    def forward(self, hidden_states: torch.Tensor) -> torch.Tensor:
        # We "pool" the model by simply taking the hidden state corresponding
        # to the first token.
        first_token_tensor = hidden_states[:, 0]
        pooled_output = self.dense(first_token_tensor)
        pooled_output = self.activation(pooled_output)
        return pooled_output
这个类挺短,他是干啥的?
首先看调用它的地方:
sequence_output = encoder_outputs[0]
pooled_output = self.pooler(sequence_output) if self.pooler is not None else None
这里就是将hidden_states,(大小为(batch_size,seq_len,hidden_states))单独拿出来处理了,然后将hidden_states[:, 0]就是每个句子的第一个向量,在bert中,每个句子的第token是cls,代表整句的全局语义表示。这里将第一个token的向量取出来之后,又过了一个线性层,然后过了一个tanh函数。这一步操作的意义是什么呢?个人理解他是为了更好的服务于下游任务的,在实际应用中,一般用cls向量去处理句级的下游任务,所以使用再套一个线性层+激活函数,来让他更好的拟合下游任务。
首先看一下他的初始化函数:
class BertModel(BertPreTrainedModel):
    def __init__(self, config, add_pooling_layer=True):
        super().__init__(config)
        self.config = config        self.embeddings = BertEmbeddings(config)
        self.encoder = BertEncoder(config)        self.pooler = BertPooler(config) if add_pooling_layer else None        # Initialize weights and apply final processing
        self.post_init()
很明确,就是将前面的类堆叠起来,而其中self.post_init()是初始化参数用的。
接着往下看,跳过几个剪枝函数以及装饰器函数。直接看forward部分
经过前面几个类的学习,参数都已经很明白干什么的了:
 def forward(
        self,
        input_ids: Optional[torch.Tensor] = None,
        attention_mask: Optional[torch.Tensor] = None,
        token_type_ids: Optional[torch.Tensor] = None,
        position_ids: Optional[torch.Tensor] = None,
        head_mask: Optional[torch.Tensor] = None,
        inputs_embeds: Optional[torch.Tensor] = None,
        encoder_hidden_states: Optional[torch.Tensor] = None,
        encoder_attention_mask: Optional[torch.Tensor] = None,
        past_key_values: Optional[List[torch.FloatTensor]] = None,
        use_cache: Optional[bool] = None,#是否使用KVcache
        output_attentions: Optional[bool] = None,#是否保存注意力分数
        output_hidden_states: Optional[bool] = None,#是否保存所有的hidden_states
        return_dict: Optional[bool] = None,
    ) -> Union[Tuple[torch.Tensor], BaseModelOutputWithPoolingAndCrossAttentions]:
接下来是数据流动了,细节我都写在注释里:
        #下边这几行就是对是否为decoder模式、是否使用KVcache、保存所有的hidden_states、是否保存注意力分数等这些参数量进行处理如果使用就初始化这些量
        output_attentions = output_attentions if output_attentions is not None else self.config.output_attentions
        output_hidden_states = (
            output_hidden_states if output_hidden_states is not None else self.config.output_hidden_states
        )
        return_dict = return_dict if return_dict is not None else self.config.use_return_dict        if self.config.is_decoder:
            use_cache = use_cache if use_cache is not None else self.config.use_cache
        else:
            use_cache = False
        #对必要的参数进行一些判断
        if input_ids is not None and inputs_embeds is not None:
            raise ValueError("You cannot specify both input_ids and inputs_embeds at the same time")
        elif input_ids is not None:
            self.warn_if_padding_and_no_attention_mask(input_ids, attention_mask)
            #这主要警告用户是否有padding但没mask,因为如果有padding没mask,
            # 那么padding部分就不会忽视掉,而会参与注意力分数计算,影响结果
            input_shape = input_ids.size()#(batch_size, seq_length)
        elif inputs_embeds is not None:
            input_shape = inputs_embeds.size()[:-1]#(batch_size, seq_length,hidden_size)
        else:
            raise ValueError("You have to specify either input_ids or inputs_embeds")        batch_size, seq_length = input_shape
        device = input_ids.device if input_ids is not None else inputs_embeds.device        # past_key_values_length
        past_key_values_length = past_key_values[0][0].shape[2] if past_key_values is not None else 0

            """
            #past_key_values的结构为
            past_key_values = [
            (
                key_0:   (batch_size, num_heads, past_seq_len, head_dim),
                value_0: (batch_size, num_heads, past_seq_len, head_dim)
            ),
            (
                key_1:   (batch_size, num_heads, past_seq_len, head_dim),
                value_1: (batch_size, num_heads, past_seq_len, head_dim)
            ),
            ...
            (
                key_11:  (batch_size, num_heads, past_seq_len, head_dim),
                value_11:(batch_size, num_heads, past_seq_len, head_dim)
            )
             ]            """        if attention_mask is None:
            attention_mask = torch.ones(((batch_size, seq_length + past_key_values_length)), device=device)
        #主要用于decoder模式的推理情况,该情况下,会一个token一个token的生成,所以每次输
        # 入的token也为1,则seq_length为1,pask_key_values就包含了前面已经生成的token,
        #所以past_key_values_length为前面已经生成的seq_len        if token_type_ids is None:
            #这里和embedding层的forward函数写的基本一样
            if hasattr(self.embeddings, "token_type_ids"):
                buffered_token_type_ids = self.embeddings.token_type_ids[:, :seq_length]
            #self.embeddings.token_type_idstoken_type_ids长度为(1,512)
                buffered_token_type_ids_expanded = buffered_token_type_ids.expand(batch_size, seq_length)
                token_type_ids = buffered_token_type_ids_expanded
            else:
                token_type_ids = torch.zeros(input_shape, dtype=torch.long, device=device)#(batch_size,seq_len)        # We can provide a self-attention mask of dimensions [batch_size, from_seq_length, to_seq_length]
        # ourselves in which case we just need to make it broadcastable to all heads.
        extended_attention_mask: torch.Tensor = self.get_extended_attention_mask(attention_mask, input_shape)
        #这里前面也提到了,作用是将attention_mask(batch_size,seq_len),一个为0,1序列的向量
        #转换成大小为:(batch_size, 1, from_seq_length, to_seq_length)
        #其中from_seq_length大小为Q向量的长度,to_seq_lenght为K向量的长度
        #这样就可以广播到(batch_size, num_head_num, from_seq_length, to_seq_length)
        #且数字也进行了转换,不再是1、0序列,而是0、-inf的序列,
        # 因为在attention函数中attention_score和mask进行了乘法运算
        # If a 2D or 3D attention mask is provided for the cross-attention
        # we need to make broadcastable to [batch_size, num_heads, seq_length, seq_length]
        if self.config.is_decoder and encoder_hidden_states is not None:
            encoder_batch_size, encoder_sequence_length, _ = encoder_hidden_states.size()#(batch_size,seq_len,hidden_states)
            encoder_hidden_shape = (encoder_batch_size, encoder_sequence_length)
            if encoder_attention_mask is None:
                encoder_attention_mask = torch.ones(encoder_hidden_shape, device=device)#不mask
            encoder_extended_attention_mask = self.invert_attention_mask(encoder_attention_mask)
    #invert_attention_mask的作用和上边get_extended_attention_mask的作用类似,
    #1.转换维度:(batch_size,seq_len)--->(batch, 1, 1, seq_len)
    #因为在cross_attention中,只能确定decoder中的Q,所以num_head和seq_k都是1,用来广播匹配encoder中的K
    #2.将1,0序列转成0、-inf。
        else:
            encoder_extended_attention_mask = None        # Prepare head mask if needed
        # 1.0 in head_mask indicate we keep the head
        # attention_probs has shape bsz x n_heads x N x N
        # input head_mask has shape [num_heads] or [num_hidden_layers x num_heads]
        # and head_mask is converted to shape [num_hidden_layers x batch x num_heads x seq_length x seq_length]
        head_mask = self.get_head_mask(head_mask, self.config.num_hidden_layers)
        #转换传入的 head_mask,确保每层每个头都有 mask 值        #下边就是正常的前向传播
        embedding_output = self.embeddings(
            input_ids=input_ids,
            position_ids=position_ids,
            token_type_ids=token_type_ids,
            inputs_embeds=inputs_embeds,
            past_key_values_length=past_key_values_length,
        )
        #第一个参数为:hidden_states=embedding_output
        encoder_outputs = self.encoder(
            embedding_output,
            attention_mask=extended_attention_mask,
            head_mask=head_mask,
            encoder_hidden_states=encoder_hidden_states,
            encoder_attention_mask=encoder_extended_attention_mask,
            past_key_values=past_key_values,
            use_cache=use_cache,
            output_attentions=output_attentions,
            output_hidden_states=output_hidden_states,
            return_dict=return_dict,
        )
        sequence_output = encoder_outputs[0] #hidden_state
        pooled_output = self.pooler(sequence_output) if self.pooler is not None else None
        #后边也很常规。
        if not return_dict:
            return (sequence_output, pooled_output) + encoder_outputs[1:]
        #同bertencoder层
        return BaseModelOutputWithPoolingAndCrossAttentions(
            last_hidden_state=sequence_output,
            pooler_output=pooled_output,
            past_key_values=encoder_outputs.past_key_values,
            hidden_states=encoder_outputs.hidden_states,
            attentions=encoder_outputs.attentions,
            cross_attentions=encoder_outputs.cross_attentions,
        )
至此,整个BertModel就是这样。可以看到BertModel并不仅仅是原生的Bert,他还包含了很多额外的东西:对多头注意力的剪枝、KV cache、相对位置编码、以及bertmodel是有decoder模式的。
并且还有很多封装的函数。理论上来说用两个BertModel是可以拼成一个传统Transformer架构的。
此内容由惯性聚合(RSS阅读器)自动聚合整理,仅供阅读参考。 原文来自 — 版权归原作者所有。