


前几天偶然发现,Windows 11的WSL2可以通过WSLg来无缝使用GUI应用。类似推理/训练等任务,都不在话下,这瞬间勾起了我的好奇心,决定试试微软提供的这个神奇功能。其实微软在2021年就发布了WSLg,现在已经是2025年了,刚刚开始折腾也算是后知后觉了。
WSL支持GUI应用只能算是WSLg的一个最简单的功能了,当涉及模型训练或者GPU加速时,GPU驱动还有CUDA等等相关的配置就会变得复杂起来。我并不希望因为“折腾”这么一下,就把我的WSL环境搞得一团糟,这时候,Docker的价值就体现出来了。利用Docker,可以在不修改现有WSL环境的情况下,快速搭建一个隔离的环境来做些简单的测试。我决定使用YOLO作为测试对象,看看在WSL+WSLg+Docker的场景下,YOLO还能不能很好的工作,正确使用我的GPU进行加速。
理论上,WSLg是WSL默认启用的功能,当你安装完成WSL2,并且安装了Ubuntu等Linux发行版后,就可以直接使用GUI应用了。具体的安装方法,这里就不多说了,毕竟微软的文档在适用于 Linux 的 Windows 子系统上运行 Linux GUI 应用写的非常的详细:
安装完成后,如果WSLg被正确启用的话,应该就可以看到:
# mount|grep wslg
none on /mnt/wslg type tmpfs (rw,relatime)
/dev/sdc on /mnt/wslg/distro type ext4 (ro,relatime,discard,errors=remount-ro,data=ordered)
none on /mnt/wslg/versions.txt type overlay (rw,relatime,lowerdir=/systemvhd,upperdir=/system/rw/upper,workdir=/system/rw/work)
none on /mnt/wslg/doc type overlay (rw,relatime,lowerdir=/systemvhd,upperdir=/system/rw/upper,workdir=/system/rw/work)
tmpfs on /mnt/wslg/run/user/1000 type tmpfs (rw,nosuid,nodev,relatime,size=809692k,nr_inodes=202423,mode=700,uid=1000,gid=1000)
与此同时,在不用安装任何Linux版本GPU驱动的情况下,应该也可以正确识别到GPU设备:
# which nvidia-smi
/usr/lib/wsl/lib/nvidia-smi
# nvidia-smi
Sun Jun  8 19:59:36 2025
+-----------------------------------------------------------------------------------------+
| NVIDIA-SMI 560.35.02              Driver Version: 560.94         CUDA Version: 12.6     |
|-----------------------------------------+------------------------+----------------------+
| GPU  Name                 Persistence-M | Bus-Id          Disp.A | Volatile Uncorr. ECC |
| Fan  Temp   Perf          Pwr:Usage/Cap |           Memory-Usage | GPU-Util  Compute M. |
|                                         |                        |               MIG M. |
|=========================================+========================+======================|
|   0  NVIDIA GeForce RTX 4070 ...    On  |   00000000:2B:00.0  On |                  N/A |
|  0%   45C    P8              7W /  285W |     895MiB /  16376MiB |      4%      Default |
|                                         |                        |                  N/A |
+-----------------------------------------+------------------------+----------------------+

+-----------------------------------------------------------------------------------------+
| Processes:                                                                              |
|  GPU   GI   CI        PID   Type   Process name                              GPU Memory |
|        ID   ID                                                               Usage      |
|=========================================================================================|
|    0   N/A  N/A        25      G   /Xwayland                                   N/A      |
+-----------------------------------------------------------------------------------------+以我的这台主机为例,可以看到nvidia-smi可以正常识别到GPU(甚至nvidia-smi也不是我安装的,微软直接帮我挂载了)
再试试运行一个GUI应用:
# sudo apt install -y x11-apps
# /usr/bin/xcalc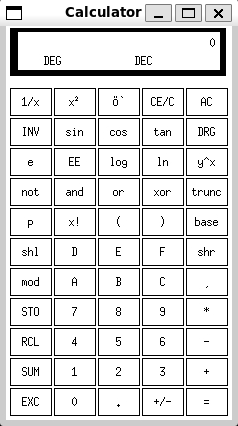
由于要使用Docker并且还需要在Docker里使用GPU,Docker的安装比较简单,在Ubuntu里,直接sudo apt install -y docker.io即可,而对于我的NVIDIA显卡来说,还需要安装NVIDIA的容器运行环境,这里可以参考NVIDIA的文档Installing the NVIDIA Container Toolkit进行安装,安装完成之后,可以跑一个简单的测试,确认一下安装是否成功,以及容器里是否可以正确识别并调用到GPU:
# sudo docker run --gpus all --runtime=nvidia nvcr.io/nvidia/k8s/cuda-sample:nbody nbody -gpu -benchmark
Run "nbody -benchmark [-numbodies=<numBodies>]" to measure performance.
        -fullscreen       (run n-body simulation in fullscreen mode)
        -fp64             (use double precision floating point values for simulation)
        -hostmem          (stores simulation data in host memory)
        -benchmark        (run benchmark to measure performance)
        -numbodies=<N>    (number of bodies (>= 1) to run in simulation)
        -device=<d>       (where d=0,1,2.... for the CUDA device to use)
        -numdevices=<i>   (where i=(number of CUDA devices > 0) to use for simulation)
        -compare          (compares simulation results running once on the default GPU and once on the CPU)
        -cpu              (run n-body simulation on the CPU)
        -tipsy=<file.bin> (load a tipsy model file for simulation)

NOTE: The CUDA Samples are not meant for performance measurements. Results may vary when GPU Boost is enabled.

> Windowed mode
> Simulation data stored in video memory
> Single precision floating point simulation
> 1 Devices used for simulation
MapSMtoCores for SM 8.9 is undefined.  Default to use 128 Cores/SM
MapSMtoArchName for SM 8.9 is undefined.  Default to use Ampere
GPU Device 0: "Ampere" with compute capability 8.9

> Compute 8.9 CUDA device: [NVIDIA GeForce RTX 4070 Ti SUPER]
67584 bodies, total time for 10 iterations: 41.515 ms
= 1100.228 billion interactions per second
= 22004.559 single-precision GFLOP/s at 20 flops per interaction
可以看到在容器里看到并且使用了我的GPU。
接下来就可以在Docker里使用YOLOv11了。由于官方已经给我们打好了Docker镜像,所以只需要拉取镜像并运行即可,因为我还想能将推理结果实时的显示出来,所以还需要处理一些显示相关的环境变量,需要注意的是,虽然YOLO的文档里也有在Docker中使用GUI的说明,但这里需要参考WSLg的文档Containerizing GUI applications with WSLg来启动容器:
# sudo docker run -it -v /tmp/.X11-unix:/tmp/.X11-unix -v /mnt/wslg:/mnt/wslg -e DISPLAY=$DISPLAY -e WAYLAND_DISPLAY=$WAYLAND_DISPLAY -e XDG_RUNTIME_DIR=$XDG_RUNTIME_DIR -e PULSE_SERVER=$PULSE_SERVER --net=host --ipc=host --gpus all ultralytics/ultralytics:latest
root@DESKTOP:/ultralytics# yolo predict model=yolo11n.pt show=True
WARNING ⚠️ 'source' argument is missing. Using default 'source=/ultralytics/ultralytics/assets'.
WARNING ⚠️ Environment does not support cv2.imshow() or PIL Image.show()
OpenCV(4.11.0) /io/opencv/modules/highgui/src/window.cpp:1301: error: (-2:Unspecified error) The function is not implemented. Rebuild the library with Windows, GTK+ 2.x or Cocoa support. If you are on Ubuntu or Debian, install libgtk2.0-dev and pkg-config, then re-run cmake or configure script in function 'cvShowImage'

Ultralytics 8.3.151 🚀 Python-3.11.12 torch-2.7.0+cu126 CUDA:0 (NVIDIA GeForce RTX 4070 Ti SUPER, 16376MiB)
YOLO11n summary (fused): 100 layers, 2,616,248 parameters, 0 gradients, 6.5 GFLOPs

image 1/2 /ultralytics/ultralytics/assets/bus.jpg: 640x480 4 persons, 1 bus, 47.2ms
image 2/2 /ultralytics/ultralytics/assets/zidane.jpg: 384x640 2 persons, 1 tie, 41.1ms
Speed: 5.1ms preprocess, 44.2ms inference, 93.1ms postprocess per image at shape (1, 3, 384, 640)
Results saved to /ultralytics/runs/detect/predict
💡 Learn more at https://docs.ultralytics.com/modes/predict
发现出了点小问题,虽然可以正确调用到GPU,但是没办法实时显示推理结果,从日志上看,有一条报错:
OpenCV(4.11.0) /io/opencv/modules/highgui/src/window.cpp:1301: error: (-2:Unspecified error) The function is not implemented. Rebuild the library with Windows, GTK+ 2.x or Cocoa support. If you are on Ubuntu or Debian, install libgtk2.0-dev and pkg-config, then re-run cmake or configure script in function 'cvShowImage'看起来是opencv出现了一些兼容性的问题,经过一番搜索,发现了一个issue,也是同样的问题,因为默认ultralytics/ultralytics:latest镜像里安装了opencv-python-headless,并没有对GUI的支持,因此需要重新安装一下opencv-python:
root@DESKTOP:/ultralytics# pip uninstall opencv-python-headless opencv-python -y
Found existing installation: opencv-python-headless 4.11.0.86
Uninstalling opencv-python-headless-4.11.0.86:
  Successfully uninstalled opencv-python-headless-4.11.0.86
Found existing installation: opencv-python 4.11.0.86
Uninstalling opencv-python-4.11.0.86:
  Successfully uninstalled opencv-python-4.11.0.86
root@DESKTOP:/ultralytics# pip install opencv-python==4.11.0.86
Collecting opencv-python==4.11.0.86
  Downloading opencv_python-4.11.0.86-cp37-abi3-manylinux_2_17_x86_64.manylinux2014_x86_64.whl.metadata (20 kB)
Requirement already satisfied: numpy>=1.21.2 in /opt/conda/lib/python3.11/site-packages (from opencv-python==4.11.0.86) (2.1.3)
Downloading opencv_python-4.11.0.86-cp37-abi3-manylinux_2_17_x86_64.manylinux2014_x86_64.whl (63.0 MB)
   ━━━━━━━━━━━━━━━━━━━━━━━━━━━━━━━━━━━━━━━━ 63.0/63.0 MB 753.5 kB/s eta 0:00:00
Installing collected packages: opencv-python
Successfully installed opencv-python-4.11.0.86
重新安装完成后,再次运行YOLO的推理命令:
root@DESKTOP:/ultralytics# yolo predict model=yolo11n.pt show=True
WARNING ⚠️ 'source' argument is missing. Using default 'source=/ultralytics/ultralytics/assets'.
Ultralytics 8.3.151 🚀 Python-3.11.12 torch-2.7.0+cu126 CUDA:0 (NVIDIA GeForce RTX 4070 Ti SUPER, 16376MiB)
YOLO11n summary (fused): 100 layers, 2,616,248 parameters, 0 gradients, 6.5 GFLOPs

image 1/2 /ultralytics/ultralytics/assets/bus.jpg: 640x480 4 persons, 1 bus, 51.1ms
image 2/2 /ultralytics/ultralytics/assets/zidane.jpg: 384x640 2 persons, 1 tie, 41.6ms
Speed: 4.1ms preprocess, 46.3ms inference, 72.4ms postprocess per image at shape (1, 3, 384, 640)
Results saved to /ultralytics/runs/detect/predict2
💡 Learn more at https://docs.ultralytics.com/modes/predict
这次没有报错了,并且可以看到一闪而过的推理结果窗口:
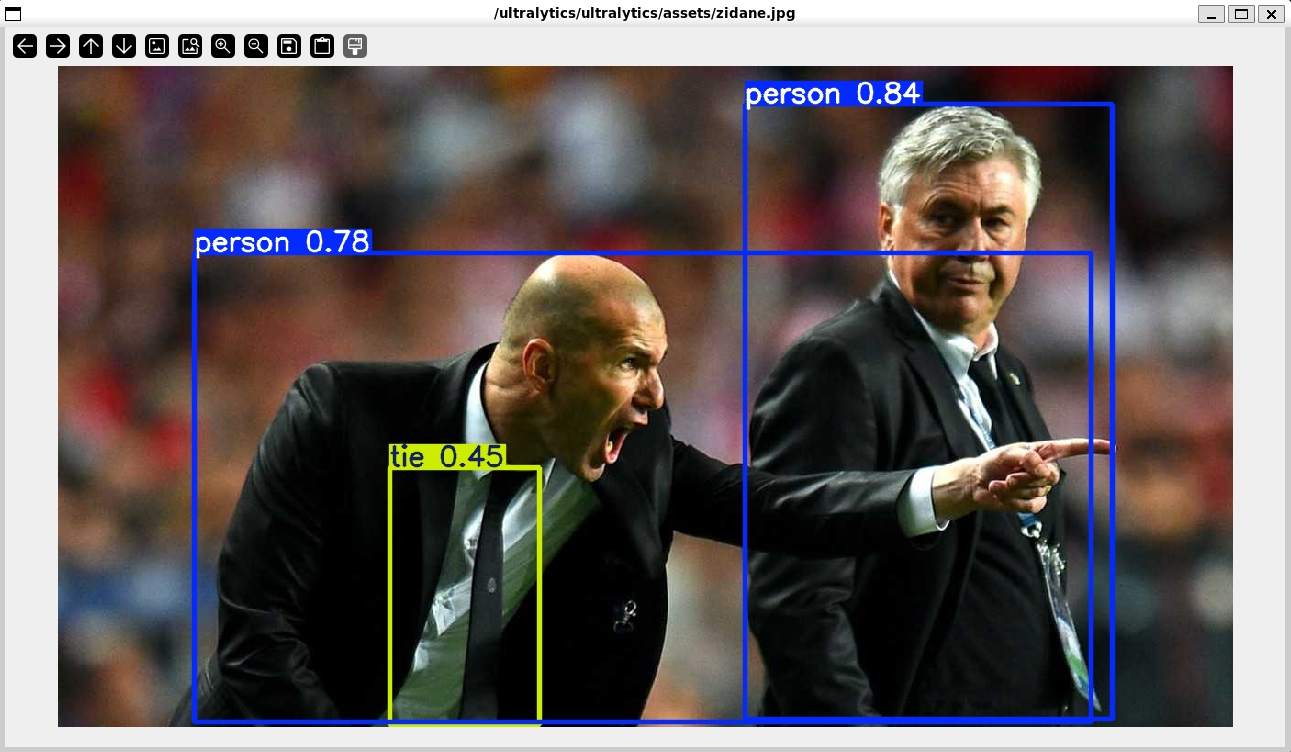
嘿嘿,效果不错。
从网上找一段视频,再看看实时推理的效果:
root@DESKTOP:/ultralytics# yolo predict model=yolo11n.pt show=True source=car.mp4
Ultralytics 8.3.151 🚀 Python-3.11.12 torch-2.7.0+cu126 CUDA:0 (NVIDIA GeForce RTX 4070 Ti SUPER, 16376MiB)
YOLO11n summary (fused): 100 layers, 2,616,248 parameters, 0 gradients, 6.5 GFLOPs

video 1/1 (frame 1/617) /ultralytics/car.mp4: 384x640 2 persons, 14 cars, 2 buss, 1 truck, 44.8ms
video 1/1 (frame 2/617) /ultralytics/car.mp4: 384x640 2 persons, 14 cars, 2 buss, 1 truck, 14.5ms
video 1/1 (frame 3/617) /ultralytics/car.mp4: 384x640 2 persons, 14 cars, 2 buss, 1 truck, 32.5ms
video 1/1 (frame 4/617) /ultralytics/car.mp4: 384x640 2 persons, 14 cars, 2 buss, 1 truck, 19.3ms
video 1/1 (frame 5/617) /ultralytics/car.mp4: 384x640 2 persons, 14 cars, 2 buss, 1 truck, 14.5ms
video 1/1 (frame 6/617) /ultralytics/car.mp4: 384x640 2 persons, 14 cars, 2 buss, 1 truck, 13.2ms
video 1/1 (frame 7/617) /ultralytics/car.mp4: 384x640 3 persons, 13 cars, 2 buss, 2 trucks, 12.0ms
video 1/1 (frame 8/617) /ultralytics/car.mp4: 384x640 3 persons, 13 cars, 2 buss, 2 trucks, 12.3ms
video 1/1 (frame 9/617) /ultralytics/car.mp4: 384x640 3 persons, 14 cars, 1 bus, 2 trucks, 14.2ms
...
video 1/1 (frame 613/617) /ultralytics/car.mp4: 384x640 12 cars, 2 buss, 4 trucks, 24.0ms
video 1/1 (frame 614/617) /ultralytics/car.mp4: 384x640 14 cars, 2 buss, 3 trucks, 24.2ms
video 1/1 (frame 615/617) /ultralytics/car.mp4: 384x640 14 cars, 2 buss, 4 trucks, 28.3ms
video 1/1 (frame 616/617) /ultralytics/car.mp4: 384x640 13 cars, 2 buss, 3 trucks, 25.6ms
video 1/1 (frame 617/617) /ultralytics/car.mp4: 384x640 12 cars, 2 buss, 3 trucks, 1 traffic light, 22.4ms
Speed: 2.7ms preprocess, 16.9ms inference, 2.7ms postprocess per image at shape (1, 3, 384, 640)
Results saved to /ultralytics/runs/detect/predict4
💡 Learn more at https://docs.ultralytics.com/modes/predict
性能还不错,毕竟也算是比较强力的显卡了,与此同时,还可以可以看到在任务管理器里的GPU使用率:
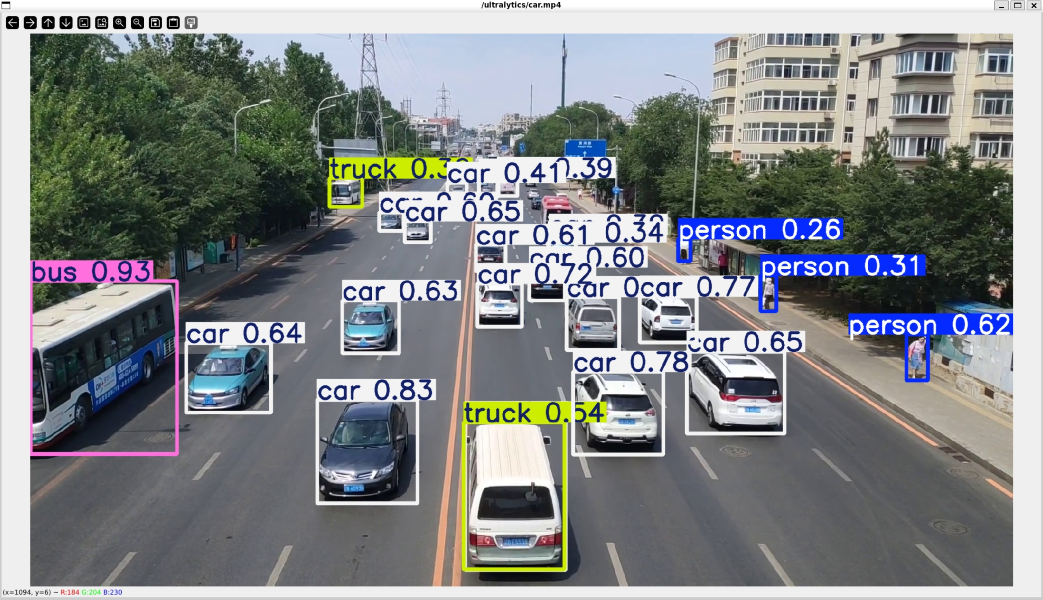
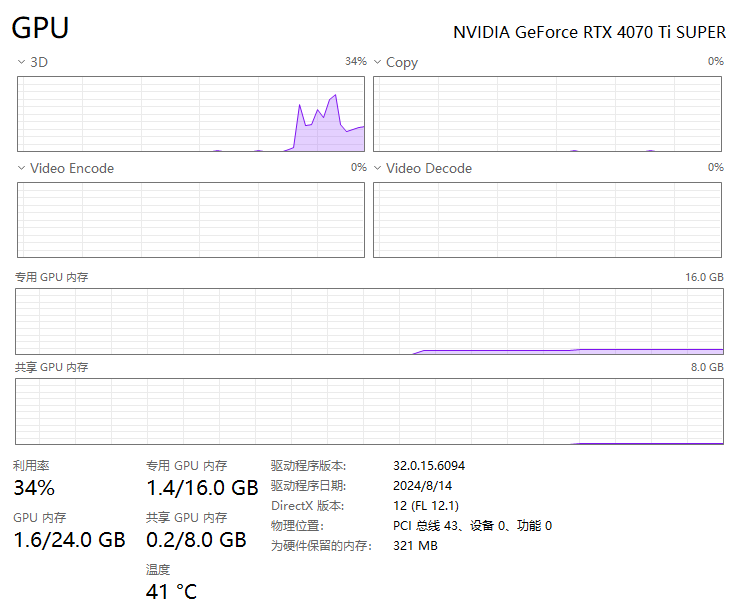
确实有够折腾的,Windows + WSL + WSLg + Docker + YOLOv11的”无限”套娃组合,无痛的跑起来了YOLO的推理,理论上来说,包括当前LLM等等各种AI应用,都可以在这套体系下很好的工作,Windows不愧是“最好的”Linux发型版。微软还是牛逼啊。
此内容由惯性聚合(RSS阅读器)自动聚合整理,仅供阅读参考。 原文来自 — 版权归原作者所有。