








1、使用有admin权限的账号登录GitLab;
2、单击右上角的头像,点击"Settings"进入设置页面;
3、点击左侧菜单Access Tokens,然后生成 Personal Access Tokens;
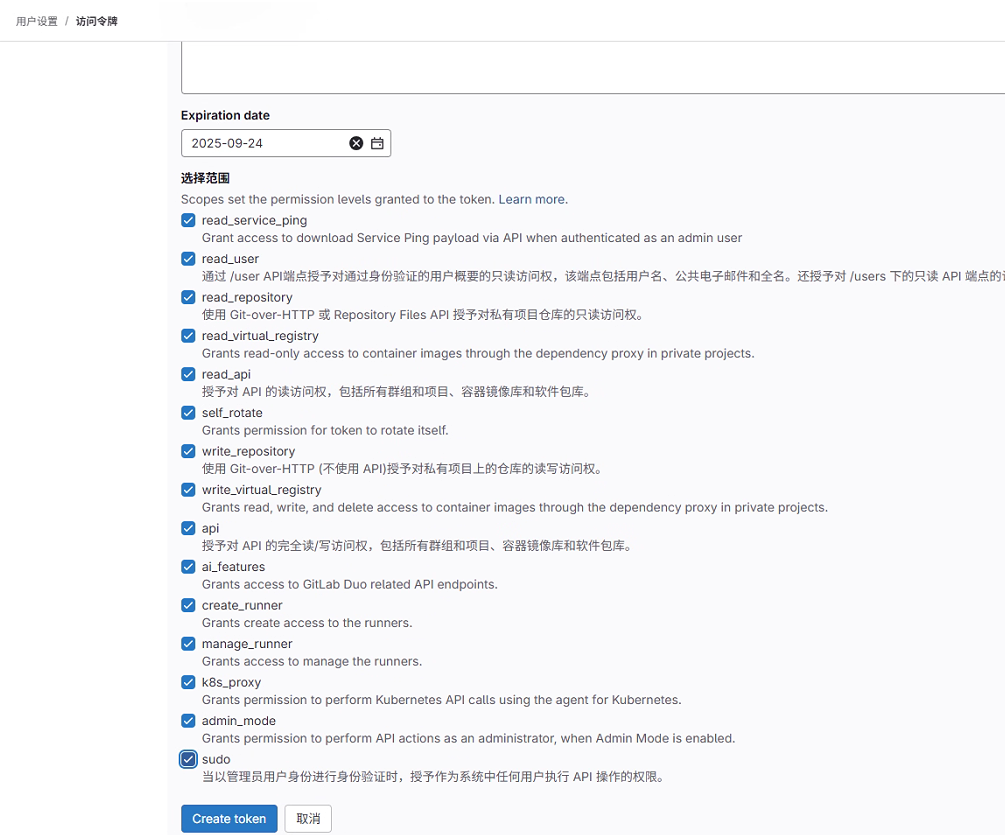
4、将生成的personal access token记录下来,后面会用到。
创建userlist.txt文件,内容格式如下:
xxxxxxx@G1t2025 songxxxx@xxxxxxxxx.cn xxxx 宋xx
xxxxxxx@G1t2025 lixxxx@xxxxxxxxx.cn xxxx 李xx
xxxxxxx@G1t2025 longxxxx@xxxxxxxxx.cn xxxx 龙xx
xxxxxxx@G1t2025 lixxxx@xxxxxxxxx.cn xxxx 李xx
xxxxxxx@G1t2025 qixxxx@xxxxxxxxx.cn xxxx 祁xx
xxxxxxx@G1t2025 zengxxxx@xxxxxxxxx.cn xxxx 曾xx
xxxxxxx@G1t2025 yuxxxx@xxxxxxxxx.cn xxxx 余xx
xxxxxxx@G1t2025 lixxxx@xxxxxxxxx.cn xxxx 李xx
xxxxxxx@G1t2025  Shixxxx@xxxxxxxxx.cn  xxxx 师xx
对应字段分别是:密码 邮箱 用户名 别名,字段可以按需调整。
创建 gitlabAddUser.sh 文件,内容如下:
#!/bin/bash

# 用户信息文件
userinfo="userlist.txt"
# 读取文件
while read -r line
do
    # 去除行首尾空格
    l=`echo $line | awk '{gsub(/^\s+|\s+$/, "");print}'`
    echo $l
    # 按照空格分隔  字段顺序按需调整,但需与userinfo.txt文件一致
    password=`echo $l | awk '{print $1}'`
    email=`echo $l | awk '{print $2}'`
    username=`echo $l | awk '{print $3}'`
    name=`echo $l | awk '{print $4}'`
    # 发送post请求 token与url需更换为自己的
    curl -X POST -H "PRIVATE-TOKEN: token-tokenxxxxxABCDEF" "http://test.gitlab.com/api/v4/users" -H 'cache-control: no-cache' -H 'content-type: application/json' \
    -d '{ "email": "'"$email"'", "username": "'"$username"'", "password": "'"$password"'", "name": "'"$name"'", "skip_confirmation": "true" }'
    echo ""
done < $userinfo
其中PRIVATE-TOKEN需要改为第一步获取到的personal access token, API地址http://test.gitlab.com/api/v4/users需要改为自己的gitlab服务器地址,相应的api可查看gitlab的官方文档https://docs.gitlab.com/ce/api/
打开shell命令窗口,找到 gitlabAddUser.sh 文件,给此文件添加可执行权限,执行gitlabAddUser.sh。
chmod +x gitlabAddUser.sh
sh gitlabAddUser.sh
此内容由惯性聚合(RSS阅读器)自动聚合整理,仅供阅读参考。 原文来自 — 版权归原作者所有。