






Examples
Overview
The goal of this project is simple: given a prompt like "what is a leveraged buyout?", get back a lecture video. More specifically, a narrated, animated explainer video, with slides, a voiceover, and elements that appear in time with the narration.
You could try to do this with a video-generation model that produces the pixels directly, but we take a different approach based on the idea that an LLM (today) is (in my opinion) better at writing code than what a SOTA diffusion model is at generating pixels directly. Instead of generating a video, the model writes the source code of one: a sequence of Remotion scene components (React that renders to video frames) along with a narration script for each. We then render that code ourselves.
Working in code rather than pixels also changes what we can do with the result. A scene is something we can read and edit, so fixing a wrong label or color is a one-line change and a re-render, not a re-roll of the whole video in the hope that the next sample comes out better. Text and diagrams come out exactly as written, which still isn't a given with diffusion models on dense, labelled content. And the part that matters most for what follows is that a scene renders to a DOM we can inspect and measure headlessly, which is exactly what lets us check each scene's layout in Step 2.
The pipeline has five steps. The model writes the scenes in an agent loop, we check and repair their layout, we turn each script into narration with word-level timestamps, we time the reveals so each element appears as it is mentioned, and we finally render everything into a single MP4.

Step 1 - Writing the scenes
The first step is a single agent loop. We hand the model the prompt and a small set of tools, and it writes the video one file at a time until it decides it is done.
The unit it produces is a scene, which is a self-contained React component, sized to the 1920x1080 frame and styled with Tailwind, paired with a plain-text narration script. It is up to the model how many scenes the topic needs, what each one shows, and how the narration carries from one to the next.
The tools are deliberately minimal. write_file saves a scene component or a narration file, web_search lets the model ground facts it is unsure about, and search_image pulls real photos through Brave when a topic has a real-world subject like a person, a place, or a product, so the scene can use an actual image instead of a drawn approximation. Importantly we want to steer the models as little as possible, and nothing about the shape of the video is fixed in advance.
One convention does the heavy lifting later. As it writes a scene, the model tags the elements that should appear one at a time with data-animate="reveal-1", data-animate="reveal-2", and so on, in the order it wants them to land, and it writes the narration to describe them in that same order. Turning those tags into real timings is the job of Step 4; here the model is only declaring intent.
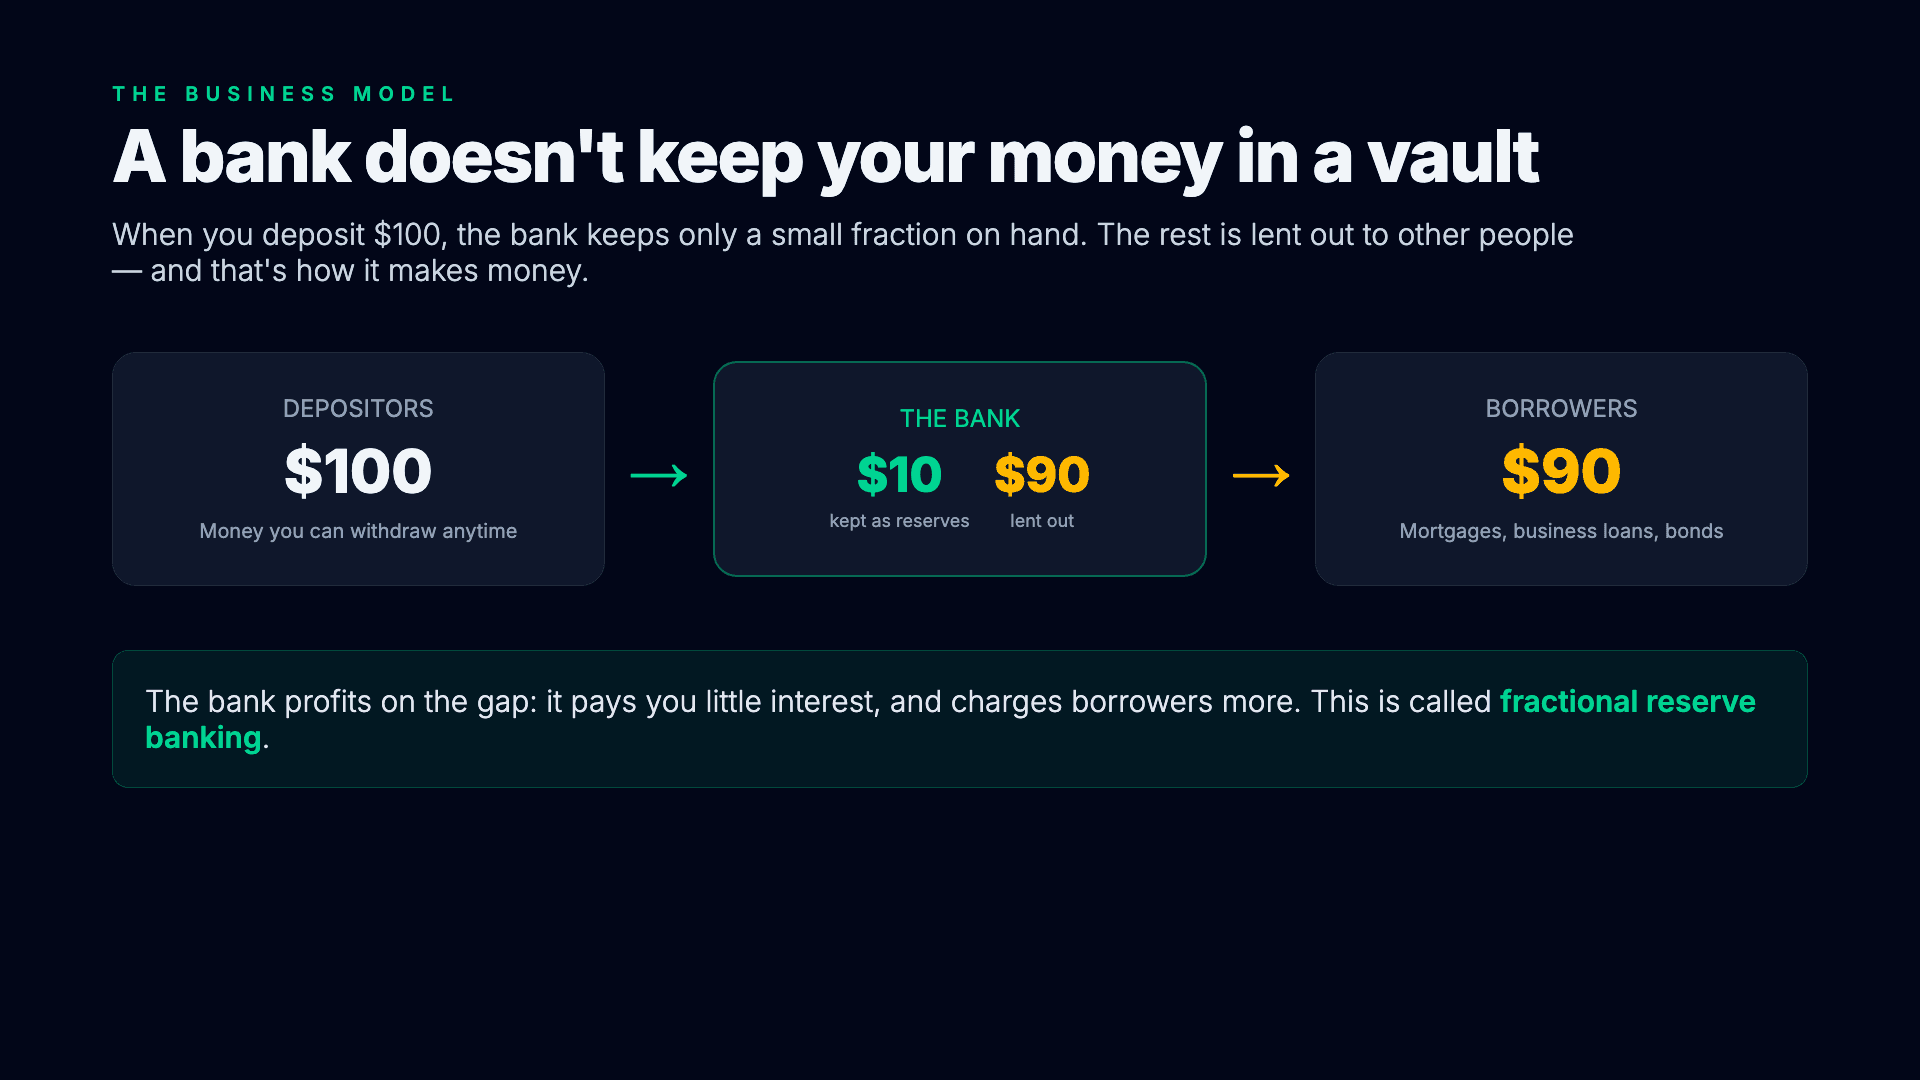
export function Scene() {
  return (
    <div className="w-[1920px] h-[1080px] bg-slate-950 text-slate-100 flex flex-col px-28 py-20">
      <div data-animate="reveal-1">
        <div className="text-emerald-400 tracking-[0.35em] ...">THE BUSINESS MODEL</div>
        <h2 className="text-7xl font-extrabold">A bank doesn't keep your money in a vault</h2>
      </div>

      <p data-animate="reveal-2" className="text-3xl text-slate-300 ...">
        When you deposit $100, the bank keeps only a small fraction on hand.
      </p>

      {/* Flow diagram */}
      <div className="flex items-center justify-between ...">
        <div data-animate="reveal-3" className="...">
          <div>DEPOSITORS</div>
          <div className="text-6xl font-extrabold">$100</div>
        </div>

        <div data-animate="reveal-4" className="text-6xl text-emerald-400">→</div>

        <div data-animate="reveal-4" className="...">
          <div>THE BANK</div>
          {/* $10 kept as reserves, $90 lent out */}
        </div>

        <div data-animate="reveal-5" className="text-6xl text-amber-400">→</div>

        <div data-animate="reveal-5" className="...">
          <div>BORROWERS</div>
          <div className="text-6xl font-extrabold">$90</div>
        </div>
      </div>

      <div data-animate="reveal-6" className="...">
        The bank profits on the gap. This is called <span>fractional reserve banking</span>.
      </div>
    </div>
  );
}
One more thing happens on every write. When the model saves a .tsx file, we parse it before accepting it and hand any syntax error straight back as the tool result, so it gets fixed on the next turn. That is the first and cheapest check we run on generated code. The more interesting one is Step 2: whether the scene actually fits on screen.
Step 2 - Checking and repairing layout
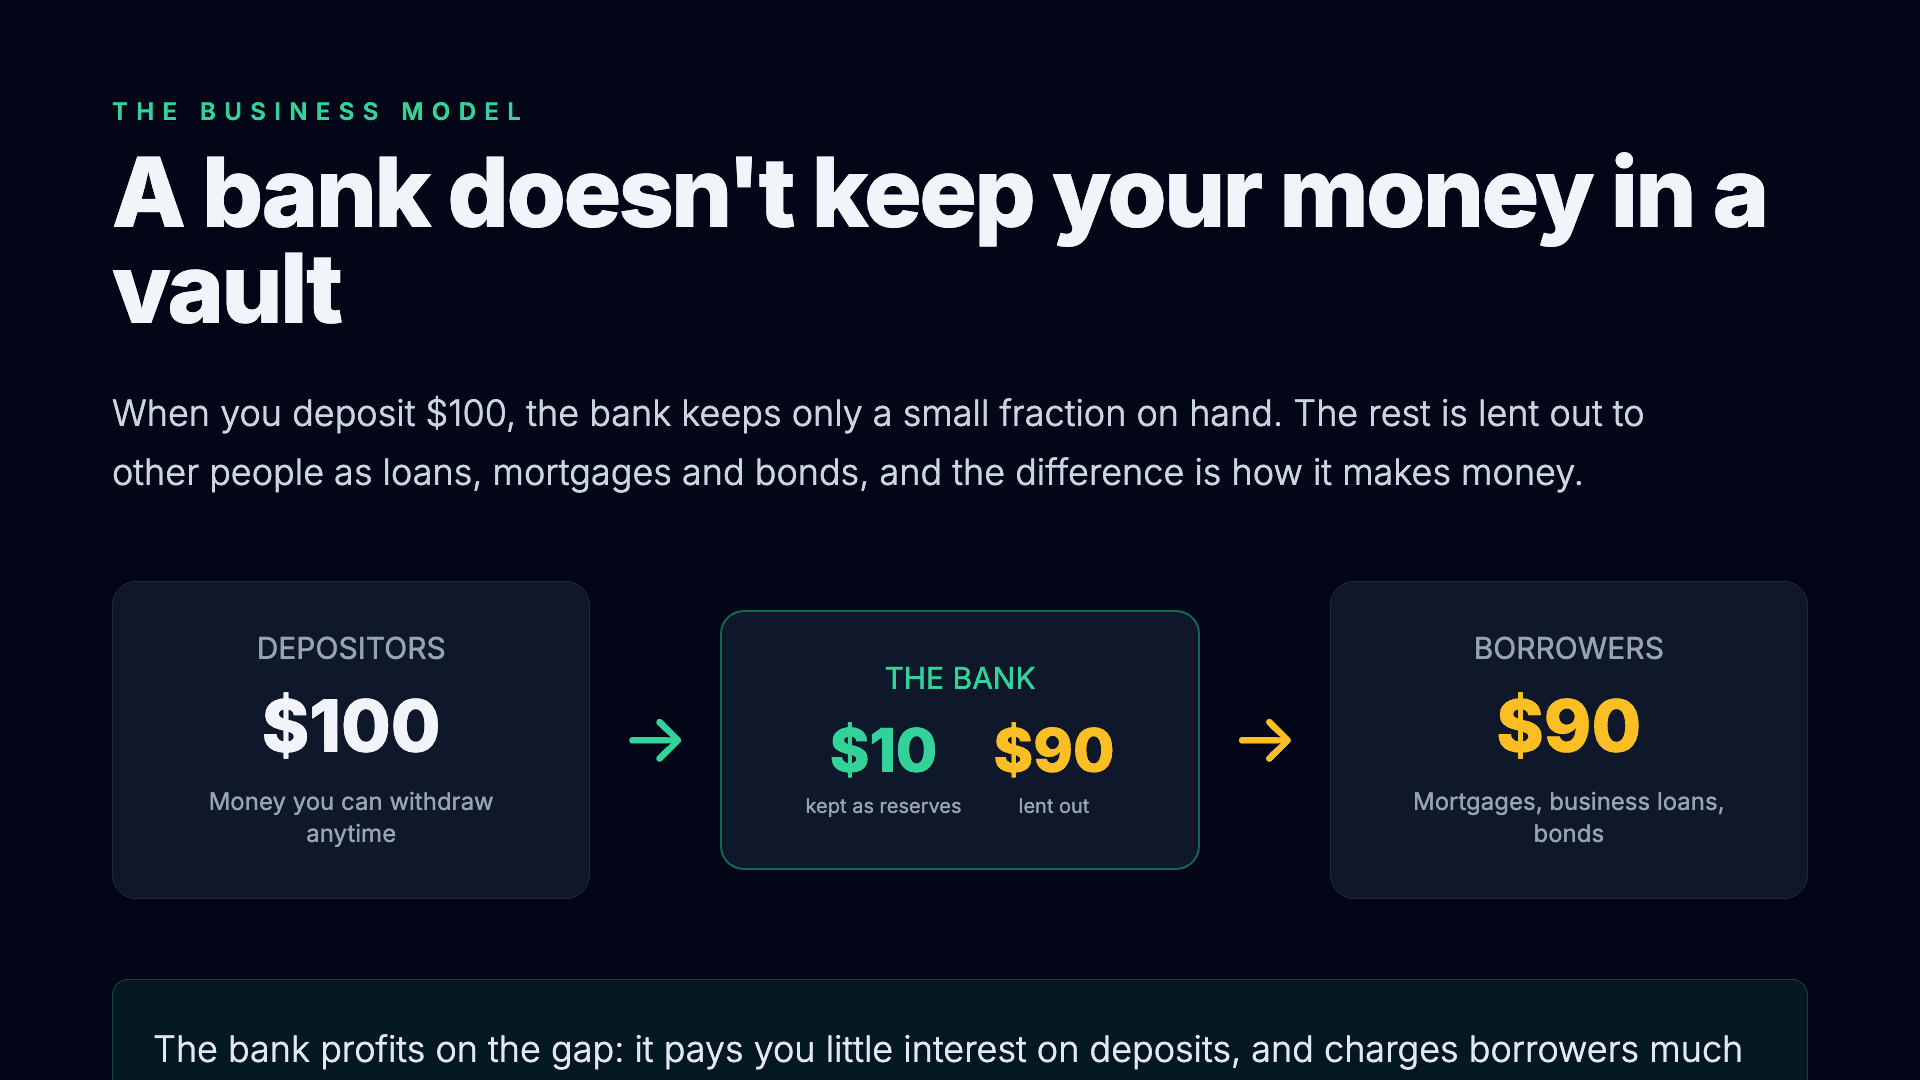
Every model we tried shares one failure mode: it writes scenes that overflow the frame. Because the model never sees what its code renders to, it tends to pack in one card too many or size the text a little too large, and the bottom of the scene ends up past the 1080-pixel edge, where it gets cut off in the video. This is the most common problem by far, and it is also the easiest to catch, because a scene is something we can render and measure.
After the writing agent finishes, we render every scene to a still frame in a headless browser and measure it. A small hook injected into each component walks the DOM once the fonts and images have loaded, takes the bounding box of every element a few levels deep, and compares each one against the bottom edge of the 1920×1080 container. Anything that extends past it is reported, with the element, its classes, and how far it overflows in pixels, together with a screenshot of the frame.
{
  "hasOverflow": true,
  "overflowBy": 142,
  "overflowingElements": 2,
  "elements": [
    { "tagName": "DIV", "className": "rounded-2xl bg-emerald-500/10 ...", "overflowBy": 142 },
    { "tagName": "P",   "className": "text-3xl text-slate-300 ...",        "overflowBy": 88 }
  ]
}
Before: overflowing
After: repaired
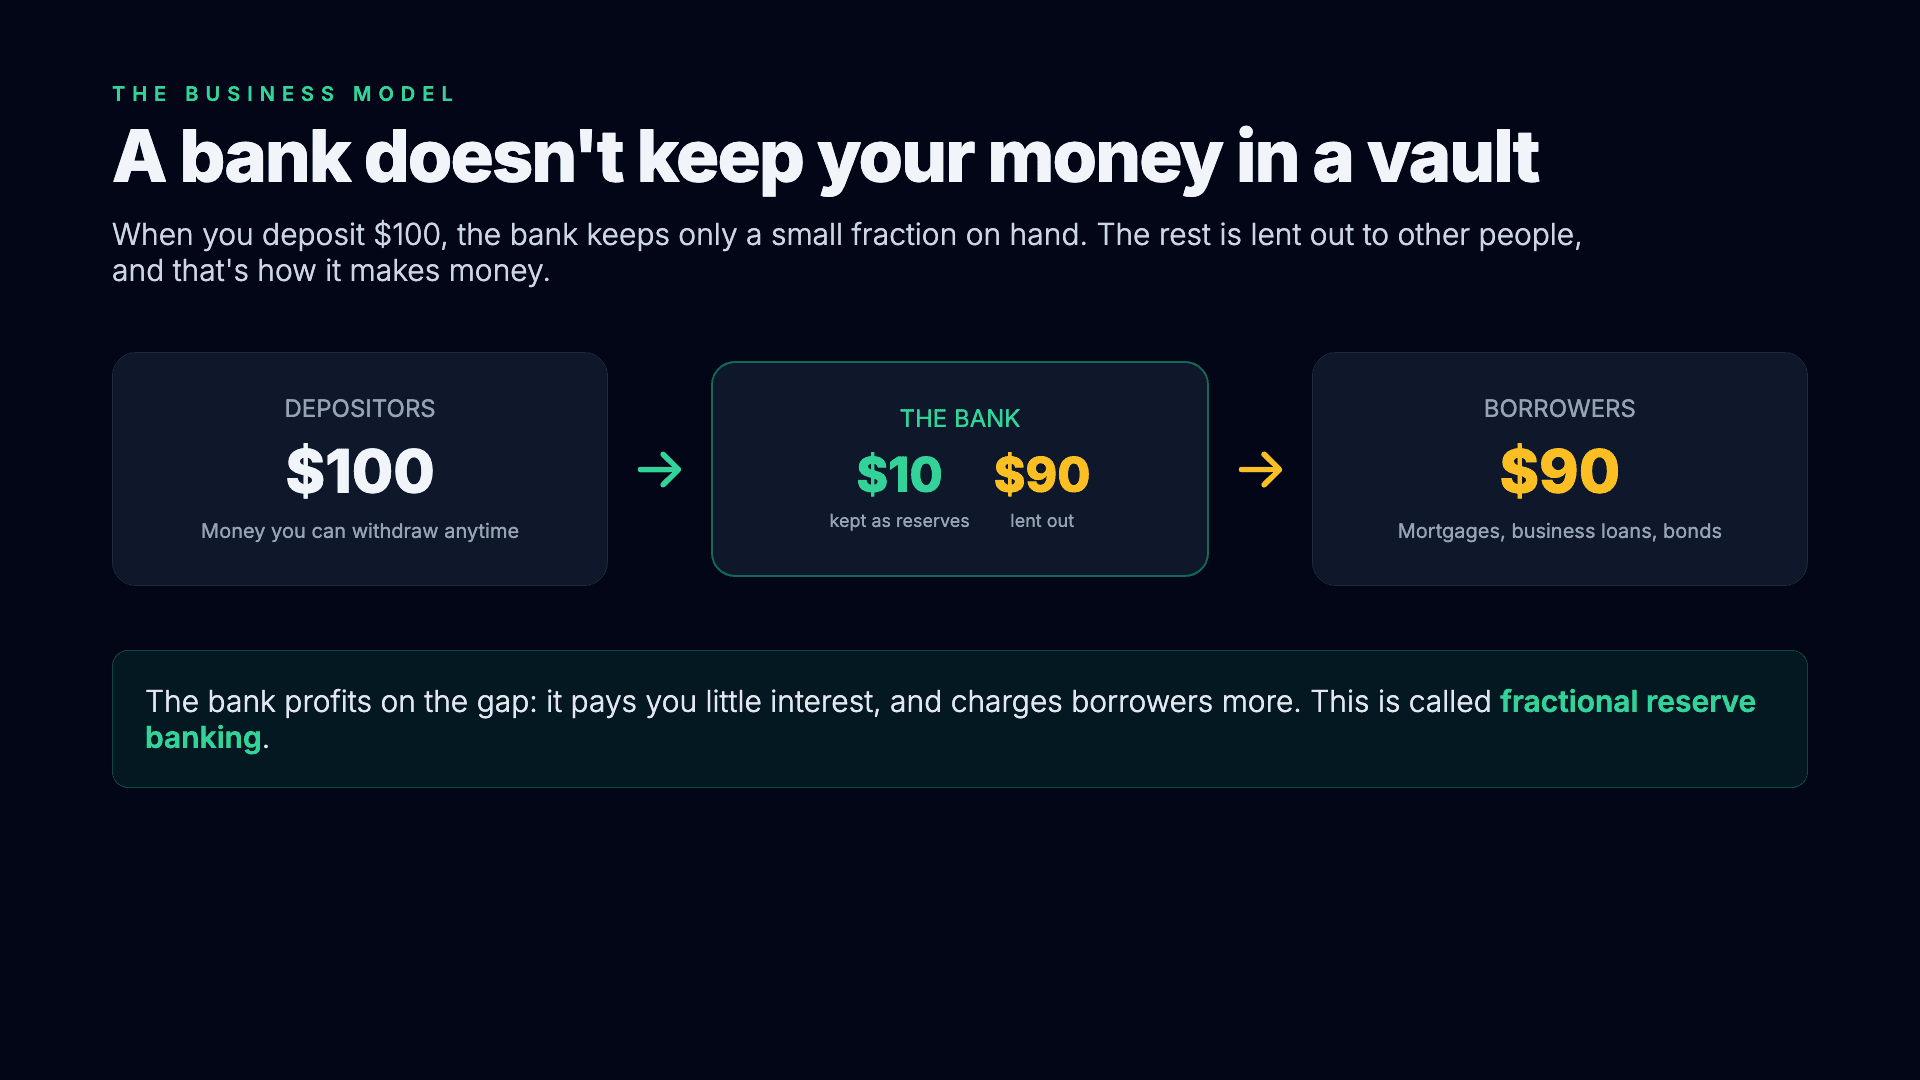
When a scene overflows, we hand it to a smaller model along with the overflow report, the current code, and the screenshot, and we restrict it to a narrow and simple job (that a small model can handle): adjust only spacing and sizing (padding, margins, gaps, font sizes, heights) and change nothing about the content, structure, or design. After the scene is rewritten, we measure again, and we repeat this a few times if needed. Empirically this works really well, and essentially all layout issues can be resolved.
Step 3 - Narration and timestamps
With the scenes settled, each one already has its narration script from Step 1. We send each script to OpenAI's tts-1 to produce the voiceover, one audio file per scene, and measure its duration so the render knows how long to hold the scene on screen.
The voiceover on its own is not quite enough, because to animate a scene in time with the speech we need to know when each word is actually spoken, and that is not something you can read off the script. So we round-trip: the generated audio goes straight back through a speech-to-text model, whisper-1, which returns the transcript aligned to the audio, with a start and end time for every word and for every sentence-level segment. Obviously we could use an endpoint that returns timestamps directly along with the speech (ElevenLabs supports this), but this works well enough and is a lot cheaper than e.g. the ElevenLabs endpoint.
[
  { "word": "Here's",   "start": 0.00, "end": 0.22 },
  { "word": "the",      "start": 0.22, "end": 0.38 },
  { "word": "first",    "start": 0.38, "end": 0.64 },
  { "word": "surprise", "start": 0.64, "end": 1.14 },
  { "word": "a",        "start": 1.64, "end": 1.78 },
  { "word": "bank",     "start": 1.78, "end": 1.90 }
]
Those timings are what the rest of the pipeline runs on. The per-word times let Step 4 line up each reveal with the moment it is mentioned, the per-segment times become the subtitle track, and the per-scene durations decide how many frames each scene occupies in the final video. Audio is the one part of the pipeline that always uses OpenAI, whatever model wrote the scenes. If you want to, you can obviously add support for other providers as well.
Step 4 - Timing the reveals
This is the step that gives the videos their presentation feel, where each piece of a scene appears as the narration reaches it rather than all at once (imitating the way a human would present a powerpoint!).
It has two inputs that already exist. From Step 1, every element meant to appear in sequence is tagged with data-animate="reveal-1", reveal-2, and so on, and the narration was written to introduce them in that order. From Step 3, we know the exact time each word is spoken. The one thing that is missing is the link between them: at which word should each reveal appear?
We let a small model decide. It gets the scene and the transcript with every word numbered, and returns, for each reveal marker, the index of the word it should appear on, keeping them in order. This is a judgment about meaning rather than arithmetic: reveal-3 is the depositors card, so it should land when the narration actually reaches the depositor, not at some evenly spaced interval. For the banks scene it comes back like this:
[
  { "reveal": "reveal-1", "wordIndex": 0 },
  { "reveal": "reveal-2", "wordIndex": 15 },
  { "reveal": "reveal-3", "wordIndex": 39 },
  { "reveal": "reveal-4", "wordIndex": 56 },
  { "reveal": "reveal-5", "wordIndex": 69 },
  { "reveal": "reveal-6", "wordIndex": 79 }
]
Read through the Step 3 timestamps, those indices put the six pieces of the scene at roughly 0s, 4.7s, 13.9s, 19.4s, 23.7s, and 28.3s, each appearing as the narration gets to it. At render time every reveal element starts hidden and fades in over about half a second when its word begins. As with overflow repair, this is a narrow task handed to a cheap model, and it works very well empirically.
6 / 6
Step 5 - Rendering
By this point everything the video needs exists: the scene components, an audio file and duration for each, and the reveal mappings. Rendering is where they are composed into a single timeline and turned into pixels.
Each scene becomes one segment of the video, and its length is simply the length of its narration, so the pacing follows the voiceover rather than any fixed per-scene duration. The scene's audio is attached to its segment, and the reveal mappings and word timings drive the per-frame opacity, so each tagged element fades in exactly when Step 4 said it should. No model is involved here; it is a plain render of the pieces we already have.
Remotion bundles the scene components and renders the composition to an MP4 locally, frame by frame. Alongside the video we write a WebVTT subtitle track from the segment timings and a metadata file with the full transcript, the per-scene start times and durations, and the config the run used.
Model comparison
All three providers produce working videos, but what they produce differs in some ways. In our testing Claude Opus is the strongest by a clear margin, both in the visual design of the scenes and in the narration. Its layouts are cleaner and more consistent, and its scripts are more coherent and carry better from one scene to the next. Judge it yourself by comparing the outputs at the top of this post!
Cost and speed tells the following story, averaged over the twelve examples above:
| Provider | $/video | Video length | $/min | Wall-clock |
|---|---|---|---|---|
| Anthropic (Opus 4.8) | $0.72 | 6.9 min | $0.11 | 7.5 min |
| OpenAI (GPT-5.5) | $1.40 | 6.1 min | $0.23 | 15.0 min |
| Google (Gemini 3.1 Pro) | $0.25 | 3.4 min | $0.07 | 4.8 min |
Google is the cheapest and fastest, but it also writes the shortest videos, so the per-minute figure is the fairer comparison. OpenAI costs the most, roughly twice Anthropic, mostly because its run uses more tokens. Anthropic, the model we think produces the best videos, lands in the middle.
Closing thoughts
Being honest about the output, I think these videos are decent but I would still call them slop. They are watchable, the facts are almost always correct, and the presentation is clean, but I still wouldn't say they have the spark that makes you actually want to watch a bunch of them for their own sake.
That points to a broader issue which is that AI-generated content meant to be consumed by humans, as opposed to AI output that is just an input to some other system, feels like its own distinct problem. There seems to be an almost reflexive pull away from content once people realize it was generated, even when it is perfectly competent. I do not know whether that reaction is only because the content is still subpar, or whether there is something else going on, where we place some value on a human having made the thing that is being consumed.
Obviously he quality will keep climbing. A year or two from now the output might be good enough that these go from being a demo to something people actually want to watch!