


惯性聚合 高效追踪和阅读你感兴趣的博客、新闻、科技资讯
阅读原文 在惯性聚合中打开

推荐订阅源

S
Secure Thoughts
云风的 BLOG
云风的 BLOG
Engineering at Meta
Engineering at Meta
A
About on SuperTechFans
Hugging Face - Blog
Hugging Face - Blog
钛媒体:引领未来商业与生活新知
钛媒体:引领未来商业与生活新知
WordPress大学
WordPress大学
U
Unit 42
月光博客
月光博客
美团技术团队
S
Security Affairs
L
Lohrmann on Cybersecurity
Latest news
Latest news
cs.AI updates on arXiv.org
Application and Cybersecurity Blog
Recent Announcements
P
Palo Alto Networks Blog
The Last Watchdog
The Last Watchdog
T
Tor Project blog
Schneier on Security
Jina AI
Jina AI
MongoDB | Blog
MongoDB | Blog
Cloudbric
Cloudbric
B
Blog RSS Feed
Project Zero
Project Zero
Hacker News: Ask HN
Hacker News: Ask HN
Security Latest
Security Latest
C
Cybersecurity and Infrastructure Security Agency CISA
NISL@THU
NISL@THU
M
MIT News - Artificial intelligence
H
Help Net Security
Google DeepMind News
L
LINUX DO - 热门话题
V
Visual Studio Blog
W
WeLiveSecurity
T
The Exploit Database - CXSecurity.com
Recent Commits to openclaw:main
奇客Solidot–传递最新科技情报
奇客Solidot–传递最新科技情报
T
Threat Research - Cisco Blogs
Help Net Security
Help Net Security
F
Fortinet All Blogs
IT之家
IT之家
A
Arctic Wolf
Apple Machine Learning Research
I
Intezer
D
DataBreaches.Net
C
Cyber Attacks, Cyber Crime and Cyber Security
Stack Overflow Blog
Stack Overflow Blog
SecWiki News
SecWiki News
Last Week in AI
Last Week in AI

lvbibir's Blog

shell | 磁盘空间分析脚本 Linux cat 和 tee 命令写入文件 python | 使用 uv 管理你的 python 环境 Claude Code 完整配置指南 windows | mihomo 内核独立部署指南 linux | 磁盘扩容 wsl | 释放长久运行占用的磁盘空间 mysql | 线程上限问题处理 麒麟 7.6 安装谷歌 OTP 认证模块 suse 12sp5 升级 openssh 及 openssl suse 12sp5 部署 mysql 5.7 《谁的青春不迷茫》 docker | centos7 部署 docker vim | 基础配置和使用 windows | rime 输入法 & 雾凇方案 shell | sshpass 批量传输文件及执行命令 wsl | 原生 linux 方式安装 docker nodejs | fnm + pnpm 开发环境配置 wsl | 安装配置 miniconda 虚拟环境 wsl | 自动更新系统代理 wsl | bashrc 环境变量不正确加载的处理方法 wsl | win10 安装 wsl2 troubleshooting | ssh 成功但是 scp 失败 linux | 常用命令总结 shell | 检测网站存活并自动钉钉告警 Zabbix | 监控端口连通性并自动追踪 TCP 路由 windows | 自定义开机快速启动项 windows | miniconda 配置 python 虚拟环境 Zabbix | 监控主机到指定 ip 的流量大小 shell | centos 初始化 loki (二) 部署 loki (一) 简介 prometheus (六) Alertmanager prometheus (五) 记录规则与告警规则 prometheus (四) 黑盒监控 prometheus (三) 服务发现 prometheus (二) 静态配置 prometheus (一) 简介及部署 traefik (四) TraefikService 服务 traefik (三) Middleware 中间件 traefik (二) ingressRoute 路由 traefik (一) 简介、部署和配置 kubernetes | Gateway API 简介及部署 linux | dns 配置文件中 search 和 options ndots 详解 kubernetes | command args 和 dockerfile 中的 ENTRYPOINT CMD kubernetes | statefulset 控制器详解 docker | dockerfile 最佳实践 docker | dockerfile 指令详解 linux | kill 命令详解以及 linux 中的信号 troubleshooting | elasticsearch 安装插件报错 shell | if 条件判断 docker | 下载外网镜像的几种方式 python | 鬼谷子数学问题 steam挂刀教程 linux | history 命令的格式化输出 shell | 将本地镜像批量推送到 harbor windows | hosts 文件修复 kubernetes | configmap & secret kubernetes | RBAC 鉴权和 NetworkPolicy kubernetes | service & ingress kubernetes | 存储 kubernetes | 滚动升级和自动伸缩 kubernetes | 控制器 kubernetes | 日志 kubernetes | 调度 kubernetes | pod kubernetes | 杂记 linux | set 命令详解 ceph | openeuler 部署 ceph-v16 ceph | ceph-v16 离线安装解决方案 pxe 如何应对复杂的服务器硬件环境 python | 批量修改目录下文件名 《微习惯》 ceph | openeuler (aarch64) 部署 ceph-v16 troubleshooting | glibc 误升级后修复 pxe 安装配置大全 《人间失格》 跑步日常 [置顶] Hello, hugo! shell | 检索某 url 中所有文件的内容 shell | 不同执行方式的区别 shell | 开启 debug 模式 vscode | 常见问题 windows & linux 多网卡时设置默认路由以及添加静态路由 mysql (二) 主从复制原理 GTID 并行复制 mysql (一) 部署 mysql | 杂记 cicd | jenkins 部署 mall-swarm 项目 httpd 源码打包编译成 rpm 包 openssl 源码打包编译成 rpm 包 centos7 | 修改网卡名称 ceph | pool pg_num 配置 docker | 脚本方式批量导出/导入镜像 centos 密码尝试次数过多问题处理 centos7 | 升级内核至 5.10 CVE-1999-0526 ceph | centos7 部署 ceph-v12 python | 修改 pip 源 troubleshooting | 安装 cloud-init 后导致 ssh 连接失败 windows | autohotkey 常用脚本
docker 部署 piclist
lvbibir · 2023-12-29 · via lvbibir's Blog

0 前言

感谢 piclist 作者的 不吝解答

最近从 typora 迁移到了 obsidian, typora 可以很方便的自动调用 picgo 实现图片上传, obsidian 得益于丰富的插件市场, 可以通过 Image Auto Upload Plugin 插件调用 picgo, 但是必须手动启动 picgo 后才能正常使用

在插件配置的注释中发现了 piclist, 经了解发现这个二开版本支持 docker 部署, 综合考虑了一下还是值得折腾一下的, 既能避免手动打开 picgo 的繁琐, 也可以在我所有的 pc 上卸载掉一个软件, 同时还能水一文

注意本文以已有服务器/ip/域名且 web 服务使用 nginx 为前提, 如果不满足上述前提, 需要将 piclist 的 36677 端口映射到主机, 部署完 piclist 后直接通过 ip 加端口的形式调用即可

1 部署

1.1 piclist 配置

docker-compose.yml 中添加如下配置

version: '3.1'

services:

  piclist:
    image: 'kuingsmile/piclist:v1.7.0'
    container_name: piclist
    restart: always
    networks:
      blog_net:
        ipv4_address: 172.19.0.5
    volumes:
      - '$PWD/data/piclist:/root/.piclist'
    # 需要在 .env 文件中配置环境变量
    env_file:
      - .env
    command: node /usr/local/bin/picgo-server -k ${piclist_key}

networks:
  blog_net:
    driver: bridge
    ipam:
     config:
       - subnet: 172.19.0.0/16

添加 .env 环境变量文件并启动 piclist 容器, 此环境变量用于 client(obsidian) 和 piclist server 之间的鉴权

# 将 123456 设置为自定义的密码
cat > .env <<-'EOF'
# PicList 配置
# 请修改为你的实际 key 值
piclist_key='123456'
EOF

docker-compose up -d

修改 data/piclist/config.json 的配置, 以阿里云 OSS 为例添加图床配置, 内容自行修改, 官方没有配置文件的详细文档, 可以折中一下, 先 windows 安装 piclist, 测试无误后导出配置

{
  "picBed": {
    "current": "aliyun",
    "uploader": "aliyun",
    "aliyun": {
      "accessKeyId": "******",
      "accessKeySecret": "******",
      "bucket": "lvbibir-image",
      "area": "oss-cn-beijing",
      "path": "blog/",
      "customUrl": "https://img.lvbibir.cn",
      "options": ""
    }
  },
  "picgoPlugins": {}
}

最后再重启一下 piclist

1.2 nginx 配置

nginx 中添加如下 location 配置

    location /piclist/ {
        proxy_pass http://172.19.0.5:36677/;
        proxy_redirect off;
        proxy_set_header X-Real-IP $remote_addr;
        proxy_set_header X-Real-Port $remote_port;
        proxy_set_header X-Forwarded-For $proxy_add_x_forwarded_for;
        proxy_set_header HTTP_X_FORWARDED_FOR $remote_addr;
        proxy_set_header X-Forwarded-Proto $scheme;
        proxy_set_header Host $host;
        proxy_set_header X-NginX-Proxy true;
        proxy_set_header Accept-Encoding "br";
    }

执行 docker restart nginx-proxy 重启 nginx

最后修改 obsidian 的 Image auto upload Plugin 插件的配置
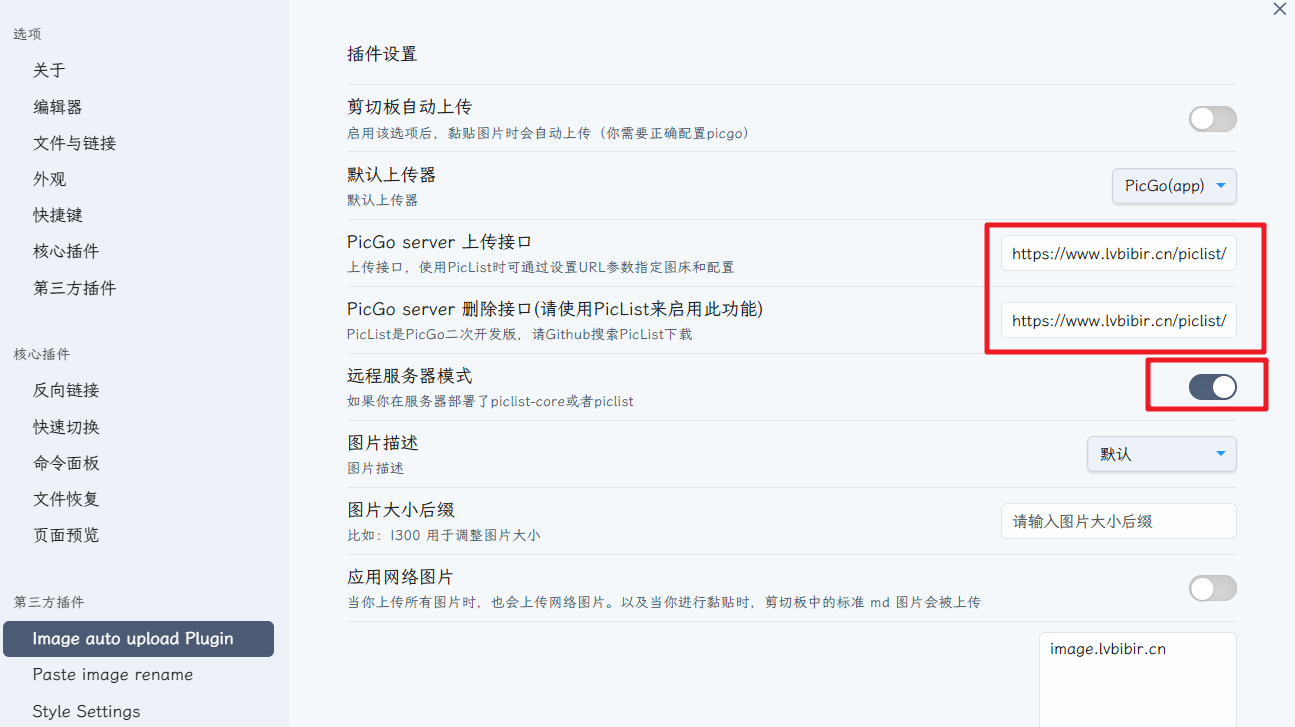
  1. 打开远程服务器模式
  2. 将接口 url 设置为 https://<你的域名>/piclist/upload?key=<你的key>, 这里的 key 就是启动容器时配置的环境变量的值, 需注意如果 key 中有特殊字符需要 url 转义一下

最后测试一下图片上传即可, 如果有报错可以通过 docker logs -f piclist 查看日志

2 常见问题

2.1 上传失败

  1. obsdian 直接提示上传失败, 可能是 key 中有特殊字符没有转义或者没有打开远程服务器模式
  2. 日志中有如下 Unauthorized access 报错, 一般是 key 不匹配

2.2 忘记 piclist_key

如果已经启动了的容器可以通过如下命令查看

docker exec -it piclist ps -ef | grep -v grep | grep node

以上