







安装了 docker 的系统,使用 ifconfig 可以查看到 docker0 设备,docker 守护进程就是通过 docker0 为容器提供网络连接的各种服务
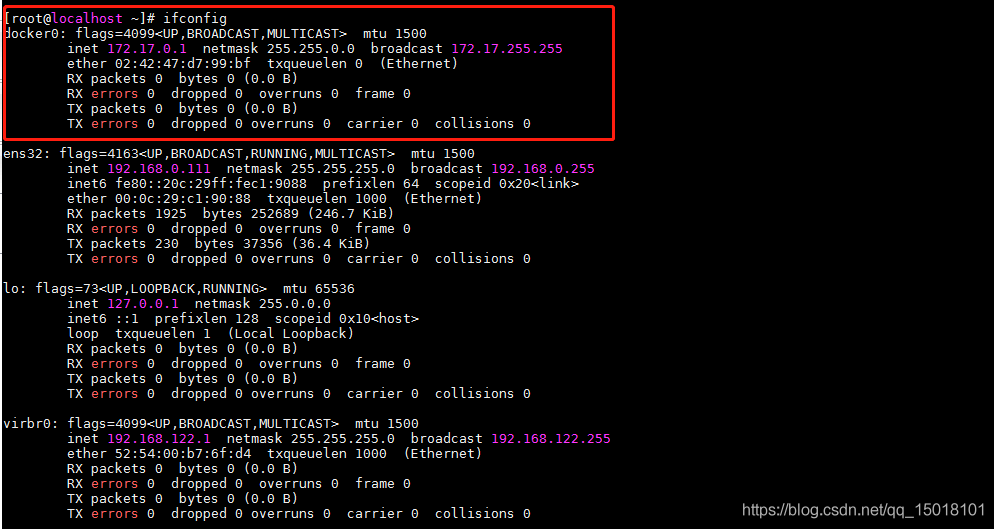
docker0 实际上是 linux 虚拟网桥(交换机)
网桥是数据链路层的设备,它通过 mac 地址来对网络进行划分,并且在不同的网络之间传递数据
linux 虚拟网桥的特点:

docker0 的地址划分:
每当一个容器启动时,docker 守护进程会创建网络连接的两端,一端在容器内创建 eth0 网卡,另一端在 dokcer0 网桥中开启一个端口 veth*
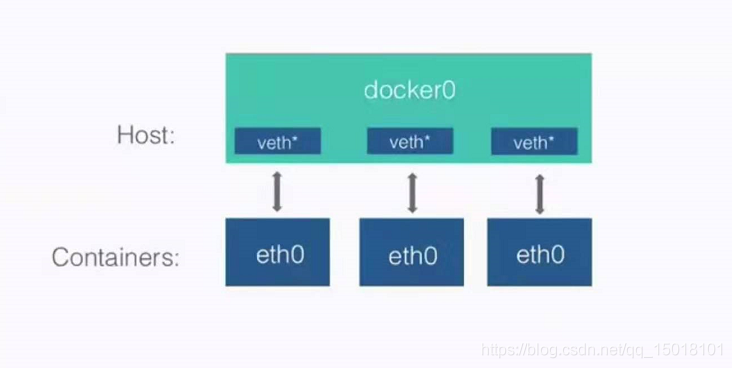
查看网桥设备需要预先安装 bridge-utils 软件包
[root@localhost ~]# yum install -y bridge-utils
[root@localhost ~]# brctl show
bridge name     bridge id               STP enabled     interfaces
docker0         8000.024247d799bf       no
virbr0          8000.525400b76fd4       yes             virbr0-nic
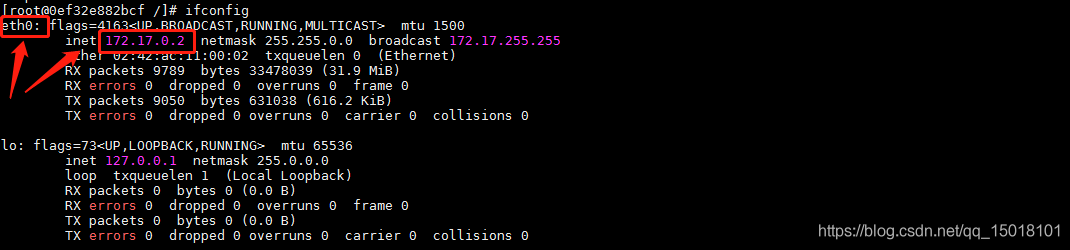
开启一个容器,查看网络设置:
[root@localhost ~]# docker run -it --name nwt1 centos /bin/bash
[root@0ef32e882bcf /]# ifconfig
bash: ifconfig: command not found
[root@0ef32e882bcf /]# yum install -y net-tools
[root@0ef32e882bcf /]# ifconfig
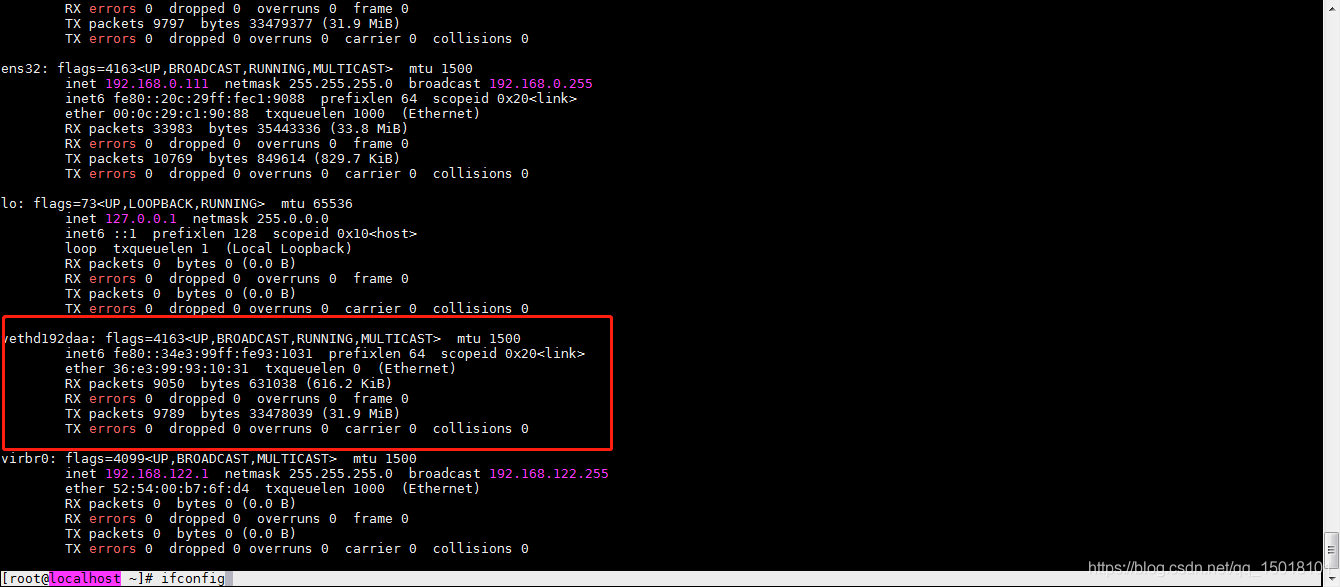
再查看一下网桥
[root@localhost ~]# brctl show

[root@localhost ~]# ifconfig
当默认 docker0 的 ip 或者网段与主机环境发生冲突时,可以修改 docker0 的地址和网段来进行自定义
# ifconfig docker0 IP netmask NETMASK
[root@localhost ~]# ifconfig docker0 192.168.200.1 netmask 255.255.255.0
[root@localhost ~]# ifconfig
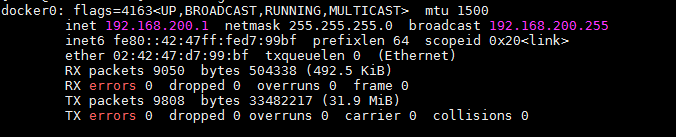
[root@localhost ~]# systemctl restart docker
[root@localhost ~]# docker run -it centos /bin/bash
[root@a5c6ebf79340 /]# yum install -y net-tools
[root@a5c6ebf79340 /]# ifconfig
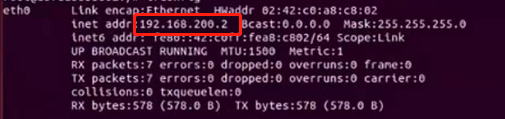
添加虚拟网桥
[root@localhost ~]# brctl addbr br0
[root@localhost ~]# ifconfig br0 192.168.100.1 netmask 255.255.255.0
[root@localhost ~]# ifconfig
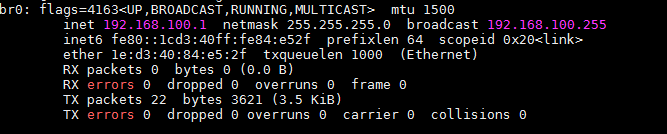
修改 docker 守护进程的配置
[root@localhost ~]# vim /lib/systemd/system/docker.service
ExecStart=/usr/bin/dockerd -b=br0
[root@localhost ~]# systemctl daemon-reload
[root@localhost ~]# systemctl restart docker
[root@localhost ~]# ps -ef | grep docker
root       4156      1  1 14:06 ?        00:00:00 /usr/bin/dockerd -b=br0
root       4161   4156  0 14:06 ?        00:00:00 docker-containerd --config /var/run/docker/containerd/containerd.toml
root       4263   1558  0 14:06 pts/0    00:00:00 grep --color=auto docker
启动一个测试容器
[root@localhost ~]# docker run -it --name nwt3 centos /bin/bash
[root@d70269c9557e /]# yum install -y net-tools
[root@d70269c9557e /]# ifconfig
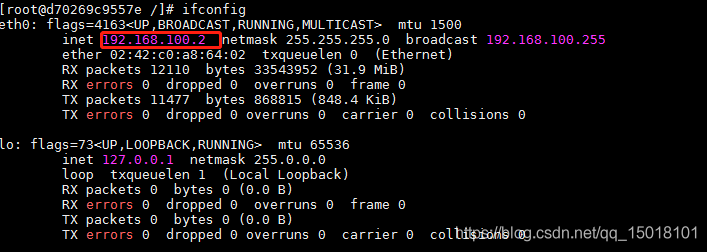
–icc=true 默认为 true,即允许同一宿主机下所有容器之间网络连通
[root@localhost ~]# docker run -itd --name test1 busybox /bin/sh
7ec641b21b66b6472f4e92cfaa7f9c0674c4322a5265a05e272ae180b0d4687c
[root@localhost ~]# docker exec test1 ifconfig eth0
eth0      Link encap:Ethernet  HWaddr 02:42:AC:11:00:02
          inet addr:172.17.0.2  Bcast:172.17.255.255  Mask:255.255.0.0
          UP BROADCAST RUNNING MULTICAST  MTU:1500  Metric:1
          RX packets:8 errors:0 dropped:0 overruns:0 frame:0
          TX packets:0 errors:0 dropped:0 overruns:0 carrier:0
          collisions:0 txqueuelen:0
          RX bytes:648 (648.0 B)  TX bytes:0 (0.0 B)

[root@localhost ~]# docker run -itd --name test2 busybox /bin/sh
fee0ff3e7f82cd1fa06eea11d850251931dff4dff2f0c7ee3e5a9904532beeb6
[root@localhost ~]# docker exec test2 ping 172.17.0.2 -c 4
PING 172.17.0.2 (172.17.0.2): 56 data bytes
64 bytes from 172.17.0.2: seq=0 ttl=64 time=0.133 ms
64 bytes from 172.17.0.2: seq=1 ttl=64 time=0.136 ms
64 bytes from 172.17.0.2: seq=2 ttl=64 time=0.264 ms
64 bytes from 172.17.0.2: seq=3 ttl=64 time=0.163 ms

--- 172.17.0.2 ping statistics ---
4 packets transmitted, 4 packets received, 0% packet loss
round-trip min/avg/max = 0.133/0.174/0.264 ms
容器的 ip 是不可靠的连接
可以使用 –link 选项来连接两个容器
docker run --link=[CONTAINER_NAME]:[ALIAS] [IMAGE] [COMMAND]
–link 后面的 test3 指连接到 test3 容器,nt 是为 test3 创建了一个别名
新建两个容器进行测试
[root@localhost ~]# docker run -itd --name test3 busybox /bin/sh
1fd4e373dba17fdf1fa93121e08ea2f1f32d8f4116339c072a72a73574b0926f
[root@localhost ~]# docker run -itd --name test4 --link=test3:nt  busybox /bin/sh
c04b9b759bd4cc9af54000a742df58c8369a7f1bfc8862a8325481f1d61db135
[root@localhost ~]#
[root@localhost ~]# docker exec test4 ping nt -c 4
PING nt (172.17.0.4): 56 data bytes
64 bytes from 172.17.0.4: seq=0 ttl=64 time=0.256 ms
64 bytes from 172.17.0.4: seq=1 ttl=64 time=0.196 ms
64 bytes from 172.17.0.4: seq=2 ttl=64 time=0.164 ms
64 bytes from 172.17.0.4: seq=3 ttl=64 time=0.148 ms

--- nt ping statistics ---
4 packets transmitted, 4 packets received, 0% packet loss
round-trip min/avg/max = 0.148/0.191/0.256 ms
–link 选项对容器做了如下改变:
[root@localhost ~]# docker exec test4 env
[root@localhost ~]# docker exec test4 cat /etc/hosts
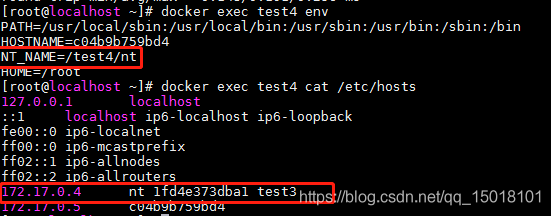
删除之前使用的 test1 与 test2 容器,这两个容器占用的 ip 释放,重启 test3 后,使用最新的 ip 地址
[root@localhost ~]# docker rm -f test1
test1
[root@localhost ~]# docker rm -f test2
test2
[root@localhost ~]# docker restart test3
test3
[root@localhost ~]# docker exec test3 ifconfig eth0
eth0      Link encap:Ethernet  HWaddr 02:42:AC:11:00:02
          inet addr:172.17.0.2  Bcast:172.17.255.255  Mask:255.255.0.0
          UP BROADCAST RUNNING MULTICAST  MTU:1500  Metric:1
          RX packets:8 errors:0 dropped:0 overruns:0 frame:0
          TX packets:0 errors:0 dropped:0 overruns:0 carrier:0
          collisions:0 txqueuelen:0
          RX bytes:648 (648.0 B)  TX bytes:0 (0.0 B)
可以看到随着 test3 的 ip 地址发生改变,test4 容器中的 hosts 文件也随之改变
[root@localhost ~]# docker exec test4 cat /etc/hosts
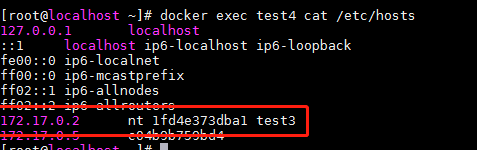
修改守护进程的启动选项:–icc=false
[root@localhost ~]# vim /lib/systemd/system/docker.service
ExecStart=/usr/bin/dockerd   --icc=false
[root@localhost ~]# systemctl daemon-reload
[root@localhost ~]# systemctl restart docker
新建两个容器进行测试,可以看到无法 ping 通
[root@localhost ~]# docker run -itd --name test10 busybox /bin/sh
700f026459206531b0fda811a43bc12af2f0815dc695f317a1f52939bfada2a1
[root@localhost ~]# docker run -itd --name test11 busybox /bin/sh
792cc31481739e1b2537597bc54c76737333bf95412dac2209e050f35d276dd4
[root@localhost ~]# docker exec test10 ifconfig eth0
eth0      Link encap:Ethernet  HWaddr 02:42:AC:11:00:06
          inet addr:172.17.0.6  Bcast:172.17.255.255  Mask:255.255.0.0
          UP BROADCAST RUNNING MULTICAST  MTU:1500  Metric:1
          RX packets:8 errors:0 dropped:0 overruns:0 frame:0
          TX packets:0 errors:0 dropped:0 overruns:0 carrier:0
          collisions:0 txqueuelen:0
          RX bytes:648 (648.0 B)  TX bytes:0 (0.0 B)

[root@localhost ~]# docker exec test11 ping 172.16.0.6
^C
修改守护进程选项:
只有设置了 –link 的两个容器间才可以互通
[root@localhost ~]# vim /lib/systemd/system/docker.service
ExecStart=/usr/bin/dockerd   --icc=false --iptables=true
[root@localhost ~]# systemctl daemon-reload
[root@localhost ~]# systemctl restart docker
新建两个容器进行验证
[root@localhost ~]# docker run -itd --name test21  busybox /bin/sh
77f56db227acaa590f729c12a4852d3131f1729851ea8c613a670effbfa512ad

[root@localhost ~]# docker run -itd --name test22 --link=test21:nt busybox /bin/sh
f4e346387588198cafcfd1d6a2c330a20375b746d05c08bf06e100f9af294a9e

[root@localhost ~]# docker exec test22 ping nt -c 4
PING nt (172.17.0.2): 56 data bytes
64 bytes from 172.17.0.2: seq=0 ttl=64 time=0.201 ms
64 bytes from 172.17.0.2: seq=1 ttl=64 time=0.164 ms
64 bytes from 172.17.0.2: seq=2 ttl=64 time=0.195 ms
64 bytes from 172.17.0.2: seq=3 ttl=64 time=0.188 ms

--- nt ping statistics ---
4 packets transmitted, 4 packets received, 0% packet loss
round-trip min/avg/max = 0.164/0.187/0.201 ms

[root@localhost ~]# docker exec test22 ifconfig eth0
eth0      Link encap:Ethernet  HWaddr 02:42:AC:11:00:03
          inet addr:172.17.0.3  Bcast:172.17.255.255  Mask:255.255.0.0
          UP BROADCAST RUNNING MULTICAST  MTU:1500  Metric:1
          RX packets:14 errors:0 dropped:0 overruns:0 frame:0
          TX packets:6 errors:0 dropped:0 overruns:0 carrier:0
          collisions:0 txqueuelen:0
          RX bytes:1124 (1.0 KiB)  TX bytes:476 (476.0 B)

[root@localhost ~]# docker exec test21 ping 172.17.0.3 -c 4
PING 172.17.0.3 (172.17.0.3): 56 data bytes
64 bytes from 172.17.0.3: seq=0 ttl=64 time=0.181 ms
64 bytes from 172.17.0.3: seq=1 ttl=64 time=0.168 ms
64 bytes from 172.17.0.3: seq=2 ttl=64 time=0.109 ms
64 bytes from 172.17.0.3: seq=3 ttl=64 time=0.226 ms

--- 172.17.0.3 ping statistics ---
4 packets transmitted, 4 packets received, 0% packet loss
round-trip min/avg/max = 0.109/0.171/0.226 ms
以上
此内容由惯性聚合(RSS阅读器)自动聚合整理,仅供阅读参考。 原文来自 — 版权归原作者所有。