本文继续 大神 的 Transformer 介绍 ,进入第三篇 —— Transformer 的实现。
问题
完整的 Transformer Block 是什么样的? 怎么捕获序列中的位置信息呢 ? 怎么用 Pytorch 实现一个完整的 Transformer 模型?
Transformer 模型来源于 Google 发表的一篇论文 “Attention Is All You Need”,希望大家能在有一些了解的基础上,能够自己读一下这篇文章 。
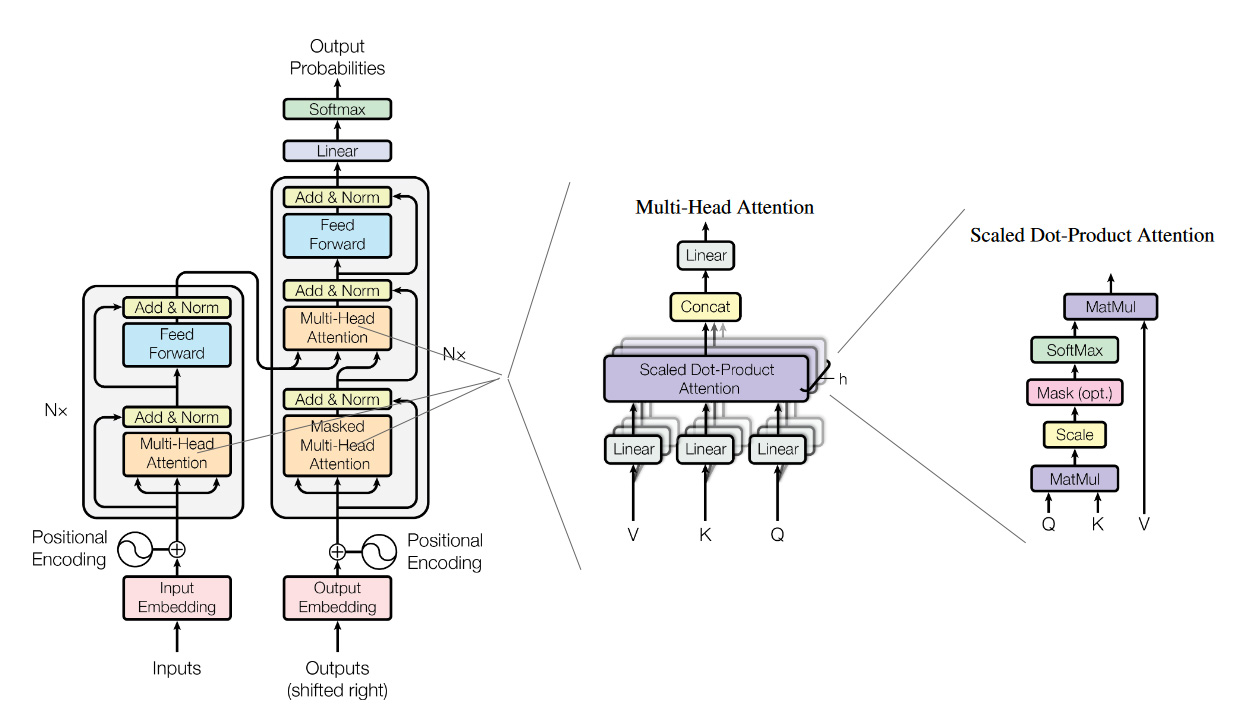
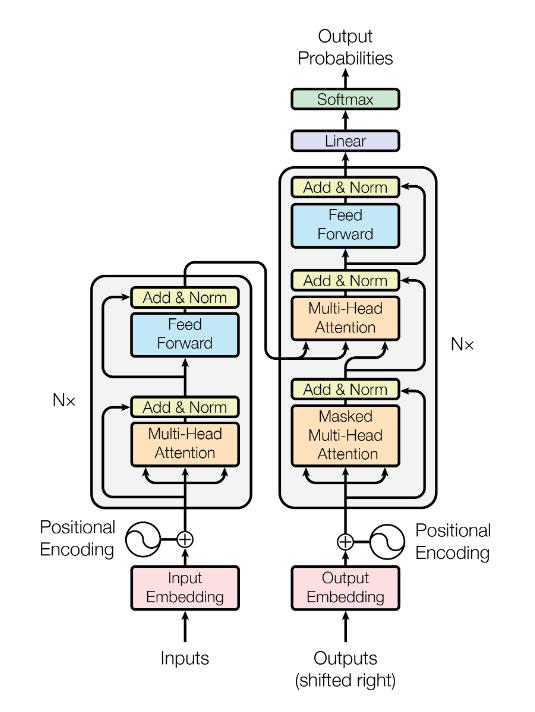
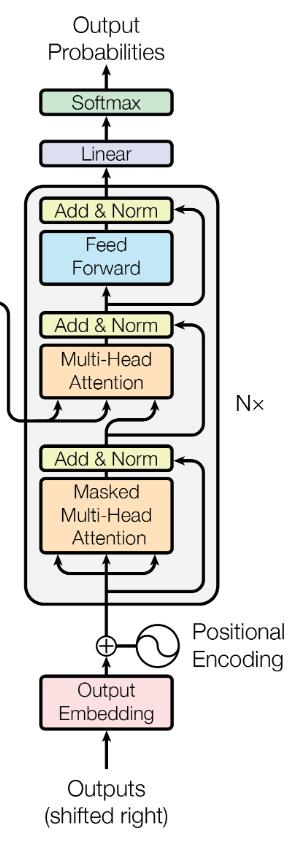
上面这张图片是论文原文中的图片。这几个模型分别代表了 Transformer 在翻译任务中的应用(左),Multi-Head Attention(中),Self-attention(右)。在前面的文章中,我们已经讲解过 Self-attetnion(右),这里和我们之前讲解过的稍有不同的是多了一个粉色的方框 Mask(opt),这个是用来左 Mask任务的,括号中的opt表示是一个可选项,后面我们再细说;也讲解了 Multi-Head Attention(中),多头的注意力机制;本篇文章,我们把重点集中在最左侧的图片,来看看 Transformer 结构。
这个模型结构分为左右两个部分,因为原文中是用 Transtormer 来做翻译任务的,大家可能知道通常我们做翻译任务的时候,都使用 Encoder-Decoder 的架构来做。这里面的左侧对应着 Encoder ,右侧就是 Decoder。Encoder 本质的目的就是对 input 生成一种中间表示,Decoder 目的就是对这种中间表示做解码,生成目标语言的 ouput。大家会发现两边的结构基本上是一致的,为了着重的研究 Transformer 结构,我们把视线聚焦在 Encoder 的部分。
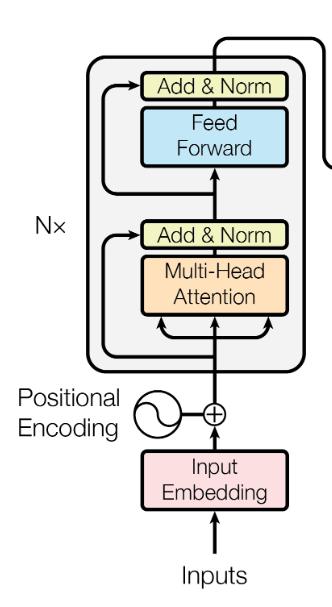
大家会在图中看到,这里有个 $N×$ 的符号,这表示了右侧的结构可以被 $N$ 次堆叠,这就像是我们在使用神经网络的时候,可以 $N$ 次堆叠 layer 一样,通常我们把这样的一种由多个 layer 组成的模块叫做 block,这种 block 就是一种比 layer 更大规模的可复用单元。那么,接下来我们把重点放到 Transformer Block 上。
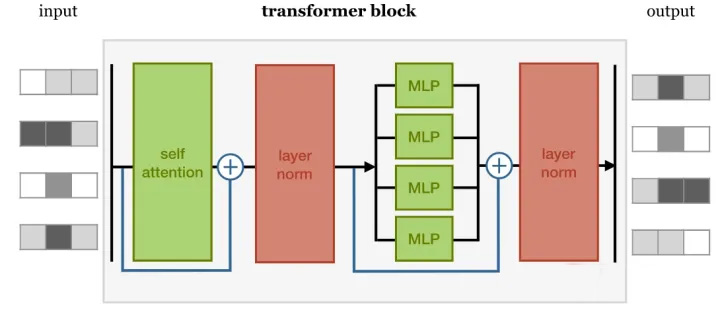
在这样一个block中,是由几个重要的组件构成的:
Self-attention layer Normalization layer Feed forward layer Another normalization layer
在这样四个组件中的两个 Normalization layer 之前,使用了残差网络(Residula connections)进行了连接。实际上,这几个组件之间的顺序并没有被完全的定死,这里面最重要的事情是,要联合使用 Self-attention 和 Feed forward layer,并且要在它们之间增加 Normalization 和 Residual connections。
Normaliztion 和 Residual connections 是我们经常使用的,帮助加快深度神经网络训练速度和准确率的 tricks。
这里我们可以先看看使用 Pytorch 实现这样一个 block 是什么样子的。
1
2
3
4
5
6
7
8
9
10
11
12
13
14
15
16
17
18
19
20
class TransformerBlock (nn.Module):def __init__ (self, k, heads ):super ().__init__() self.attention = SelfAttention(k, heads=heads)
self.norm1 = nn.LayerNorm(k)
self.ff = nn.Sequential(4 * k),4 * k, k))
def forward (self, x ):
fedforward = self.ff(x)return self.norm2(fedforward + x)
这里主观的选择 4 倍输入大小作为我们 feedforward 层的维度,这个值使用的越小就越节省内存,但是相应的表示性也会变弱;但是,最小也应该大于我们输入的维度。
怎么捕获序列中的顺序信息呢 ?
通过使用 Transformer 我们可以得到一个对于输入信息的 embedding vector,但是这里大家可能也会发现,我们并没有利用好序列的输入顺序。比如说 We are happy 和 are we happy ,它们得到的 vector 是一样的。显然,这并不是希望看到的。所以,我们要给模型增加捕获序列顺序的能力。我们应该怎么做呢?
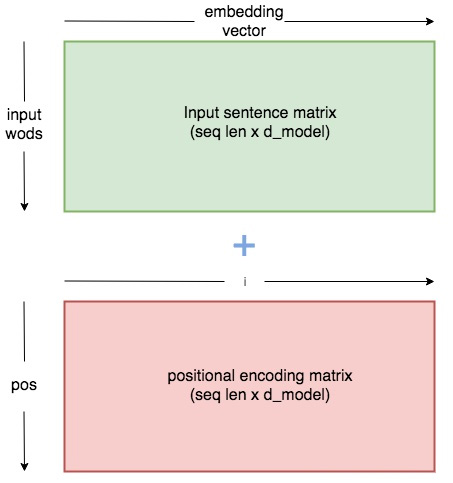
办法也很简单,我们创建一个和输入序列等长的新序列,这个序列里包含序列中的顺序信息,我们把这个序列和原有序列进行相加,从而得到输入到 Transformer 的序列。那应该怎样表示序列中的位置信息呢?
这里我们有两种方法:
position embeddings 我们简单的 embed 位置信息,就像我们对待每一个输入一样。比如说我们之前对每个单词创建一个 vector $v_{\text {we }} v_{\text {are }} v_{h a p p y} $ ,那我们也对每一个位置生成一个向量 $v_{1} v_{2} v_{3}$ 。然后我们使用模型的学习能力来学习到这些位置的 vector。但是这种方法会存在一个问题,那就是我们需要在训练的过程中让模型见过所有的需要在预测阶段使用的位置 vector,否则模型就不知道相应位置的 vector。
position encodings position encoding 的方法其实和 position embedding 的方法很相似,我们都是希望能够通过一个位置的 vector 来表示位置的信息,让模型学习到这个信息。但是,这里稍有不同的是,encoding 的方法是由我们选择一个 function 来生成每个位置的 vector 的,并且让模型网络去找出该如何去理解这些 encoding vector。这样做的好处是,对于一个选择的比较好的 function,网络模型能够处理那些在训练阶段没有见过的序列位置 vector(虽然这也并不是说这些没见过的位置 vector 一定能够表现的很好,但是好在是我们可以有比较直接的方法来测试他们)。这种方法也是 Transformer 的作者选择的方法,让我们看看作者是怎么设计这个 function 的。
$$
作者使用上面的两个 functions 来生成一个 2 维的矩阵常量, pos 表示在序列中的顺序, $ i $ 表示 序列中数据 vector 的维度, $ d_{\text {model }} $ 表示输出的维度大小,如下图所示:
给出一个使用 Pytorch 实现的 PositionEncoder 的代码:
1
2
3
4
5
6
7
8
9
10
11
12
13
14
15
16
17
18
19
20
21
22
23
24
25
class PositionalEncoder (nn.Module):def __init__ (self, d_model, max_seq_len = 80 ):super ().__init__() # 根据pos和i创建一个常量pe矩阵 for pos in range (max_seq_len):for i in range (0 , d_model, 2 ):10000 ** ((2 * i)/d_model)))1 ] = \10000 ** ((2 * (i + 1 ))/d_model)))
pe = pe.unsqueeze(0 )'pe' , pe)
def forward (self, x ):# 让 embeddings vector 相对大一些 # 增加位置常量到 embedding 中 1 )False ).cuda()return x
Tokenize
Input Embedding
Positional Encoder
Transformer Block
Encoder
Decoder
Transformer
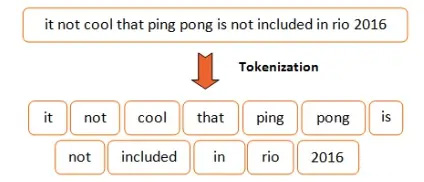
1.Tokenize 首先,我们要对输入的语句做分词,这里使用 spacy 来完成这件事,你也可以选择你喜欢的工具来做。
1
2
3
4
5
6
7
8
9
10
11
12
13
14
class Tokenize (object ): def __init__ (self, lang ):
def tokenizer (self, sentence ):r"[\*\"“”\n\\…\+\-\/\=\(\)‘•:\[\]\|’\!;]" , " " , str (sentence))r"[ ]+" , " " , sentence)r"\!+" , "!" , sentence)r"\,+" , "," , sentence)r"\?+" , "?" , sentence)return [tok.text for tok in self.nlp.tokenizer(sentence) if tok.text != " " ]
Token Embedding 给语句分词后,我们就得到了一个个的 token,我们之前有说过,要对这些 token 做向量化的表示,这里我们使用 pytorch 中 torch.nn.Embedding 让模型学习到这些向量。
1
2
3
4
5
6
7
8
9
class Embedding (nn.Module): def __init__ (self, vocab_size, d_model ):super ().__init__()
def forward (self, x ):return self.embed(x)
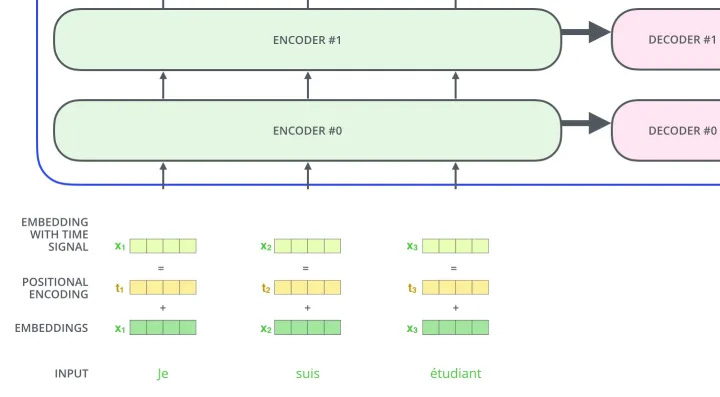
Positional Encoder 前文中,我们有说过,要把 token 在句子中的顺序也加入到模型中,让模型进行学习。这里我们使用的是 position encodings 的方法。
1
2
3
4
5
6
7
8
9
10
11
12
13
14
15
16
17
18
19
20
21
22
23
24
25
26
class PositionalEncoder (nn.Module): def __init__ (self, d_model, max_seq_len = 80 ):super ().__init__()
# 根据pos和i创建一个常量pe矩阵 for pos in range (max_seq_len):for i in range (0 , d_model, 2 ):10000 ** ((2 * i)/d_model)))1 ] = \10000 ** ((2 * (i + 1 ))/d_model)))
pe = pe.unsqueeze(0 )'pe' , pe)
def forward (self, x ):# 让 embeddings vector 相对大一些 # 增加位置常量到 embedding 中 1 )False ).cuda()return x
有了输入,我们接下来就要开始构建 Transformer Block 了,Transformer Block 主要是有以下4个部分构成的:
self-attention layer normalization layer feed forward layer another normalization layer
Attention
1
2
3
4
5
6
7
8
9
10
11
12
13
14
15
16
def attention (q, k, v, d_k, mask=None , dropout=None ): scores = torch.matmul(q, k.transpose(-2 , -1 )) / math.sqrt(d_k)
# mask掉那些为了padding长度增加的token,让其通过softmax计算后为0 if mask is not None :1 )0 , -1e9 )
scores = F.softmax(scores, dim=-1 )
if dropout is not None :
output = torch.matmul(scores, v)return output
这个 attention 的代码中,使用 mask 的机制,这里主要的意思是因为在去给文本做 batch化的过程中,需要序列都是等长的,不足的部分需要 padding。但是这些 padding 的部分,我们并不想在计算的过程中起作用,所以使用 mask 机制,将这些值设置成一个非常大的负值,这样才能让 softmax 后的结果为0。关于 mask 机制,在 Transformer 中有 attention、encoder 和 decoder 中,有不同的应用,我会在后面的文章中进行解释。
MultiHead Attention
多头的注意力机制,用来识别数据之间的不同联系 .
1
2
3
4
5
6
7
8
9
10
11
12
13
14
15
16
17
18
19
20
21
22
23
24
25
26
27
28
29
30
31
32
33
34
35
36
37
38
class MultiHeadAttention (nn.Module): def __init__ (self, heads, d_model, dropout = 0.1 ):super ().__init__()
self.d_model = d_model
self.q_linear = nn.Linear(d_model, d_model)
self.dropout = nn.Dropout(dropout)
def forward (self, q, k, v, mask=None ):
bs = q.size(0 )
# perform linear operation and split into N heads 1 , self.h, self.d_k)1 , self.h, self.d_k)1 , self.h, self.d_k)
# transpose to get dimensions bs * N * sl * d_model 1 ,2 )1 ,2 )1 ,2 )
# calculate attention using function we will define next # concatenate heads and put through final linear layer 1 ,2 ).contiguous()\1 , self.d_model)
return output
Layer Norm
这里使用 Layer Norm 来使得梯度更加的平稳,关于为什么选择 Layer Norm 而不是选择其他的方法,有篇论文对此做了一些研究,Rethinking Batch Normalization in Transformers,对这个有兴趣的可以看看这篇文章 。
1
2
3
4
5
6
7
8
9
10
11
12
13
14
15
16
17
class NormLayer (nn.Module): def __init__ (self, d_model, eps = 1e-6 ):super ().__init__()
self.size = d_model
# 使用两个可以学习的参数来进行 normalisation
self.eps = eps
def forward (self, x ):1 , keepdim=True )) \1 , keepdim=True ) + self.eps) + self.biasreturn norm
Feed Forward Layer
1
2
3
4
5
6
7
8
9
10
11
12
13
class FeedForward (nn.Module): def __init__ (self, d_model, d_ff=2048 , dropout = 0.1 ):super ().__init__()
# We set d_ff as a default to 2048
def forward (self, x ):
4. Encoder Encoder 就是将上面讲解的内容,按照下图堆叠起来,完成将源编码到中间编码的转换。
1
2
3
4
5
6
7
8
9
10
11
12
13
14
15
16
17
18
19
20
21
22
23
24
25
26
27
28
29
30
31
32
33
34
35
class EncoderLayer (nn.Module): def __init__ (self, d_model, heads, dropout=0.1 ):super ().__init__()
def forward (self, x, mask ):return x
class Encoder (nn.Module):
def __init__ (self, vocab_size, d_model, N, heads, dropout ):super ().__init__()
def forward (self, src, mask ):for i in range (self.N):return self.norm(x)
5. Decoder Decoder部分和 Encoder 的部分非常的相似,它主要是把 Encoder 生成的中间编码,转换为目标编码。
1
2
3
4
5
6
7
8
9
10
11
12
13
14
15
16
17
18
19
20
21
22
23
24
25
26
27
28
29
30
31
32
33
34
35
36
37
38
39
40
41
42
43
class DecoderLayer (nn.Module): def __init__ (self, d_model, heads, dropout=0.1 ):super ().__init__()
self.dropout_1 = nn.Dropout(dropout)
self.attn_1 = MultiHeadAttention(heads, d_model, dropout=dropout)
def forward (self, x, e_outputs, src_mask, trg_mask ):return x
class Decoder (nn.Module):
def __init__ (self, vocab_size, d_model, N, heads, dropout ):super ().__init__()
def forward (self, trg, e_outputs, src_mask, trg_mask ):for i in range (self.N):return self.norm(x)
1
2
3
4
5
6
7
8
9
10
11
12
13
class Transformer (nn.Module): def __init__ (self, src_vocab, trg_vocab, d_model, N, heads, dropout ):super ().__init__()
def forward (self, src, trg, src_mask, trg_mask ):return output
以上,就是 Transformer 实现的全过程,配套着大佬的 jupyter notebook 食用, 效果更加。
参考资料
文章链接:https://www.zywvvd.com/notes/study/deep-learning/transformer/transformer-intr/transformer-intr-3/