惯性聚合 高效追踪和阅读你感兴趣的博客、新闻、科技资讯
阅读原文 在惯性聚合中打开

推荐订阅源

cs.AI updates on arXiv.org
PCI Perspectives
PCI Perspectives
钛媒体:引领未来商业与生活新知
钛媒体:引领未来商业与生活新知
Google Online Security Blog
K
KPMG report finds enterprise disconnect between AI and its ROI | CIO
The GitHub Blog
The GitHub Blog
S
Secure Thoughts
cs.CV updates on arXiv.org
WordPress大学
WordPress大学
SecWiki News
SecWiki News
B
Blog
小众软件
小众软件
Hacker News - Newest:
Hacker News - Newest: "LLM"
Webroot Blog
Webroot Blog
CTFtime.org: upcoming CTF events
L
LINUX DO - 热门话题
Recent Commits to openclaw:main
酷 壳 – CoolShell
酷 壳 – CoolShell
IT之家
IT之家
The Cloudflare Blog
Google DeepMind News
Know Your Adversary
Know Your Adversary
Y
Y Combinator Blog
F
Fortinet All Blogs
W
WeLiveSecurity
博客园 - Franky
MongoDB | Blog
MongoDB | Blog
Last Week in AI
Last Week in AI
The Last Watchdog
The Last Watchdog
S
Schneier on Security
爱范儿
爱范儿
V
V2EX - 技术
L
LINUX DO - 最新话题
月光博客
月光博客
博客园 - 【当耐特】
Latest news
Latest news
阮一峰的网络日志
阮一峰的网络日志
博客园 - 司徒正美
U
Unit 42
Schneier on Security
E
Exploit-DB.com RSS Feed
J
Java Code Geeks
Cyberwarzone
Cyberwarzone
T
The Blog of Author Tim Ferriss
TaoSecurity Blog
TaoSecurity Blog
博客园 - 叶小钗
T
Troy Hunt's Blog
大猫的无限游戏
大猫的无限游戏
AI
AI
Security Latest
Security Latest

又见苍岚

COLMAP PatchMatch Stereo 算法详解 事件驱动的状态机框架:从理论到工程实践 Git 在国内网络环境下无法 Push 的排查与修复 —— 配置 Clash 代理 分段五次多项式插值原理详解 路径插值方法深度对比研究 Claude Code 使用指南 OpenClaw 记忆管理与技能创建指南 CBS(Conflict-Based Search)算法详解 A* 算法及其变种详解 OpenClaw 配置多 Agents Windows Powershell 无法加载文件,因为在此系统上禁止运行脚本问题的解决方案 MaxClaw 安装流程 大模型 AI 名词介绍 AList 网盘聚合工具简介 Protobuf 简介与测试 Claude Code 简介以及 GLM 4.7 模型接入 Github 歌词下载工具 163MusicLyrics Python __getattr__ 懒加载 Python TypedDict 机器人仿真平台 Gazebo 安装记录 机器人仿真平台 Gazebo 简介 多机器人路径规划问题(Multi-Agent Path Finding, MAPF)简介 Python exifread 读取修改过的 jpeg 信息错误问题修复 3D 坐标系变换的理解 3D 旋转矩阵基本概念 MongoDB Compass 介绍 Python 环境管理工具 uv Flutter 开发指南 Snipaste 安装下载与黑屏问题解决方案 全局路径规划算法记录 2025 Python 版本性能测试 Flutter Hello World Flutter 安装环境配置 Ubuntu VMware 硬盘扩容后 SMBus Host controller not enabled 报错问题解决 Python NetworkX 教程 Docker GPU 报错 - Failed to initialize NVML Unknown Error 解决方案 Python matplotlib 图表绘制 cuda-toolkit 安装替代 Cuda 与 Cudnn Jinja2 Python 利用 docxtpl 和 Jinja2 生成基于模板的 Word 文档 Docker 实现 CPU 核心隔离 LoFTR 基于 Transformer 的特征提取匹配算法 OmniGlue 特征匹配 SuperGlue 使用图神经网络学习特征匹配 Ubuntu 下将 xlsx 文件按照 sheet 转换为 图片 Python 使用 SQLAlchemy Python FastAPI 教程 openwrt 软路由配置安装 Nav2 地图文件(PGM/YAML)规范标准 3D OBJ 模型转换为 glb 瓦片格式 Python 源码 Redis 数据库介绍 Ubuntu 22.04 内核自动升级导致 MongoDB 7.0.12 错误记录 ubuntu 20.04 安装 ROS Noetic ubuntu 18.04 安装 ROS Melodic VMware Workstation Pro 个人免费版下载、安装、使用指南 Hybrid A-star 路径规划 Reeds-Shepp 曲线 Dubins 曲线 Linux kvm 虚拟机网络不通的问题解决方法 Ubuntu 自动内存清理 BiliBili 缓存视频转 mp4 Python 求解线性规划 3D Gaussian Splatting 官方源码实践记录 ImageMagick 教程 Ubuntu 22.04 安装 Colmap 对数几率 odds Ubuntu nmcli 网络管理工具使用指南 SuperPoint 自监督深度学习特征点提取 SyncTV Music Tag Web 在线音乐信息整理工具 ncm 格式转 mp3 MusicBrainz 音乐元数据百科数据库 Ubuntu 网络流量监控工具 私人云音乐平台 Navidrome 入门 手眼标定 四元数(Quaternions) OHTTPS 实现免费自动 https 证书申请、更新、部署 ubuntu 22.04 安装 CloudCompare 单机 KVM 虚拟机冷迁移 Ubuntu 22.04 使用 mdadm 实现软 raid 小鱼 一键安装 ROS-humble Fluid -46- 基于 Simpletex API 构建公式识别页面 公式识别 API 简介 -- Simpletex 使用 Python web 部署库 waitress 3D Gaussian Splatting for Real-Time Radiance Field Rendering Ubuntu Swap 简介与空间扩展 Ubuntu 24.04 安装 forticlient Clash Verge 使用 MongoDB 7.0.17 集群 Docker 构建源码 Error code - 2013. Lost connection to MySQL server during query 问题解决 Python 日志记录库 loguru 使用指北 Python 实现 Web 日志查看服务 MySQL LOAD DATA LOCAL INFILE 极速数据加载 Image size exceeds limit of 89478485 pixels 解决方案 Docker 使用 NVIDIA GPU 驱动错误解决 阿里云 docker 镜像仓库 Ubuntu中没有wired connected的解决方案 MinIO 简介 subconverter 代理订阅格式转换 修复 node –openssl-legacy-provider is not allowed in NODE_OPTIONS 错误
无界面 Ubuntu 服务器搭建 selenium + chromedriver 实现 Python 自动网页截图
Yiwei Zhang · 2023-02-16 · via 又见苍岚

之前我们记录了 Windows 桌面系统下 selenium 的网页截图,在无界面的 Ubuntu 系统稍微麻烦一点点,本文记录实现过程。

简介

  • selenium + chromedrive 在 Windows 或者说有界面的操作系统下比较容易,对于服务器来说他没有界面,还让他截图确实有点强人所难,但是活还是可以想办法干的

实现思路

  • 安装 xvfb 工具虚拟化图像输出设备,假装有个显示器
  • 使用 webdriver 的无沙盒模式
  • 过程中需要谷歌浏览器、浏览器驱动、selenium 版本配套

有用的小操作

卸载 Chrome

  • 如果需要卸载现有的 Chrome,可以使用 apt-get 命令

    1
    sudo apt-get remove google-chrome-stable 

查看 Ubuntu 版本

  • 通过若干命令可以查看 Ubuntu 版本
    • cat /etc/issue
    • cat /proc/version
    • uname -a
    • lsb_release -a
    • cat /etc/lsb-release

查看当前 Chrome 浏览器版本

  • 安装好 Chrome 浏览器后

    1
    google-chrome --version
  • 如果有界面的话可以用 Chrome 访问 :chrome://version

查看当前 Chrome 浏览器对应的驱动版本

  • 假设我已知自己的浏览器版本为 : 109.0.5414.75

  • 用浏览器访问链接:

    1
    https://chromedriver.storage.googleapis.com/LATEST_RELEASE_ + 浏览器版本的前三部分数字
  • 例如我的链接就是 :

    1
    https://chromedriver.storage.googleapis.com/LATEST_RELEASE_109.0.5414
  • 访问这个链接,可以看到对应的驱动版本:

查看下载好的 Chromedriver 的版本

  • 如果已经下载好了 chromedriver 文件,由于文件名称上不带版本号,直接读不出来

  • 想要知道版本号,可以直接运行该文件,在输出的日志信息中可以看到版本号:

最新版 Chrome 搭建流程

安装 Chrome

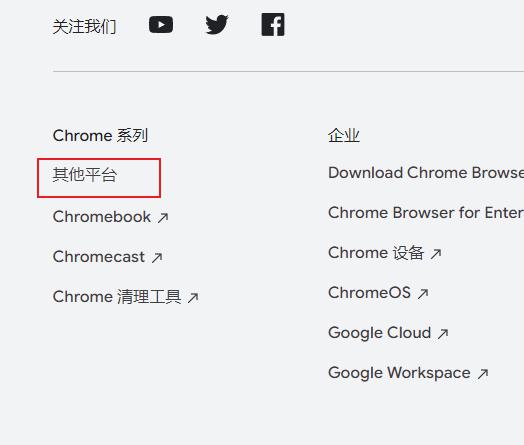
  • 访问 Chrome 官网:https://www.google.cn/intl/zh-CN/chrome/

  • Linux 版本在最下面的 其他平台

  • 选择 Linux,可以下载 deb 的 Chrome 安装包
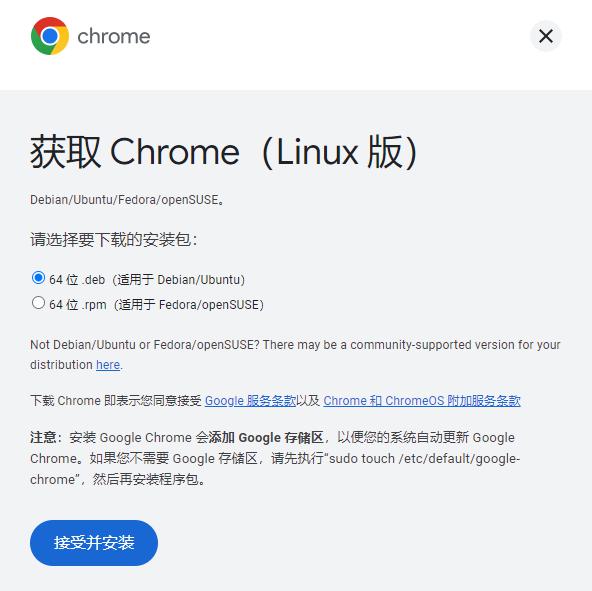
  • 安装 deb 包

    1
    sudo dpkg -i google-chrome-stable_current_amd64.deb
  • 依赖如果报错,安装依赖:

    1
    sudo apt-get -f install

下载、配置 chromedriver

安装 selenium

  • 当前 selenium 版本最高为 4.8.0,如果安装了最新的 Chrome 和 driver,可以直接安装最高版本的 selenium

    1
    pip install selenium

旧版本 Chrome 搭建流程

  • 对操作系统版本要求不高,需要安装旧版本的 Chrome 可以参考此流程

安装 Chrome

如果不完全清楚那个版本的浏览器才能正常运行,可以参考这个可用的版本:69.0.3497.100

  • 下载 google-chrome-stable deb 包 :
1
wget https://raw.githubusercontent.com/wycm/md-image/master/2019-03-14/google-chrome-stable_69.0.3497.100-1_amd64.deb
  • 安装
1
sudo dpkg -i google-chrome-stable_69.0.3497.100-1_amd64.deb
  • 可能有依赖报错,安装所需的依赖

    1
    sudo apt-get -f install

下载、配置 chromedriver

  • 下载上述 Chrome 对应的 chromedriver
1
wget https://raw.githubusercontent.com/wycm/md-image/master/2019-03-14/chromedriver_linux64.zip
  • 解压
1
unzip chromedriver_linux64.zip
  • 配置环境变量,将解压出来的 chromedriver 文件添加到系统路径中

  • 或者拷贝到 /usr/bin 目录下

    1
    sudo cp chromedriver /usr/bin

安装 selenium

  • 当前 selenium 版本最高为 4.8.0,但是该版本对于上述 Chrome 版本过高,如果你安装了上述 Chrome需要安装 4.1.3 版本的 selenium

    1
    pip install selenium==4.1.3

其他环境

安装 xvfb

  • 安装虚拟输出设备:

    1
    sudo apt-get install xvfb

启动 Xvfb

  • 启动虚拟化输出设备,设置分辨率
1
Xvfb :99 -ac -screen 0 1280x1024x24 &
  • 设置输出设备

    1
    export DISPLAY=:99

Python 调用 selenium 保存截图

  • 至此核心环境已经配置完成了

  • 创建 Python 脚本文件 test.py,内容为:

    1
    2
    3
    4
    5
    6
    7
    8
    9
    10
    11
    from selenium import webdriver
    import time
    if __name__ == '__main__':
    options = webdriver.ChromeOptions()
    options.add_argument("--no-sandbox")
    driver = webdriver.Chrome(chrome_options=options)
    driver.get('https://www.baidu.com')
    print(driver.title)
    time.sleep(3)
    driver.get_screenshot_as_file('screenshot.png')
    driver.close()
  • 执行脚本:

    1
    python test.py
  • 等了半天,如果没报错而且输出:

    1
    百度一下,你就知道

    说明是没啥毛病了

  • 过程中我保存了截图

  • 图是截了,中文显示不了,这是系统中文字体库没有安装的问题

安装中文字体库

  • 执行命令:

    1
    sudo apt-get install ttf-wqy-microhei ttf-wqy-zenhei xfonts-wqy

最终效果

参考资料

文章链接:
https://www.zywvvd.com/notes/tools/selenium-screenshot/ubuntu-selenium-chrome/ubuntu-selenium-chrome/