






Spring Cloud 微服务入门教程(一):微服务介绍 Spring Cloud 微服务入门教程(二):服务注册与发现-Eureka Spring Cloud 微服务入门教程(三):微服务的注册 Spring Cloud 微服务入门教程(四):微服务间的调用消费-FeignClient Spring Cloud 微服务入门教程(五):统一配置中心-ConfigService Spring Cloud 微服务入门教程(六):Spring Cloud BUS 消息总线实现配置中心动态更新配置文件 Spring Cloud 微服务入门教程(七):Spring Cloud Stream 消息队驱动式的微服务 Spring Cloud 微服务入门教程(八):Spring Cloud Zuul 服务网关动态路由和Cookie头信息传递和跨域 Spring Cloud 微服务入门教程(九):网关 Zuul 整合 Swagger2 实现自动生成 RESTful API 文档 Spring Cloud 微服务入门教程(十):Spring Cloud Hystrix 服务熔断和服务降级 Spring Cloud 微服务入门教程(十一):Spring Cloud Sleuth zipkin 服务追踪链路监控 Spring Cloud 微服务入门教程(十二):Spring Cloud Docker 容器化部署
代码 将在https://github.com/NeilRen/SpringCloudDemo进行分享,按不同的分支分享不同的章节代码,Master分支就是最后所有的内容合集。本章节代码在:https://github.com/NeilRen/SpringCloudDemo/tree/feature/eureka-client
原创 本篇文章是原创文章,作者:任霏,转载请注明作者和出处
上一节我们讲了《Spring Cloud 微服务入门教程(二):服务注册与发现-Eureka》搭建了微服务的注册发现中心,这一节我们就讲一下如何新建一个微服务服务并且将服务注册到注册中心。
在开始之前我先说明一下「统一接口中心」并不是微服务的标准架构,这个是我自己设计的架构,因为我觉得整个架构里会很多服务,服务之间要相互调用,而且团队合作中可能有很多人很多团队来写各自的服务模块,如果不规定好都有什么请求地址,什么样的请求对象和返回对象,就很难高效的协同,所以我会提前写好interface接口,定义好controller请求的地址、Request的结构、Result的结构,这样负责实现的服务的团队只需要实现interface接口就可以了,其他人调用的时候也之前要传什么类型的Request,收到什么样的Result。最后再次声明,统一接口中心是我自己设计的架构,并不包含在微服务体系里,仅供各位参考,可能并不适合你的业务形态,需要你自己设计,我只提供思路教程。
右击根项目名,新建一个模块叫api-center的maven子项目,就像上一节新建eureka模块那样,不再赘述,这里还需要新增一个依赖spring-boot-starter-web,因为这样可以把请求的URL地址也提前定义好,新建完成以后的POM文件是:
<?xml version="1.0" encoding="UTF-8"?>
<project xmlns="http://maven.apache.org/POM/4.0.0"
         xmlns:xsi="http://www.w3.org/2001/XMLSchema-instance"
         xsi:schemaLocation="http://maven.apache.org/POM/4.0.0 http://maven.apache.org/xsd/maven-4.0.0.xsd">

    <parent>
        <artifactId>cloud</artifactId>
        <groupId>net.renfei</groupId>
        <version>1.0.0</version>
    </parent>

    <modelVersion>4.0.0</modelVersion>
    <groupId>net.renfei</groupId>
    <artifactId>apicenter</artifactId>
    <version>1.0.0</version>
    <name>APICenter</name>
    <description>接口中心</description>

    <dependencies>
        <dependency>
            <groupId>org.springframework.boot</groupId>
            <artifactId>spring-boot-starter-web</artifactId>
        </dependency>
    </dependencies>

</project>
然后在api-center子项目的src/main/java中新建三个包:net.renfei.apicenter.service、net.renfei.apicenter.request、net.renfei.apicenter.result,在request这个包下新建一个class叫BaseRquest,作为请求体的基类并且实现Serializable序列化接口,再新建一个叫DemoRquest的类继承BaseRquest,里面有个成员字段String msg:
package net.renfei.apicenter.request;

public class DemoRquest extends BaseRquest implements Serializable {
    private static final long serialVersionUID = 1L;
    private String msg;
    public String getMsg() {
        return msg;
    }
    public void setMsg(String msg) {
        this.msg = msg;
    }
}
在net.renfei.apicenter.result包下我们新建一个Result类,这将来是我们统一的返回格式:
package net.renfei.apicenter.result;

import java.io.Serializable;

public class Result implements Serializable {
    private static final long serialVersionUID = 1L;
    private int code;
    private String message;
    private Object object;

    public int getCode() {
        return code;
    }
    public void setCode(int code) {
        this.code = code;
    }
    public String getMessage() {
        return message;
    }
    public void setMessage(String message) {
        this.message = message;
    }
    public Object getObject() {
        return object;
    }
    public void setObject(Object object) {
        this.object = object;
    }
}
然后我们在net.renfei.apicenter.service包下新建一个interface叫DemoService的接口:
package net.renfei.apicenter.service;

import net.renfei.apicenter.request.DemoRquest;
import net.renfei.apicenter.result.Result;
import org.springframework.web.bind.annotation.GetMapping;
import org.springframework.web.bind.annotation.PostMapping;

public interface DemoService {
    @GetMapping("/")
    Result index();

    @PostMapping("/sayMsg")
    Result sayMsg(DemoRquest demoRquest);
}
这样通过interface约定好了服务的地址、服务的名称、请求的类型和返回额类型,这就是DemoService的接口。
右击项目根目录,新建一个名为 demoservice 的空白maven项目,作为服务的提供者,并修改POM文件,这里依赖spring-cloud-starter-netflix-eureka-client、spring-boot-starter-web和apicenter模块:
<?xml version="1.0" encoding="UTF-8"?>
<project xmlns="http://maven.apache.org/POM/4.0.0"
         xmlns:xsi="http://www.w3.org/2001/XMLSchema-instance"
         xsi:schemaLocation="http://maven.apache.org/POM/4.0.0 http://maven.apache.org/xsd/maven-4.0.0.xsd">

    <parent>
        <artifactId>cloud</artifactId>
        <groupId>net.renfei</groupId>
        <version>1.0.0</version>
    </parent>

    <modelVersion>4.0.0</modelVersion>
    <groupId>net.renfei</groupId>
    <artifactId>demoservice</artifactId>
    <version>1.0.0</version>
    <name>demo-service</name>
    <description>演示服务</description>

    <dependencies>
        <dependency>
            <groupId>org.springframework.cloud</groupId>
            <artifactId>spring-cloud-starter-netflix-eureka-client</artifactId>
        </dependency>
        <dependency>
            <groupId>org.springframework.boot</groupId>
            <artifactId>spring-boot-starter-web</artifactId>
        </dependency>
        <dependency>
            <groupId>net.renfei</groupId>
            <artifactId>apicenter</artifactId>
            <version>1.0.0</version>
        </dependency>
    </dependencies>

    <build>
        <plugins>
            <plugin>
                <groupId>org.springframework.boot</groupId>
                <artifactId>spring-boot-maven-plugin</artifactId>
            </plugin>
        </plugins>
    </build>

</project>
然后新建包名:net.renfei.demoservice.controller,在resources中新建application.yml文件:
server:
  port: 18080
spring:
  application:
    name: DemoService
eureka:
  client:
    service-url:
defaultZone: http://localhost:8761/eureka/application.yml里设置了启动的端口、应用的名称和eureka的注册中心地址,其中http://localhost:8761/eureka/就是我们eureka注册中心的地址,见《[Spring Cloud 微服务入门教程(二):服务注册与发现-Eureka](https://blog.renfei.net/posts/1003320)》的配置过程。
在net.renfei.demoservice.controller包下新增一个DemoController并实现DemoService:
package net.renfei.demoservice.controller;

import net.renfei.apicenter.request.DemoRquest;
import net.renfei.apicenter.result.Result;
import net.renfei.apicenter.service.DemoService;
import org.springframework.web.bind.annotation.RestController;

@RestController
public class DemoController implements DemoService {
    @Override
    public Result index() {
        Result result = new Result();
        result.setCode(200);
        result.setMessage("You're visiting DemoService.");
        return result;
    }

    @Override
    public Result sayMsg(@RequestBody DemoRquest demoRquest) {
        Result result = new Result();
        result.setCode(200);
        result.setMessage("This is DemoService, Your Mag is: " + demoRquest.getMsg());
        return result;
    }
}
然后在net.renfei.demoservice包下新建一个DemoServiceApplication类作为模块的启动入口类
package net.renfei.demoservice;

import org.springframework.boot.SpringApplication;
import org.springframework.boot.autoconfigure.SpringBootApplication;
import org.springframework.cloud.netflix.eureka.EnableEurekaClient;

@EnableEurekaClient
@SpringBootApplication
public class DemoServiceApplication {
    public static void main(String[] args) {
        SpringApplication.run(DemoServiceApplication.class, args);
    }
}
与SpringBoot不同的是,新增了一个@EnableEurekaClient注解,这个就是Eureka的客户端,会向Eureka注册中心注册自己,到这里一个服务就完成了。
至此,微服务的注册发现就完成了,先启动eureka,然后启动demoservice,我们来测试一下吧。全部启动以后,并访问我们配置的eureka地址,这个就是注册中心,可以打开就是成功了,我这里的案例是:http://localhost:8761
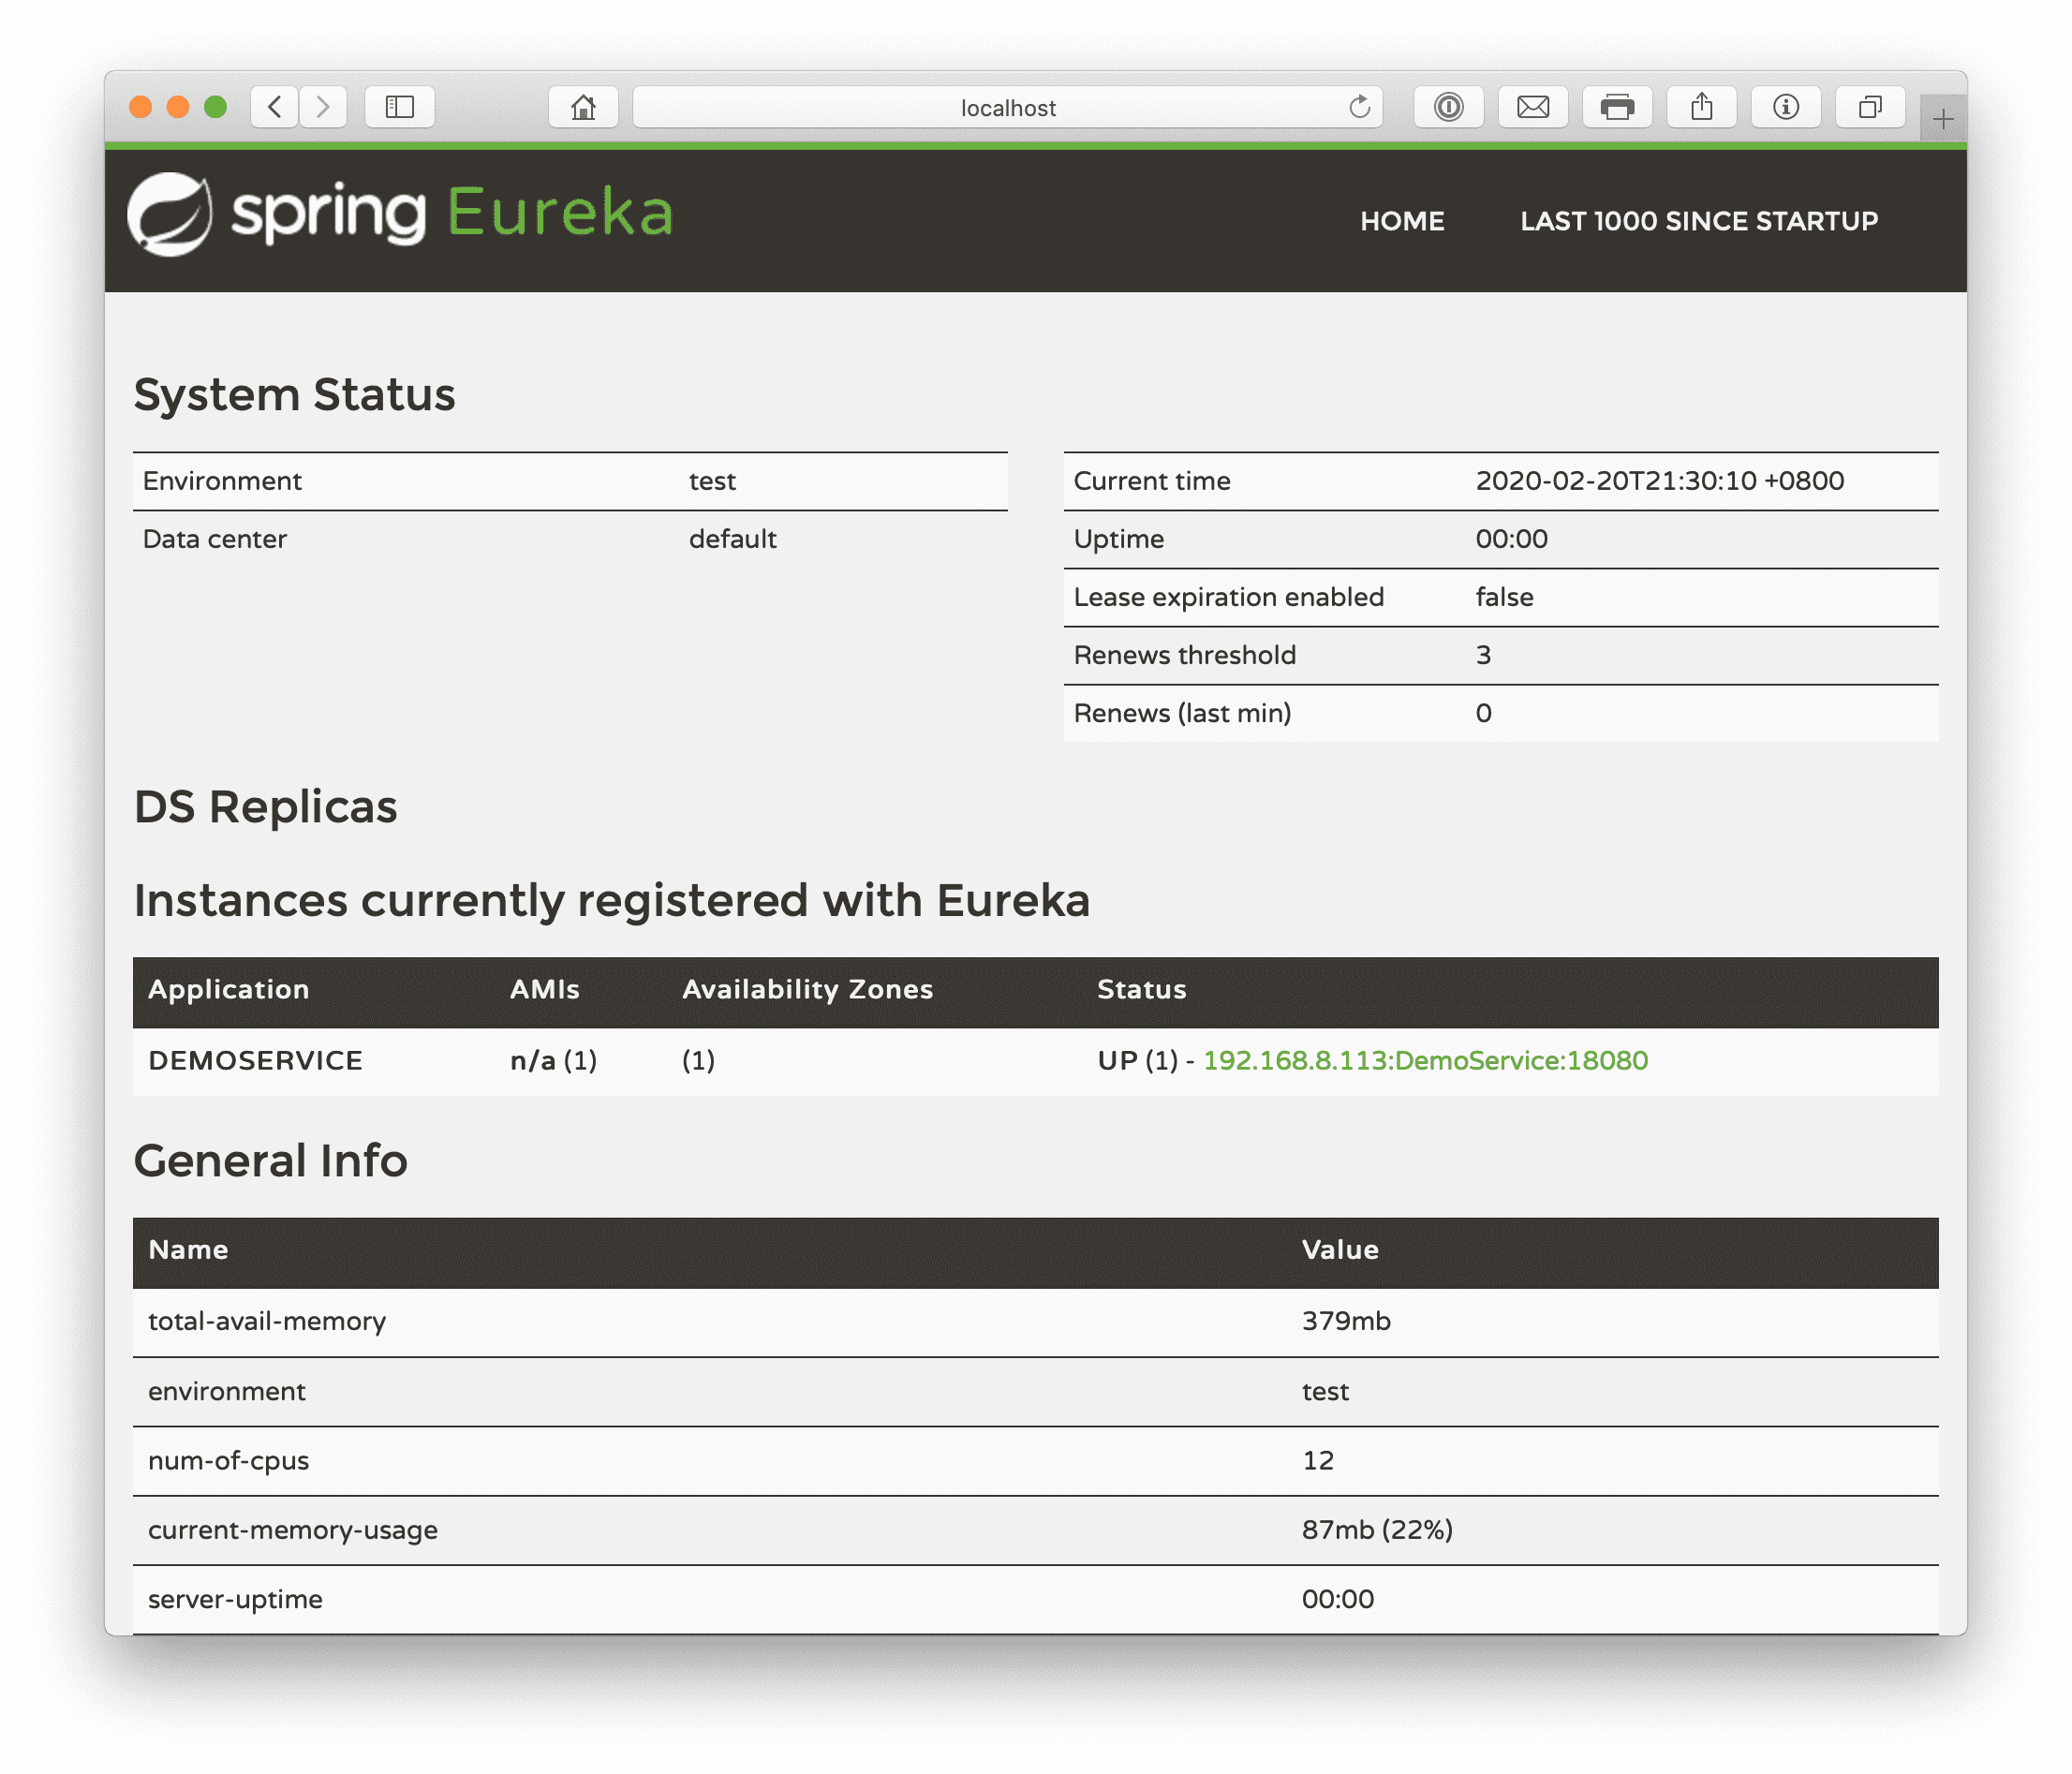
可以看到“Instances currently registered with Eureka”中已经发现了一个服务,“DEMOSERVICE”。
此内容由惯性聚合(RSS阅读器)自动聚合整理,仅供阅读参考。 原文来自 — 版权归原作者所有。