






Spring Cloud 微服务入门教程(一):微服务介绍 Spring Cloud 微服务入门教程(二):服务注册与发现-Eureka Spring Cloud 微服务入门教程(三):微服务的注册 Spring Cloud 微服务入门教程(四):微服务间的调用消费-FeignClient Spring Cloud 微服务入门教程(五):统一配置中心-ConfigService Spring Cloud 微服务入门教程(六):Spring Cloud BUS 消息总线实现配置中心动态更新配置文件 Spring Cloud 微服务入门教程(七):Spring Cloud Stream 消息队驱动式的微服务 Spring Cloud 微服务入门教程(八):Spring Cloud Zuul 服务网关动态路由和Cookie头信息传递和跨域 Spring Cloud 微服务入门教程(九):网关 Zuul 整合 Swagger2 实现自动生成 RESTful API 文档 Spring Cloud 微服务入门教程(十):Spring Cloud Hystrix 服务熔断和服务降级 Spring Cloud 微服务入门教程(十一):Spring Cloud Sleuth zipkin 服务追踪链路监控 Spring Cloud 微服务入门教程(十二):Spring Cloud Docker 容器化部署
代码 将在https://github.com/NeilRen/SpringCloudDemo进行分享,按不同的分支分享不同的章节代码,Master分支就是最后所有的内容合集。本章节代码在:https://github.com/NeilRen/SpringCloudDemo/tree/feature/spring-cloud-zuul-swagger2
原创 本篇文章是原创文章,作者:任霏,转载请注明作者和出处
上一节我们讲了SpringCloud的服务网关Zuul,随着服务接口的增加,我们还需要一个管理接口文档的工具,所以本节介绍给大家Swagger,这个不是微服务架构里的内容,但是非常实用,所以我也安排在入门教程中了,Swagger不但可以将接口可视化文档,还可以在线测试、生成SDK,本节主要讲整合Swagger,不去细讲Swagger的使用,后续我会专门写一篇关于Swagger使用的详细教程。
我计划给每个服务接口都生成Swagger文档,所以我在项目的根POM文件中增加了Swagger的依赖,修改根POM文件:
<?xml version="1.0" encoding="UTF-8"?>
<project xmlns="http://maven.apache.org/POM/4.0.0"
         xmlns:xsi="http://www.w3.org/2001/XMLSchema-instance"
         xsi:schemaLocation="http://maven.apache.org/POM/4.0.0 http://maven.apache.org/xsd/maven-4.0.0.xsd">
    <modelVersion>4.0.0</modelVersion>
    <groupId>net.renfei</groupId>
    <artifactId>cloud</artifactId>
    <version>1.0.0</version>
    <modules>
        <module>eureka</module>
        <module>apicenter</module>
        <module>config</module>
        <module>demoservice</module>
        <module>democlient</module>
        <module>gateway</module>
    </modules>
    <packaging>pom</packaging>
    <name>SpringCloudDemo</name>
    <description>Demo project for Spring Cloud By RENFEI.NET</description>
    <properties>
        <java.version>1.8</java.version>
        <project.build.sourceEncoding>UTF-8</project.build.sourceEncoding>
        <spring-cloud.version>Hoxton.SR1</spring-cloud.version>
        <swagger.version>2.9.2</swagger.version>
    </properties>
    <parent>
        <groupId>org.springframework.boot</groupId>
        <artifactId>spring-boot-starter-parent</artifactId>
        <version>2.2.4.RELEASE</version>
        <relativePath/>
    </parent>
    <dependencies>
        <dependency>
            <groupId>org.springframework.boot</groupId>
            <artifactId>spring-boot-starter-test</artifactId>
            <scope>test</scope>
        </dependency>
        <dependency>
            <groupId>org.projectlombok</groupId>
            <artifactId>lombok</artifactId>
            <optional>true</optional>
        </dependency>
        <dependency>
            <groupId>io.springfox</groupId>
            <artifactId>springfox-swagger2</artifactId>
            <version>${swagger.version}</version>
        </dependency>
        <dependency>
            <groupId>io.springfox</groupId>
            <artifactId>springfox-swagger-ui</artifactId>
            <version>${swagger.version}</version>
        </dependency>
    </dependencies>
    <dependencyManagement>
        <dependencies>
            <dependency>
                <groupId>org.springframework.cloud</groupId>
                <artifactId>spring-cloud-dependencies</artifactId>
                <version>${spring-cloud.version}</version>
                <type>pom</type>
                <scope>import</scope>
            </dependency>
        </dependencies>
    </dependencyManagement>
    <build>
        <plugins>
            <plugin>
                <groupId>org.springframework.boot</groupId>
                <artifactId>spring-boot-maven-plugin</artifactId>
            </plugin>
        </plugins>
    </build>
</project>
这样每个项目都有了Swagger的包,然后给每个微服务中增加配置类,我的演示项目中是demoservice、democlient和gateway三个项目,我以democlient为例,其他也是一样的,新增一个配置类:
package net.renfei.democlient.config;

import org.springframework.context.annotation.Bean;
import org.springframework.context.annotation.Configuration;
import springfox.documentation.builders.ApiInfoBuilder;
import springfox.documentation.builders.PathSelectors;
import springfox.documentation.builders.RequestHandlerSelectors;
import springfox.documentation.service.ApiInfo;
import springfox.documentation.spi.DocumentationType;
import springfox.documentation.spring.web.plugins.Docket;
import springfox.documentation.swagger2.annotations.EnableSwagger2;

/**
 * Swagger2的配置
 *
 * @author RenFei
 */
@Configuration
@EnableSwagger2
public class SwaggerConfig {
    public static final String VERSION = "1.0.0";

    @Bean
    public Docket createRestApi() {
        return new Docket(DocumentationType.SWAGGER_2)
                .apiInfo(apiInfo())
                .select()
                .apis(RequestHandlerSelectors.basePackage("net.renfei.democlient.controller"))
                // 可以根据url路径设置哪些请求加入文档,忽略哪些请求
                .paths(PathSelectors.any())
                .build();
    }
    private ApiInfo apiInfo() {
        return new ApiInfoBuilder()
                //设置文档的标题
                .title("SpringCloud教程")
                // 设置文档的描述
                .description("Spring Cloud 微服务入门教程 Powered By RenFei.Net")
                // 设置文档的版本信息-> 1.0.0 Version information
                .version(VERSION)
                .termsOfServiceUrl("https://www.renfei.net")
                .build();
    }
}
其中RequestHandlerSelectors.basePackage就是设置要扫描哪个包下的,每个项目各自设置各自的扫描包名。
在服务网关Zuul项目中除了添加上面的配置类以外,还需要一个配置类,因为这些服务的Swagger文档都分散在各个服务上,我们还需要手动添加一下,就可以实现在服务网关处查看所有Swagger文档了,新增配置类:
package net.renfei.gateway.config;

import org.springframework.cloud.netflix.zuul.filters.Route;
import org.springframework.cloud.netflix.zuul.filters.RouteLocator;
import org.springframework.context.annotation.Primary;
import org.springframework.stereotype.Component;
import springfox.documentation.swagger.web.SwaggerResource;
import springfox.documentation.swagger.web.SwaggerResourcesProvider;
import java.util.ArrayList;
import java.util.List;

/**
 * Swagger2的文档生成配置,需要遍历Zuul的路由才能生成所有文档
 *
 * @author RenFei
 */
@Component
@Primary
public class SwaggerDocumentationConfig implements SwaggerResourcesProvider {
    private final RouteLocator routeLocator;

    public SwaggerDocumentationConfig(RouteLocator routeLocator) {
        this.routeLocator = routeLocator;
    }
    private SwaggerResource swaggerResource(String name, String location, String version) {
        SwaggerResource swaggerResource = new SwaggerResource();
        swaggerResource.setName(name);
        swaggerResource.setLocation(location);
        swaggerResource.setSwaggerVersion(version);
        return swaggerResource;
    }
    @Override
    public List<SwaggerResource> get() {
        List<SwaggerResource> resources = new ArrayList<>();
        List<Route> routes = routeLocator.getRoutes();
        routes.forEach(route -> {
            //从各个服务里获取文档
            resources.add(swaggerResource(route.getId(), route.getFullPath().replace("**", "v2/api-docs"), "1.0"));
        });
        return resources;
    }
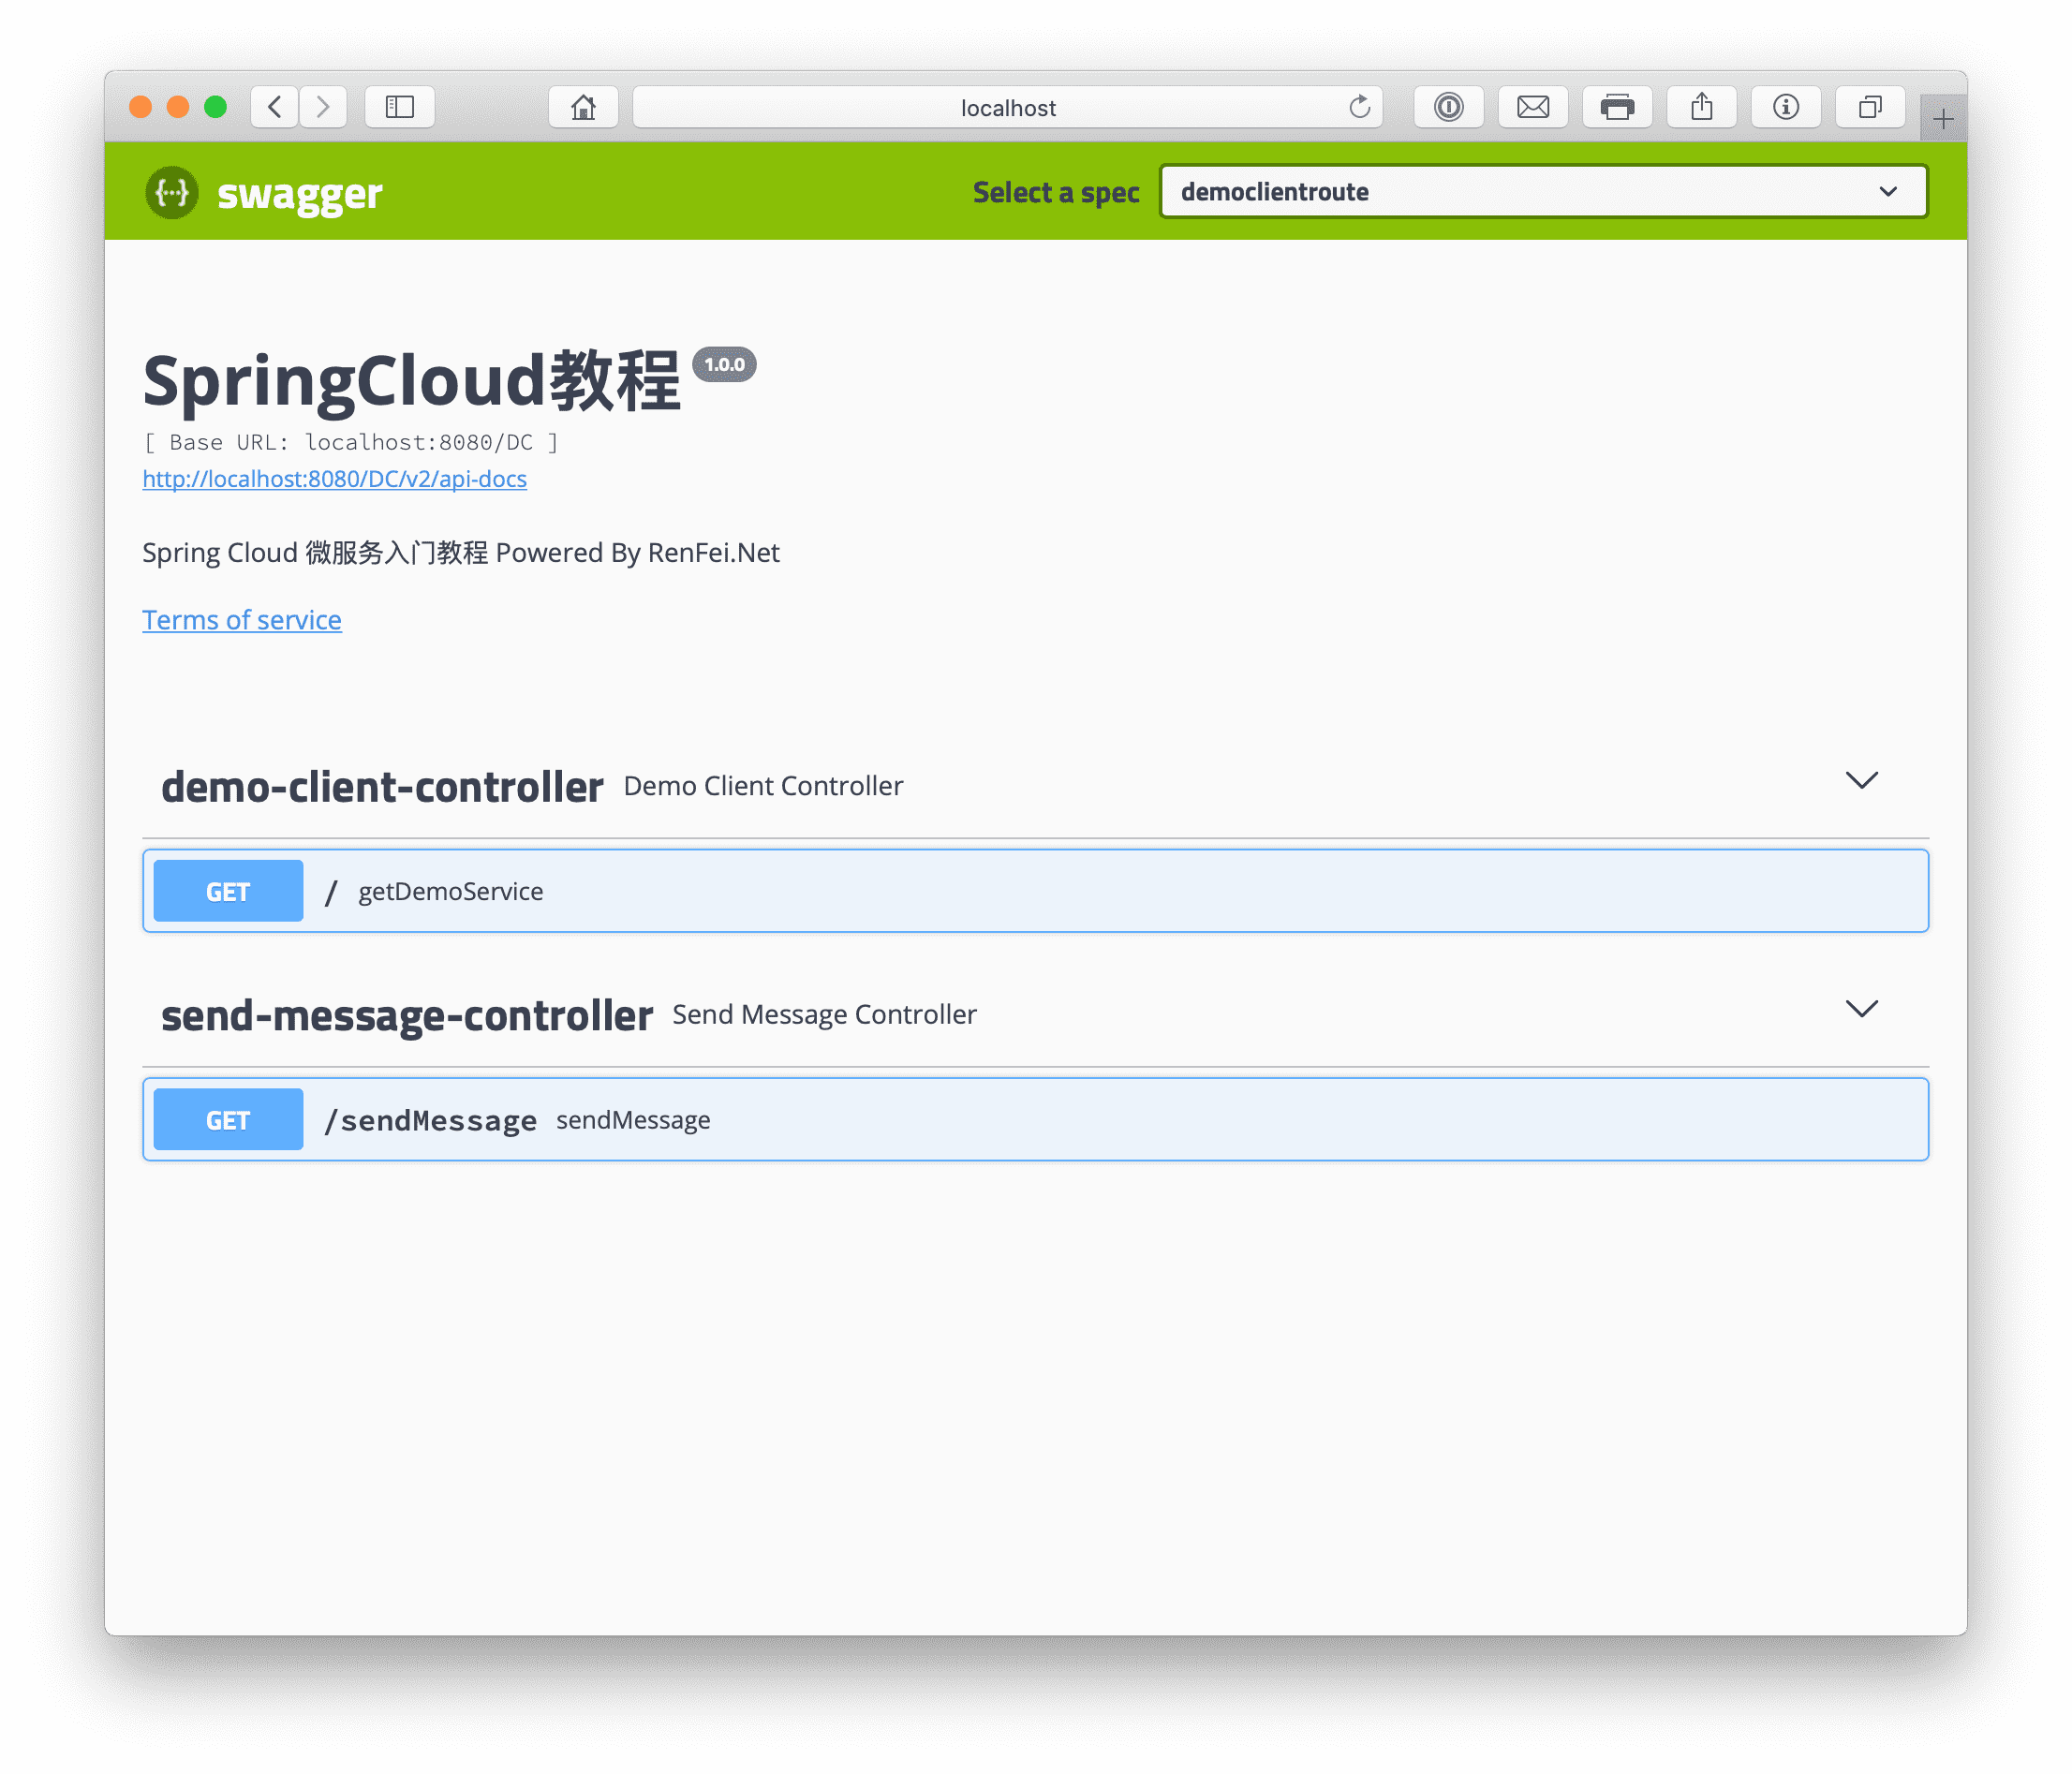
}上面的配置类就是从RouteLocator里面读取所有的路由,然后手动添加到SwaggerResource列表里,至此文档的简单整合就完成了,依次运行注册中心、配置中心、各个服务、最后启动服务网关,访问网关地址:http://localhost:8080/swagger-ui.html,见下图效果:
此内容由惯性聚合(RSS阅读器)自动聚合整理,仅供阅读参考。 原文来自 — 版权归原作者所有。