



本文接上篇从零开始制作树莓派遥控小车。前面那篇文章里介绍了第一版小车是通过蓝牙仿真串口协议(RFCOMM)远程遥控的。RFCOMM 协议也是经典蓝牙协议,连接双方是对等的,耗电量比较大,另外手机端对经典蓝牙的开发支持也不太好。如果想自己尝试开发一个手机遥控器,选择蓝牙BLE协议会更好。本文主要介绍一下如何通过微信小程序(蓝牙BLE)远程遥控树莓派小车。
遥控程序主要分为3个部分:
微信小程序遥控客户端界面操作,转化为指令通过蓝牙传输给树莓派蓝牙服务端程序,蓝牙服务端再把指令下达给小车控制程序,小车控制程序执行指令改变小车的动作。
Clone 代码(代码地址)
git clone git@github.com:huoyijie/raspberrypi-car.git
目录说明
$ tree -L 3
.
├── ble
│   ├── car.py
│   ├── miniclientctl
│   │   ├── app.js
│   │   ├── app.json
│   │   ├── app.wxss
│   │   ├── index
│   │   ├── project.config.json
│   │   └── sitemap.json
│   └── rpicarctl
│       ├── characteristic.js
│       ├── main.js
│       ├── node_modules
│       ├── package.json
│       └── package-lock.json
├── car.py
├── LICENSE
└── README.md
本文介绍的所有代码都在ble目录下,ble/car.py为新版本小车控制程序,miniclientctl 为微信小程序遥控客户端,rpicarctl 为蓝牙服务端程序。接下来先介绍下处于中间位置的蓝牙通信服务端程序。
树莓派官方支持的开发语言是 Python,小车控制程序也是基于 Python 实现的,但是基于 Python 的蓝牙 BLE 封装库资料比较少,而基于 Node.js 的库更易上手,所以本文选择了基于 Node.js 的bleno库来实现蓝牙服务端。但是在安装完后运行程序报错,缺少 bluetooth-hci-socket 库,然后安装这个库确一直无法安装成功。于是查看了一下 bleno github 上的 issues,找到了同样的问题。解决方案主要是采用另一个 fork 库,那个库解决了这个问题。
先查看下树莓派 Node.js 环境
$ node -v
v14.16.0
$ npm -v
7.6.1
安装依赖
cd ble/rpicarctl
npm i @abandonware/bleno
npm i @abandonware/bluetooth-hci-socket
运行蓝牙服务端
sudo node main.js
控制台输出下面代表已经成功运行
bleno - rpicarctl
on -> stateChange: poweredOn
on -> advertisingStart: success
蓝牙服务端共有 2 个文件,分别定义了 rpicarctl 服务(service)和特征(character),先看程序入口 main.js
var bleno = require('@abandonware/bleno');

var BlenoPrimaryService = bleno.PrimaryService;

var CarCtlCharacteristic = require('./characteristic');

console.log('bleno - rpicarctl');

bleno.on('stateChange', function(state) {
  console.log('on -> stateChange: ' + state);

  if (state === 'poweredOn') {
    bleno.startAdvertising('rpicarctl', ['cc00']);
  } else {
    bleno.stopAdvertising();
  }
});

bleno.on('advertisingStart', function(error) {
  console.log('on -> advertisingStart: ' + (error ? 'error ' + error : 'success'));

  if (!error) {
    bleno.setServices([
      new BlenoPrimaryService({
        uuid: 'cc00',
        characteristics: [
          new CarCtlCharacteristic()
        ]
      })
    ]);
  }
});
再看一下特征定义文件 characteristic.js
const http = require('http');

var util = require('util');

var bleno = require('@abandonware/bleno');

var BlenoCharacteristic = bleno.Characteristic;

var CarCtlCharacteristic = function() {
  CarCtlCharacteristic.super_.call(this, {
    uuid: 'cc0e',
    properties: ['read', 'write', 'notify'],
    value: null
  });

  this._value = Buffer.alloc(0);
  this._updateValueCallback = null;
};

util.inherits(CarCtlCharacteristic, BlenoCharacteristic);

CarCtlCharacteristic.prototype.onReadRequest = function(offset, callback) {
  console.log('CarCtlCharacteristic - onReadRequest: value = ' + this._value.toString('hex'));

  callback(this.RESULT_SUCCESS, this._value);
};

CarCtlCharacteristic.prototype.onWriteRequest = function(data, offset, withoutResponse, callback) {
  this._value = data;

  console.log('CarCtlCharacteristic - onWriteRequest: value = ' + this._value.toString('hex'));

  http.get(`http://127.0.0.1:8888/car/ctl/${this._value.readUInt8()}`, resp => {
    // console.log(resp.statusCode);
  }).on('error', err => {
    console.error(err.message);
  }).end();

  if (this._updateValueCallback) {
    console.log('CarCtlCharacteristic - onWriteRequest: notifying');

    this._updateValueCallback(this._value);
  }

  callback(this.RESULT_SUCCESS);
};

CarCtlCharacteristic.prototype.onSubscribe = function(maxValueSize, updateValueCallback) {
  console.log('CarCtlCharacteristic - onSubscribe');

  this._updateValueCallback = updateValueCallback;
};

CarCtlCharacteristic.prototype.onUnsubscribe = function() {
  console.log('CarCtlCharacteristic - onUnsubscribe');

  this._updateValueCallback = null;
};

module.exports = CarCtlCharacteristic;
重点看下这句话,蓝牙服务端再收到来自微信小程序的指令数字 ${this._value.readUInt8()} 后会转发给监听在本机8888端口的小车控制程序,由后者控制小车执行动作。
http.get(`http://127.0.0.1:8888/car/ctl/${this._value.readUInt8()}`, resp => {
    // console.log(resp.statusCode);
}).on('error', err => {
    console.error(err.message);
}).end();
接下来再看一下新版本小车控制程序 ble/car.py
# -*- coding: UTF-8 -*-

import time
import RPi.GPIO as GPIO

GPIO.setmode(GPIO.BOARD)
GPIO.setwarnings(False)

########电机驱动接口定义#################
ENA = 13    # L298使能A
ENB = 15    # L298使能B
IN1 = 31    # 电机接口1
IN2 = 33    # 电机接口2
IN3 = 35    # 电机接口3
IN4 = 37    # 电机接口4

frequency = 30 # 电机频率
dc = 50 # 占空比,即电机工作时间占比

#########电机初始化为LOW#################
GPIO.setup(ENA, GPIO.OUT, initial=GPIO.LOW)
ENA_pwm = GPIO.PWM(ENA, frequency)
ENA_pwm.start(0)
# ENA_pwm.ChangeFrequency(frequency)
ENA_pwm.ChangeDutyCycle(dc)
GPIO.setup(IN1, GPIO.OUT, initial=GPIO.LOW)
GPIO.setup(IN2, GPIO.OUT, initial=GPIO.LOW)

GPIO.setup(ENB, GPIO.OUT, initial=GPIO.LOW)
ENB_pwm = GPIO.PWM(ENB, frequency)
ENB_pwm.start(0)
# ENB_pwm.ChangeFrequency(frequency)
ENB_pwm.ChangeDutyCycle(dc)
GPIO.setup(IN3, GPIO.OUT, initial=GPIO.LOW)
GPIO.setup(IN4, GPIO.OUT, initial=GPIO.LOW)

def Motor_Forward():
    print( 'motor forward' )
    GPIO.output(ENA, True)
    GPIO.output(ENB, True)
    GPIO.output(IN1, False)
    GPIO.output(IN2, True)
    GPIO.output(IN3, False)
    GPIO.output(IN4, True)

def Motor_Backward():
    print( 'motor_backward' )
    GPIO.output(ENA, True)
    GPIO.output(ENB, True)
    GPIO.output(IN1, True)
    GPIO.output(IN2, False)
    GPIO.output(IN3, True)
    GPIO.output(IN4, False)

def Motor_TurnLeft():
    print( 'motor_turnleft' )
    GPIO.output(ENA, True)
    GPIO.output(ENB, True)
    GPIO.output(IN1, True)
    GPIO.output(IN2, False)
    GPIO.output(IN3, False)
    GPIO.output(IN4, True)

def Motor_TurnRight():
    print( 'motor_turnright' )
    GPIO.output(ENA, True)
    GPIO.output(ENB, True)
    GPIO.output(IN1, False)
    GPIO.output(IN2, True)
    GPIO.output(IN3, True)
    GPIO.output(IN4, False)

def Motor_Stop():
    print( 'motor_stop' )
    GPIO.output(ENA, False)
    GPIO.output(ENB, False)
    GPIO.output(IN1, False)
    GPIO.output(IN2, False)
    GPIO.output(IN3, False)
    GPIO.output(IN4, False)


##########分割线##############################################
from flask import Flask

app = Flask(__name__)

@app.route('/car/ctl/<int:action>')
def do_carctl(action):

    print('action={}'.format(action))

    # 控制小车执行命令
    if action == 1:       # 前进
        Motor_Forward()
    elif action == 2:     # 后退
        Motor_Backward()
    elif action == 3:     # 左转
        Motor_TurnLeft()
        time.sleep(0.05)
        Motor_Stop()
    elif action == 4:     # 右转
        Motor_TurnRight()
        time.sleep(0.05)
        Motor_Stop()
    elif action == 5:     # 停止
        Motor_Stop()
    elif action == 6:     # clockwise circle
        Motor_TurnRight()
    elif action == 7:     # anti-clockwise circle
        Motor_TurnLeft()
    else:                 # 未知命令,小车停止
        Motor_Stop()

    return 'action={}'.format(action)

@app.route('/')
def do_index():
    return 'Welcome to RaspberryPi Car!'

app.run(host='127.0.0.1', port=8888, debug=False)
以前控制小车动作的程序做了如下改写(可以参照上篇文章从零开始制作树莓派遥控小车对比看下),暴露了本机 8888 端口的 http 接口,Node.js 进程(蓝牙服务端)通过 http 接口和 Python 进程(小车控制程序)通信,Python 搭建一个简单的 http server 是非常容易的。
from flask import Flask

app = Flask(__name__)

@app.route('/car/ctl/<int:action>')
def do_carctl(action):

    print('action={}'.format(action))

    # 控制小车执行命令
    if action == 1:       # 前进
        Motor_Forward()
    elif action == 2:     # 后退
        Motor_Backward()
    elif action == 3:     # 左转
        Motor_TurnLeft()
        time.sleep(0.05)
        Motor_Stop()
    elif action == 4:     # 右转
        Motor_TurnRight()
        time.sleep(0.05)
        Motor_Stop()
    elif action == 5:     # 停止
        Motor_Stop()
    elif action == 6:     # clockwise circle
        Motor_TurnRight()
    elif action == 7:     # anti-clockwise circle
        Motor_TurnLeft()
    else:                 # 未知命令,小车停止
        Motor_Stop()

    return 'action={}'.format(action)

@app.route('/')
def do_index():
    return 'Welcome to RaspberryPi Car!'

app.run(host='127.0.0.1', port=8888, debug=False)
先安装下 Flusk 依赖
pip3 install Flask
运行新版小车控制程序,此时会监听本机8888端口,等待来自蓝牙服务端的指令
cd ble/
python3 car.py
然后配置一下树莓派启动后自动运行蓝牙服务端和小车控制程序,输入命令
crontab -e
再文件后面添加下面两句话,注意运行蓝牙服务端程序(sudo node main.js)时需要延时一段时间(sleep 10s),等待系统初始化好了才能正确运行。另外运行蓝牙服务端需要获得root权限。
@reboot cd /home/pi/pywork/raspberrypi-car/ble; python3 car.py  > car.log 2>&1;

@reboot cd /home/pi/pywork/raspberrypi-car/ble/rpicarctl; sleep 10s; sudo node main.js > console.log 2>&1;
如上配置好后,以后树莓派开机后会自动启动上面两个服务,这样微信小程序遥控客户端可以在小车开机后随时连接上来。最后再来看一下小程序遥控端。
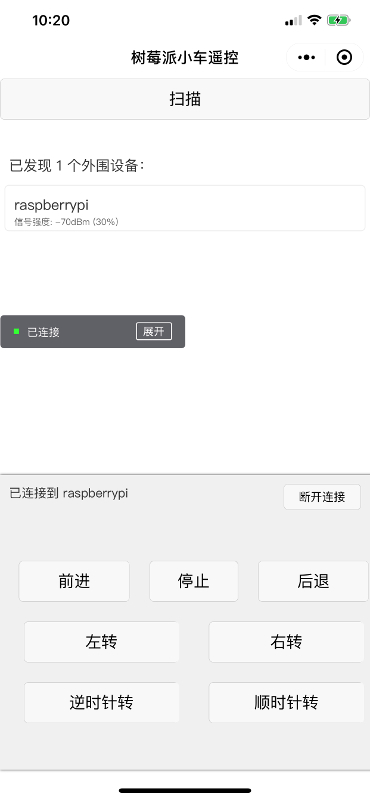
上图是小程序遥控界面。打开小程序后,先点击扫描按钮,会自动发现树莓派小车。点击对应发现的设备即可以连接上树莓派蓝牙服务端。连接后可以看到下面出现了遥控按钮。通过这些按钮就可以操作小车的动作了。
小程序代码文件有点长,这里就不贴出全部了,具体可以到github仓库看一下代码。下面只看下和蓝牙服务端直接交互的部分。
writeBLECharacteristicValue(action) {
    // 向蓝牙设备发送一个0x00的16进制数据
    let buffer = new ArrayBuffer(1)
    let dataView = new DataView(buffer)
    dataView.setUint8(0, action)
    wx.writeBLECharacteristicValue({
        deviceId: this._deviceId,
        serviceId: this._serviceId,
        characteristicId: this._characteristicId,
        value: buffer,
    })
},
forward() {
    this.writeBLECharacteristicValue(1)
},
stop() {
    this.writeBLECharacteristicValue(5)
},
backward() {
    this.writeBLECharacteristicValue(2)
},
left() {
    this.writeBLECharacteristicValue(3)
},
right() {
    this.writeBLECharacteristicValue(4)
},
clockwise() {
    this.writeBLECharacteristicValue(6)
},
anticlockwise() {
    this.writeBLECharacteristicValue(7)
}
可以看到在点击界面相应按钮的时候会通过BLE连接发送相关指令到蓝牙服务端。
本文主要介绍了实现微信小程序遥控小车的主要步骤方法,代码细节没有讲,不过拉一下 Github 上项目代码很容易就看懂。
此内容由惯性聚合(RSS阅读器)自动聚合整理,仅供阅读参考。 原文来自 — 版权归原作者所有。