


本文接上篇 网站图片视频接入CDN,上篇文章介绍了如何把图片接入 CDN,里面提到了需要搭建自有的回源服务器。本文将会介绍如何快速搭建一个简单的回源服务器。我的服务器是 Ubuntu 系统,后面的操作都是基于 Ubuntu。
回源服务器只需提供静态资源访问,所以有很多工具都可以实现。我选择了 nodejs+express,先检查下回源服务器环境。
$ node -v
v8.10.0
$ npm -v
6.14.4
全局安装 express
$ sudo npm install express --save -g
$ sudo npm install express-generator --save -g
创建项目
$ express cdn-service
# 控制台输出
# create : cdn-service/
# create : cdn-service/public/
# create : cdn-service/public/javascripts/
# create : cdn-service/public/images/
# create : cdn-service/public/stylesheets/
# create : cdn-service/public/stylesheets/style.css
# create : cdn-service/routes/
# create : cdn-service/routes/index.js
# create : cdn-service/routes/users.js
# create : cdn-service/views/
# create : cdn-service/views/error.jade
# create : cdn-service/views/index.jade
# create : cdn-service/views/layout.jade
# create : cdn-service/app.js
# create : cdn-service/package.json
# create : cdn-service/bin/
# create : cdn-service/bin/www

$ cd cdn-service
# 安装依赖
$ npm install
# 运行 App
$ DEBUG=cdn-service:* npm start
express 脚手架已经生成了项目结构。看一下程序入口 cdn-service/app.js
var createError = require('http-errors');
var express = require('express');
var path = require('path');
var cookieParser = require('cookie-parser');
var logger = require('morgan');

var indexRouter = require('./routes/index');
var usersRouter = require('./routes/users');

var app = express();

// view engine setup
app.set('views', path.join(__dirname, 'views'));
app.set('view engine', 'jade');

app.use(logger('dev'));
app.use(express.json());
app.use(express.urlencoded({ extended: false }));
app.use(cookieParser());
app.use(express.static(path.join(__dirname, 'public')));

app.use('/', indexRouter);
app.use('/users', usersRouter);

// catch 404 and forward to error handler
app.use(function(req, res, next) {
  next(createError(404));
});

// error handler
app.use(function(err, req, res, next) {
  // set locals, only providing error in development
  res.locals.message = err.message;
  res.locals.error = req.app.get('env') === 'development' ? err : {};

  // render the error page
  res.status(err.status || 500);
  res.render('error');
});

module.exports = app;
下面这个语句配置了可以公开访问的静态文件的存储目录,后面会在该目录下建子目录用来存放静态资源
app.use(express.static(path.join(__dirname, 'public')));
因为只对外提供静态文件访问,可以删除掉下面几行代码
var indexRouter = require('./routes/index');
var usersRouter = require('./routes/users');

app.use('/', indexRouter);
app.use('/users', usersRouter);
此时除了访问已上传的静态资源之外,其他路径都会返回 404,并显示出错页面。然后修改下出错后渲染的页面,删除所有内容,只显示一张大图,显示更加友好。

建立静态资源存放目录ab
$ cd cdn-service/public
$ mkdir -p ab/static
Copy 一张测试图片放到 ab/static 下,我选的就是上面显示的那张 404 图 404.svg
配置 cdn-service 服务开机自启动,输入命令
$ crontab -e
编辑加入下面一行配置,其中 path 填入服务器上实际的部署路径
@reboot cd ${path}/cdn-service; sudo npm start > console.log 2>&1;
修改下启动端口,编辑 bin/www,把 4000 改成想要的端口
var port = normalizePort(process.env.PORT || '4000');
现在来测试下,手动启动 cdn-service 服务
$ sudo npm start > console.log 2>&1 &
打开浏览器访问任何一个不存在的路径都会显示刚刚的 404 图片。到目前为指,回源服务已经搭建好了。现在去到腾讯云 CDN 控制台,去配置回源服务器站点
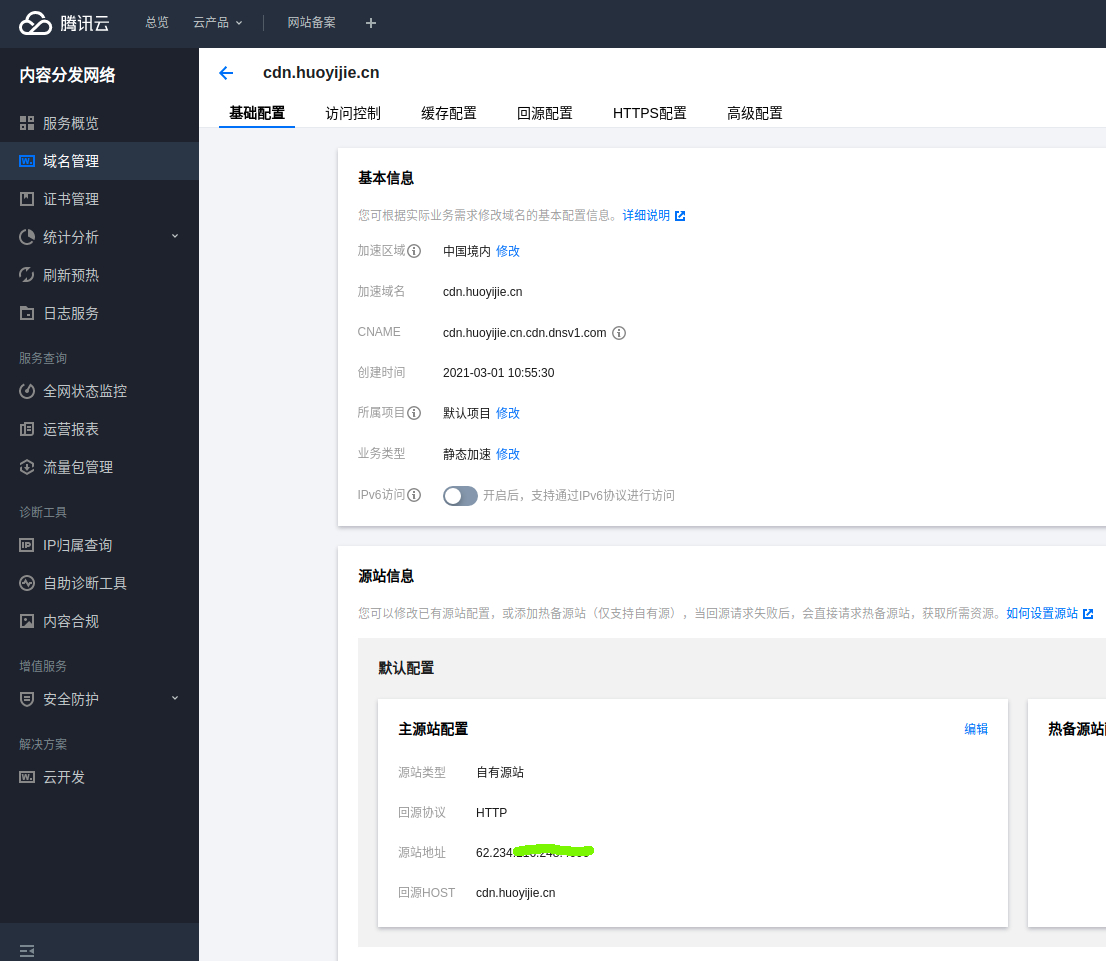
如上图,回源协议选择 HTTP,源站地址填写 ip:port,其中 ip 是回源服务器地址,端口就是刚刚配置的端口号,现在通过 cdn 加速域名访问一下刚刚的 404 图片(https://cdn.huoyijie.cn/ab/static/404.svg) 试试,已经可以正常访问了,并且经过初次访问预热后,CDN 格节点已经缓存了该图片。
接下来还有一个重要问题,就是如何快速方便的把资源文件上传到回源服务器呢?我写了一个 nodejs 脚本,可以方便在自己的电脑上面管理源服务器上面的资源。
$ ./scripts/cdnclient.js
Usage: node cdnclient [--cmd=nEW,pUBLISH,delete,hELP] [--id or --articleId=article uuid] [--fILE=file] [--isdir=false]
cdnclient主要有如下命令:
1.创建新目录
./scripts/cdnclient.js --cmd=new --id=${dir.name}
--cmd=new 代表创建命令,--id=${dir.name} 传入目录名,创建好目录后,后续可以在该目录下上传资源文件。我一般会传入 articleId(uuid) 作为目录名
2.上传文件
./scripts/cdnclient.js --cmd=publish --id=fa1b6d507d7111eb9aeae3d030369a53 --file=~/cdnservice-cover.jpg
--cmd=publish 代表上传文件命令,--id=fa1b6d507d7111eb9aeae3d030369a53 是上传的目标目录,--file=~/cdnservice-cover.jpg 是要上传的文件名,命令执行完成后,文件会被同步到源服务器指定目录下。
3.删除文件
./scripts/cdnclient.js --cmd=delete --id=fa1b6d507d7111eb9aeae3d030369a53 --file=cdnservice-cover.jpg
--cmd=delete 代表删除命令,删除--id=fa1b6d507d7111eb9aeae3d030369a53 目录下的--file=cdnservice-cover.jpg 文件
4.删除目录
./scripts/cdnclient.js --cmd=delete --id=fa1b6d507d7111eb9aeae3d030369a53 --isdir=true
--cmd=delete 代表删除命令,--isdir=true 表示要删除--id=fa1b6d507d7111eb9aeae3d030369a53 的目录
5.help 信息
./scripts/cdnclient.js --cmd=help
cdnclient 脚本底层是基于 ssh 命令实现的,运行这个脚本可以直接 ssh 连接远程服务器进行数据传输。Ubuntu 系统的 ssh 密钥信息一般存储在 ~/.ssh 目录下。
$ ls ~/.ssh/
authorized_keys  id_rsa.pub
id_rsa           known_hosts
其中 id_rsa 是当前主机的私钥文件,绝对不能通过任何途径传给任何人,这个要保管好。id_rsa.pub 是当前主机的公钥文件。authorized_keys是授权文件,可配置谁能通过公钥免密码登录当前主机,是影响主机安全的非常重要的文件。
我把自己电脑的公钥 id_rsa.pub 加入到了回源服务器的授权文件 authorized_keys中,这样我的电脑就可以运行上面的脚本了。运行这个脚本需要先安装 shelljs npm 包。
npm i shelljs --save
最后附上 cdnclient.js 脚本
#!/usr/bin/env node

const fs = require('fs')
const shell = require('shelljs')

// 命令行参数
const args = require('minimist')(process.argv.slice(2))
const cmd = args['cmd'] || 'help'

const cdnDir = '${work.dir}/cdn-service/public'
const abCdnDir = `${cdnDir}/ab`

if (cmd === 'n' || cmd === 'new') {
    const nHelpTxt = `--cmd=nEW --id=articleId`
    const articleId = args['id'] || args['articleId']
    if (!articleId) {
        console.error(`lack of articleId param with cmd -> ${cmd}`)
        console.log(nHelpTxt)
        process.exit(-1)
    }

    const articleCdnDir = `${abCdnDir}/${articleId}`
    if (!shell.exec(`ssh -o ServerAliveInterval=60 ${user.name}@${回源服务器域名或ip} 'mkdir ${articleCdnDir}'`).code) {
        console.log(`new article cdn dir succeed with id -> ${articleId}`)
        process.exit(0)
    } else {
        console.error(`error: mkdir article cdn dir failed with id -> ${articleId}`)
        process.exit(-1)
    }
}

if (cmd === 'p' || cmd === 'publish') {
    const pHelpTxt = `--cmd=pUBLISH --id=articleId --fILE=files`
    const articleId = args['id'] || args['articleId']
    if (!articleId) {
        console.error(`lack of articleId param with cmd -> ${cmd}`)
        console.log(pHelpTxt)
        process.exit(-1)
    }

    const files = args['f'] || args['file']
    if (!files) {
        console.error(`lack of file param with cmd -> ${cmd}`)
        console.log(pHelpTxt)
        process.exit(-1)
    }

    const articleCdnDir = `${abCdnDir}/${articleId}`
    if (!shell.exec(`scp ${files} ${user.name}@${回源服务器域名或ip}:${articleCdnDir}/`).code) {
        console.log(`publish files to cdn succeed with id -> ${articleId} and file -> ${files}`)
        process.exit(0)
    } else {
        console.error(`error: publish file to cdn failed with id -> ${articleId} and file -> ${files}`)
        process.exit(-1)
    }
}

if (cmd === 'delete') {
    const delHelpTxt = `--cmd=delete --id=articleId --isdir=false --fILE=files`
    const articleId = args['id'] || args['articleId']
    if (!articleId) {
        console.error(`lack of articleId param with cmd -> ${cmd}`)
        console.log(delHelpTxt)
        process.exit(-1)
    }

    const isDir = args['isdir'] || 'false'
    if (isDir === 'true') {
        const articleCdnDir = `${abCdnDir}/${articleId}`
        if (!shell.exec(`ssh -o ServerAliveInterval=60 ${user.name}@${回源服务器域名或ip} 'rm -rf ${articleCdnDir}'`).code) {
            console.log(`delete dir from cdn succeed with id -> ${articleId}`)
            process.exit(0)
        } else {
            console.error(`error: delete dir from cdn failed with id -> ${articleId}`)
            process.exit(-1)
        }
    }

    const files = args['f'] || args['file']
    if (!files) {
        console.error(`lack of file param with cmd -> ${cmd}`)
        console.log(delHelpTxt)
        process.exit(-1)
    }

    const articleCdnDir = `${abCdnDir}/${articleId}`
    if (!shell.exec(`ssh -o ServerAliveInterval=60 ${user.name}@${回源服务器域名或ip} 'rm ${articleCdnDir}/${files}'`).code) {
        console.log(`delete files from cdn succeed with id -> ${articleId} and file -> ${files}`)
        process.exit(0)
    } else {
        console.error(`error: delete file from cdn failed with id -> ${articleId} and file -> ${files}`)
        process.exit(-1)
    }
}

const helpTxt = `Usage: node cdnclient [--cmd=nEW,pUBLISH,delete,hELP] [--id or --articleId=article uuid] [--fILE=file] [--isdir=false]`

if (cmd === 'h' || cmd === 'help') {
  console.log(helpTxt)
  process.exit(0)
}

console.error(`unknown cmd -> ${cmd}`)
console.log(helpTxt)

process.exit(-1)
注意其中有一些环境变量,需要根据实际情况进行配置
const cdnDir = '${work.dir}/cdn-service/public'
const abCdnDir = `${cdnDir}/ab`
${work.dir} 是工作目录,也就是源站服务器中,cd-service 的部署目录,/ab 目录是为博客项目分配的一个顶层上级目录,这个是可以根据实际情况设置的。${user.name}@${回源服务器域名或ip} 是回源服务器的用户名和 ip/域名。
新建文章前,可以先传入 articleId 并通过 cdnclient 命令创建文章资源目录,遇到需要引用资源时,可以通过 cdnclient 命令把相关资源上传至源服务器,拿到加速域名 (cdn.huoyijie.cn) 可以引用到的 url 地址,然后在文章中引用这个 url 即可。
OK,关于搭建 CDN 回源服务器的主要内容就介绍完了。
此内容由惯性聚合(RSS阅读器)自动聚合整理,仅供阅读参考。 原文来自 — 版权归原作者所有。